Page 403 of 522
6-32
1. Speed- restriction label
2. Sealant bottle and label withspeed restriction
3. Filling hose from sealant bottle to wheel
4. Connectors and cable for the power outlet direct connection 5. Holder for the sealant bottle
6. Compressor
7. ON/OFF switch
8. Pressure gauge for displaying the
tire inflation pressure
9. Button for reducing tire inflation pressure Connectors, cable and connection
hose are stored in the compressor
housing.
Strictly follow the specified
sequence, otherwise the sealant
may escape under high pressure.
What to do in an emergency
ODE067044
Expired sealant
Do not use the Tire sealant after
the sealant has expired (i.e.
pasted the expiration date on
the sealant container). This can
increase the risk of tire failure.
WARNING
Sealant
Keep out of reach of children.
Avoid contact with eyes.
Do not swallow.
WARNING
Components of the Tire Mobility Kit
Page 405 of 522

6-34
5. Plug the compressor power cord(4) into the vehicle power outlet.
Only use the front passenger side
power outlet when connecting the
power cord.
6. With the ignition switch in the ON position, switch on the compres-
sor and let it run for approximately
5~7 minutes to fill the sealant up
to proper pressure. (refer to the
Tire and Wheels, chapter 8). The
inflation pressure of the tire after
filling is unimportant and will be
checked/corrected later.
Be careful not to overinflate the
tire and stay away from the tire
when filling it. 7. Switch off the compressor.
8. Detach the hoses from the sealant
bottle connector and from the tire
valve.
Return the Tire Mobility Kit to its stor-
age location in the vehicle.
NOTICE
What to do in an emergency
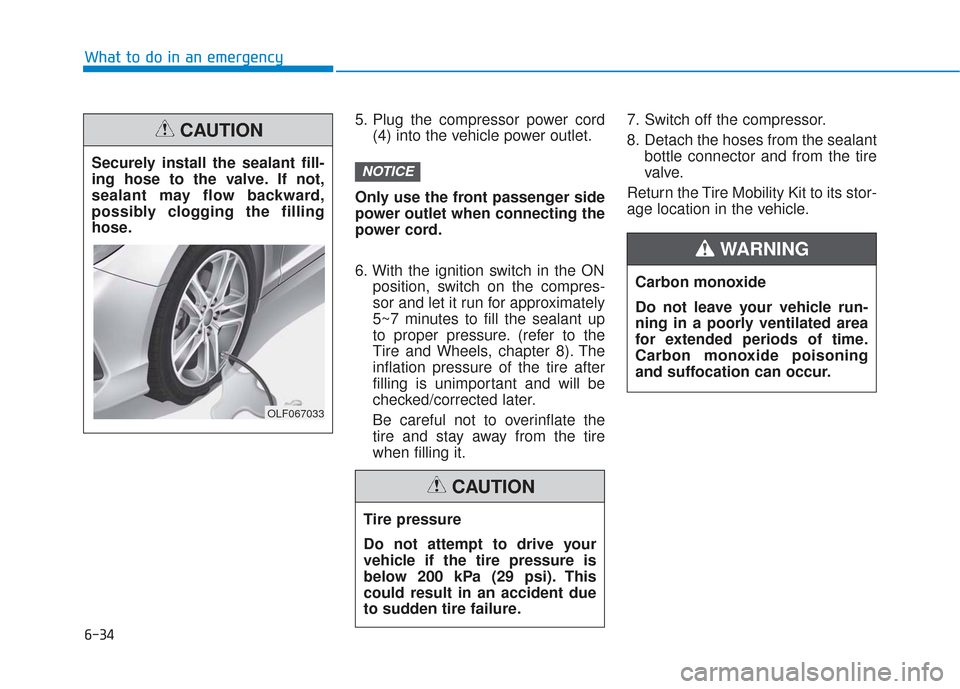
Securely install the sealant fill-
ing hose to the valve. If not,
sealant may flow backward,
possibly clogging the filling
hose.
CAUTION
OLF067033
Tire pressure
Do not attempt to drive your
vehicle if the tire pressure is
below 200 kPa (29 psi). This
could result in an accident due
to sudden tire failure.
CAUTION
Carbon monoxide
Do not leave your vehicle run-
ning in a poorly ventilated area
for extended periods of time.
Carbon monoxide poisoning
and suffocation can occur.
WARNING
Page 407 of 522

6-36
3. Plug the compressor power cordinto the vehicle power outlet.
4. Adjust the tire inflation pressure to the recomended tire inflation.
With the ignition swithched on, proceed as follows.
- To increase the inflation pres- sure : Switch on the compres-
sor. To check the current inflation
pressure setting, briefly switch
off the compressor.
- To reduce the inflation pres- sure: Press the button (8) on the
compressor.
Do not let the compressor run for
more than 10 minutes, otherwise
the device will overheat and may
be damaged.
Information
The pressure gauge may show higher
than actual reading when the com-
pressor is running. To get an accurate
tire reading, the compressor needs to
be turned off.
i
NOTICE
What to do in an emergency
The tire inflation pressure must
be at least 220 kPa (32 psi). If it
is not, do not continue driving.
Call for road side service or
towing.
WARNING
If the inflation pressure is not
maintained, drive the vehicle a
second time, refer to
Distributing the sealant. Then
repeat steps 1 to 4.
Use of the TMK may be ineffec-
tual for tire damage larger than
approximately 4 mm (0.16 in).
We recommend that you con-
tact an authorized HYUNDAI
dealer if the tire cannot be made
roadworthy with the Tire
Mobility Kit.
CAUTION
Tire pressure sensor
The sealant on the tire pressure
sensor and wheel should be
removed when you replace the
tire with a new one and inspect
the tire pressure sensors at an
authorized dealer.
When reinstalling the repaired
or replaced tire and wheel on
the vehicle, tighten the wheel
lug nut to 11~13 kgf·m (79~94
lbf·ft).
CAUTION
Page 409 of 522

When towing your vehicle in an
emergency without wheel dollies :
1. Place the ignition switch in theACC position.
2. Place the shift lever in N (Neutral).
3. Release the parking brake.Emergency Towing
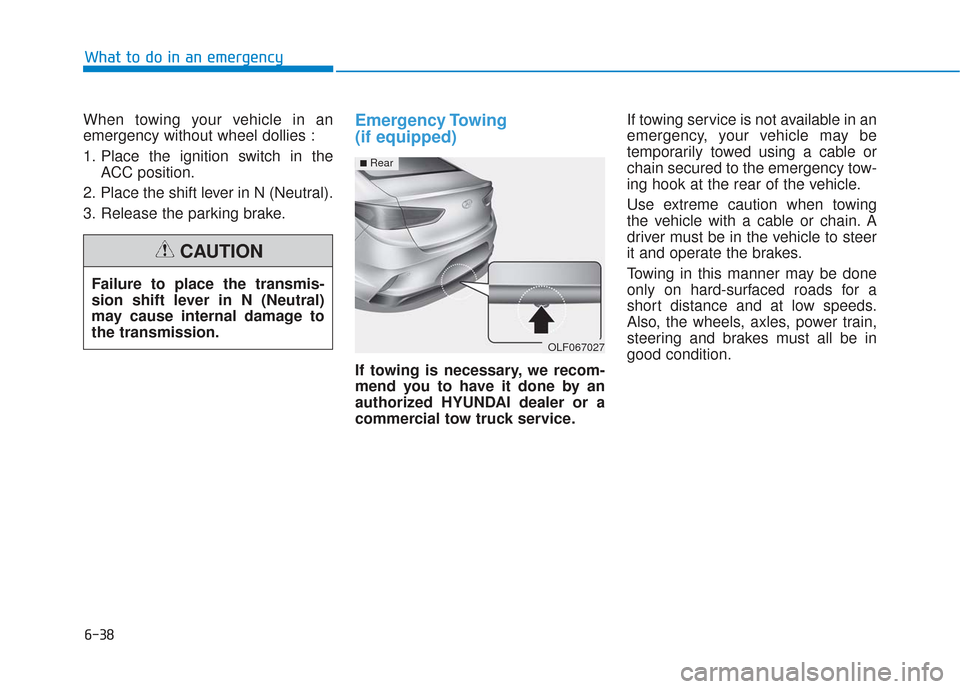
(if equipped)
If towing is necessary, we recom-
mend you to have it done by an
authorized HYUNDAI dealer or a
commercial tow truck service. If towing service is not available in an
emergency, your vehicle may be
temporarily towed using a cable or
chain secured to the emergency tow-
ing hook at the rear of the vehicle.
Use extreme caution when towing
the vehicle with a cable or chain. A
driver must be in the vehicle to steer
it and operate the brakes.
Towing in this manner may be done
only on hard-surfaced roads for a
short distance and at low speeds.
Also, the wheels, axles, power train,
steering and brakes must all be in
good condition.
Failure to place the transmis-
sion shift lever in N (Neutral)
may cause internal damage to
the transmission.
CAUTION
OLF067027
■Rear
What to do in an emergency
6-38
Page 410 of 522

Always follow these emergency tow-
ing precautions:
• Place the ignition switch in theACC position so the steering wheel
is not locked.
Place the shift lever in N (Neutral).
Release the parking brake.
Depress the brake pedal with more force than normal since you will
have reduced braking perform-
ance.
More steering effort will be required because the power steer-
ing system will be disabled.
Use a vehicle heavier than your own to tow your vehicle.
The drivers of both vehicles should communicate with each other fre-
quently.
Before emergency towing, check that the hook is not broken or dam-
aged.
Fasten the towing cable or chain securely to the hook.
Do not jerk the hook. Apply steady and even force. Use a towing cable or chain less
than 16 feet (5 m) long. Attach a
white or red cloth (about 12 inches
(30 cm) wide) in the middle of the
cable or chain for easy visibility.
Drive carefully so the towing cable or chain remains tight during tow-
ing.
Before towing, check the automat- ic transmission for fluid leaks under
your vehicle. If the automatic trans-
mission fluid is leaking, flatbed
equipment or a towing dolly must
be used.
ODH063025
To avoid damage to your vehicle
and vehicle components when
towing:
•Always pull straight ahead
when using the towing hooks.
Do not pull from the side or at
a vertical angle.
Do not use the towing hooks
to pull a vehicle out of mud,
sand or other conditions from
which the vehicle cannot be
driven out under its own
power.
Limit the vehicle speed to 10
mph (15 km/h) and drive less
than 1 mile (1.5 km) when tow-
ing to avoid serious damage
to the automatic transmis-
sion.
CAUTION
What to do in an emergency
6-39
6
Page 422 of 522

Maintenance
7-12
I : Inspect : Inspect and if necessary, adjust, correct, clean or replace.
R : Replace or change.
*
4: Fuel filter & Fuel tank air filter are considered to be maintenance free\
but periodic inspection is recommended for this mainte-nance schedule depends on fuel quality. If there are some important safety matters like fuel flow restriction, surging, loss of
power, hard starting problem, etc. replace the fuel filter immediately regardless of maintenance schedule a\
nd consult an
authorized HYUNDAI dealer for details.
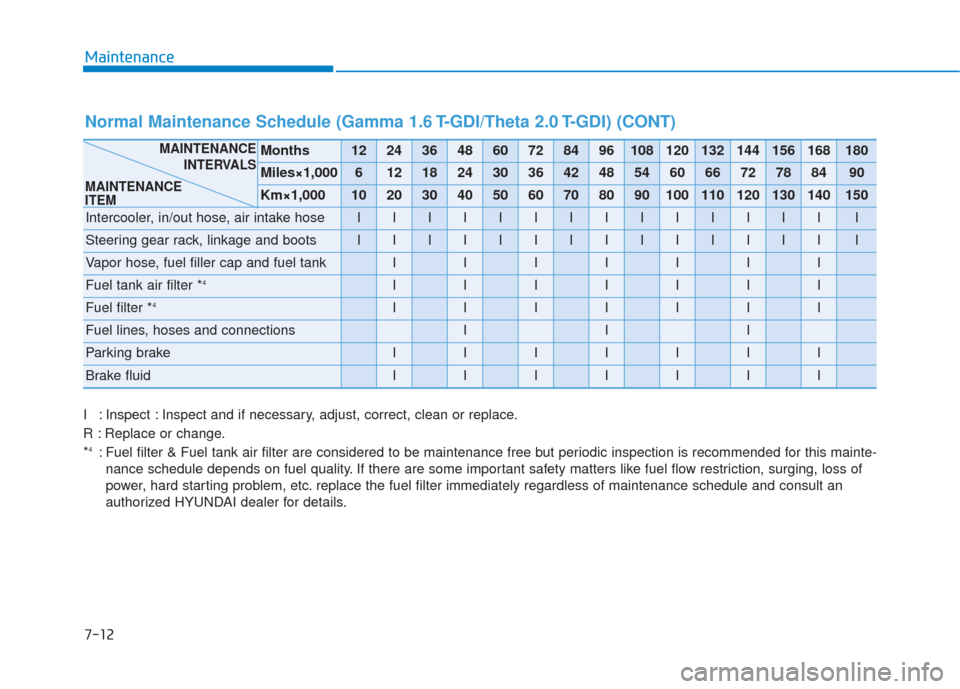
Normal Maintenance Schedule (Gamma 1.6 T-GDI/Theta 2.0 T-GDI) (CONT)
Months1224364860728496108120132144156168180
Miles×1,00061218243036424854606672788490
Km×1,000102030405060708090100110120130140150
Intercooler, in/out hose, air intake hoseIIIIIIIIIIIIIII
Steering gear rack, linkage and bootsIIIIIIIIIIIIIII
Vapor hose, fuel filler cap and fuel tankIIIIIII
Fuel tank air filter *4IIIIIII
Fuel filter *4IIIIIII
Fuel lines, hoses and connectionsIII
Parking brakeIIIIIII
Brake fluidIIIIIII
MAINTENANCE INTERVALS
MAINTENANCE
ITEM
Page 426 of 522

Maintenance
7-16
I : Inspect : Inspect and if necessary, adjust, correct, clean or replace.
R : Replace or change.
*
3: Fuel filter & Fuel tank air filter are considered to be maintenance free\
but periodic inspection is recommended for this mainte-nance schedule depends on fuel quality. If there are some important safety matters like fuel flow restriction, surging, loss of
power, hard starting problem, etc. replace the fuel filter immediately regardless of maintenance schedule a\
nd consult an
authorized HYUNDAI dealer for details.
Normal Maintenance Schedule (Theta 2.4 GDI) (CONT)
Months1224364860728496108120132144156168180
Miles×1,0007.51522.53037.54552.56067.57582.59097.5105112.5
Km×1,0001224364860728496108120132144156168180
Brake lines, hoses and connectionsIIIIIIIIIIIIIII
Disc brakes and padsIIIIIIIIIIIIIII
Driveshaft and bootsIIIIIIIIIIIIIII
Suspension mounting boltsIIIIIIIIIIIIIII
Air conditioner refrigerantIIIIIIIIIIIIIII
Air conditioner compressorIIIIIIIIIIIIIII
Exhaust pipe and mufflerIIIIIIIIIIIIIII
Automatic transaxle fluid (if equipped)No check, No service required
Steering gear rack, linkage and bootsIIIIIIIIIIIIIII
Vapor hose, fuel filler cap and fuel tankIIIIIII
Fuel tank air filter *3IIIIIII
Fuel filter *3IIIIIII
Fuel lines, hoses and connectionsIII
MAINTENANCE INTERVALS
MAINTENANCE
ITEM
Page 449 of 522

7-39
7
Maintenance
By jump starting
After a jump start from a good bat-
tery, idle the vehicle with the head-
lights turned ON for 20-30 minutes
before started driving. The vehicle
may not run properly if you drive it off
before the battery had a chance to
adequately recharge. See "Jump
Starting" in chapter 6 for more infor-
mation on jump starting procedures.
Information
An inappropriately disposedbattery can be harmful to
the environment and human
health.
Dispose the battery according to your
local law(s) or regulation.
Reset features
Some items need to be reset after
the battery has been discharged or
the battery has been disconnected.
See chapter 3 for:
Power Windows
Trip Computer
Climate Control System
Clock
Audio System
Sunroof
i
(Continued)
Watch the battery during
charging, and stop or reduce
the charging rate if the battery
cells begin boiling violently.
The negative battery cable
must be removed first and
installed last when the battery
is disconnected. Disconnect
the battery charger in the fol-
lowing order:
(1) Turn off the battery charger main switch.
(2) Unhook the negative
clamp from the negative
battery terminal.
(3) Unhook the positive clamp from the positive battery
terminal.
Always use a genuine HYUNDAI
approved battery when you
replace the battery.