2018 Hyundai Sonata trip computer
[x] Cancel search: trip computerPage 171 of 522

3-86
Fuel economy
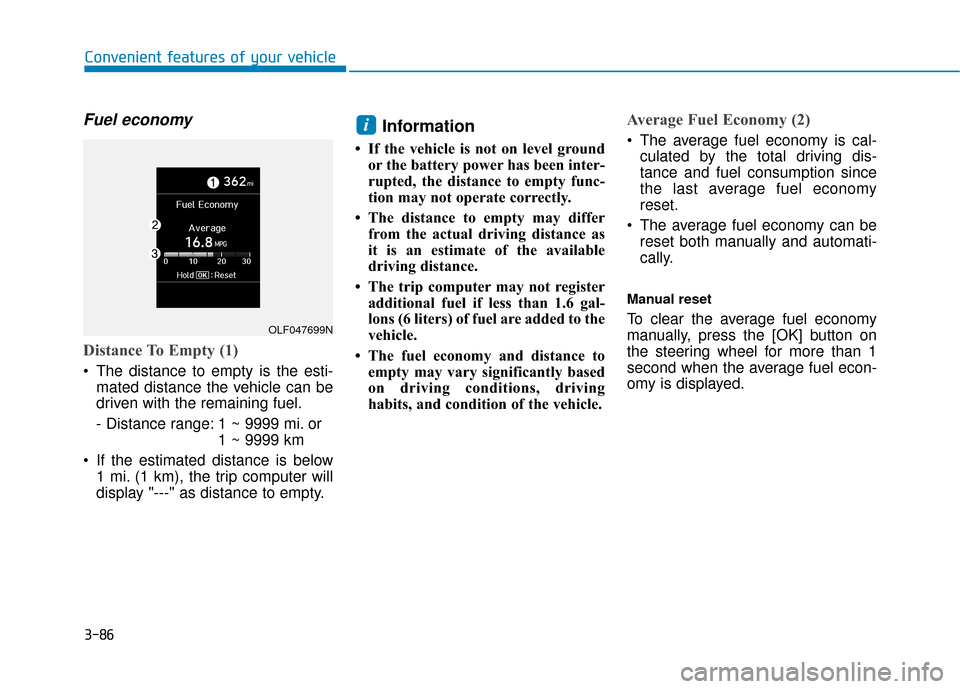
Distance To Empty (1)
The distance to empty is the esti-mated distance the vehicle can be
driven with the remaining fuel.
- Distance range: 1 ~ 9999 mi. or 1 ~ 9999 km
If the estimated distance is below 1 mi. (1 km), the trip computer will
display "---" as distance to empty.
Information
• If the vehicle is not on level groundor the battery power has been inter-
rupted, the distance to empty func-
tion may not operate correctly.
• The distance to empty may differ from the actual driving distance as
it is an estimate of the available
driving distance.
• The trip computer may not register additional fuel if less than 1.6 gal-
lons (6 liters) of fuel are added to the
vehicle.
• The fuel economy and distance to empty may vary significantly based
on driving conditions, driving
habits, and condition of the vehicle.
Average Fuel Economy (2)
The average fuel economy is cal-culated by the total driving dis-
tance and fuel consumption since
the last average fuel economy
reset.
The average fuel economy can be reset both manually and automati-
cally.
Manual reset
To clear the average fuel economy
manually, press the [OK] button on
the steering wheel for more than 1
second when the average fuel econ-
omy is displayed.
i
Convenient features of your vehicle
OLF047699N
Page 301 of 522

5-51
Driving your vehicle
Drive mode indicator screen
The drive mode indicator screen can
be displayed by using the trip com-
puter button on the steering wheel.
drive mode indicator screen displays
the status of current drive mode.
DRIVE MODE button is located onthe lower part of the transmission
lever for selecting drive mode. If
drive mode is selected manually by
the user, the drive mode indicator
screen will show user-selected
drive mode. (COMFORT, ECO, or
SPORT)
If SMART mode is selected by
DRIVE MODE button, the drive
mode indicator screen will show
current drive mode automatically
selected by SMART mode system.
(SMART COMFORT, SMART
ECO, or SMART SPORT)
When the trip computer mode is selected to show drive mode and
the SMART mode is in operation,
an automatically selected driving
mode SMART ECO, SMART
COMFORT, or SMART SPORT will
be selected on the LCD display. And right below is the horizontal
driving style gauge which reflects
the driving style in real time.
If you drive carefully and slowly in SMART mode, the left side of the
driving style gauge will illuminate,
and automatically shift to the
SMART ECO mode.
When the driver accelerates more
frequently, the right side of the driv-
ing style gauge will fill up, and shift
to SMART COMFORT mode.
In addition, if the rate of accelera-
tion and speed is high, drive mode
will change to SMART SPORT
mode.
If the auto cruise control function is operated or the transmission is
shifted to manual shift mode while
SMART mode is on, the SMART
mode will stop temporarily, and the
drive mode will be displayed as
OFF. The driving style gauge light
will be turned off accordingly. If the trip computer is not set to
show drive mode indicator screen,
and you want to know the on/off
status of the SMART mode, simply
check whether the letters 'SMART'
is lighten up on the screen or not
(green - ECO MODE, white -
COMFORT MODE, red - SPORT
MODE).
5
Page 302 of 522

5-52
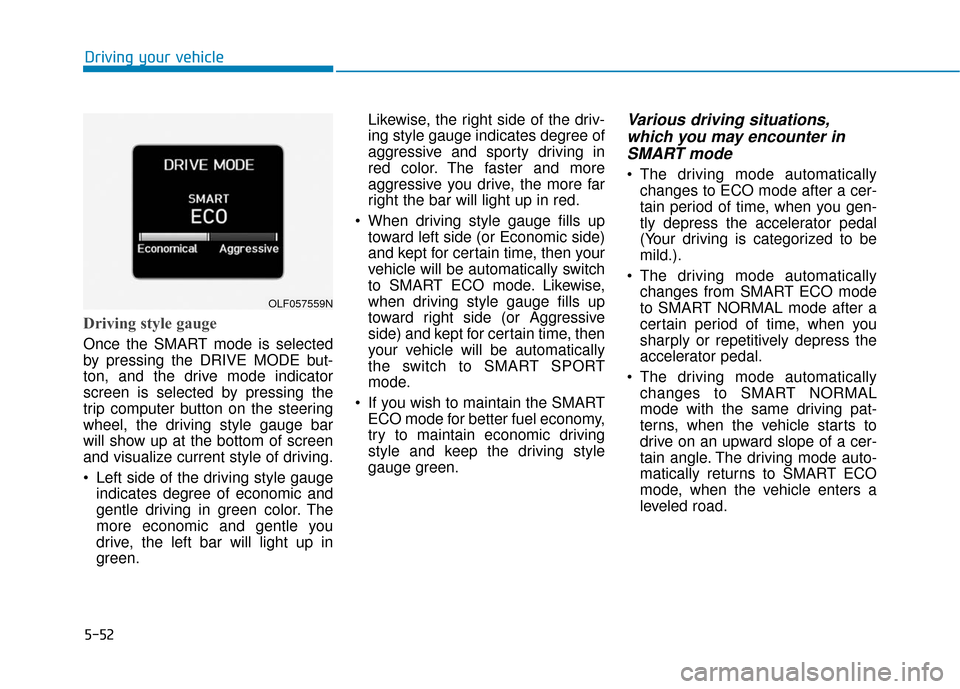
Driving style gauge
Once the SMART mode is selected
by pressing the DRIVE MODE but-
ton, and the drive mode indicator
screen is selected by pressing the
trip computer button on the steering
wheel, the driving style gauge bar
will show up at the bottom of screen
and visualize current style of driving.
Left side of the driving style gaugeindicates degree of economic and
gentle driving in green color. The
more economic and gentle you
drive, the left bar will light up in
green. Likewise, the right side of the driv-
ing style gauge indicates degree of
aggressive and sporty driving in
red color. The faster and more
aggressive you drive, the more far
right the bar will light up in red.
When driving style gauge fills up toward left side (or Economic side)
and kept for certain time, then your
vehicle will be automatically switch
to SMART ECO mode. Likewise,
when driving style gauge fills up
toward right side (or Aggressive
side) and kept for certain time, then
your vehicle will be automatically
the switch to SMART SPORT
mode.
If you wish to maintain the SMART ECO mode for better fuel economy,
try to maintain economic driving
style and keep the driving style
gauge green.
Various driving situations,which you may encounter inSMART mode
The driving mode automatically
changes to ECO mode after a cer-
tain period of time, when you gen-
tly depress the accelerator pedal
(Your driving is categorized to be
mild.).
The driving mode automatically changes from SMART ECO mode
to SMART NORMAL mode after a
certain period of time, when you
sharply or repetitively depress the
accelerator pedal.
The driving mode automatically changes to SMART NORMAL
mode with the same driving pat-
terns, when the vehicle starts to
drive on an upward slope of a cer-
tain angle. The driving mode auto-
matically returns to SMART ECO
mode, when the vehicle enters a
leveled road.
Driving your vehicle
OLF057559N
Page 449 of 522

7-39
7
Maintenance
By jump starting
After a jump start from a good bat-
tery, idle the vehicle with the head-
lights turned ON for 20-30 minutes
before started driving. The vehicle
may not run properly if you drive it off
before the battery had a chance to
adequately recharge. See "Jump
Starting" in chapter 6 for more infor-
mation on jump starting procedures.
Information
An inappropriately disposedbattery can be harmful to
the environment and human
health.
Dispose the battery according to your
local law(s) or regulation.
Reset features
Some items need to be reset after
the battery has been discharged or
the battery has been disconnected.
See chapter 3 for:
Power Windows
Trip Computer
Climate Control System
Clock
Audio System
Sunroof
i
(Continued)
Watch the battery during
charging, and stop or reduce
the charging rate if the battery
cells begin boiling violently.
The negative battery cable
must be removed first and
installed last when the battery
is disconnected. Disconnect
the battery charger in the fol-
lowing order:
(1) Turn off the battery charger main switch.
(2) Unhook the negative
clamp from the negative
battery terminal.
(3) Unhook the positive clamp from the positive battery
terminal.
Always use a genuine HYUNDAI
approved battery when you
replace the battery.
Page 521 of 522

I-9
Theft-alarm system .........................................................3-19
Tire Pressure Monitoring System (TPMS) .......................6-9Changing a Tire with TPMS ......................................6-13
Check Tire Pressure......................................................6-9
Low Tire Pressure Position and Tire Pressure Telltale ...............................................6-11
Low Tire Pressure Telltale..........................................6-11
Tire Pressure Monitoring System...............................6-10
TPMS (Tire Pressure Monitoring System) Malfunction Indicator .............................................6-12
Tire Specification and Pressure Label ............................8-11
Tires and Wheels .....................................................7-40, 8-5 All Season Tires .........................................................7-53
Check Tire Inflation Pressure .....................................7-42
Low Aspect Ratio Tires ..............................................7-54
Radial-Ply Tires ..........................................................7-54
Recommended Cold Tire Inflation Pressures.............7-41
Snow Tires ..................................................................7-53
Summer Tires .............................................................7-53
Tire Care .....................................................................7-4\
0
Tire Maintenance ........................................................7-46
Tire Replacement........................................................7\
-44
Tire Rotation...............................................................7-43
Tire Sidewall Labeling ...............................................7-46 Tire Terminology and Definitions ..............................7-50
Tire Traction ...............................................................7-45
Wheel Alignment and Tire Balance ...........................7-44
Wheel Replacement....................................................7-45
Towing ........................................................................\
....6-30 Emergency Towing.....................................................6-31
Towing Service ...........................................................6-30
Trailer Towing...............................................................5-121
Transmission ...................................................................5-14 Automatic Transmission.............................................5-14
Ecoshift Dual Clutch Transmission............................5-18
Good Driving Practices ..............................................5-26
Paddle Shifter .............................................................5-24
Parking........................................................................\
5-26
Shift-Lock Release .....................................................5-25
Shift-Lock System ......................................................5-25
Trip computer..................................................................3-85 Trip modes ..................................................................3-85
Vehicle Certification Label .............................................8-10
Vehicle Identification Number (VIN) .............................8-10
Vehicle Load Limit .......................................................5-116 Tire Loading Information Label ...............................5-117
Volume and Weight ...........................................................8-6
I
Index
T
V