2018 Hyundai Santa Fe light
[x] Cancel search: lightPage 513 of 570

765
Maintenance
Inner panel fuse replacement
1. Turn the ignition switch and allother switches off.
2. Open the fuse panel cover. 3. Pull the suspected fuse straight
out. Use the removal tool provided
in the engine compartment fuse
panel.
4. Check the removed fuse; replace it if it is blown.
5. Push in a new fuse of the same rating, and make sure it fits tightly
in the clips.
If it fits loosely, consult an authorized
HYUNDAI dealer.
If you do not have a spare, use a fuse of the same rating from a circuit youmay not need for operating the vehi-cle, such as the cigar lighter fuse.
ODM072017
ONCNMC2030
CAUTION
When replacing an open fuse or relay with a new one, makesure the new fuse or relay fitstightly into the clips. Theincomplete fastening fuse orrelay may cause the vehiclewiring and electric systemsdamage and a possible fire.
Do not remove fuses, relays and terminals fastened withbolts or nuts. The fuses, relaysand terminals may be fas-tened incompletely, and it maycause a possible fire. If fuses,relays and terminals fastenedwith bolts or nuts are open,consult with an authorizedHYUNDAI dealer.
Do not input any other objects except fuses or relays intofuse/relay terminals such as adriver or wiring. It may causecontact failure and systemmalfunction.
Page 514 of 570
Maintenance
66
7
If the headlights or other electrical
components do not work and the
fuses are OK, check the fuse block in
the engine compartment. If a fuse is
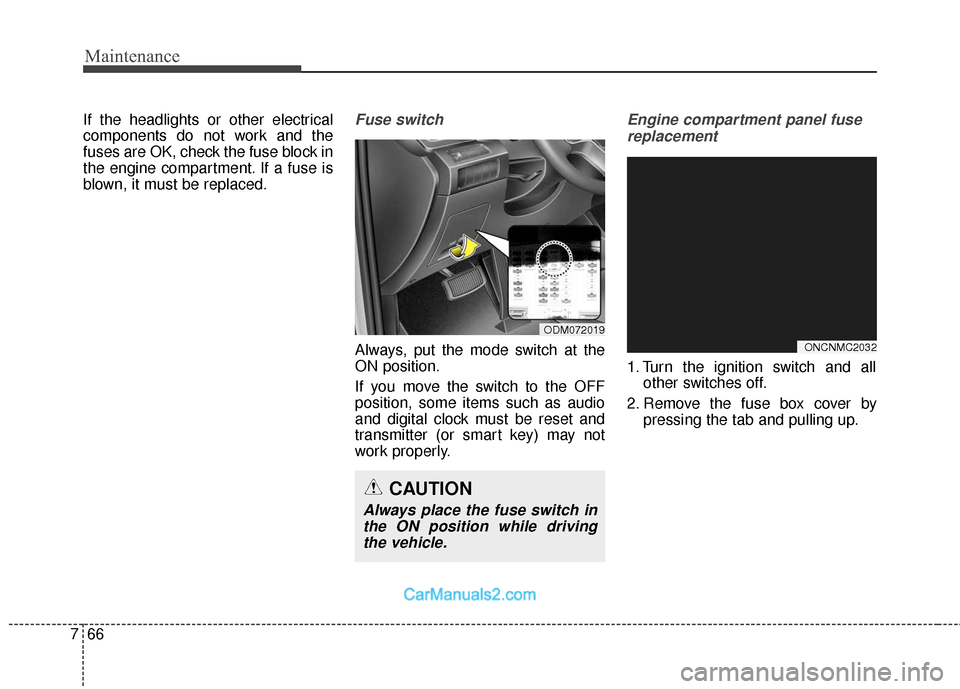
blown, it must be replaced.Fuse switch
Always, put the mode switch at the
ON position.
If you move the switch to the OFF
position, some items such as audio
and digital clock must be reset and
transmitter (or smart key) may not
work properly.
Engine compartment panel fuse
replacement
1. Turn the ignition switch and all other switches off.
2. Remove the fuse box cover by pressing the tab and pulling up.
ODM072019
CAUTION
Always place the fuse switch inthe ON position while drivingthe vehicle.
ONCNMC2032
Page 517 of 570
769
Maintenance
DescriptionFuse ratingProtected Component
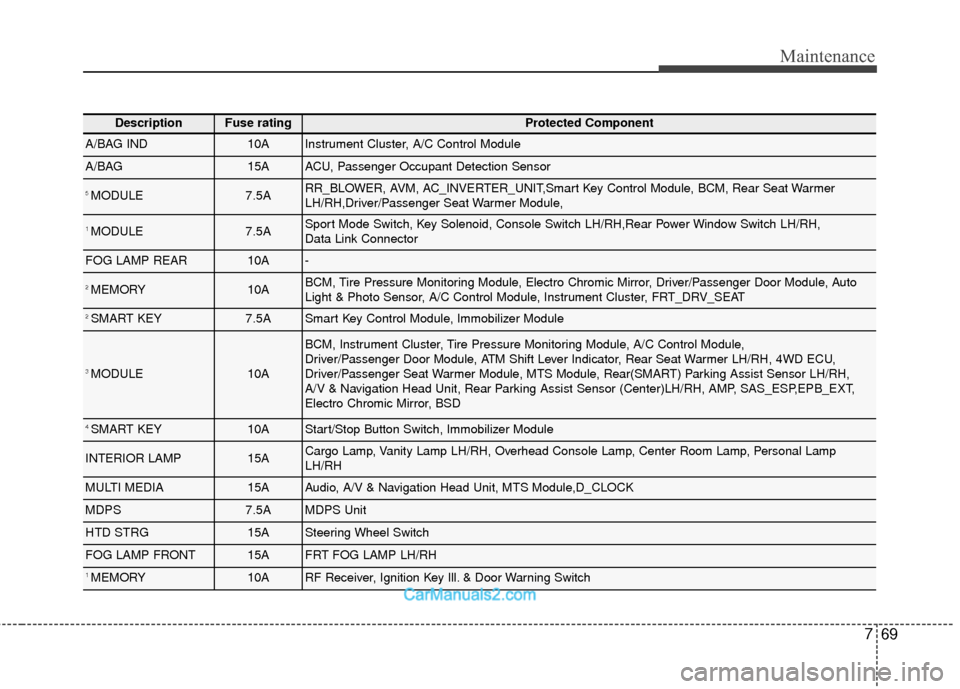
A/BAG IND10AInstrument Cluster, A/C Control Module
A/BAG15AACU, Passenger Occupant Detection Sensor
5 MODULE7.5ARR_BLOWER, AVM, AC_INVERTER_UNIT,Smart Key Control Module, BCM, Rear Seat Warmer
LH/RH,Driver/Passenger Seat Warmer Module,
1 MODULE7.5ASport Mode Switch, Key Solenoid, Console Switch LH/RH,Rear Power Window Switch LH/RH,
Data Link Connector
FOG LAMP REAR10A-
2 MEMORY10ABCM, Tire Pressure Monitoring Module, Electro Chromic Mirror, Driver/Passenger Door Module, Auto
Light & Photo Sensor, A/C Control Module, Instrument Cluster, FRT_DRV_SEAT
2 SMART KEY7.5ASmart Key Control Module, Immobilizer Module
3 MODULE10A
BCM, Instrument Cluster, Tire Pressure Monitoring Module, A/C Control Module,
Driver/Passenger Door Module, ATM Shift Lever Indicator, Rear Seat Warmer LH/RH, 4WD ECU,
Driver/Passenger Seat Warmer Module, MTS Module, Rear(SMART) Parking Assist Sensor LH/RH,
A/V & Navigation Head Unit, Rear Parking Assist Sensor (Center)LH/RH, AMP, SAS_ESP,EPB_EXT,
Electro Chromic Mirror, BSD
4 SMART KEY10AStart/Stop Button Switch, Immobilizer Module
INTERIOR LAMP15ACargo Lamp, Vanity Lamp LH/RH, Overhead Console Lamp, Center Room Lamp, Personal Lamp
LH/RH
MULTI MEDIA15AAudio, A/V & Navigation Head Unit, MTS Module,D_CLOCK
MDPS7.5AMDPS Unit
HTD STRG15ASteering Wheel Switch
FOG LAMP FRONT15AFRT FOG LAMP LH/RH
1 MEMORY10ARF Receiver, Ignition Key Ill. & Door Warning Switch
Page 518 of 570

Maintenance
70
7
DescriptionFuse ratingProtected Component
START7.5AW/O IMMO. & Smart Key : ICM Relay Box (Burglar Alarm Relay)
With IMMO. or Smart Key : INHIBIT_SW(POSITION_SW)
2 MODULE10ACrash Pad Switch, Multipurpose Check Connector, Head Lamp Leveling Device Actuator LH/RH, Auto
Head Lamp Leveling Device Module, Stop Lamp Switch,AFLS_UNIT, F_WATER_SNSR,
GLOW_RLY_UNIT_METAL, FPAS_SNSR, DSL_BOX
CORNERING LAMP10A-
2 SUNROOF20ASunroof_MTR
S/HEATER RR15ARear Seat Warmer LH/RH
IGN20AE/R Fuse & Relay Box (Fuse - ABS 3, SENSOR 5, TCU)
1 A/CON7.5AE/R Fuse & Relay Box (Blower Relay), A/C Control Module, Cluster Ionizer, DSL_BOX(PTC_RLY)
WIPER RR15ARear Wiper Relay, Rear Wiper Motor, Multifunction Switch, BCM
1 SMART KEY25ASmart Key Control Module
S/HEATER FRT20ADriver/Passenger Seat Warmer Module
2 A/CON7.5AA/C Control Module
C/LIGHTER20AFront Power Outlet & Cigarette Lighter, Luggage Power Outlet
WIPER FRT15AMultifunction Switch, E/R Fuse & Relay Box (Wiper HI Relay, IG2 Relay)
A/CON RR20A-
P/WDW RH25APassenger Door Module, Rear Power Window Switch RH
REAR HTD10AA/C Control Module
BRAKE SWITCH7.5ASmart Key Control Module, Stop Lamp Switch
Page 524 of 570
Maintenance
76
7
LIGHT BULBS
Use only the bulbs of the specified
wattage.
✽
✽ NOTICE
After heavy, driving rain or wash-
ing, headlamp and taillamp lenses
could appear frosty. This condition
is caused by the temperature differ-
ence between the lamp inside and
outside. This is similar to the con-
densation on your windows inside
your vehicle during the rain and
doesn't indicate a problem with
your vehicle. If the water leaks into
the lamp bulb circuitry, have the
vehicle checked by an authorized
HYUNDAI dealer.WARNING - Working on
the lights
Prior to working on the light,
firmly apply the parking brake,
ensure that the ignition switch
is turned to the "LOCK" posi-
tion and turn off the lights to
avoid sudden movement of the
vehicle and burning your fin-
gers or receiving an electric
shock.
CAUTION
Be sure to replace the burned-
out bulb with one of the samewattage rating. Otherwise, itmay cause damage to the fuseor electric wiring system.
CAUTION
If you don't have necessarytools, the correct bulbs and theexpertise, consult an authorizedHYUNDAI dealer. In many cases,it is difficult to replace vehiclelight bulbs because other partsof the vehicle must be removedbefore you can get to the bulb.This is especially true if youhave to remove the headlightassembly to get to the bulb(s).Removing/installing the head-light assembly can result indamage to the vehicle.
Page 526 of 570
Maintenance
78
7
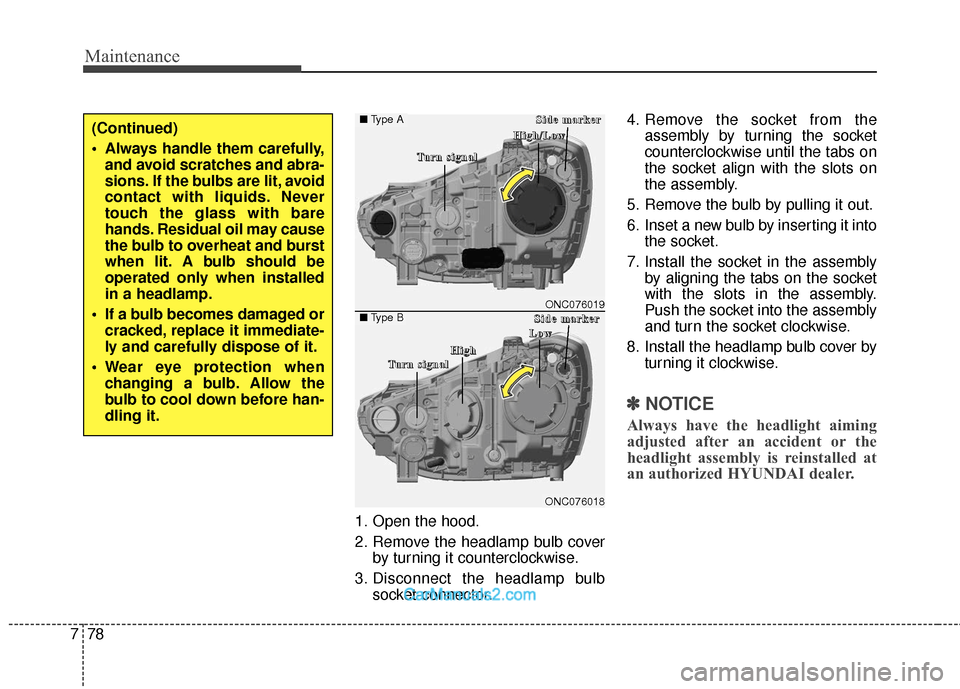
1. Open the hood.
2. Remove the headlamp bulb cover
by turning it counterclockwise.
3. Disconnect the headlamp bulb socket-connector. 4. Remove the socket from the
assembly by turning the socket
counterclockwise until the tabs on
the socket align with the slots on
the assembly.
5. Remove the bulb by pulling it out.
6. Inset a new bulb by inserting it into the socket.
7. Install the socket in the assembly by aligning the tabs on the socket
with the slots in the assembly.
Push the socket into the assembly
and turn the socket clockwise.
8. Install the headlamp bulb cover by turning it clockwise.
✽ ✽NOTICE
Always have the headlight aiming
adjusted after an accident or the
headlight assembly is reinstalled at
an authorized HYUNDAI dealer.
(Continued)
Always handle them carefully,
and avoid scratches and abra-
sions. If the bulbs are lit, avoid
contact with liquids. Never
touch the glass with bare
hands. Residual oil may cause
the bulb to overheat and burst
when lit. A bulb should be
operated only when installed
in a headlamp.
If a bulb becomes damaged or cracked, replace it immediate-
ly and carefully dispose of it.
Wear eye protection when changing a bulb. Allow the
bulb to cool down before han-
dling it.
ONC076018
■ Type A
■Type BONC076019
T
T
T
T
u
u
u
u
r
r
r
r
n
n
n
n
s
s
s
s
i
i
i
i
g
g
g
g
n
n
n
n
a
a
a
a
l
l
l
lS
S
S
S
i
i
i
i
d
d
d
d
e
e
e
e
m
m
m
m
a
a
a
a
r
r
r
r
k
k
k
k
e
e
e
e
r
r
r
r
T
T
T
T
u
u
u
u
r
r
r
r
n
n
n
n
s
s
s
s
i
i
i
i
g
g
g
g
n
n
n
n
a
a
a
a
l
l
l
l
H
H
H
H
i
i
i
i
g
g
g
g
h
h
h
h
/
/
/
/
L
L
L
L
o
o
o
o
w
w
w
w
S
S
S
S
i
i
i
i
d
d
d
d
e
e
e
e
m
m
m
m
a
a
a
a
r
r
r
r
k
k
k
k
e
e
e
e
r
r
r
r
H
H
H
H
i
i
i
i
g
g
g
g
h
h
h
h
L
L
L
L
o
o
o
o
w
w
w
w
Page 527 of 570
779
Maintenance
HID HeadlampIf the HID lamp does not operate,
have the system checked by an
authorized HYUNDAI dealer.
✽ ✽NOTICE
A skilled technician should check or
repair the LED light. Otherwise, it
may damage related parts.
✽ ✽NOTICE
HID lamps have superior perform-
ance vs. halogen bulbs. HID lamps
are estimated by the manufacturer
to last twice as long or longer than
halogen bulbs depending on their
frequency of use. They will probably
require replacement at some point
in the life of the vehicle. Cycling the
headlamps on and off more than
typical use will shorten HID lamps
life. HID lamps do not fail in the
same manner as halogen incandes-
cent lamps. If a headlamp goes out
after a period of operation but will
immediately relight when the head-
lamp switch is cycled it is likely the
HID lamp needs to be replaced. HID
lighting components are more com-
plex than conventional halogen
bulbs thus have higher replacement
cost.
WARNING - HID
Headlamp low beam
(if equipped)
Do not attempt to replace or
inspect the low beam (XENON
bulb) due to electric shock dan-
ger. If the low beam (XENON
bulb) is not working, have your
vehicle checked by an author-
ized HYUNDAI Dealer.
CAUTION
If your vehicle is equipped with
High Intensity Discharge (HID)headlights, these headlightscontain mercury. So if you needto have your vehicle disposed,you should remove the HIDHeadlights before disposal. Theremoved HID headlights shouldbe recycled, re-used or dis-posed as hazardous waste.
Page 535 of 570
787
Maintenance
APPEARANCE CARE
Exterior care
Exterior general caution
It is very important to follow the label
directions when using any chemical
cleaner or polish. Read all warning
and caution statements that appear
on the label.
High-pressure washing
When using high-pressure wash-ers, make sure to maintain suffi-
cient distance from the vehicle.
Insufficient clearance or excessive
pressure can lead to component
damage or water penetration.
Do not spray the camera, sensors or its surrounding area directly with
a high pressure washer. Shock
applied from high pressure water
may cause the device to not oper-
ate normally.
Do not bring the nozzle tip close to boots (rubber or plastic covers)or
connectors as they may be dam-
aged if they come into contact with
high pressure water.
Finish maintenance
Washing
To help protect your vehicle’s finish
from rust and deterioration, wash it
thoroughly and frequently at least
once a month with lukewarm or cold
water.
If you use your vehicle for off-road
driving, you should wash it after each
off-road trip. Pay special attention to
the removal of any accumulation of
salt, dirt, mud, and other foreign
materials. Make sure the drain holes
in the lower edges of the doors and
rocker panels are kept clear and
clean.
Insects, tar, tree sap, bird droppings,
industrial pollution and similar
deposits can damage your vehicle’s
finish if not removed immediately.
Even prompt washing with plain
water may not completely remove all
these deposits.
A mild soap, safe for use on painted
surfaces, may be used.
After washing, rinse the vehicle thor-
oughly with lukewarm or cold water.
Do not allow soap to dry on the fin-
ish.
WARNING - Wet brakes
After washing the vehicle, test
the brakes while driving slowly
to see if they have been affected
by water. If braking performance
is impaired, dry the brakes by
applying them lightly while main-
taining a slow forward speed.
CAUTION
Do not use strong soap, chem- ical detergents or hot water,and do not wash the vehicle indirect sunlight or when thebody of the vehicle is warm.
Be careful when washing the side windows of your vehicle.
Especially, with high-pressurewater, water may leak throughthe windows and wet the inte-rior.
To prevent damage to the plastic parts and lamps, donot clean with chemical sol-vents or strong detergents.