Page 514 of 570
Maintenance
66
7
If the headlights or other electrical
components do not work and the
fuses are OK, check the fuse block in
the engine compartment. If a fuse is
blown, it must be replaced.Fuse switch
Always, put the mode switch at the
ON position.
If you move the switch to the OFF
position, some items such as audio
and digital clock must be reset and
transmitter (or smart key) may not
work properly.
Engine compartment panel fuse
replacement
1. Turn the ignition switch and all other switches off.
2. Remove the fuse box cover by pressing the tab and pulling up.
ODM072019
CAUTION
Always place the fuse switch inthe ON position while drivingthe vehicle.
ONCNMC2032
Page 517 of 570

769
Maintenance
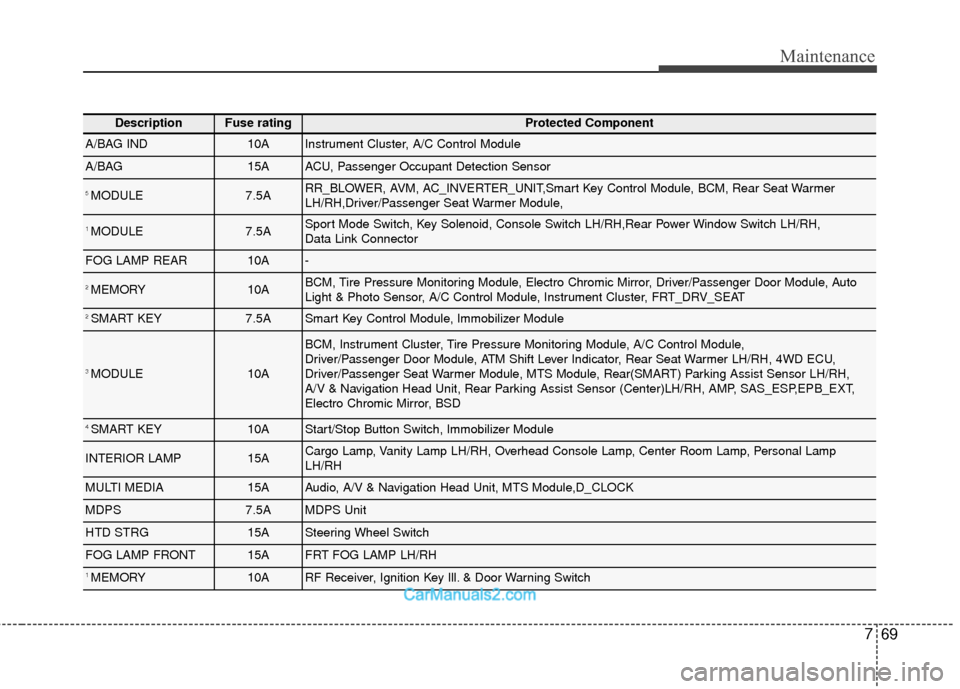
DescriptionFuse ratingProtected Component
A/BAG IND10AInstrument Cluster, A/C Control Module
A/BAG15AACU, Passenger Occupant Detection Sensor
5 MODULE7.5ARR_BLOWER, AVM, AC_INVERTER_UNIT,Smart Key Control Module, BCM, Rear Seat Warmer
LH/RH,Driver/Passenger Seat Warmer Module,
1 MODULE7.5ASport Mode Switch, Key Solenoid, Console Switch LH/RH,Rear Power Window Switch LH/RH,
Data Link Connector
FOG LAMP REAR10A-
2 MEMORY10ABCM, Tire Pressure Monitoring Module, Electro Chromic Mirror, Driver/Passenger Door Module, Auto
Light & Photo Sensor, A/C Control Module, Instrument Cluster, FRT_DRV_SEAT
2 SMART KEY7.5ASmart Key Control Module, Immobilizer Module
3 MODULE10A
BCM, Instrument Cluster, Tire Pressure Monitoring Module, A/C Control Module,
Driver/Passenger Door Module, ATM Shift Lever Indicator, Rear Seat Warmer LH/RH, 4WD ECU,
Driver/Passenger Seat Warmer Module, MTS Module, Rear(SMART) Parking Assist Sensor LH/RH,
A/V & Navigation Head Unit, Rear Parking Assist Sensor (Center)LH/RH, AMP, SAS_ESP,EPB_EXT,
Electro Chromic Mirror, BSD
4 SMART KEY10AStart/Stop Button Switch, Immobilizer Module
INTERIOR LAMP15ACargo Lamp, Vanity Lamp LH/RH, Overhead Console Lamp, Center Room Lamp, Personal Lamp
LH/RH
MULTI MEDIA15AAudio, A/V & Navigation Head Unit, MTS Module,D_CLOCK
MDPS7.5AMDPS Unit
HTD STRG15ASteering Wheel Switch
FOG LAMP FRONT15AFRT FOG LAMP LH/RH
1 MEMORY10ARF Receiver, Ignition Key Ill. & Door Warning Switch
Page 519 of 570
771
Maintenance
DescriptionFuse ratingProtected Component
1 SUNROOF20ASUNROOF_MTR
P/WDW LH25ADriver Safety Power Window Module, Driver Door Module, Rear Power Window Switch LH
FUEL LID15AFuel Fillar Door Switch (DOOR_EXT)
3 SMART KEY7.5ASmart Key Control Module
STOP LAMP15AStop Signal Electronic Module
P/SEAT (PASS)20APassenger Seat Manual Switch, Passenger Lumbar Support Switch
AMP30AAMP
4 MODULE10AAudio, A/V & Navigation Head Unit, BCM, AMP, MTS Module, Power Outside Mirror Switch,
E/R Fuse & Relay Box (Power Outlet Relay), AVM, D_CLOCK, USB_CHARGE
DOOR LOCK20ADoor Lock/Unlock Relay, Tail Gate Relay, ICM Relay Box (Dead Lock Relay)
P/SEAT (DRV)30ADriver IMS Module, Driver Seat Manual Switch, Driver Lumbar Support Switch
Page 526 of 570

Maintenance
78
7
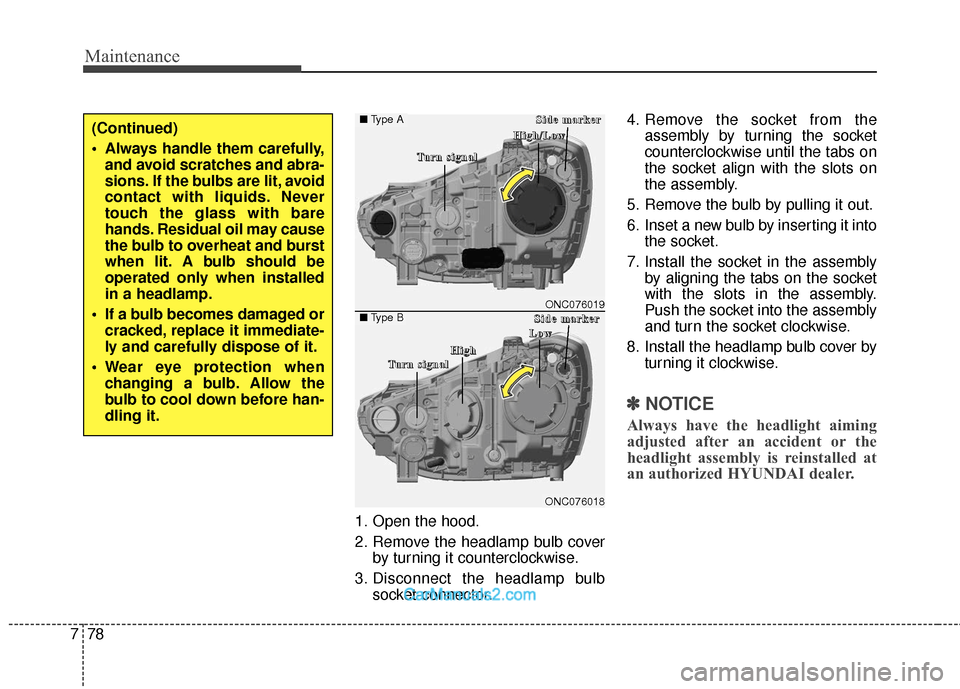
1. Open the hood.
2. Remove the headlamp bulb cover
by turning it counterclockwise.
3. Disconnect the headlamp bulb socket-connector. 4. Remove the socket from the
assembly by turning the socket
counterclockwise until the tabs on
the socket align with the slots on
the assembly.
5. Remove the bulb by pulling it out.
6. Inset a new bulb by inserting it into the socket.
7. Install the socket in the assembly by aligning the tabs on the socket
with the slots in the assembly.
Push the socket into the assembly
and turn the socket clockwise.
8. Install the headlamp bulb cover by turning it clockwise.
✽ ✽NOTICE
Always have the headlight aiming
adjusted after an accident or the
headlight assembly is reinstalled at
an authorized HYUNDAI dealer.
(Continued)
Always handle them carefully,
and avoid scratches and abra-
sions. If the bulbs are lit, avoid
contact with liquids. Never
touch the glass with bare
hands. Residual oil may cause
the bulb to overheat and burst
when lit. A bulb should be
operated only when installed
in a headlamp.
If a bulb becomes damaged or cracked, replace it immediate-
ly and carefully dispose of it.
Wear eye protection when changing a bulb. Allow the
bulb to cool down before han-
dling it.
ONC076018
■ Type A
■Type BONC076019
T
T
T
T
u
u
u
u
r
r
r
r
n
n
n
n
s
s
s
s
i
i
i
i
g
g
g
g
n
n
n
n
a
a
a
a
l
l
l
lS
S
S
S
i
i
i
i
d
d
d
d
e
e
e
e
m
m
m
m
a
a
a
a
r
r
r
r
k
k
k
k
e
e
e
e
r
r
r
r
T
T
T
T
u
u
u
u
r
r
r
r
n
n
n
n
s
s
s
s
i
i
i
i
g
g
g
g
n
n
n
n
a
a
a
a
l
l
l
l
H
H
H
H
i
i
i
i
g
g
g
g
h
h
h
h
/
/
/
/
L
L
L
L
o
o
o
o
w
w
w
w
S
S
S
S
i
i
i
i
d
d
d
d
e
e
e
e
m
m
m
m
a
a
a
a
r
r
r
r
k
k
k
k
e
e
e
e
r
r
r
r
H
H
H
H
i
i
i
i
g
g
g
g
h
h
h
h
L
L
L
L
o
o
o
o
w
w
w
w
Page 528 of 570

Maintenance
80
7
Turn signal lamp/
Side marker lamp (bulb type)
1. Remove the socket from the assembly by turning the socket
counterclockwise until the tabs on
the socket align with the slots on
the assembly.
2. Remove the bulb from the socket by pressing it in and rotating it
counterclockwise until the tabs on
the bulb align with the slots in the
socket. Pull the bulb out of the
socket
3. Insert a new bulb by inserting it into the socket and rotating it until
it locks into place.
4. Install the socket in the assembly by aligning the tabs on the socket
with the slots in the assembly.
Push the socket into the assembly
and turn the socket clockwise.
Daytime running lamp (DRL)/
Position lamp/Fog lamp (LED type)
If the LED lamp does not operate,
have the system checked by an
authorized HYUNDAI dealer.
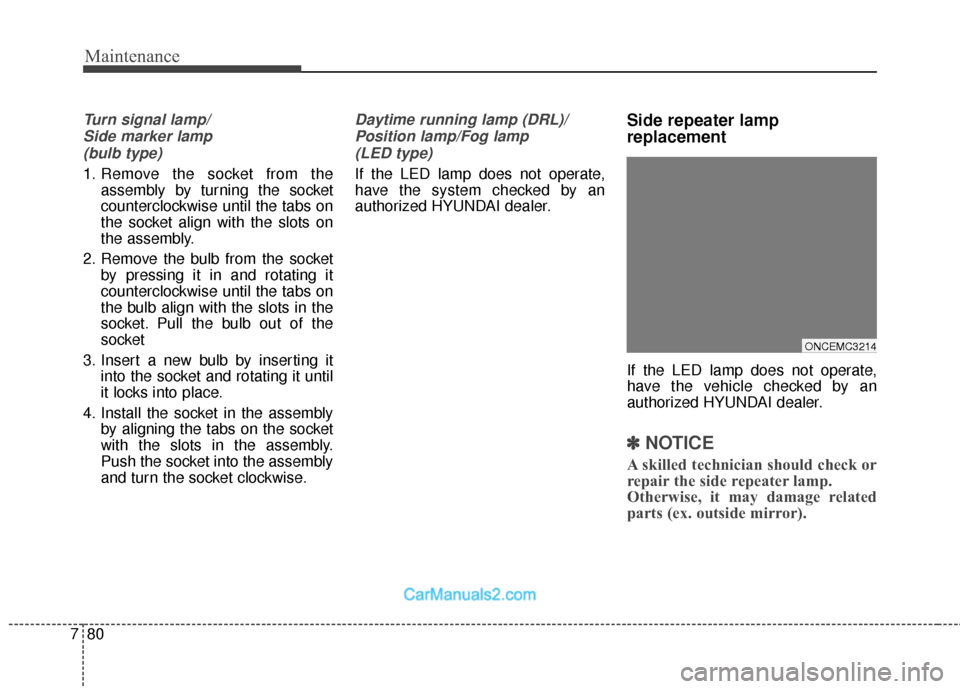
Side repeater lamp
replacement
If the LED lamp does not operate,
have the vehicle checked by an
authorized HYUNDAI dealer.
✽ ✽ NOTICE
A skilled technician should check or
repair the side repeater lamp.
Otherwise, it may damage related
parts (ex. outside mirror).
ONCEMC3214
Page 530 of 570
Maintenance
82
7
5. Remove the socket from the
assembly by turning the socket
counterclockwise until the tabs on
the socket align with the slots on
the assembly. 6. Remove the bulb from the socket
by pressing it in and rotating it
counterclockwise until the tabs on
the bulb align with the slots in the
socket. Pull the bulb out of the
socket. (Side marker : Remove the
bulb from the socket by pulling it
out)
7. Insert a new bulb by inserting it into the socket and rotating it until
it locks into place.
8. Install the socket in the assembly by aligning the tabs on the socket
with the slots in the assembly.
Push the socket into the assembly
and turn the socket clockwise.
9. Reinstall the lamp assembly to the body of the vehicle.
Inside lamp
1. Open the liftgate (tailgate).
2. Remove the service cover using aflat-blade screwdriver.
OANNMC2036
ODM076104L
ODM076103L
■
Type A
■ Type B
Page 531 of 570
783
Maintenance
3. Remove the socket from theassembly by turning the socket
counterclockwise until the tabs on
the socket align with the slots on
the assembly.
4. Remove the bulb from the socket by pressing it in and rotating it
counterclockwise until the tabs on
the bulb align with the slots in the
socket. Pull the bulb out of the
socket. (Back-up lamp : Remove
the bulb from the socket by pulling
it out) 5. Insert a new bulb by inserting it
into the socket and rotating it until
it locks into place.
6. Install the socket in the assembly by aligning the tabs on the socket
with the slots in the assembly.
Push the socket into the assembly
and turn the socket clockwise.
7. Install the service cover by putting it into the service hole.
Stop/tail lamp (LED type)
If the LED lamp does not operate,
have the vehicle checked by an
authorized HYUNDAI dealer.
ONCNMC2039