2018 Hyundai Kona door lock
[x] Cancel search: door lockPage 118 of 523

3-35
Convenient features of your vehicle
3
3. Pull the fuel filler door (1) out tofully open.
4. To remove the fuel tank cap (2), turn it counterclockwise. You may hear a hissing noise as the pres-
sure inside the tank equalizes.
5. Place the cap on the fuel filler door.
Information
If the fuel filler door does not open
because ice has formed around it, tap
lightly or push on the door to break
the ice and release the door. Do not
pry on the door. If necessary, spray
around the door with an approved de-
icer fluid (do not use radiator anti-
freeze) or move the vehicle to a warm
place and allow the ice to melt.
Closing the fuel filler door
1. To install the fuel tank cap, turn it clockwise until it “clicks” one time.
2. Close the fuel filler door until it is latched securely.
Information
The fuel filler door will not close if the
driver's door is locked. If you lock the
driver's door while fueling, unlock it
before closing the fuel filler door.
i
i
part of the vehicle, a safe dis-
tance away from the fuel filler
neck, nozzle, or other gas
source, with your bare hand.
Do not use cellular phones
while refueling. Electric cur-
rent and/or electronic interfer-
ence from cellular phones can
potentially ignite fuel vapors
and cause a fire.
Do not get back into a vehicle
once you have begun refuel-
ing. You can generate a build-
up of static electricity by touch-
ing, rubbing or sliding against
any item or fabric capable of
producing static electricity.
Static electricity discharge can
ignite fuel vapors causing a
fire. If you must re-enter the
vehicle, you should once again
eliminate potentially danger-
ous static electricity discharge
by touching a metal part of the
vehicle, away from the fuel filler
neck, nozzle or other gasoline
source, with your bare hand.OOS047031
Gasoline is highly flammable
and explosive. Failure to follow
these guidelines may result in
SERIOUS INJURY or DEATH:
Read and follow all warnings posted at the gas station.
Before refueling, note the
location of the Emergency
Gasoline Shut-Off, if available,at the gas station.
Before touching the fuel noz-
zle, you should eliminate the
potential build-up of static
electricity by touching a metal
WARNING
Page 141 of 523
3-58
Convenient features of your vehicle
Press START button while turn-ing wheel (for smart key sys-
tem)
This warning message is displayed if
the steering wheel does not unlock
normally when the Engine Start/Stop
button is pressed.
You should press the Engine Start/Stop
button while turning the steering wheel
right and left.
Steering wheel not locked (for smart key system)
This warning message is displayed if
the steering wheel is not locked while
the Engine Start/Stop button changesto the OFF position.
Check Steering Wheel LockSystem (for smart key system)
This warning message is displayed if
the steering wheel does not lock nor-
mally while the Engine Start/Stop but-ton changes to the OFF position.
Press brake pedal to start engine(for smart key system and dual
clutch transmission)
This warning message is displayed if
the Engine Start/Stop button changes
to the ACC position twice by pressing
the button repeatedly without depress-
ing the brake pedal.
You can start the vehicle by depressing
the brake pedal.
Press clutch pedal to start engine (for smart key system
and manual transmission)
This warning message is displayed if
the Engine Start/Stop button is in the
ACC position twice by pressing the
button repeatedly without depressingthe clutch pedal.
Depress the clutch pedal to start the
engine.
Key not in vehicle(for smart key system)
This warning message is displayed if
the smart key is not in the vehicle
when you open or close door in the
ACC position or ON position. The
warning sound is heard when you
close door without a smart key in
vehicle.
When attempting to start the vehicle
always have the smart key with you.
Key not detected (for smart key system)
This warning message is displayed if
the smart key is not detected when you
press the Engine Start/Stop button.
Page 152 of 523
3-69
Convenient features of your vehicle
3
Forward Collision Warning- Late/Normal/Early
To adjust the initial warning alert time
for Forward Collision-AvoidanceAssist (FCA) system.
For more information, refer to
"Forward Collision-Avoidance
Assist (FCA) system" in chapter 5.
Blind-Spot Collision Warning (BCW) sound
To activate or deactivate the Blind-
Spot Collision Warning (BCW) sound.
For more information, refer to "
Blind-Spot Collision Warning
(BCW) system" in chapter 5.
Blind-Spot Collision Warning (BCW)
To activate or deactivate the Blind-
Spot Collision Warning (BCW) sys-tem.
For more information, refer to
"Blind-Spot Collision Warning
(BCW) system" in chapter 5. 3. Door
- Disable: The auto door lock opera-
tion will be canceled.
- Enable on Speed: All doors will be automatically locked when the vehi-
cle speed exceeds 15km/h(9.3mph).
- Enable on Shift: All doors will be automatically locked if the dual
clutch transmission shift lever is
shifted from the P (Park) position to
the R (Reverse), N (Neutral), or D
(Drive) position.
- Disable: The auto door unlock oper- ation will be canceled.
- Vehicle Off: All doors will be auto- matically unlocked when the
Engine Star/Stop button is set to
the OFF position. (if equipped with
smart key) - On Key Out: All doors will be auto-
matically unlocked when the igni-
tion key is removed from the igni-
tion switch. (if equipped with remote
key)
- On Shift to P: All doors will be auto- matically unlocked if the dual clutch
transmission shift lever is shifted to
the P (Park) position.
- Driver Door Unlock: All doors will be automatically unlocked when the
driver’s door is opened.
To activate or deactivate the horn
feedback.
If the horn feedback is activated,
after locking the door by pressing the
lock button on the remote key, and
pressing it again within 4 seconds,
the horn feedback sound will operateonce to indicate that all doors are
locked. (if equipped with remote key)
Page 153 of 523
3-70
Convenient features of your vehicle
4. Lights
- Off: The one touch turn signal func-tion will be deactivated.
- 3, 5, 7 Flashes: The turn signal indi- cator will blink 3, 5, or 7 times when
the turn signal lever is moved slightly.
For more information, refer to
"Light" in this chapter.
To activate or deactivate the head-
lamp delay function.
For more information, refer to
"Light" in this chapter 5. Sound
- Softer/Louder
To adjust the Park Assist System
volume.
To activate or deactivate the wel- come sound.
6. Convenience
Welcome mirror
To activate or deactivate the wel- come mirror function. When all the doors (and tailgate) are
closed and locked, the outside mirror
will unfold if any of the below is per-
formed.
- When the door unlock button is pressed on the remote key or
smart key.
- When the button of the outside door handle is pressed with the
smart key in possession.
To activate or deactivate the Wiper/
Light mode.
When activated, the LCD display
shows the selected Wiper/Light
mode whenever you changed the
mode.
Auto Rear Wiper (reverse)
To activate or deactivate the rear
wiper while the vehicle is in reversewith the front wiper ON.
Gear Position Pop-up
To activate or deactivate the gear
position pop-up.
When activated, the gear position
will be displayed on the LCD display.
(if equipped with dual clutch trans-mission)
Icy Road Warning
To activate or deactivate the Icy
Road Warning function.
Page 164 of 523
3-81
Convenient features of your vehicle
Head Up Display ON/OFF
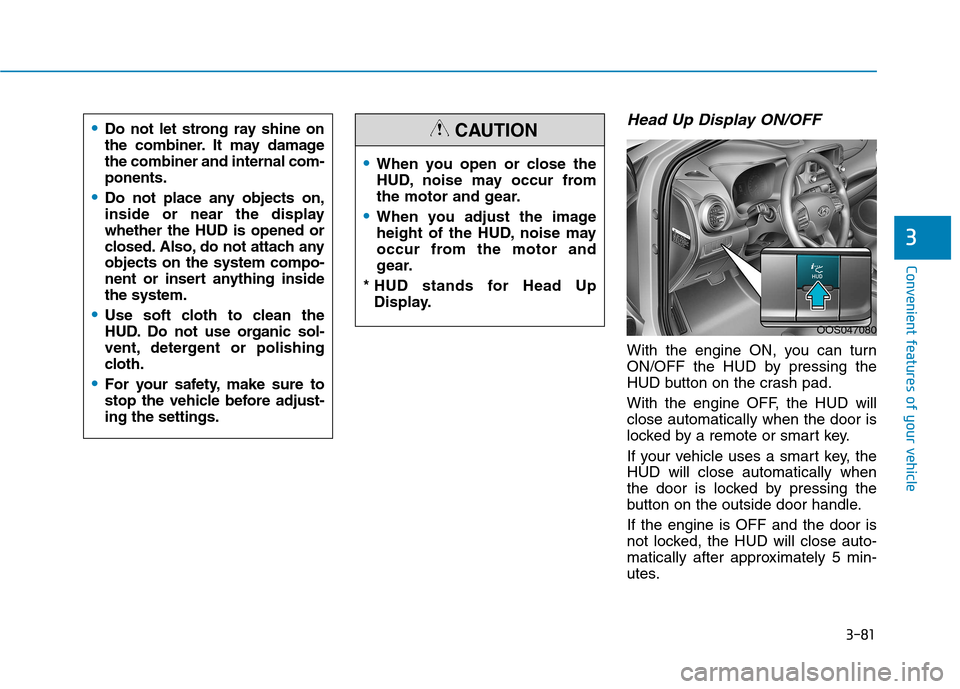
With the engine ON, you can turn
ON/OFF the HUD by pressing the
HUD button on the crash pad.
With the engine OFF, the HUD will close automatically when the door is
locked by a remote or smart key.
If your vehicle uses a smart key, the HUD will close automatically when
the door is locked by pressing the
button on the outside door handle. If the engine is OFF and the door is
not locked, the HUD will close auto-
matically after approximately 5 min-
utes.
3
When you open or close the
HUD, noise may occur from
the motor and gear.
When you adjust the image
height of the HUD, noise may
occur from the motor and
gear.
* HUD stands for Head Up Display.
CAUTION
OOS047080
Do not let strong ray shine on
the combiner. It may damagethe combiner and internal com-ponents.
Do not place any objects on,
inside or near the displaywhether the HUD is opened or
closed. Also, do not attach anyobjects on the system compo-
nent or insert anything insidethe system.
Use soft cloth to clean the
HUD. Do not use organic sol-
vent, detergent or polishing
cloth.
For your safety, make sure to
stop the vehicle before adjust-ing the settings.
Page 173 of 523
3-90
Convenient features of your vehicle
Battery saver function
The purpose of this feature is to pre-
vent the battery from being dis-
charged. The system automatically
turns off the position lamp when the
driver turns the engine off and opens
the driver-side door.
With this feature, the position lamps
will turn off automatically if the driver
parks on the side of road at night.
If necessary, to keep the lamps on
when the engine is turned off, perform
the following:
1) Open the driver-side door.
2) Turn the position lamps OFF andON again using the light switch on
the steering column.
Headlamp delay function
(if equipped)
If you place the ignition switch to the
ACC or OFF position with the head-lamps ON, the headlamps (and/or
position lamps) remain on for about 5
minutes. However, with the engine off if
the driver’s door is opened and closed,the headlamps (and/or position lamps)
are turned off after 15 seconds. The headlamps (and/or position
lamps) can be turned off by pressing
the lock button on the remote key or
smart key twice or turning the light
switch to the OFF or AUTO position.
However, if you turn the light switch
to the AUTO position when it is dark
outside, the headlamps will not be
turned off.
You can activate or deactivate the
Headlamp Delay function from theUser Settings mode on the LCD dis-
play. For more details, refer to
"LCD Display" in this chapter. If the driver gets out of the vehicle
through other doors (except dri-
ver's door), the battery saver func-tion does not operate and the
headlamp delay function does not
turn off automatically. Therefore, It
causes the battery to be dis-
charged. In this case, make sure to
turn off the lamp before getting out
of the vehicle.
NOTICE
Page 175 of 523
3-92
Automatic type
It automatically adjusts the head-
lamp beam level according to the
number of passengers and loading
weight in the luggage area.
It also adjusts to the appropriate head-
lamp beam level for various situations.
Low Beam Assist-Static light (if equipped)
While driving a corner, for greater
visibility and safety, either the left or
right side Low Beam Assist-Static
light will turn on automatically. The
Low Beam Assist-Static light will turn
on when one of the following condi-
tions occur.
Vehicle speed is less than 10 km/h(6 mph) and steering wheel angle
is turned approximately 80 degrees
with the low beam on.
Vehicle speed is between 10 km/h (6 mph) to 90 km/h (56 mph) and
steering wheel angle is turned
approximately 35 degrees with the
low beam on.
When the vehicle is in reverse with one of the conditions above satis-fied, the light opposite to the direc-
tion the steering wheel is steered
will turn on.
Welcome system (if equipped)
Interior lamp
When the interior lamp switch is in the DOOR position and all doors (and
tailgate) are closed and locked, the
room lamp will come on for 30 sec-
onds if any of the below is performed.
When the door unlock button ispressed on the remote key or
smart key.
When the button of the outside door handle is pressed with the
smart key in possession.
At this time, if you press the door lock
or unlock button, the room lamp will
turn off immediately.
Convenient features of your vehicle
If the function does not work
properly, we recommend that
the system be inspected by an
authorized HYUNDAI dealer. Donot attempt to inspect or
replace the wiring yourself.
WARNING
Page 176 of 523
3-93
Convenient features of your vehicle
Interior lights
Do not use the interior lights for
extended periods when the engine
is turned off otherwise the battery
will discharge.
Interior lamp AUTO cut
The interior lamps will automatically
go off approximately 20 minutes after
the engine is turned off and the
doors are closed. If a door is opened,
the lamp will go off 40 minutes after
the engine is turned off. If the doors
are locked and the vehicle enters the
armed stage of the theft alarm sys-
tem, the lamps will go off five sec-
onds later.
Front lamps
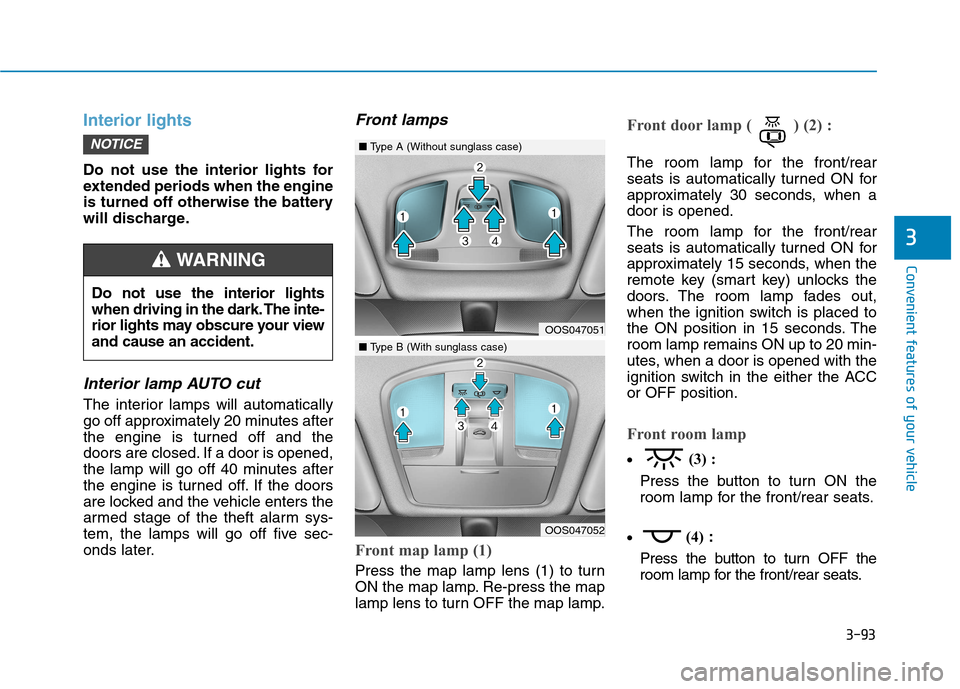
Front map lamp (1)
Press the map lamp lens (1) to turn
ON the map lamp. Re-press the map
lamp lens to turn OFF the map lamp.
Front door lamp ( ) (2) :
The room lamp for the front/rear
seats is automatically turned ON for
approximately 30 seconds, when adoor is opened.
The room lamp for the front/rear
seats is automatically turned ON for
approximately 15 seconds, when the
remote key (smart key) unlocks the
doors. The room lamp fades out,
when the ignition switch is placed to
the ON position in 15 seconds. Theroom lamp remains ON up to 20 min-
utes, when a door is opened with the
ignition switch in the either the ACCor OFF position.
Front room lamp
(3) :
Press the button to turn ON the
room lamp for the front/rear seats.
(4)
:
Press the button to turn OFF the
room lamp for the front/rear seats.
NOTICE
3
Do not use the interior lights
when driving in the dark. The inte-
rior lights may obscure your viewand cause an accident.
WARNING
OOS047051
OOS047052
■ Type A (Without sunglass case)
■Type B (With sunglass case)