2018 Hyundai Kona air conditioning
[x] Cancel search: air conditioningPage 207 of 523

3-124
WWIINN DDSSHH IIEE LLDD DD EEFFRR OO SSTT IINN GG AA NN DD DD EEFFOO GGGGIINN GG
Convenient features of your vehicle
For maximum windshield defrost-
ing, set the temperature control
knob to the highest temperature
setting and the fan control knob to
the highest fan speed. Select the
front defrost button on the climate
control display. After the engine
warm-up period, warm air will bedirected to the front windshield.
If warm air to the floor is desired while defrosting or defogging, set themode to the floor-defrost position.
Before driving, clear all snow and ice from the windshield, rear win-
dow, outside rear view mirrors, and
all side windows.
Clear all snow and ice from the hood and air inlet in the cowl grill to
improve heater and defroster effi-ciency and to reduce the probability
of fogging up inside of the wind-shield.
Information
If the engine temperature is still cold
after starting, then a brief engine warm
up period may be required for the
vented air flow to become warm or hot.Manual climate control system
To defog inside windshield
1. Select any fan speed except “0” position.
2. Select the desired temperature.
3. Select the or position.
4. The outside (fresh) air will be select- ed automatically. Additionally, the air conditioning (if equipped) will auto-
matically operate if the mode is
selected to the position.
If the air conditioning and outside(fresh) air position are not selected
automatically, press the correspon-
ding button manually.
i
Windshield heating
Do not use the or posi- tion during cooling operation in
extremely humid weather. The
difference between the temper-ature of the outside air and thatof the windshield could causethe outer surface of the wind-
shield to fog up, causing loss of
visibility. In this case, set the
mode selection knob or button
to the position and fan
speed control knob or button to
lower speed.
WARNING
OOS047309
Page 208 of 523

3-125
Convenient features of your vehicle
3
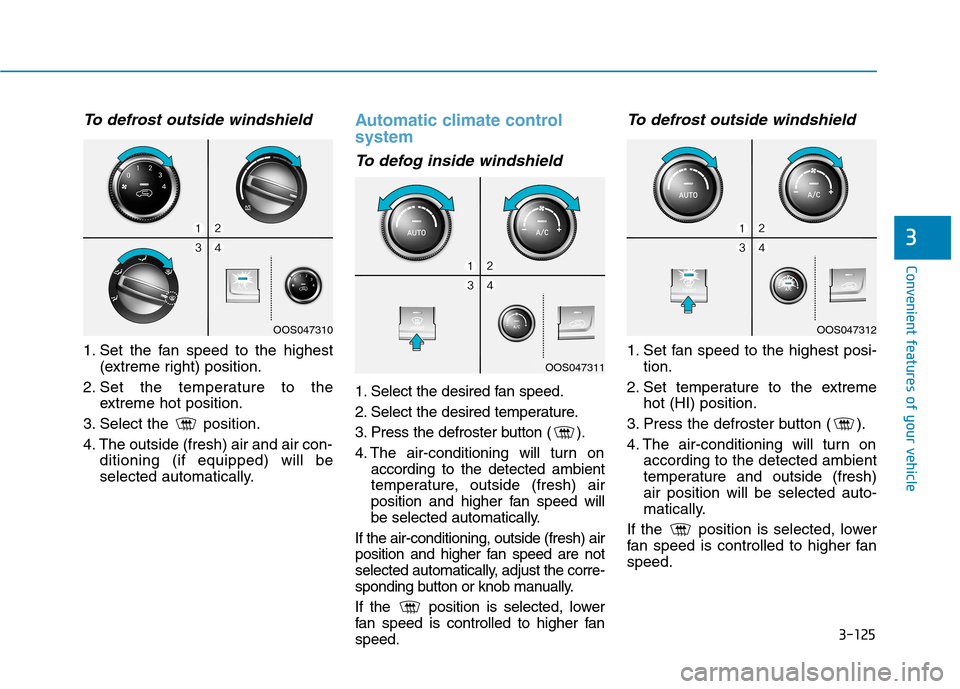
To defrost outside windshield
1. Set the fan speed to the highest(extreme right) position.
2. Set the temperature to the extreme hot position.
3. Select the position.
4. The outside (fresh) air and air con- ditioning (if equipped) will be
selected automatically.
Automatic climate control system
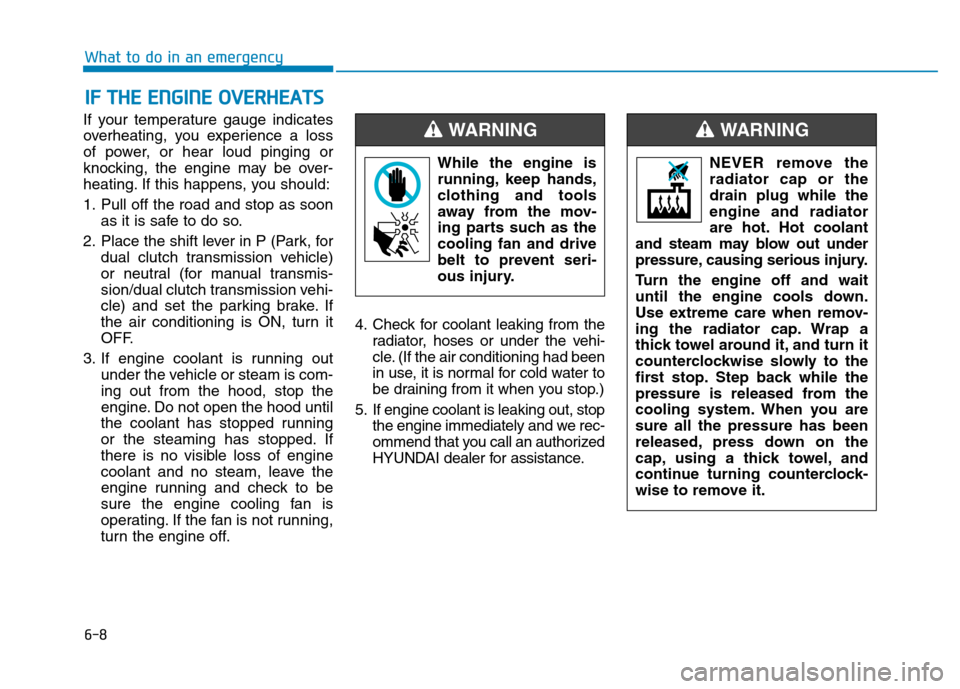
To defog inside windshield
1. Select the desired fan speed.
2. Select the desired temperature.
3. Press the defroster button ( ).
4. The air-conditioning will turn onaccording to the detected ambient
temperature, outside (fresh) air
position and higher fan speed will
be selected automatically.
If the air-conditioning, outside (fresh) air
position and higher fan speed are not
selected automatically, adjust the corre-
sponding button or knob manually.
If the position is selected, lower
fan speed is controlled to higher fanspeed.
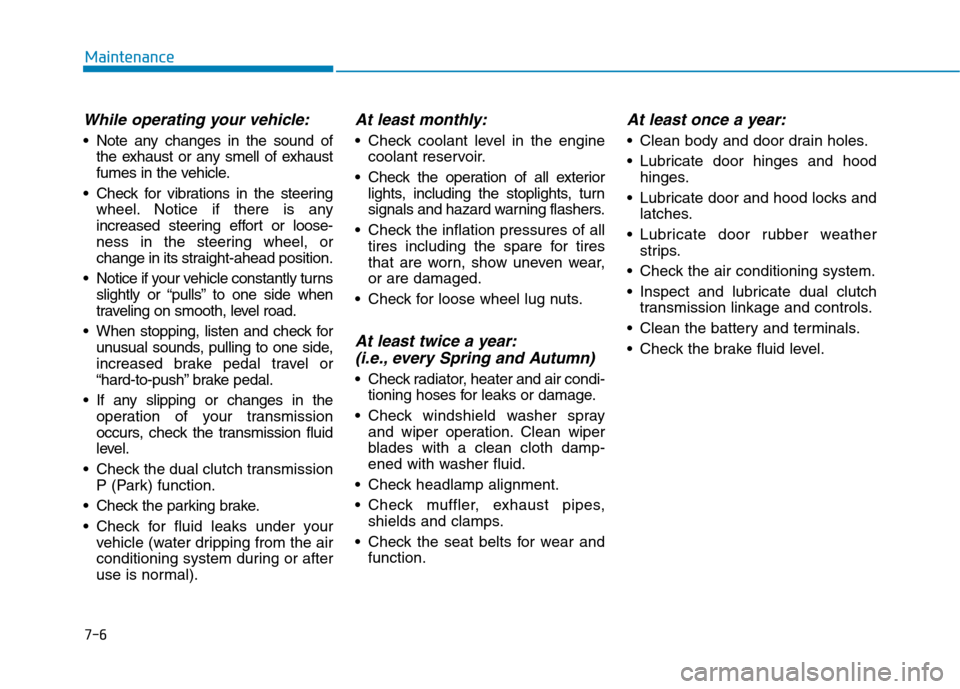
To defrost outside windshield
1. Set fan speed to the highest posi- tion.
2. Set temperature to the extreme hot (HI) position.
3. Press the defroster button ( ).
4. The air-conditioning will turn on according to the detected ambient
temperature and outside (fresh)air position will be selected auto-
matically.
If the position is selected, lower
fan speed is controlled to higher fanspeed.
OOS047310
OOS047311
OOS047312
Page 209 of 523

3-126
Auto defogging system
(only for automatic climate
control system, if equipped)
Auto defogging reduces the possibili-
ty of fogging up the inside of the wind-
shield by automatically sensing themoisture on inside the windshield.
The auto defogging system operates when the heater or air conditioning ison.Information
The auto defogging system may not
operate normally, when the outside
temperature is below -10 °C.
To cancel or set the Auto Defogging
System, keep the front defroster but-
ton pressed for 3 seconds. The “ADS
OFF” symbol will be shown in the cli-
mate display to inform you that the
system is deactivated. To re-activate
the auto defogging system, follow the
procedure mentioned above and the
“ADS OFF” symbol will disappear.
If the battery has been disconnected or discharged, it resets to the auto
defogging status. Information
For efficiency, do not select recirculat-
ed air position while the Auto defog-
ging system is operating.
Do not remove the sensor cover located on the upper end of thewindshield glass.
Damage to system parts could
occur and may not be covered by
your vehicle warranty.
NOTICE
i
i
Convenient features of your vehicle
Page 210 of 523

3-127
Convenient features of your vehicle
Cluster ionizer (if equipped)
When the ignition switch is in the ON
position, the clean air function turns
on automatically.
Also, the clean air function turns off
automatically, when the ignition
switch is in the OFF position.
Automatic ventilation (if equipped)
To increase cabin air quality and reduce windscreen misting, air recir-
culation mode switches off automati-
cally after about 5 to 30 minutes,
depending on outside temperature,
and the air intake will change to out-
side (fresh) mode.
To cancel or set the automatic venti-
lation feature, select Face level modeand press the air recirculation
mode button for 3 seconds.
When the automatic ventilation is set, the air recirculation indicator will
blink 6 times. When canceled, the
indicator will blink 3 times.
Sunroof inside air recirculation (if equipped)
When the heater or air conditioning system is on with the sunroof opened,the outside (fresh) air position will be
automatically selected. At this time, if
you press the recirculated air position
button, the recirculated air position
will be selected but will change backto the outside (fresh) air position after
3 minutes. When the sunroof is closed, the air
intake position will return to the orig-
inal position that was selected.
CC LLIIMM AATTEE CC OO NNTTRR OO LL AA DDDDIITT IIOO NNAALL FF EE AA TTUU RREESS
3
Page 373 of 523

6-6
What to do in an emergency
To prevent damage to your vehi-
cle:
Only use a 12-volt power supply(battery or jumper system) to
jump start your vehicle.
Do not attempt to jump start your vehicle by push-starting.
Information An inappropriately disposedbattery can be harmful to the
environment and human
health. Dispose the battery
according to your local law(s)
or regulations.
Jump starting procedure
1. Position the vehicles close enough that the jumper cables will reach,
but do not allow the vehicles totouch.
2. Avoid fans or any moving parts in the engine compartment at all
times, even when the vehicles are
turned off.
3. Turn off all electrical devices such as radios, lights, air conditioning,
etc. Put the vehicles in P (Park, for
dual clutch transmission vehicle)
or neutral (for manual transmis-
sion vehicle), and set the parking
brakes. Turn both vehicles OFF.
i
NOTICEDo not attempt to jump start
your vehicle if your battery is
frozen.
NEVER attempt to recharge
the battery when the vehicle’s
battery cables are connected
to the battery.
The electrical ignition system
works with high voltage.
NEVER touch these compo-nents with the engine running
or when the ignition switch isin the ON position.
Do not allow the (+) and (-)
jumper cables to touch. It maycause sparks.
The battery may rupture or
explode when you jump start
with a low or frozen battery.
Pb
Page 375 of 523

6-8
What to do in an emergency
If your temperature gauge indicates
overheating, you experience a loss
of power, or hear loud pinging or
knocking, the engine may be over-
heating. If this happens, you should:
1. Pull off the road and stop as soonas it is safe to do so.
2. Place the shift lever in P (Park, for dual clutch transmission vehicle)
or neutral (for manual transmis-
sion/dual clutch transmission vehi-
cle) and set the parking brake. If
the air conditioning is ON, turn it
OFF.
3. If engine coolant is running out under the vehicle or steam is com-ing out from the hood, stop the
engine. Do not open the hood until
the coolant has stopped running
or the steaming has stopped. If
there is no visible loss of engine
coolant and no steam, leave the
engine running and check to be
sure the engine cooling fan is
operating. If the fan is not running,
turn the engine off. 4. Check for coolant leaking from the
radiator, hoses or under the vehi-
cle. (If the air conditioning had been
in use, it is normal for cold water to
be draining from it when you stop.)
5. If engine coolant is leaking out, stop the engine immediately and we rec-
ommend that you call an authorized
HYUNDAI dealer for assistance.
IIFF TT HH EE EE NN GGIINN EE OO VVEERR HH EEAA TTSS
While the engine is
running, keep hands,
clothing and tools
away from the mov-
ing parts such as thecooling fan and drive
belt to prevent seri-
ous injury.
WARNING
NEVER remove the radiator cap or thedrain plug while theengine and radiator
are hot. Hot coolant
and steam may blow out under
pressure, causing serious injury.
Turn the engine off and wait
until the engine cools down.
Use extreme care when remov-
ing the radiator cap. Wrap a
thick towel around it, and turn it
counterclockwise slowly to the
first stop. Step back while the
pressure is released from the
cooling system. When you aresure all the pressure has been
released, press down on the
cap, using a thick towel, and
continue turning counterclock-
wise to remove it.
WARNING
Page 418 of 523

7-6
Maintenance
While operating your vehicle:
Note any changes in the sound ofthe exhaust or any smell of exhaust
fumes in the vehicle.
Check for vibrations in the steering wheel. Notice if there is any
increased steering effort or loose-
ness in the steering wheel, or
change in its straight-ahead position.
Notice if your vehicle constantly turns slightly or “pulls” to one side when
traveling on smooth, level road.
When stopping, listen and check for unusual sounds, pulling to one side,
increased brake pedal travel or
“hard-to-push” brake pedal.
If any slipping or changes in the operation of your transmission
occurs, check the transmission fluid
level.
Check the dual clutch transmission P (Park) function.
Check the parking brake.
Check for fluid leaks under your vehicle (water dripping from the air
conditioning system during or after
use is normal).
At least monthly:
Check coolant level in the enginecoolant reservoir.
Check the operation of all exterior lights, including the stoplights, turn
signals and hazard warning flashers.
Check the inflation pressures of all tires including the spare for tires
that are worn, show uneven wear,or are damaged.
Check for loose wheel lug nuts.
At least twice a year: (i.e., every Spring and Autumn)
Check radiator, heater and air condi- tioning hoses for leaks or damage.
Check windshield washer spray and wiper operation. Clean wiper
blades with a clean cloth damp-
ened with washer fluid.
Check headlamp alignment.
Check muffler, exhaust pipes, shields and clamps.
Check the seat belts for wear and function.
At least once a year:
Clean body and door drain holes.
Lubricate door hinges and hoodhinges.
Lubricate door and hood locks and latches.
Lubricate door rubber weather strips.
Check the air conditioning system.
Inspect and lubricate dual clutch transmission linkage and controls.
Clean the battery and terminals.
Check the brake fluid level.
Page 433 of 523

7-21
7
Maintenance
Brake pads, calipers and
rotors
Check the pads for excessive wear,
discs for run out and wear, and
calipers for fluid leakage.
For more information on checking
the pads or lining wear limit, refer to
the HYUNDAI web site. (http://ser
vice.hyundai-motor.com)
Suspension mounting bolts
Check the suspension connections
for looseness or damage. Retighten
to the specified torque.
Steering gear box, linkage &
boots/lower arm ball joint
With the vehicle stopped and engine
off, check for excessive free-play in
the steering wheel.
Check the linkage for bends or dam-
age. Check the dust boots and ball
joints for deterioration, cracks, or
damage. Replace any damaged
parts.
Drive shafts and boots
Check the drive shafts, boots and
clamps for cracks, deterioration, or
damage. Replace any damaged
parts and, if necessary, repack the
grease.
Air conditioning refrigerant/ compressor
Check the air conditioning lines and
connections for leakage and dam-
age.
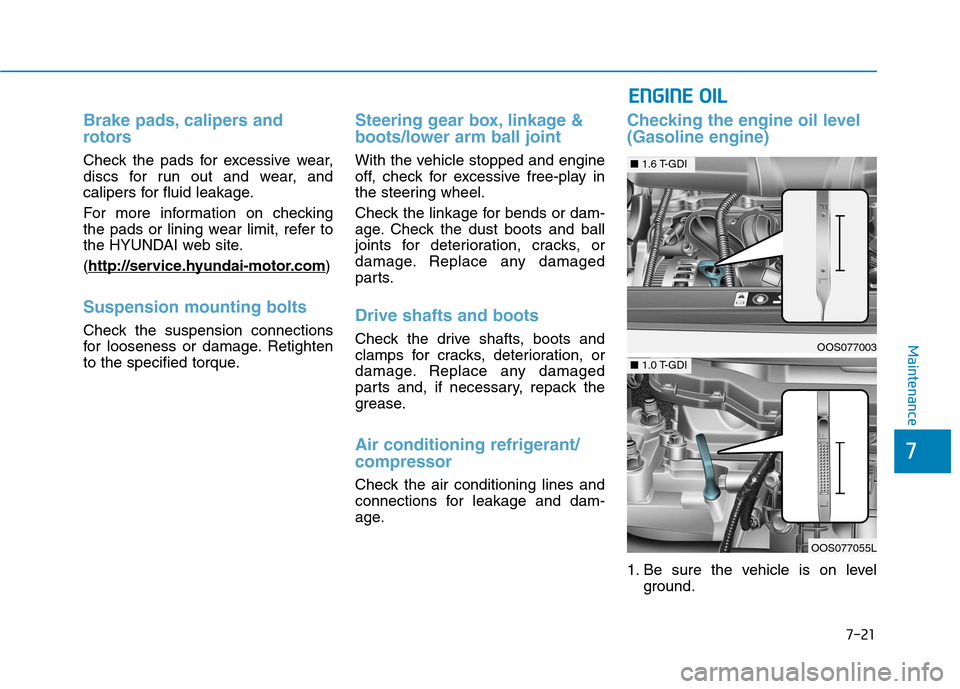
Checking the engine oil level (Gasoline engine)
1. Be sure the vehicle is on level
ground.
EENN GGIINN EE OO IILL
OOS077003
OOS077055L
■ 1.0 T-GDI
■1.6 T-GDI