2018 Hyundai Kona Low beam
[x] Cancel search: Low beamPage 171 of 523
3-88
Convenient features of your vehicle
Turn signals and lane changesignals
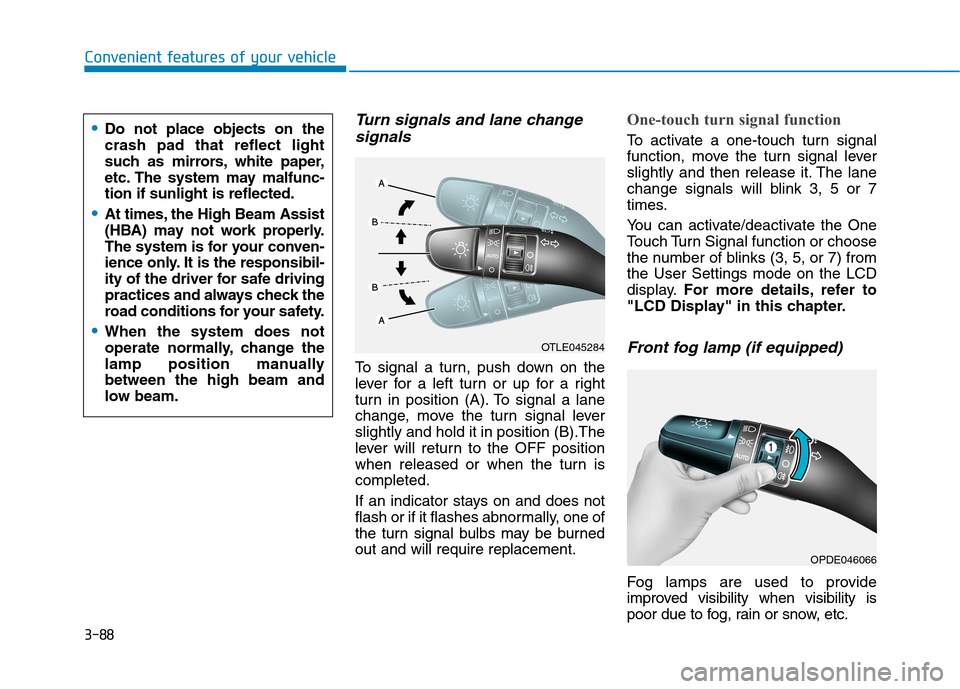
To signal a turn, push down on the
lever for a left turn or up for a right
turn in position (A). To signal a lane
change, move the turn signal leverslightly and hold it in position (B).The
lever will return to the OFF position
when released or when the turn iscompleted.
If an indicator stays on and does not
flash or if it flashes abnormally, one of
the turn signal bulbs may be burnedout and will require replacement.
One-touch turn signal function
To activate a one-touch turn signal
function, move the turn signal lever
slightly and then release it. The lane
change signals will blink 3, 5 or 7
times.
You can activate/deactivate the One
Touch Turn Signal function or choose
the number of blinks (3, 5, or 7) fromthe User Settings mode on the LCD
display. For more details, refer to
"LCD Display" in this chapter.
Front fog lamp (if equipped)
Fog lamps are used to provide
improved visibility when visibility is
poor due to fog, rain or snow, etc.
OPDE046066
OTLE045284
Do not place objects on the crash pad that reflect light
such as mirrors, white paper,
etc. The system may malfunc-tion if sunlight is reflected.
At times, the High Beam Assist
(HBA) may not work properly.
The system is for your conven-
ience only. It is the responsibil-
ity of the driver for safe driving
practices and always check the
road conditions for your safety.
When the system does not
operate normally, change the
lamp position manuallybetween the high beam and
low beam.
Page 174 of 523
3-91
Convenient features of your vehicle
3
Daytime running light (DRL) (if equipped)
The Daytime Running Lights (DRL)
can make it easier for others to see
the front of your vehicle during the
day, especially after dawn and beforesunset.
The DRL system will turn the dedi- cated lamp OFF when:
1. The headlamps or front fog lights are in the ON position.
2. The position light switch is in the ON position.
3. The engine is turned off.
Headlamp leveling device (if equipped)
Manual type
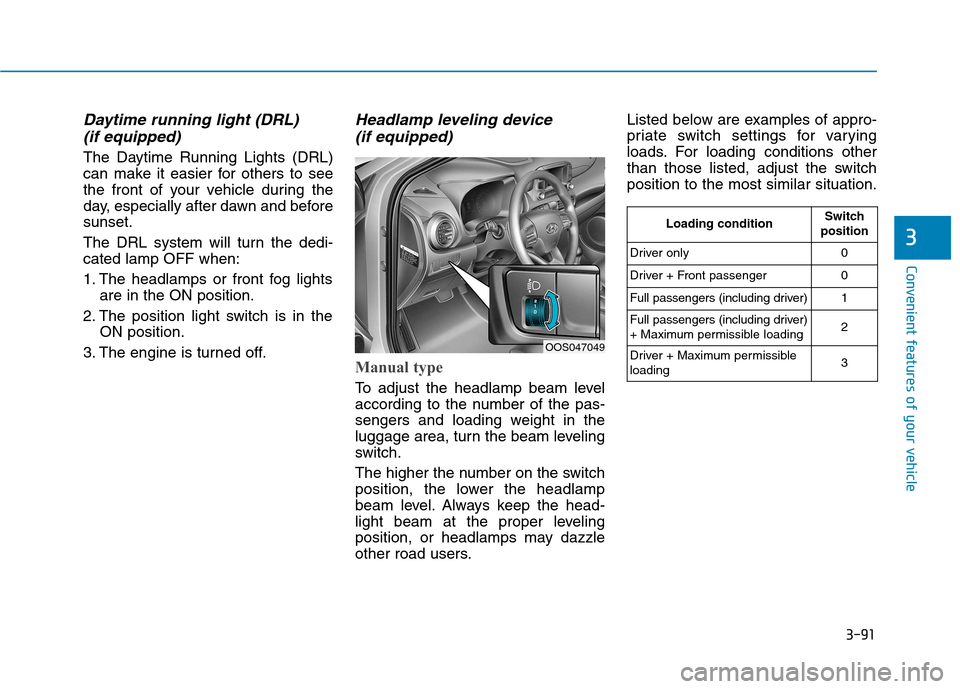
To adjust the headlamp beam level
according to the number of the pas-
sengers and loading weight in the
luggage area, turn the beam leveling
switch.
The higher the number on the switch
position, the lower the headlamp
beam level. Always keep the head-
light beam at the proper leveling
position, or headlamps may dazzle
other road users. Listed below are examples of appro-
priate switch settings for varying
loads. For loading conditions other
than those listed, adjust the switchposition to the most similar situation.
OOS047049
Loading conditionSwitch
position
Driver only0
Driver + Front passenger0
Full passengers (including driver)1
Full passengers (including driver)
+ Maximum permissible loading2
Driver + Maximum permissible loading 3
Page 175 of 523
3-92
Automatic type
It automatically adjusts the head-
lamp beam level according to the
number of passengers and loading
weight in the luggage area.
It also adjusts to the appropriate head-
lamp beam level for various situations.
Low Beam Assist-Static light (if equipped)
While driving a corner, for greater
visibility and safety, either the left or
right side Low Beam Assist-Static
light will turn on automatically. The
Low Beam Assist-Static light will turn
on when one of the following condi-
tions occur.
Vehicle speed is less than 10 km/h(6 mph) and steering wheel angle
is turned approximately 80 degrees
with the low beam on.
Vehicle speed is between 10 km/h (6 mph) to 90 km/h (56 mph) and
steering wheel angle is turned
approximately 35 degrees with the
low beam on.
When the vehicle is in reverse with one of the conditions above satis-fied, the light opposite to the direc-
tion the steering wheel is steered
will turn on.
Welcome system (if equipped)
Interior lamp
When the interior lamp switch is in the DOOR position and all doors (and
tailgate) are closed and locked, the
room lamp will come on for 30 sec-
onds if any of the below is performed.
When the door unlock button ispressed on the remote key or
smart key.
When the button of the outside door handle is pressed with the
smart key in possession.
At this time, if you press the door lock
or unlock button, the room lamp will
turn off immediately.
Convenient features of your vehicle
If the function does not work
properly, we recommend that
the system be inspected by an
authorized HYUNDAI dealer. Donot attempt to inspect or
replace the wiring yourself.
WARNING
Page 414 of 523

7
Tires and wheels ..................................................7-36Tire care ............................................................................7-36
Recommended cold tire inflation pressures.............7-37
Check tire inflation pressure........................................7-38
Tire rotation .....................................................................7-38
Wheel alignment and tire balance ..............................7-39
Tire replacement .............................................................7-40
Wheel replacement .........................................................7-41
Tire traction ......................................................................7-41
Tire maintenance ............................................................7-41
Tire sidewall labeling ......................................................7-41
Low aspect ratio tires ....................................................7-45
Fuses ......................................................................7-46 Instrument panel fuse replacement ...........................7-47
Engine compartment panel fuse replacement.........7-48
Fuse/Relay panel description ......................................7-50 Light bulbs.............................................................7-63
Headlamp, Low beam assist - Static,
position lamp, turn signal lamp and
daytime running light bulb replacement ...................7-64
Front fog lamp .................................................................7-68
Headlamp and front fog lamp aiming (for Europe) ..7-68
Side repeater lamp replacement .................................7-74
Rear combination lamp bulb replacement ................7-74
High mounted stop lamp replacement .......................7-76
License plate light bulb replacement .........................7-76
Interior light bulb replacement ....................................7-77
Appearance care ..................................................7-78 Exterior care ....................................................................7-78
Interior care......................................................................7-82
Emission control system .....................................7-85 Crankcase emission control system ...........................7-85
Evaporative emission control system.........................7-85
Exhaust emission control system ...............................7-86
Page 475 of 523
7-63
7
Maintenance
LLIIGG HH TT BB UU LLBB SS
Consult an authorized HYUNDAI
dealer to replace most vehicle light
bulbs. It is difficult to replace vehicle
light bulbs because other parts of the
vehicle must be removed before you
can get to the bulb. This is especially
true for removing the headlamp
assembly to get to the bulb(s).
Removing/installing the headlamp
assembly can result in damage to
the vehicle. Be sure to replace the burned-out
bulb with one of the same wattage
rating. Otherwise, it may cause
damage to the fuse or electricalwiring system.
Information
After heavy driving rain or washing,
headlamp and tail lamp lenses could
appear frosty. This condition is caused
by the temperature difference between
the lamp inside and outside. This is
similar to the condensation on your
windows inside your vehicle when
raining and doesn’t indicate a problem
with your vehicle. If the water leaks
into the lamp bulb circuitry, we rec-
ommend that the system be checked
by an authorized HYUNDAI dealer. Information
The headlamp aiming should be adjust-
ed after an accident or after the head-
lamp assembly is reinstalled at an
authorized HYUNDAI dealer.
Information - Traffic Change
(for Europe)
The low beam light distribution is
asymmetric. If you go abroad to a coun-
try with opposite traffic direction, this
asymmetric part will dazzle oncoming
car driver. To prevent dazzle, ECE reg-
ulation demand several technical solu-
tions (ex. automatic change system,
adhesive sheet, down aiming). These
headlamps are designed not to dazzle
opposite drivers. So, you need not
change your headlamps in a country
with opposite traffic direction.
i
i
i
NOTICE
Prior to working on a light, firmly
apply the parking brake, ensure
that the ignition switch is in theLOCK/OFF position and turn off
the lights to avoid sudden move-
ment of the vehicle and burning
your fingers or receiving an elec-
tric shock.
WARNING
Page 476 of 523
7-64
Maintenance
Headlamp, Low beam assist –
Static, position lamp, turn sig-
nal lamp and daytime running
light bulb replacement
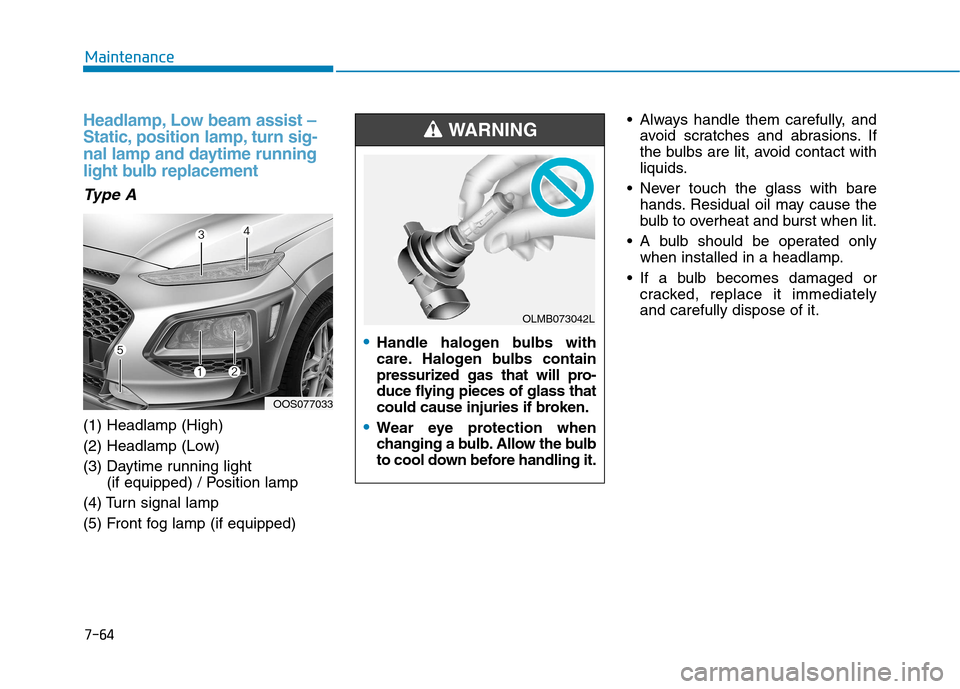
Type A
(1) Headlamp (High)
(2) Headlamp (Low)
(3) Daytime running light (if equipped) / Position lamp
(4) Turn signal lamp
(5) Front fog lamp (if equipped) Always handle them carefully, and
avoid scratches and abrasions. If
the bulbs are lit, avoid contact with
liquids.
Never touch the glass with bare hands. Residual oil may cause the
bulb to overheat and burst when lit.
A bulb should be operated only when installed in a headlamp.
If a bulb becomes damaged or cracked, replace it immediatelyand carefully dispose of it.
OOS077033
Handle halogen bulbs with
care. Halogen bulbs contain
pressurized gas that will pro-
duce flying pieces of glass that
could cause injuries if broken.
Wear eye protection when
changing a bulb. Allow the bulb
to cool down before handling it.
WARNING
OLMB073042L
Page 477 of 523
![Hyundai Kona 2018 Owners Manual 7-65
7
Maintenance
[1] : High beam, [2] : Low beam
Headlamp and position lamp
1. Open the hood.
2. Disconnect the negative batterycable.
3. Remove the bulb cover by turning it counterclockwise.
4. Di Hyundai Kona 2018 Owners Manual 7-65
7
Maintenance
[1] : High beam, [2] : Low beam
Headlamp and position lamp
1. Open the hood.
2. Disconnect the negative batterycable.
3. Remove the bulb cover by turning it counterclockwise.
4. Di](/manual-img/35/16231/w960_16231-476.png)
7-65
7
Maintenance
[1] : High beam, [2] : Low beam
Headlamp and position lamp
1. Open the hood.
2. Disconnect the negative batterycable.
3. Remove the bulb cover by turning it counterclockwise.
4. Disconnect the bulb socket-con- nector. (for low beam and high beam)
5. Remove the bulb from the head- lamp assembly.
6. Install a new bulb.
7. Connect the bulb socket-connec- tor. (for low beam and high beam)
8. Install the bulb cover by turning it clockwise.
Turn signal lamp
1. Open the hood.
2. Disconnect the negative batterycable.
3.Remove the socket (1) from the assembly by turning the socket
counterclockwise until the tabs on
the socket align with the slots on
the assembly.
4.Remove the bulb from the socket by pressing it in and rotating it
counterclockwise until the tabs on
the bulb align with the slots in the
socket. Pull the bulb out of the
socket. 5.Insert a new bulb by inserting it into
the socket and rotating it until it
locks into place.
6.Install the socket in the assembly by aligning the tabs on the socket
with the slots in the assembly.
7.Push the socket into the assembly and turn the socket clockwise.
Daytime running light
If the LED lamp does not operate, we
recommend you to have the vehicle
checked by an authorized HYUNDAI
dealer.OOS077038OOS077034
Page 478 of 523
7-66
Maintenance
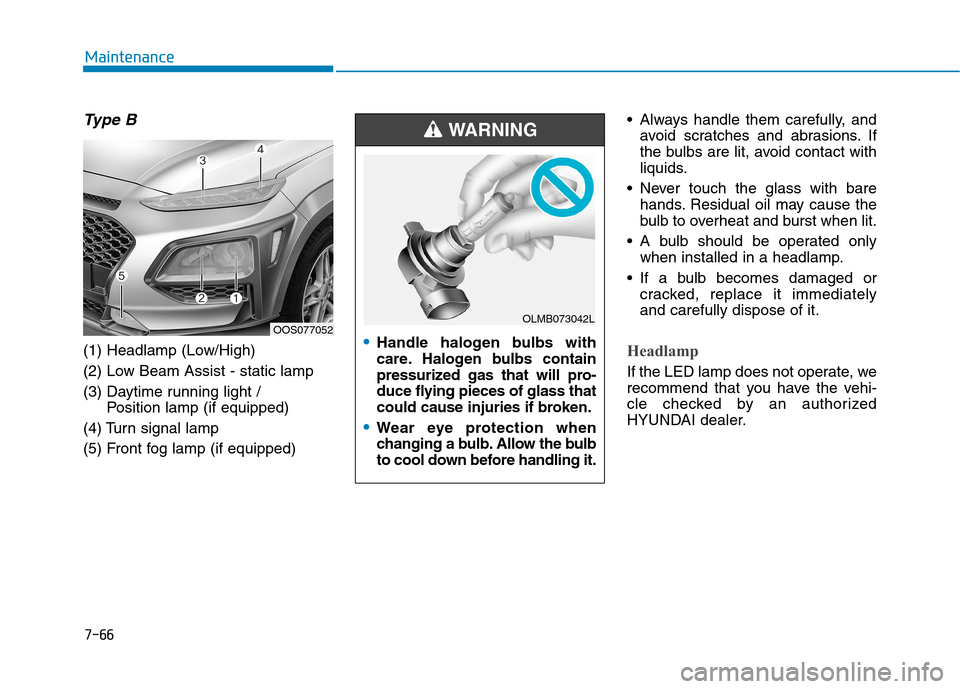
Type B
(1) Headlamp (Low/High)
(2) Low Beam Assist - static lamp
(3) Daytime running light / Position lamp (if equipped)
(4) Turn signal lamp
(5) Front fog lamp (if equipped) Always handle them carefully, and
avoid scratches and abrasions. If
the bulbs are lit, avoid contact with
liquids.
Never touch the glass with bare hands. Residual oil may cause the
bulb to overheat and burst when lit.
A bulb should be operated only when installed in a headlamp.
If a bulb becomes damaged or cracked, replace it immediatelyand carefully dispose of it.Headlamp
If the LED lamp does not operate, we
recommend that you have the vehi-
cle checked by an authorized
HYUNDAI dealer.
OOS077052Handle halogen bulbs with
care. Halogen bulbs contain
pressurized gas that will pro-
duce flying pieces of glass that
could cause injuries if broken.
Wear eye protection when
changing a bulb. Allow the bulb
to cool down before handling it.
WARNING
OLMB073042L