Page 441 of 523

7-29
7
Maintenance
CCLLIIMM AATTEE CC OO NNTTRR OO LL AA IIRR FF IILL TT EERR
Filter inspection
If the vehicle is operated in the
severely air-polluted cities or on dusty
rough roads for a long period, itshould be inspected more frequently
and replaced earlier. When you, the
owner, replace the climate control air
filter, replace it performing the follow-
ing procedure, and be careful to
avoid damaging other components. Replace the filter according to the
Maintenance Schedule.
Filter replacement
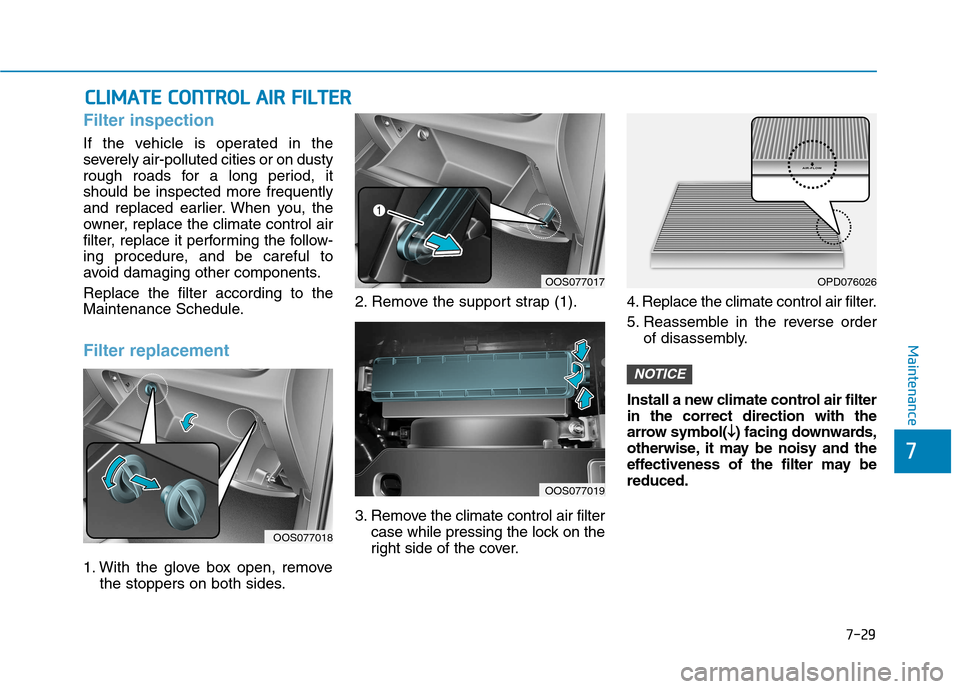
1. With the glove box open, remove
the stoppers on both sides. 2. Remove the support strap (1).
3. Remove the climate control air filter
case while pressing the lock on the
right side of the cover. 4. Replace the climate control air filter.
5. Reassemble in the reverse order
of disassembly.
Install a new climate control air filter in the correct direction with the
arrow symbol( �
�
) facing downwards,
otherwise, it may be noisy and the
effectiveness of the filter may bereduced.
NOTICE
OOS077018
OOS077017
OOS077019
OPD076026
Page 442 of 523

7-30
MaintenanceW
W IIPP EERR BB LLAA DDEESS
Blade inspection
Contamination of either the wind-
shield or the wiper blades with for-
eign matter can reduce the effective-
ness of the windshield wipers. Common sources of contamination
are insects, tree sap, and hot wax
treatments used by some commer-
cial car washes. If the blades are not
wiping properly, clean both the win-
dow and the blades with a good
cleaner or mild detergent, and rinse
thoroughly with clean water.
To prevent damage to the wiper
blades, arms or other compo-
nents, do not:
Use gasoline, kerosene, paint
thinner, or other solvents on or near them.
Attempt to move the wipers manually.
Use non-specified wiper blades.
Information
Commercial hot waxes applied by auto-
matic car washes have been known to
make the windshield difficult to clean. Information
Wiper blades are consumable item and
normal wear of the wipers may not be
covered by your vehicle warranty.
Blade replacement
When the wipers no longer clean
adequately, the blades may be worn
or cracked, and require replacement.
To prevent damage to the wiper arms
or other components, do not attempt
to move the wipers manually.
The use of a non-specified wiper
blade could result in wiper mal-
function and failure.
In order to prevent damage to the hood and the wiper arms, the
wiper arms should only be liftedwhen in the top wiping position.
Always return the wiper arms to the windshield before driving.
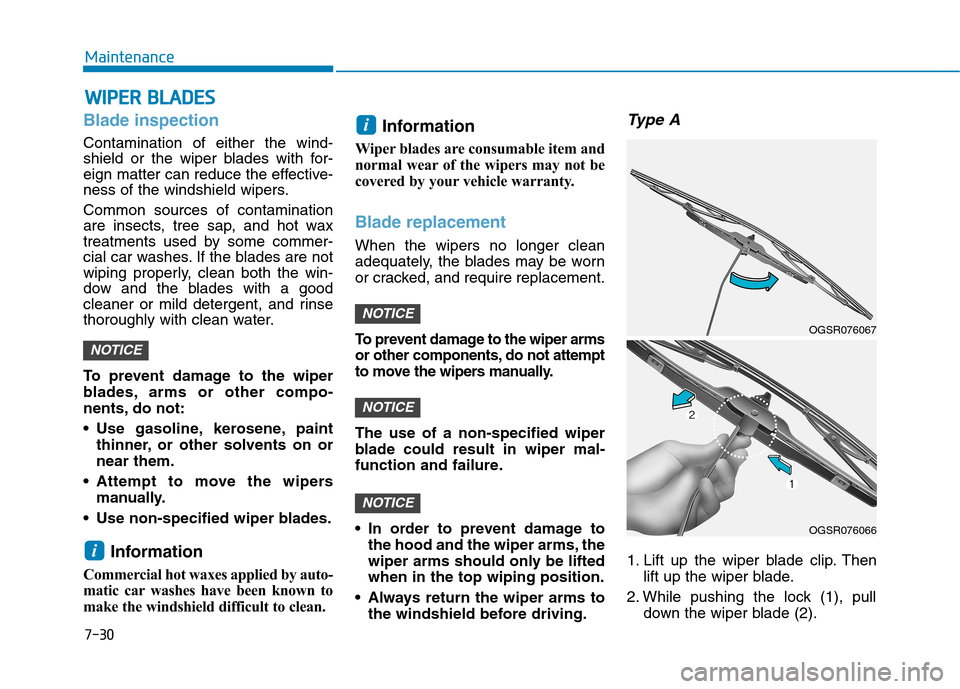
Type A
1. Lift up the wiper blade clip. Then lift up the wiper blade.
2. While pushing the lock (1), pull down the wiper blade (2).
NOTICE
NOTICE
NOTICE
i
i
NOTICE
OGSR076067
OGSR076066
Page 447 of 523

7-35
7
Maintenance
By jump starting
After a jump start from a good bat-
tery, drive the vehicle for 20-30 min-
utes before it is shutoff. The vehicle
may not restart if you shut it off
before the battery had a chance to
adequately recharge. See “Jump
Starting” in chapter 6 for more infor-
mation on jump starting procedures.Information An inappropriately disposedbattery can be harmful to
the environment and human
health.
Dispose of the battery according to
your local law(s) or regulations.
Reset items
The following items may need to be
reset after the battery has been dis-
charged or the battery has been dis-connected.
Auto up/down window
Sunroof
Trip computer
Climate control system
Driver position memory system
Clock
Audio system
i
AGM battery (if equipped)
Absorbent Glass Matt (AGM) batteries are maintenance-free and we recommend that
the AGM battery be serviced
by an authorized HYUNDAI
dealer. For charging your
AGM battery, use only fully
automatic battery chargers
that are specially developed
for AGM batteries.
When replacing the AGM bat-
tery, we recommend that you
use parts for replacement
from an authorized HYUNDAI
dealer.
Do not open or remove the
cap on top of the battery. This
may cause leaks of internal
electrolyte that could result in
severe injury.
CAUTION
Page 448 of 523

7-36
MaintenanceT
T IIRR EESS AA NN DD WW HHEEEELLSS
Tire care
For proper maintenance, safety, and
maximum fuel economy, you must
always maintain recommended tire
inflation pressures and stay within the
load limits and weight distribution rec-
ommended for your vehicle.
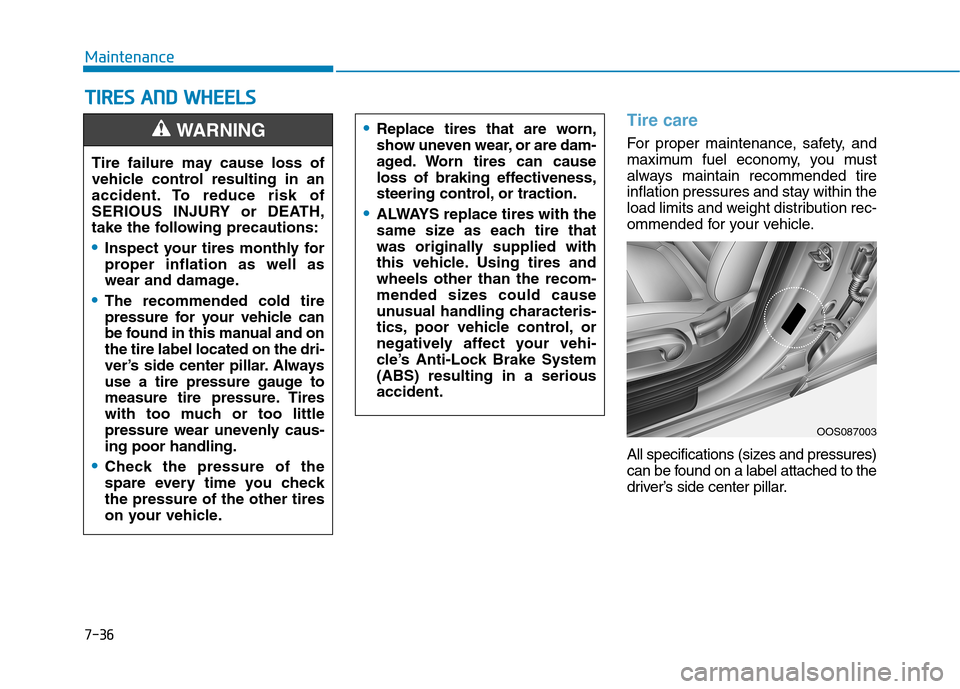
All specifications (sizes and pressures)
can be found on a label attached to the
driver’s side center pillar.Replace tires that are worn,
show uneven wear, or are dam-
aged. Worn tires can cause
loss of braking effectiveness,
steering control, or traction.
ALWAYS replace tires with the
same size as each tire that
was originally supplied with
this vehicle. Using tires andwheels other than the recom-
mended sizes could cause
unusual handling characteris-
tics, poor vehicle control, or
negatively affect your vehi-
cle’s Anti-Lock Brake System(ABS) resulting in a seriousaccident.
Tire failure may cause loss of
vehicle control resulting in an
accident. To reduce risk of
SERIOUS INJURY or DEATH,
take the following precautions:
Inspect your tires monthly for
proper inflation as well as
wear and damage.
The recommended cold tire
pressure for your vehicle can
be found in this manual and onthe tire label located on the dri-
ver’s side center pillar. Always
use a tire pressure gauge to
measure tire pressure. Tires
with too much or too little
pressure wear unevenly caus-ing poor handling.
Check the pressure of the
spare every time you checkthe pressure of the other tires
on your vehicle.
WARNING
OOS087003
Page 452 of 523

7-40
Maintenance
Tire replacement
If the tire is worn evenly, a tread wear indicator will appear as a solid band
across the tread. This shows there isless than 1.6 mm (1/16 in.) of tread
left on the tire. Replace the tire when
this happens.
Do not wait for the band to appear
across the entire tread before replac-
ing the tire.
OLMB073027
Tread wear indicatorTo reduce the risk of DEATH or
SERIOUS INJURY:
Replace tires that are worn,
show uneven wear, or are
damaged. Worn tires can
cause loss of braking effec-
tiveness, steering control, andtraction.
Always replace tires with the
same size as each tire that
was originally supplied with
this vehicle. Using tires andwheels other than the recom-
mended sizes could cause
unusual handling characteris-
tics, poor vehicle control, or
negatively affect your vehi-
cle’s Anti-Lock Brake System(ABS) resulting in a seriousaccident.
WARNING When replacing tires (or
wheels), it is recommended to
replace the two front or two
rear tires (or wheels) as a pair.Replacing just one tire can
seriously affect your vehicle’s
handling. If only replacing one
pair of tires, it is recommend-
ed to install the pair of new
tires on the rear axle.
Tires degrade over time, even
when they are not being used.
Regardless of the remaining
tread, HYUNDAI recommendsthat tires be replaced after six
(6) years of normal service.
Heat caused by hot climates or frequent high loading condi-
tions can accelerate the aging
process. Failure to follow this
warning may cause sudden
tire failure, which could lead to
a loss of vehicle control result-ing in an accident.
Page 460 of 523
7-48
Maintenance
Fuse switch
Always, place the fuse switch to the ON position.
If you move the switch to the OFF position, some items such as the
audio system and digital clock must
be reset and the smart key may not
work properly.Information
If the fuse switch is OFF, “Turn on
FUSE SWITCH” message will appear.
(if equipped)
Always place the fuse switch in the ON position while driving the
vehicle.
Do not move the transportation fuse switch repeatedly. The fuse
switch may be damaged.
Engine compartment panel fuse replacement
1. Turn the vehicle off.
2. Turn all other switches OFF.
3. Remove the fuse panel cover by pressing the tab and pulling up.
NOTICE
i
OOS077027OPDE046119
OOS077024
■Blade type fuse
OOS077025
■Cartridge type fuse
Page 465 of 523
7-53
7
Maintenance
Driver's side fuse Panel
Fuse NameSymbolFuse RatingCircuit Protected
START7.5ATransaxle Range Switch (A/T), Smart Key Control (With Smart Key),
ICM Relay Box (Burglar Alarm Relay), ECM
CLUSTERCLUSTER7.5AHead Up Display, Instrument Cluster
DR/LOCK20ADoor Lock Relay, Door Unlock Relay, ICM Relay Box (Dead Lock Relay)
PDM227.5AStart/Stop Button Switch, Immobilizer Module
FCA10AForward Collision Avoidance Assist Unit
S/HTR20AFront Seat Warmer Module, Front Air Ventilation Seat Module
A/CON220AA/C Control Module
A/CON17.5AA/C Control Module, E/R Junction Block (RLY.10)
PDM1115ASmart Key Control Module
SPARES pare10ASpare
A/BAG15ASRS Control Module
IG1IG125APCB Block (FUSE : F9, F10, F11, F12)
Page 466 of 523
7-54
Maintenance
Driver's side fuse Panel
Fuse NameSymbolFuse RatingCircuit Protected
MODULE2MODULE210AWiresess Charger Unit, Smart Key Control Module, BCM, Audio, A/V & Navigation Head Unit,
ICM Relay Box (Power Outlet Relay), Power Outside Mirror Switch, ISG DC-DC Convertor
Washe15AMuntifunction Switch
WiperLO/HI10ABCM
R/Wiper15ARear Wiper Relay, Rear Wiper Motor
F/WiperFRT25AFront Wiper Motor, PCM Block (Front Wiper (Low) Relay)
RR HTD10ADriver Power Outside Mirror, A/C Control Module, ECM
P/OUTLET1POWER
OUTLET
120APower Outlet
SPARES
pare15ASpare
HTD STRG15ABCM