Page 281 of 642
3-131
Convenient features of your vehicle
3
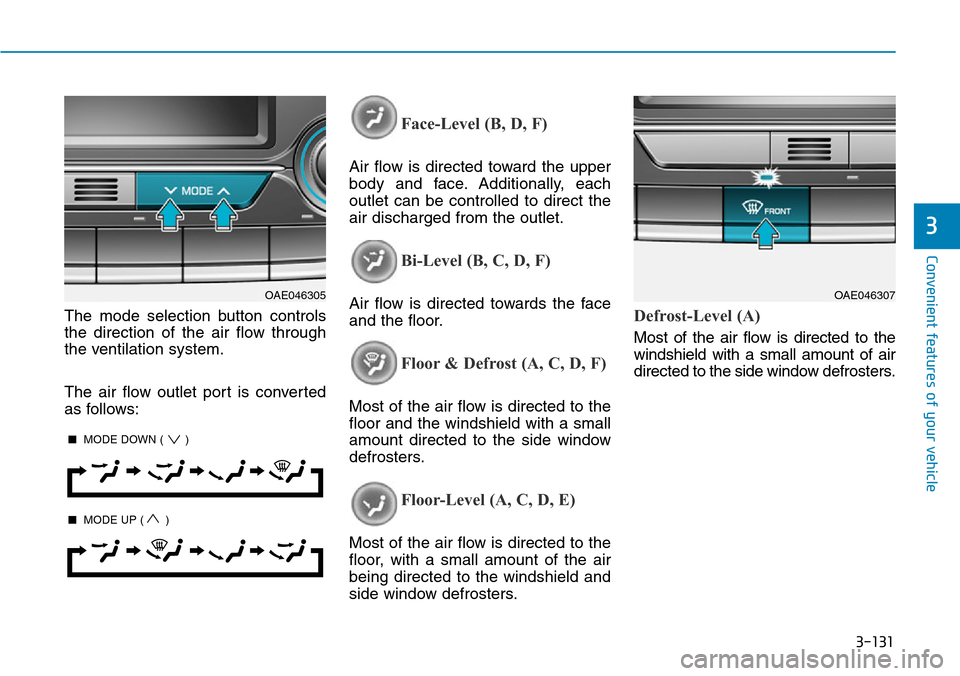
The mode selection button controls
the direction of the air flow through
the ventilation system.
The air flow outlet port is converted
as follows:
Face-Level (B, D, F)
Air flow is directed toward the upper
body and face. Additionally, each
outlet can be controlled to direct the
air discharged from the outlet.
Bi-Level (B, C, D, F)
Air flow is directed towards the face
and the floor.
Floor & Defrost (A, C, D, F)
Most of the air flow is directed to the
floor and the windshield with a small
amount directed to the side window
defrosters.
Floor-Level (A, C, D, E)
Most of the air flow is directed to the
floor, with a small amount of the air
being directed to the windshield and
side window defrosters.
Defrost-Level (A)
Most of the air flow is directed to the
windshield with a small amount of air
directed to the side window defrosters.
OAE046305OAE046307
■MODE DOWN ( )
■MODE UP ( )
Page 287 of 642
3-137
Convenient features of your vehicle
3
Information
• When using the air conditioning sys-
tem, monitor the temperature gauge
closely while driving up hills or in
heavy traffic when outside tempera-
tures are high. Air conditioning sys-
tem operation may cause engine
overheating. Continue to use the
fan but turn the air conditioning
system off if the temperature gauge
indicates engine overheating.
• When opening the windows in
humid weather, air conditioning
may create water droplets inside the
vehicle. Since excessive water
droplets may cause damage to elec-
trical equipment, air conditioning
should only be used with the win-
dows closed.
Air conditioning system operation
tips
• If the vehicle has been parked in
direct sunlight during hot weather,
open the windows for a short time
to let the hot air inside the vehicle
escape.
• Use air conditioning to reduce
humidity and moisture inside the
vehicle on rainy or humid days.
• During air conditioning system
operation, you may occasionally
notice a slight change in engine
speed as the air conditioning com-
pressor cycles. This is a normal
system operation characteristic.
• Use the air conditioning system
every month only for a few minutes
to ensure maximum system per-
formance.
• When using the air conditioning
system, you may notice clear water
dripping (or even puddling) on the
ground under the passenger side
of the vehicle. This is a normal sys-
tem operation characteristic.• Operating the air conditioning sys-
tem in the recirculated air position
provides maximum cooling, how-
ever, continual operation in this
mode may cause the air inside the
vehicle to become stale.
• During cooling operation, you may
occasionally notice a misty air flow
because of rapid cooling and
humid air intake. This is a normal
system operation characteristic.
i
Page 290 of 642

3-140
Convenient features of your vehicle
• For maximum defrosting, set the
temperature control to the extreme
right/hot position and the fan speed
control to the highest speed.
• If warm air to the floor is desired
while defrosting or defogging, set the
mode to the floor-defrost position.
• Before driving, clear all snow and
ice from the windshield, rear win-
dow, outside rear view mirrors, and
all side windows.
• Clear all snow and ice from the
hood and air inlet in the cowl grill to
improve heater and defroster effi-
ciency and to reduce the probabili-
ty of fogging up inside of the wind-
shield.
Automatic climate control system
To defog inside windshield
1. Select the desired fan speed.
2. Select the desired temperature.
3. Press the defroster button ( ).
4. The air-conditioning will turn on
according to the detected ambient
temperature, outside (fresh) air
position and higher fan speed will
be selected automatically.
If the air-conditioning, outside (fresh) air
position and higher fan speed are not
selected automatically, adjust the corre-
sponding button or knob manually.
If the position is selected, lower
fan speed is controlled to higher fan
speed.
WWINDSHIELD DEFROSTING AND DEFOGGING
Windshield heating
Do not use the or posi-
tion during cooling operation in
extremely humid weather. The
difference between the temper-
ature of the outside air and that
of the windshield could cause
the outer surface of the wind-
shield to fog up, causing loss of
visibility. In this case, set the
mode selection knob or button
to the position and fan
speed control knob or button to
lower speed.
WARNING
OAE046317
Page 292 of 642

3-142
Convenient features of your vehicle
When the Auto Defogging
System operates, the indi-
cator will illuminate.
If high levels of moisture are sensed
in the vehicle, the Auto Defogging
System will operate in the following
order:
Step 1 : Outside air position
Step 2 :Operating the air conditioning
Step 3 : Blowing air toward the wind-
shield
Step 4 : Increasing air flow toward
the windshield
If the air conditioning is off or recircu-
lated air position is manually selected
while Auto Defogging System is ON,
the Auto Defogging System Indicator
will blink 3 times to signal that the
manual operation has been canceled.
To cancel or reset the Auto Defogging
System
Press the front windshield defroster
button for 3 seconds when the igni-
tion switch is in the ON position.When the Auto Defogging System is
canceled, the ADS OFF symbol will
blink 3 times and ADS OFF will be
displayed on the climate control
information screen.
When the Auto Defogging System is
reset, the ADS OFF symbol will blink
6 times without a signal.
Information
• When the air conditioning is turned
on by Auto defogging system, if you
try to turn off the air conditioning, the
indicator will blink 3 times and the air
conditioning will not be turned off.
• For efficiency, do not select recircu-
lated air position while the Auto
defogging system is operating.
Do not remove the sensor cover
located on the upper end of the
windshield glass.
Damage to system parts could
occur and may not be covered by
your vehicle warranty.
Defroster
To prevent damage to the conduc-
tors bonded to the inside surface
of the rear window, never use sharp
instruments or window cleaners
containing abrasives to clean the
window.
Information
If you want to defrost and defog the
front windshield, refer to “Windshield
Defrosting and Defogging” in this
chapter.
i
NOTICE
NOTICE
i
Page 293 of 642
3-143
Convenient features of your vehicle
3
Rear window defroster
The defroster heats the window to
remove frost, fog and thin ice from
the interior and exterior of the rear
window, while the engine is running.
• To activate the rear window
defroster, press the rear window
defroster button located in the cen-
ter facia switch panel. The indicator
on the rear window defroster but-
ton illuminates when the defroster
is ON.
• To turn off the defroster, press the
rear window defroster button again.
Information
• If there is heavy accumulation of
snow on the rear window, brush it off
before operating the rear defroster.
• The rear window defroster automati-
cally turns off after approximately 20
minutes or when the Engine Start/Stop
button is in the OFF position.
i
OAE046301
Page 298 of 642

3-148
Convenient features of your vehicle
• Keep your drinks sealed while
driving to prevent spilling your
drink. If liquid spills, it may get
into the vehicle's electrical/elec-
tronic system and damage elec-
trical/electronic parts.
• When cleaning spilled liquids,
do not dry the cup holder using
hot temperatures. This may dam-
age the cup holder.
Sunvisor
To use a sunvisor, pull it downward.
To use a sunvisor for a side window,
pull it downward, unsnap it from the
bracket (1) and swing it to the side (2).
To use the vanity mirror, pull down the
sunvisor and slide the mirror cover (3).
Use the ticket holder (4) to hold tick-
ets.
Information
Close the vanity mirror cover securely
and return the sunvisor to its original
position after use.
Do not put several tickets in the
ticket holder at one time. This
could cause damage to the ticket
holder.
NOTICE
i
NOTICE
Keep cans or bottles out of
direct sun light and do not put
them in a hot vehicle. It may
explode.
WARNING
OAE046425
For your safety, do not block your
view when using the sunvisor.
WARNING
Page 324 of 642
![Hyundai Ioniq Hybrid 2018 Owners Manual 4-20
Multimedia System
Repeat play
Press the [Repeat] to enable or dis-
able ‘Repeat all’, ‘Repeat current
song’.
• Repeat all: All songs in the
playlist are repeated.
• Repeat current s](/manual-img/35/14929/w960_14929-323.png "Hyundai Ioniq Hybrid 2018 Owners Manual 4-20
Multimedia System
Repeat play
Press the [Repeat] to enable or dis-
able ‘Repeat all’, ‘Repeat current
song’.
• Repeat all: All songs in the
playlist are repeated.
• Repeat current s")
4-20
Multimedia System
Repeat play
Press the [Repeat] to enable or dis-
able ‘Repeat all’, ‘Repeat current
song’.
• Repeat all: All songs in the
playlist are repeated.
• Repeat current song: The song
that is currently playing is repeated.
Shuffle play
Press the [Shuffle] to enable/disable
‘Shuffle’ play.
• Shuffle: Songs are played in a
random order.
Menu
Press the [Menu] and select the
desired function.
• Information: Detailed information
on the song that is currently play-
ing is displayed.
• Sound Settings: Audio sound set-
tings can be changed
Information- Using MP3
Supported audio formats
File formats other than the formats
above may not be recognized or
playable. Information such as file-
name may not be displayed.
Range of supported compressed file
types
1. Bitrate range (Kbps)
BIT RATE(kbps)
MPEG1MPEG2MPEG2.5WMA
Layer3High Range
328848
40161664
48242480
56323296
644040128
804848160
965656192
1126464
1288080
1609696
192112112
224128128
256144144
320160160
NOTICE
File System
ISO 9660 Level 1
ISO 9660 Level 2
Romeo / Juliet (128 characters)
Compressed
audio formats
MPEG1 Audio Layer3
MPEG2 Audio Layer3
MPEG2.5 Audio Layer3
Windows Media Audio Ver 7.X
& 8.X
i
Page 343 of 642
![Hyundai Ioniq Hybrid 2018 Owners Manual 4-39
Multimedia System
4
Contacts
Select the [PHONE]button on the
audio system ➟Select [Contacts] ➟
Select letter (ABC) ➟Contacts dis-
played.
(1) Contacts: Display downloaded
contacts.
Connect](/manual-img/35/14929/w960_14929-342.png "Hyundai Ioniq Hybrid 2018 Owners Manual 4-39
Multimedia System
4
Contacts
Select the [PHONE]button on the
audio system ➟Select [Contacts] ➟
Select letter (ABC) ➟Contacts dis-
played.
(1) Contacts: Display downloaded
contacts.
Connect")
4-39
Multimedia System
4
Contacts
Select the [PHONE]button on the
audio system ➟Select [Contacts] ➟
Select letter (ABC) ➟Contacts dis-
played.
(1) Contacts: Display downloaded
contacts.
Connect a call when selected.
(2) Download: Download contacts from
connected Bluetooth
®devices.
Information
• Up to 2,000 contacts can be saved.
• In some cases, additional confirmation
from your Bluetooth
®device is neces-
sary when downloading contacts. If
downloading of contacts unsuccessful,
consult your Bluetooth
®device’s set-
tings or the audio screen to approve
the download.
• Contacts without phone numbers
are not displayed.
Dial
Select the [PHONE]button on the
audio ➟Select [Dial].
(1) Phone number entry window: The
phone number entered using the
keypad is displayed.
(2) Clear
- Press to delete individual digits.
- Press and hold to delete the
entire phone number.
(3) Keypad: Enter phone number.
(4) Bluetooth
®Phone name
- The name of the connected
Bluetooth
®device is displayed.
- Contacts matching the keypad
number/letter input aredisplayed.
i