2018 Hyundai Ioniq Electric ECO mode
[x] Cancel search: ECO modePage 220 of 541
4-3
Multimedia System
4
Roof antenna
The roof antenna receives both AM
and FM broadcast signals. Rotate
the roof antenna in a counterclock-
wise direction to remove it. Rotate it
in a clockwise direction to reinstall it.
Before entering a place with a lowheight clearance or a car wash,
remove the antenna by rotating it
counterclockwise. If not, the
antenna may be damaged.
When reinstalling your antenna, it is important that it is fully
tightened and adjusted to the
upright position to ensure prop-
er reception.
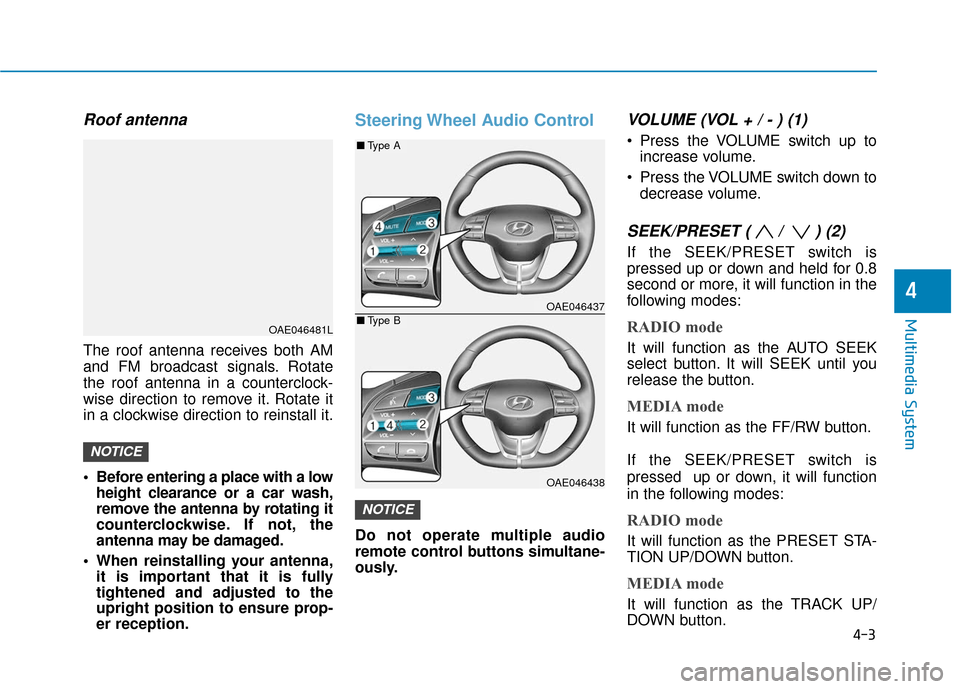
Steering Wheel Audio Control
Do not operate multiple audio
remote control buttons simultane-
ously.
VOLUME (VOL + / - ) (1)
Press the VOLUME switch up to
increase volume.
Press the VOLUME switch down to decrease volume.
SEEK/PRESET ( / ) (2)
If the SEEK/PRESET switch is
pressed up or down and held for 0.8
second or more, it will function in the
following modes:
RADIO mode
It will function as the AUTO SEEK
select button. It will SEEK until you
release the button.
MEDIA mode
It will function as the FF/RW button.
If the SEEK/PRESET switch is
pressed up or down, it will function
in the following modes:
RADIO mode
It will function as the PRESET STA-
TION UP/DOWN button.
MEDIA mode
It will function as the TRACK UP/
DOWN button.
NOTICE
NOTICE
OAE046481L
OAE046437
OAE046438
■ Type A
■Type B
Page 230 of 541
4-13
Multimedia System
4
Multimedia System
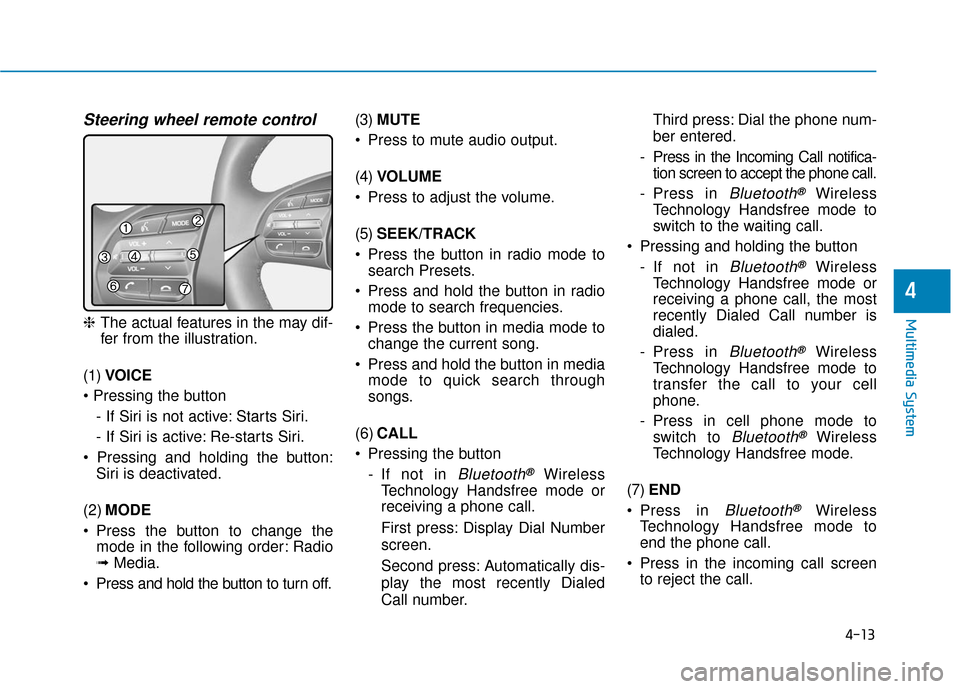
Steering wheel remote control
❈The actual features in the may dif-
fer from the illustration.
(1) VOICE
- If Siri is not active: Starts Siri.
- If Siri is active: Re-starts Siri.
Siri is deactivated.
(2) MODE
Press the button to change the mode in the following order: Radio
➟ Media.
Press and hold the button to turn off. (3)
MUTE
Press to mute audio output.
(4) VOLUME
Press to adjust the volume.
(5) SEEK/TRACK
Press the button in radio mode to search Presets.
Press and hold the button in radio mode to search frequencies.
Press the button in media mode to change the current song.
Press and hold the button in media mode to quick search through
songs.
(6) CALL
Pressing the button - If not in
Bluetooth®Wireless
Technology Handsfree mode or
receiving a phone call.
First press: Display Dial Number
screen.
Second press: Automatically dis-
play the most recently Dialed
Call number. Third press: Dial the phone num-
ber entered.
- Press in the Incoming Call notifica- tion screen to accept the phone call.
- Press in
Bluetooth®Wireless
Technology Handsfree mode to
switch to the waiting call.
Pressing and holding the button - If not in
Bluetooth®Wireless
Technology Handsfree mode or
receiving a phone call, the most
recently Dialed Call number is
dialed.
- Press in
Bluetooth®Wireless
Technology Handsfree mode to
transfer the call to your cell
phone.
- Press in cell phone mode to switch to
Bluetooth®Wireless
Technology Handsfree mode.
(7) END
Press in
Bluetooth®Wireless
Technology Handsfree mode to
end the phone call.
Press in the incoming call screen to reject the call.
Page 235 of 541
4-18
Multimedia System
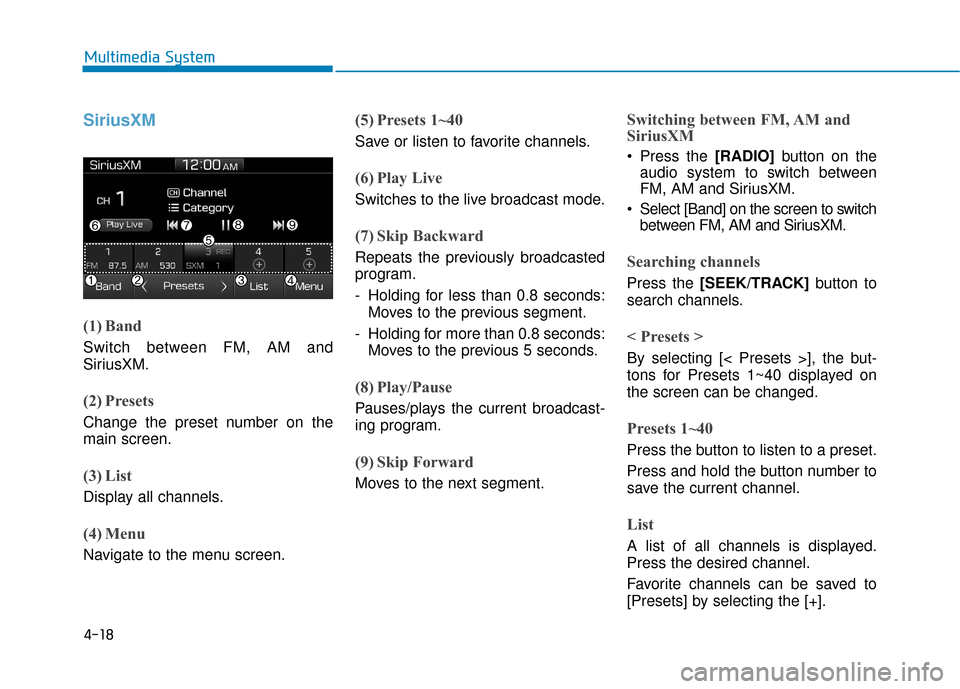
SiriusXM
(1) Band
Switch between FM, AM and
SiriusXM.
(2) Presets
Change the preset number on the
main screen.
(3) List
Display all channels.
(4) Menu
Navigate to the menu screen.
(5) Presets 1~40
Save or listen to favorite channels.
(6) Play Live
Switches to the live broadcast mode.
(7) Skip Backward
Repeats the previously broadcasted
program.
- Holding for less than 0.8 seconds:Moves to the previous segment.
- Holding for more than 0.8 seconds: Moves to the previous 5 seconds.
(8) Play/Pause
Pauses/plays the current broadcast-
ing program.
(9) Skip Forward
Moves to the next segment.
Switching between FM, AM and
SiriusXM
Press the [RADIO] button on the
audio system to switch between
FM, AM and SiriusXM.
Select [Band] on the screen to switch between FM, AM and SiriusXM.
Searching channels
Press the [SEEK/TRACK] button to
search channels.
< Presets >
By selecting [< Presets >], the but-
tons for Presets 1~40 displayed on
the screen can be changed.
Presets 1~40
Press the button to listen to a preset.
Press and hold the button number to
save the current channel.
List
A list of all channels is displayed.
Press the desired channel.
Favorite channels can be saved to
[Presets] by selecting the [+].
Page 241 of 541
![Hyundai Ioniq Electric 2018 Owners Manual 4-24
Multimedia System
(4) Save: Save the selected file(s)
.
- Select the files you want to save, and select [Save]. This saves the
selected files to My Music.
- Saving is canceled if phone calls are Hyundai Ioniq Electric 2018 Owners Manual 4-24
Multimedia System
(4) Save: Save the selected file(s)
.
- Select the files you want to save, and select [Save]. This saves the
selected files to My Music.
- Saving is canceled if phone calls are](/manual-img/35/14904/w960_14904-240.png)
4-24
Multimedia System
(4) Save: Save the selected file(s)
.
- Select the files you want to save, and select [Save]. This saves the
selected files to My Music.
- Saving is canceled if phone calls are received or made while saving.
- If Siri is activated, phone calls are received or made while sav-
ing, saving will be canceled.
- Up to 6,000 files can be saved.
- The currently playing file on the USB device cannot be changed
while saving.
- My Music cannot be used while saving.
- Up to 700 MB can be saved.
Information: Detailed information on the currently playing song is dis-
played.
Sound Settings: Audio sound set- tings can be changed.Information
-
Using the iPod®Devices
• To use the audio system’s iPod
®con-
trol function, use the dedicated
cable provided with your iPod
®.
• Connecting the iPod
®to the vehicle
during play may result in a loud
noise that lasts about one to two sec-
onds. Connect the iPod
®to the vehi-
cle after stopping or pausing play.
• Connect the iPod
®with the vehicle in
the ACC ON state to begin charging.
• When connecting the iPod
®cable,
be sure to fully push the cable into
the port.
• When EQ effects are enabled simul- taneously on external devices, such
as iPod
®s and the audio system, the
EQ effects may overlap, causing
sound quality deterioration or dis-
tortion. Deactivate the EQ function
for all external devices, if possible.
• Noise may occur when your iPod
®
or the AUX port is connected.
Disconnect and store separately
when not in use. (Continued)(Continued)
• There may be noise if the audio sys-
tem is used with an iPod
®or AUX
external device connected to the
power jack. In these cases, discon-
nect the iPod
®or external device
from the power jack.
• Play may be interrupted, or device malfunctions may occur depending
on the characteristics of your
iPod
®/iPhone®.
• Play may fail if your iPhone
®is con-
nected through both Bluetooth®
Wireless Technology and USB. In
this case, select Dock connector or
Bluetooth
®Wireless Technology on
your iPhone®to change the sound
output settings.
• If your software version does not support the communication proto-
col or your iPod
®is not recognized
due to device failure, anomalies or
defects, iPod
®mode cannot be used.
• iPod
®nano (5th generation) devices
may not be recognized if the battery
is low. Charge sufficiently before use.
(Continued)
i
Page 242 of 541
4-25
Multimedia System
4
(Continued)
• The search and song play order inthe iPod
®device may be different
from the search order in the audio
system.
• If the iPod
®has failed due to an
internal defect, please reset the
iPod
®(consult your iPod®manual).
• Depending on the software version, the iPod
®may fail to sync with the
system. If the media is removed or
disconnected before recognition, the
previous mode may not be restored
(iPad
®cannot be charged).
• Cables other than the 1-meter cable provided with iPod
®/iPhone®prod-
ucts may not be recognized.
• When other music apps are used on your iPod
®, the system sync func-
tion may fail due to malfunction of
the iPod
®application.
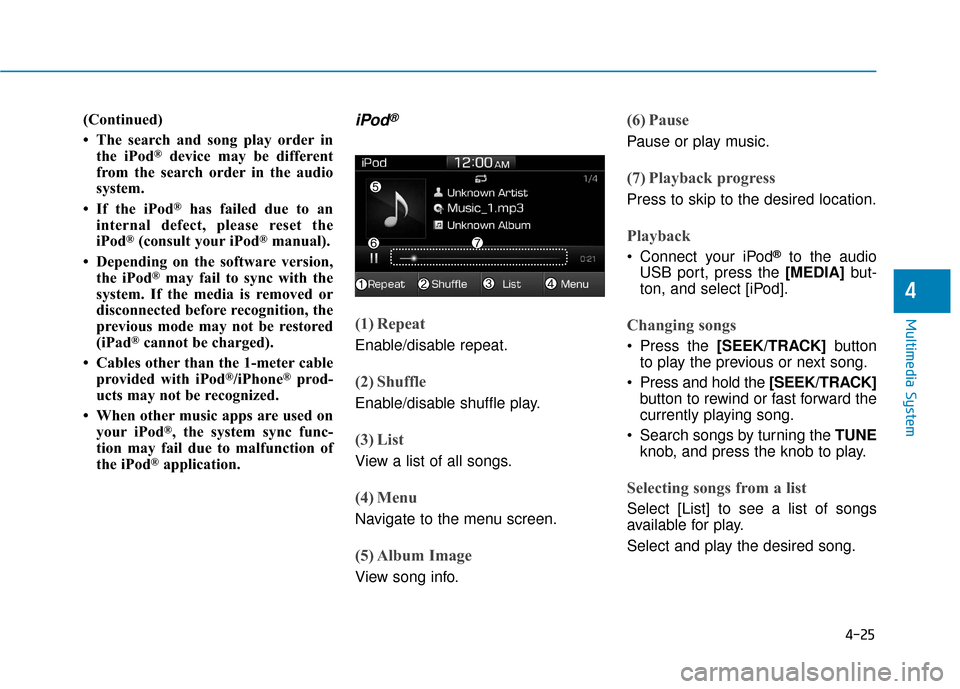
iPod®
(1) Repeat
Enable/disable repeat.
(2) Shuffle
Enable/disable shuffle play.
(3) List
View a list of all songs.
(4) Menu
Navigate to the menu screen.
(5) Album Image
View song info.
(6) Pause
Pause or play music.
(7) Playback progress
Press to skip to the desired location.
Playback
Connect your iPod®to the audio
USB port, press the [MEDIA] but-
ton, and select [iPod].
Changing songs
Press the [SEEK/TRACK] button
to play the previous or next song.
Press and hold the [SEEK/TRACK] button to rewind or fast forward the
currently playing song.
Search songs by turning the TUNE knob, and press the knob to play.
Selecting songs from a list
Select [List] to see a list of songs
available for play.
Select and play the desired song.
Page 269 of 541
5-8
Driving your vehicle
Starting the VehicleInformation
• The vehicle will start by pressing the
POWER button, only when the
smart key is in the vehicle.
• Even if the smart key is in the vehi- cle, and when it is far away from the
driver, the vehicle may not start.
• When the POWER button is in the ACC or ON position, any door is
open, the system checks for the
smart key. When the smart key is
not in the vehicle, the " " indica-
tor will blink and the warning "Key
not in vehicle" will come on. When
all doors are closed, the chime will
also sound for about 5 seconds.
Keep the smart key in the vehicle
when in the ACC position or if the
vehicle is in the ready ( ) mode. 1. Always carry the smart key with
you.
2. Make sure the parking brake is applied.
3. Make sure the gear is in P (Park).
4. Depress the brake pedal.
5. Press the POWER button. If the vehicle starts, the " " indicator
will come on.
Information
• Always start the vehicle with yourfoot on the brake pedal.
• If ambient temperature is low, the " " indicator may remain illumi-
nated longer than the normal amount
of time.
i
i
Always wear appropriate shoes
when operating your vehicle.
Unsuitable shoes, such as high
heels, ski boots, sandals, flip-
flops, etc., may interfere with
your ability to use the brake
and accelerator pedals.
Do not start the vehicle with the
accelerator pedal depressed.
The vehicle can move and
lead to an accident.
WARNING
Page 280 of 541
5-19
Driving your vehicle
5
However, if the EPB switch is
pressed within 1 second after the
vehicle is turned off, the EPB will not
be applied.Releasing the parking brake
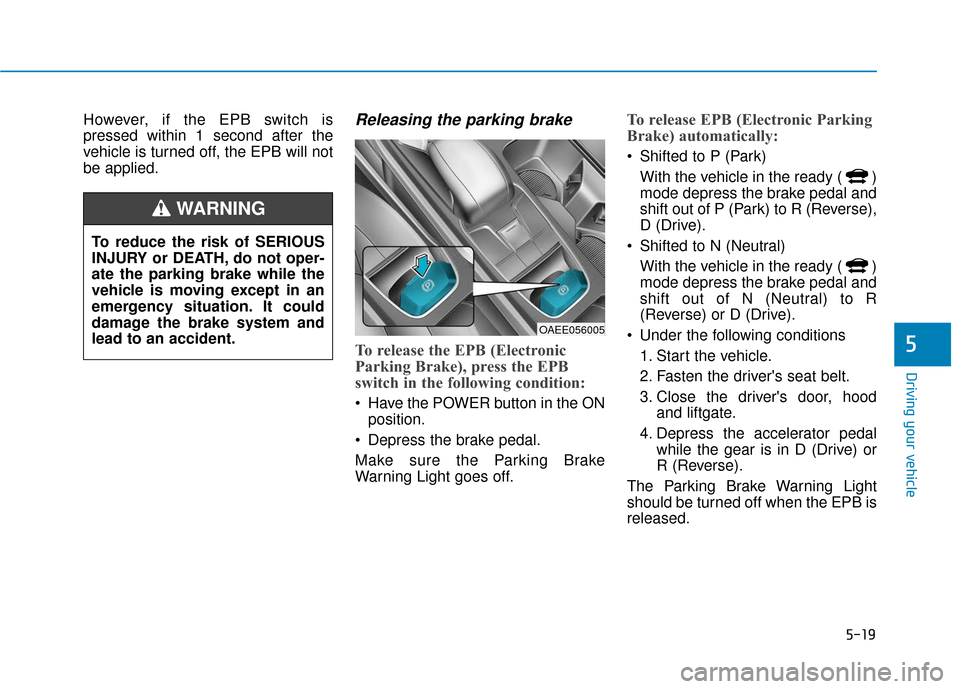
To release the EPB (Electronic
Parking Brake), press the EPB
switch in the following condition:
Have the POWER button in the ONposition.
Depress the brake pedal.
Make sure the Parking Brake
Warning Light goes off.
To release EPB (Electronic Parking
Brake) automatically:
Shifted to P (Park) With the vehicle in the ready ( )
mode depress the brake pedal and
shift out of P (Park) to R (Reverse),
D (Drive).
Shifted to N (Neutral) With the vehicle in the ready ( )
mode depress the brake pedal and
shift out of N (Neutral) to R
(Reverse) or D (Drive).
Under the following conditions 1. Start the vehicle.
2. Fasten the driver's seat belt.
3. Close the driver's door, hood and liftgate.
4. Depress the accelerator pedal while the gear is in D (Drive) or
R (Reverse).
The Parking Brake Warning Light
should be turned off when the EPB is
released.
To reduce the risk of SERIOUS
INJURY or DEATH, do not oper-
ate the parking brake while the
vehicle is moving except in an
emergency situation. It could
damage the brake system and
lead to an accident.
WARNING
OAEE056005
Page 289 of 541
5-28
Driving your vehicle
ABS is an electronic braking system
that helps prevent a braking skid.
ABS allows the driver to steer and
brake at the same time.
Using ABS
To obtain the maximum benefit from
your ABS in an emergency situation,
do not attempt to modulate your
brake pressure and do not try to
pump your brakes. Depress your
brake pedal as hard as possible.
When you apply your brakes under
conditions which may lock the
wheels, you may hear sounds from
the brakes, or feel a corresponding
sensation in the brake pedal. This is
normal and it means your ABS is
active.
ABS does not reduce the time or dis-
tance it takes to stop the vehicle.
Always maintain a safe distance from
the vehicle in front of you.
ABS will not prevent a skid that
results from sudden changes in
direction, such as trying to take a
corner too fast or making a sudden
lane change. Always drive at a safe
speed for the road and weather con-
ditions. ABS cannot prevent a loss of stabili-
ty. Always steer moderately when
braking hard. Severe or sharp steer-
ing wheel movement can still cause
your vehicle to veer into oncoming
traffic or off the road.
On loose or uneven road surfaces,
operation of the anti-lock brake sys-
tem may result in a longer stopping
distance than for vehicles equipped
with a conventional brake system.
The ABS warning light ( ) will stay
on for several seconds after the
POWER button is in the ON position.
During that time, the ABS will go
through self-diagnosis and the light
will go off if everything is normal. If
the light stays on, you may have a
problem with your ABS. Contact an
authorized HYUNDAI dealer as soon
as possible.(Continued)
On roads where the road sur-
face is pitted or has different
surface height.
Tire chains are installed on
your vehicle.
The safety features of an ABS
or ESC equipped vehicle should
not be tested by high speed
driving or cornering. This could
endanger the safety of yourself
or others.