2018 HYUNDAI I10 lock
[x] Cancel search: lockPage 28 of 343
Safety system of your vehicle
12 3
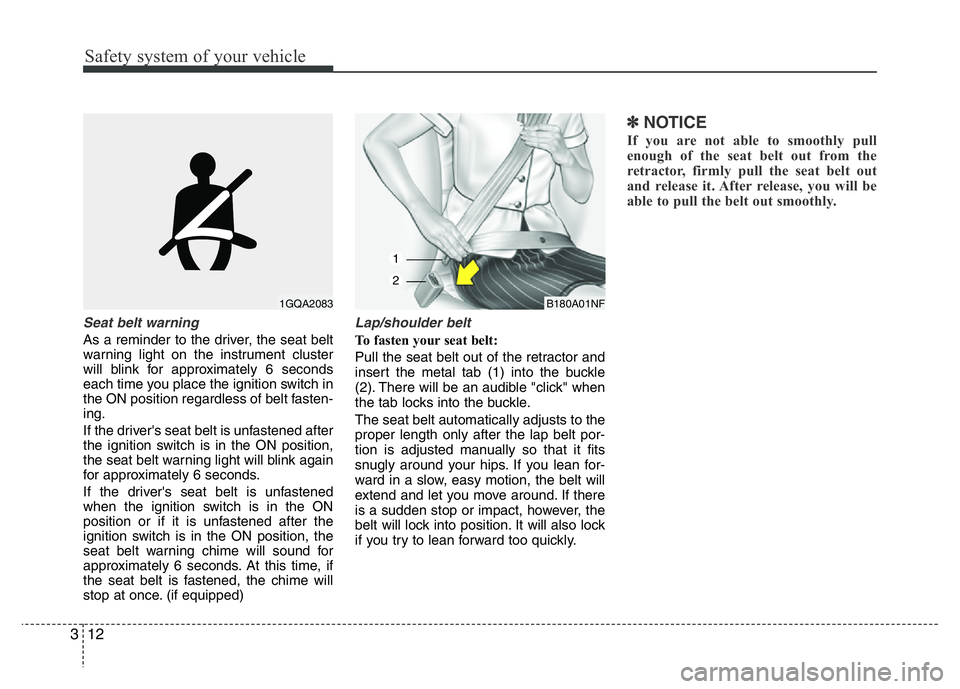
Seat belt warning
As a reminder to the driver, the seat belt
warning light on the instrument cluster
will blink for approximately 6 seconds
each time you place the ignition switch in
the ON position regardless of belt fasten-
ing.
If the driver's seat belt is unfastened after
the ignition switch is in the ON position,
the seat belt warning light will blink again
for approximately 6 seconds.
If the driver's seat belt is unfastened
when the ignition switch is in the ON
position or if it is unfastened after the
ignition switch is in the ON position, the
seat belt warning chime will sound for
approximately 6 seconds. At this time, if
the seat belt is fastened, the chime will
stop at once. (if equipped)
Lap/shoulder belt
To fasten your seat belt:
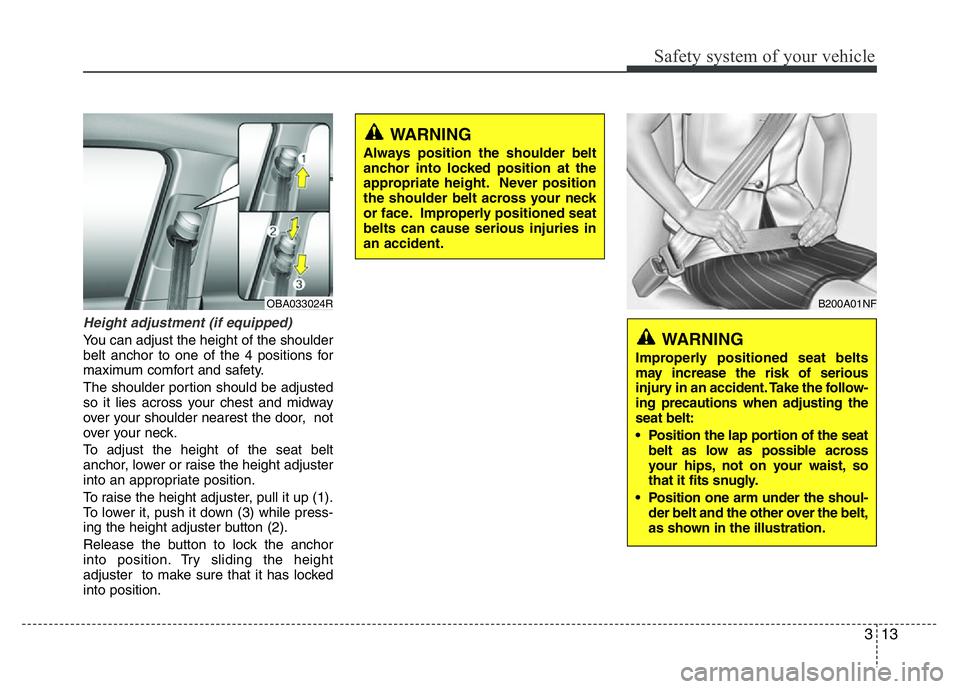
Pull the seat belt out of the retractor and
insert the metal tab (1) into the buckle
(2). There will be an audible "click" when
the tab locks into the buckle.
The seat belt automatically adjusts to the
proper length only after the lap belt por-
tion is adjusted manually so that it fits
snugly around your hips. If you lean for-
ward in a slow, easy motion, the belt will
extend and let you move around. If there
is a sudden stop or impact, however, the
belt will lock into position. It will also lock
if you try to lean forward too quickly.
✽NOTICE
If you are not able to smoothly pull
enough of the seat belt out from the
retractor, firmly pull the seat belt out
and release it. After release, you will be
able to pull the belt out smoothly.
1GQA2083B180A01NF
1
2
Page 29 of 343
313
Safety system of your vehicle
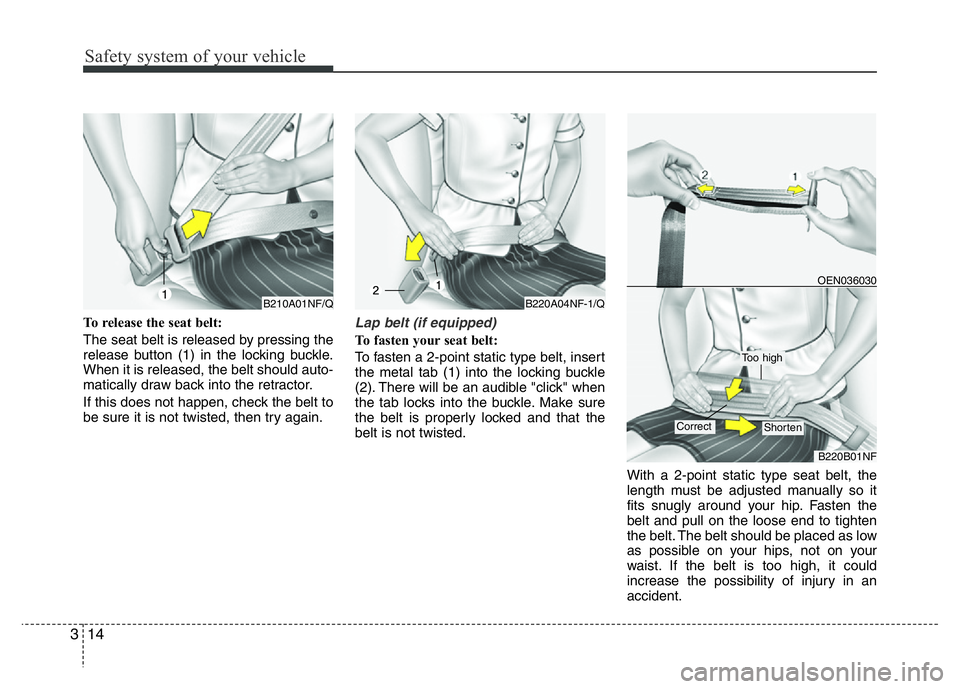
Height adjustment (if equipped)
You can adjust the height of the shoulder
belt anchor to one of the 4 positions for
maximum comfort and safety.
The shoulder portion should be adjusted
so it lies across your chest and midway
over your shoulder nearest the door, not
over your neck.
To adjust the height of the seat belt
anchor, lower or raise the height adjuster
into an appropriate position.
To raise the height adjuster, pull it up (1).
To lower it, push it down (3) while press-
ing the height adjuster button (2).
Release the button to lock the anchor
into position. Try sliding the height
adjuster to make sure that it has locked
into position.
WARNING
Always position the shoulder belt
anchor into locked position at the
appropriate height. Never position
the shoulder belt across your neck
or face. Improperly positioned seat
belts can cause serious injuries in
an accident.
B200A01NF
WARNING
Improperly positioned seat belts
may increase the risk of serious
injury in an accident. Take the follow-
ing precautions when adjusting the
seat belt:
• Position the lap portion of the seat
belt as low as possible across
your hips, not on your waist, so
that it fits snugly.
• Position one arm under the shoul-
der belt and the other over the belt,
as shown in the illustration.
OBA033024R
Page 30 of 343
Safety system of your vehicle
14 3
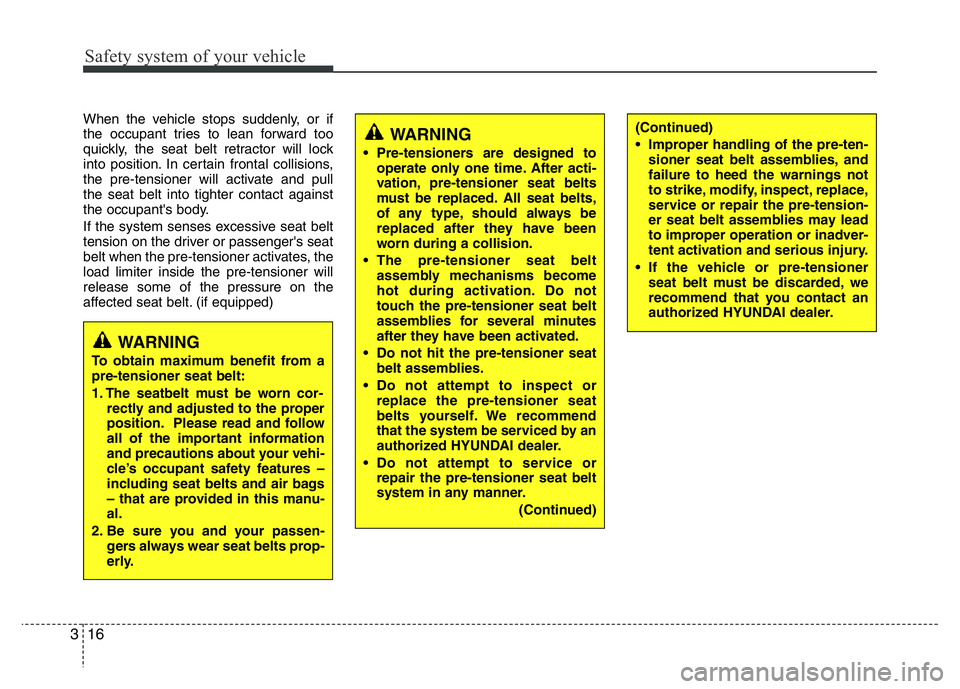
To release the seat belt:
The seat belt is released by pressing the
release button (1) in the locking buckle.
When it is released, the belt should auto-
matically draw back into the retractor.
If this does not happen, check the belt to
be sure it is not twisted, then try again.Lap belt (if equipped)
To fasten your seat belt:
To fasten a 2-point static type belt, insert
the metal tab (1) into the locking buckle
(2). There will be an audible "click" when
the tab locks into the buckle. Make sure
the belt is properly locked and that the
belt is not twisted.
With a 2-point static type seat belt, the
length must be adjusted manually so it
fits snugly around your hip. Fasten the
belt and pull on the loose end to tighten
the belt. The belt should be placed as low
as possible on your hips, not on your
waist. If the belt is too high, it could
increase the possibility of injury in an
accident.
B210A01NF/Q1B220A04NF-1/Q
OEN036030
B220B01NF
Too high
ShortenCorrect
Page 32 of 343
Safety system of your vehicle
16 3
When the vehicle stops suddenly, or if
the occupant tries to lean forward too
quickly, the seat belt retractor will lock
into position. In certain frontal collisions,
the pre-tensioner will activate and pull
the seat belt into tighter contact against
the occupant's body.
If the system senses excessive seat belt
tension on the driver or passenger's seat
belt when the pre-tensioner activates, the
load limiter inside the pre-tensioner will
release some of the pressure on the
affected seat belt. (if equipped)(Continued)
• Improper handling of the pre-ten-
sioner seat belt assemblies, and
failure to heed the warnings not
to strike, modify, inspect, replace,
service or repair the pre-tension-
er seat belt assemblies may lead
to improper operation or inadver-
tent activation and serious injury.
• If the vehicle or pre-tensioner
seat belt must be discarded, we
recommend that you contact an
authorized HYUNDAI dealer.WARNING
• Pre-tensioners are designed to
operate only one time. After acti-
vation, pre-tensioner seat belts
must be replaced. All seat belts,
of any type, should always be
replaced after they have been
worn during a collision.
• The pre-tensioner seat belt
assembly mechanisms become
hot during activation. Do not
touch the pre-tensioner seat belt
assemblies for several minutes
after they have been activated.
• Do not hit the pre-tensioner seat
belt assemblies.
• Do not attempt to inspect or
replace the pre-tensioner seat
belts yourself. We recommend
that the system be serviced by an
authorized HYUNDAI dealer.
• Do not attempt to service or
repair the pre-tensioner seat belt
system in any manner.
(Continued)
WARNING
To obtain maximum benefit from a
pre-tensioner seat belt:
1. The seatbelt must be worn cor-
rectly and adjusted to the proper
position. Please read and follow
all of the important information
and precautions about your vehi-
cle’s occupant safety features –
including seat belts and air bags
– that are provided in this manu-
al.
2. Be sure you and your passen-
gers always wear seat belts prop-
erly.
Page 62 of 343
Features of your vehicle
KEYS . . . . . . . . . . . . . . . . . . . . . . . . . . . . . . . . . . . . . 4-3
• Record your key number . . . . . . . . . . . . . . . . . . . . . . . 4-3
• Key operations . . . . . . . . . . . . . . . . . . . . . . . . . . . . . . . . 4-3
• Immobilizer system . . . . . . . . . . . . . . . . . . . . . . . . . . . . 4-4
REMOTE KEYLESS ENTRY . . . . . . . . . . . . . . . . 4-7
• Remote keyless entry system operations . . . . . . . . . . . 4-7
• Battery replacement . . . . . . . . . . . . . . . . . . . . . . . . . . . 4-9
SMART KEY . . . . . . . . . . . . . . . . . . . . . . . . . . . . . 4-11
• Smart key function . . . . . . . . . . . . . . . . . . . . . . . . . . . 4-11
• Door lock/unlock in an emergency situation . . . . . . 4-13
THEFT-ALARM SYSTEM . . . . . . . . . . . . . . . . . . 4-14
• Armed stage . . . . . . . . . . . . . . . . . . . . . . . . . . . . . . . . . 4-14
• Theft-alarm stage . . . . . . . . . . . . . . . . . . . . . . . . . . . . 4-15
• Disarmed stage. . . . . . . . . . . . . . . . . . . . . . . . . . . . . . . 4-15
DOOR LOCKS . . . . . . . . . . . . . . . . . . . . . . . . . . . 4-16
• From outside the vehicle . . . . . . . . . . . . . . . . . . . . . . 4-16
• From inside the vehicle . . . . . . . . . . . . . . . . . . . . . . . . 4-17
• Impact sensing door unlock system . . . . . . . . . . . . . . 4-20
• Speed sensing door lock system . . . . . . . . . . . . . . . . . 4-20
• Child-protector rear door lock . . . . . . . . . . . . . . . . . 4-20
TRUNK . . . . . . . . . . . . . . . . . . . . . . . . . . . . . . . . . . 4-21
• Opening the trunk . . . . . . . . . . . . . . . . . . . . . . . . . . . . 4-21
• Closing the trunk . . . . . . . . . . . . . . . . . . . . . . . . . . . . . 4-22
TAILGATE . . . . . . . . . . . . . . . . . . . . . . . . . . . . . . . 4-23
• Opening the tailgate . . . . . . . . . . . . . . . . . . . . . . . . . . 4-23
• Closing the tailgate . . . . . . . . . . . . . . . . . . . . . . . . . . . 4-23
WINDOWS . . . . . . . . . . . . . . . . . . . . . . . . . . . . . . 4-24
• Power windows . . . . . . . . . . . . . . . . . . . . . . . . . . . . . . 4-26
• Manual windows . . . . . . . . . . . . . . . . . . . . . . . . . . . . . 4-29
HOOD . . . . . . . . . . . . . . . . . . . . . . . . . . . . . . . . . . . 4-30
• Opening the hood . . . . . . . . . . . . . . . . . . . . . . . . . . . . 4-30
• Closing the hood . . . . . . . . . . . . . . . . . . . . . . . . . . . . . 4-31
FUEL FILLER LID . . . . . . . . . . . . . . . . . . . . . . . 4-32
• Opening the fuel filler lid . . . . . . . . . . . . . . . . . . . . . . 4-32
• Closing the fuel filler lid . . . . . . . . . . . . . . . . . . . . . . . 4-33
STEERING WHEEL . . . . . . . . . . . . . . . . . . . . . . . 4-35
• Electric power steering . . . . . . . . . . . . . . . . . . . . . . . . 4-35
• Horn . . . . . . . . . . . . . . . . . . . . . . . . . . . . . . . . . . . . . . . 4-36
MIRRORS . . . . . . . . . . . . . . . . . . . . . . . . . . . . . . . 4-37
• Inside rearview mirror . . . . . . . . . . . . . . . . . . . . . . . . 4-37
• Outside rearview mirror . . . . . . . . . . . . . . . . . . . . . . 4-37
INSTRUMENT CLUSTER . . . . . . . . . . . . . . . . . . 4-41
• Gauges . . . . . . . . . . . . . . . . . . . . . . . . . . . . . . . . . . . . . 4-42
• Warnings and indicators. . . . . . . . . . . . . . . . . . . . . . . 4-48
HAZARD WARNING FLASHER . . . . . . . . . . . . 4-58
4
Page 64 of 343
43
Features of your vehicle
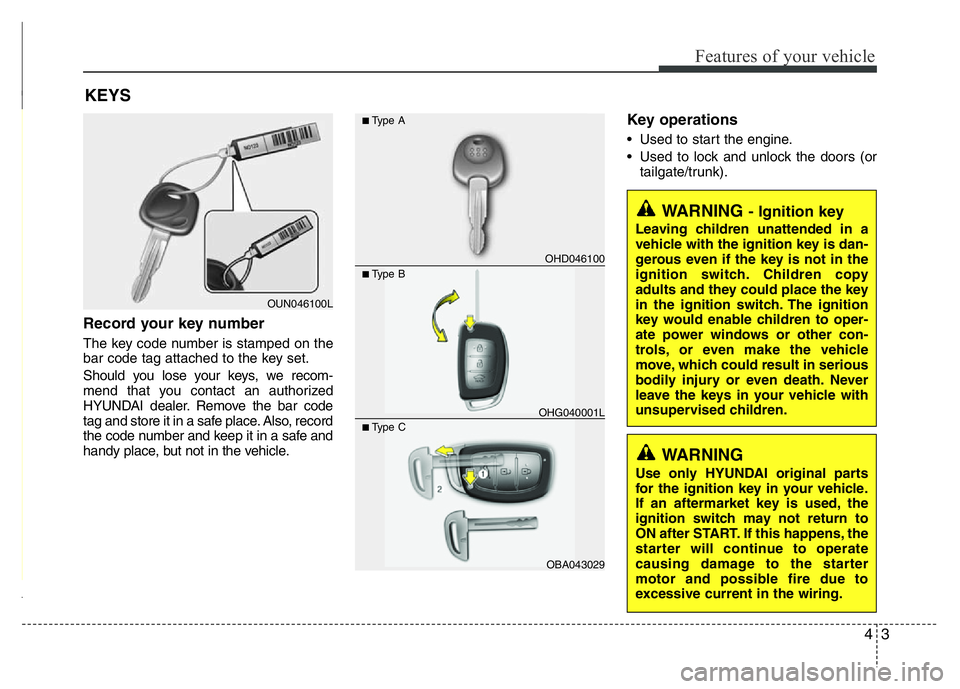
Record your key number
The key code number is stamped on the
bar code tag attached to the key set.
Should you lose your keys, we recom-
mend that you contact an authorized
HYUNDAI dealer. Remove the bar code
tag and store it in a safe place. Also, record
the code number and keep it in a safe and
handy place, but not in the vehicle.
Key operations
• Used to start the engine.
• Used to lock and unlock the doors (or
tailgate/trunk).
KEYS
WARNING - Ignition key
Leaving children unattended in a
vehicle with the ignition key is dan-
gerous even if the key is not in the
ignition switch. Children copy
adults and they could place the key
in the ignition switch. The ignition
key would enable children to oper-
ate power windows or other con-
trols, or even make the vehicle
move, which could result in serious
bodily injury or even death. Never
leave the keys in your vehicle with
unsupervised children.
OUN046100L
WARNING
Use only HYUNDAI original parts
for the ignition key in your vehicle.
If an aftermarket key is used, the
ignition switch may not return to
ON after START. If this happens, the
starter will continue to operate
causing damage to the starter
motor and possible fire due to
excessive current in the wiring.
OHD046100
■Type A
■Type B
OBA043029
■Type COHG040001L
Page 68 of 343
47
Features of your vehicle
Remote keyless entry system
operations
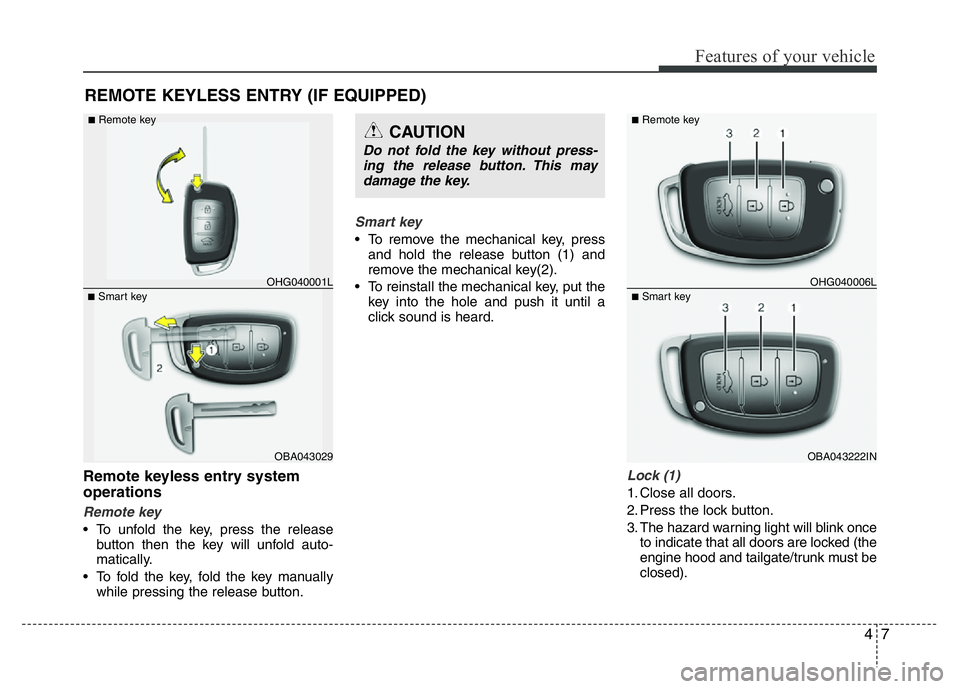
Remote key
• To unfold the key, press the release
button then the key will unfold auto-
matically.
• To fold the key, fold the key manually
while pressing the release button.
Smart key
• To remove the mechanical key, press
and hold the release button (1) and
remove the mechanical key(2).
• To reinstall the mechanical key, put the
key into the hole and push it until a
click sound is heard.
Lock (1)
1. Close all doors.
2. Press the lock button.
3. The hazard warning light will blink once
to indicate that all doors are locked (the
engine hood and tailgate/trunk must be
closed).
REMOTE KEYLESS ENTRY (IF EQUIPPED)
OBA043029
■Smart keyOHG040001L
■Remote keyCAUTION
Do not fold the key without press-
ing the release button. This may
damage the key.
OBA043222IN
■Smart keyOHG040006L
■Remote key
Page 69 of 343
Features of your vehicle
8 4
✽NOTICE
The doors will not lock if a door is
opened.
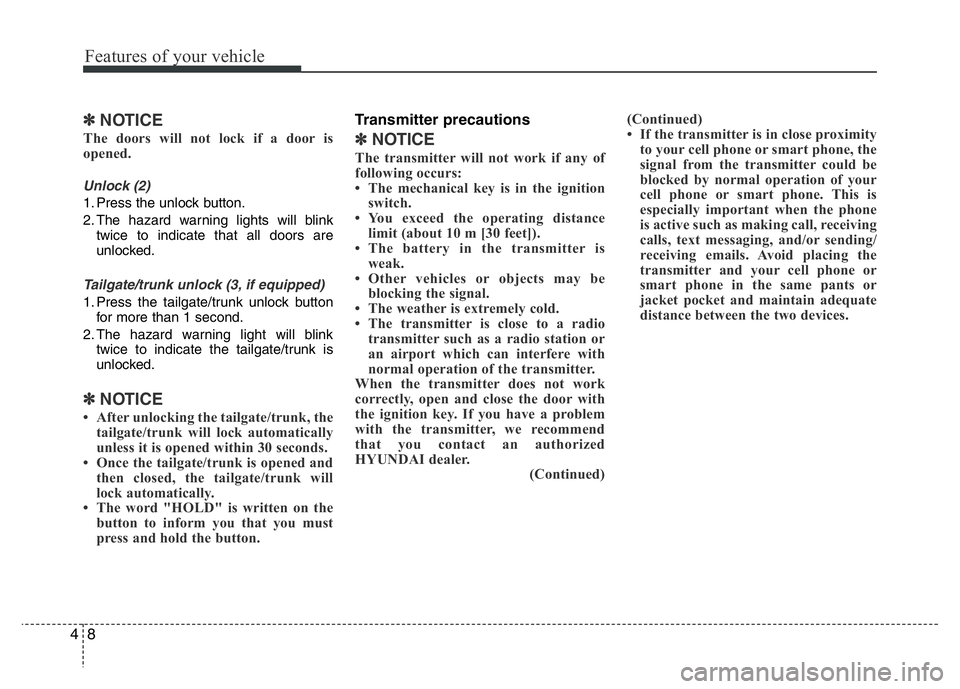
Unlock (2)
1. Press the unlock button.
2. The hazard warning lights will blink
twice to indicate that all doors are
unlocked.
Tailgate/trunk unlock (3, if equipped)
1. Press the tailgate/trunk unlock button
for more than 1 second.
2. The hazard warning light will blink
twice to indicate the tailgate/trunk is
unlocked.
✽NOTICE
• After unlocking the tailgate/trunk, the
tailgate/trunk will lock automatically
unless it is opened within 30 seconds.
• Once the tailgate/trunk is opened and
then closed, the tailgate/trunk will
lock automatically.
• The word "HOLD" is written on the
button to inform you that you must
press and hold the button.
Transmitter precautions
✽NOTICE
The transmitter will not work if any of
following occurs:
• The mechanical key is in the ignition
switch.
• You exceed the operating distance
limit (about 10 m [30 feet]).
• The battery in the transmitter is
weak.
• Other vehicles or objects may be
blocking the signal.
• The weather is extremely cold.
• The transmitter is close to a radio
transmitter such as a radio station or
an airport which can interfere with
normal operation of the transmitter.
When the transmitter does not work
correctly, open and close the door with
the ignition key. If you have a problem
with the transmitter, we recommend
that you contact an authorized
HYUNDAI dealer.
(Continued)(Continued)
• If the transmitter is in close proximity
to your cell phone or smart phone, the
signal from the transmitter could be
blocked by normal operation of your
cell phone or smart phone. This is
especially important when the phone
is active such as making call, receiving
calls, text messaging, and/or sending/
receiving emails. Avoid placing the
transmitter and your cell phone or
smart phone in the same pants or
jacket pocket and maintain adequate
distance between the two devices.