Page 315 of 343
763
Maintenance
Fuse Name Symbol Fuse rating Circuit Protected
BLOWER
7.5A PCM, A/C Control Module, Electronic A/C Compressor, Blower Switch, Blower Resistor
DR LOCK
20A Door Lock/Unlock Relay, T/Gate Unlock Relay, Crash Door Unlock Unit
HTD MIRR
10A PCM, A/C Control Module, Driver/Passenger Power Outside Mirror
MODULE 2
2 MODULE10AStop Lamp Switch, Crash Pad Switch, Rear Parking Assist, Rear Parking Assist Sensor
(Center) LH/RHSensor LH/RH
WIPER
25A Front Wiper Motor, Multifunction Switch
MODULE 3
3 MODULE10A E/R Junction Box (Multipurpose Check Connector), A/C Control Module
ECU
E10A PCM, Smart Key Control Module, Alternator (G3LA/G4LA)
A/CON 2
10A PCB Fuse & Relay Box (Blower Relay), A/C Control Module
POWER
OUTLET 2
2 POWER
OUTLET20A Rear Power Outlet
CLUSTER
10A Instrument Cluster
ABS
7.5A ESP Control Module
MODULE 5
5 MODULE10A -
Page 316 of 343
Maintenance
64 7
Fuse Name Symbol Fuse rating Circuit Protected
WIPER RR
15A Rear Wiper Motor, Multifunction Switch
POWER
OUTLET 1
1 POWER
OUTLET20A Power Outlet
A/BAG
10A SRS Control Module
MDPS
7.5A MDPS Unit
ACC
10A BCM, Smart Key Control Module, Digital Clock, Auido, Power Outside Mirror Switch
A/BAG IND
10A Instrument Cluster
T/SIG
10A Side Repeater Lamp (LH/RH), Rear Combination Lamp (LH/RH)
Page 321 of 343

769
Maintenance
LIGHT BULBS
Consult an authorized HYUNDAI dealer
to replace most vehicle light bulbs. It is
difficult to replace vehicle light bulbs
because other parts of the vehicle must
be removed before you can get to the
bulb. This is especially true for removing
the headlight assembly to get to the
bulb(s). Removing/installing the head-
light assembly can result in damage to
the vehicle.
✽NOTICE
After heavy driving, rain or washing
headlight and taillight lenses could
appear frosty. This condition is caused
by the temperature difference between
the lamp inside and outside. This is sim-
ilar to the condensation on your win-
dows inside your vehicle during the rain
and doesn’t indicate a problem with
your vehicle. If the water leaks into the
lamp bulb circuitry, we recommend that
the system be checked by an authorized
HYUNDAI dealer.
WARNING
• Prior to replacing a light, depress
the foot brake, move the shift
lever into the P (Park, for auto-
matic transaxle vehicle) or neu-
tral (for manual transaxle vehi-
cle), apply the parking brake,
place the ignition
switch in the LOCK/OFF position,
and take the key with you when
leaving the vehicle to avoid sud-
den movement of the vehicle and
to prevent possible electric
shock.
• Be aware the bulbs may be hot
and may burn your fingers.
CAUTION
Be sure to replace the burned-out
bulb with one of the same wattage
rating. Otherwise, it may cause
damage to the fuse or electric
wiring system.
Page 323 of 343

771
Maintenance
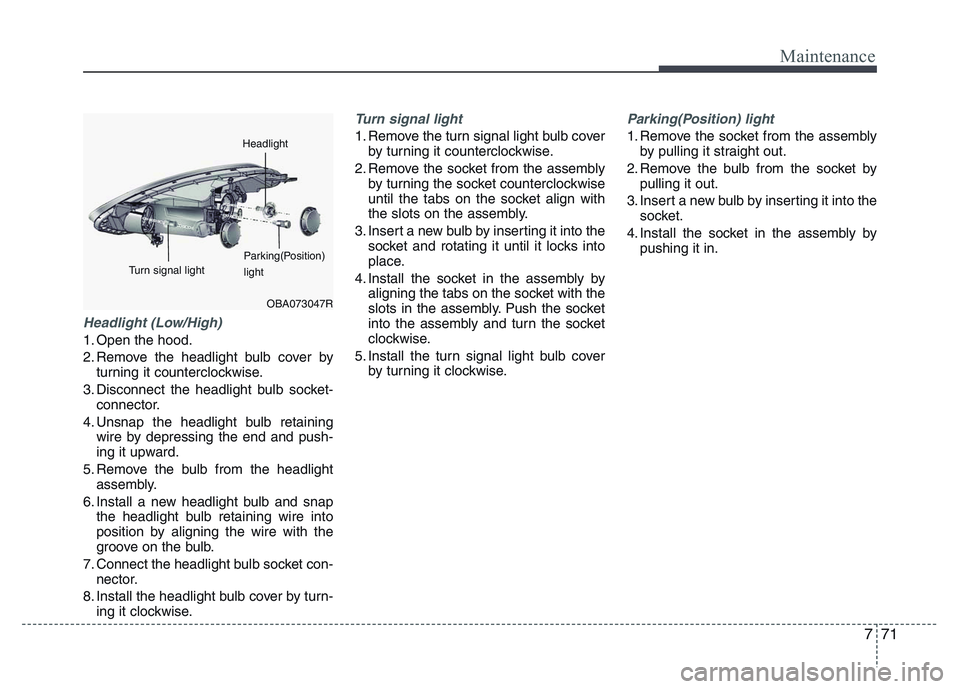
Headlight (Low/High)
1. Open the hood.
2. Remove the headlight bulb cover by
turning it counterclockwise.
3. Disconnect the headlight bulb socket-
connector.
4. Unsnap the headlight bulb retaining
wire by depressing the end and push-
ing it upward.
5. Remove the bulb from the headlight
assembly.
6. Install a new headlight bulb and snap
the headlight bulb retaining wire into
position by aligning the wire with the
groove on the bulb.
7. Connect the headlight bulb socket con-
nector.
8. Install the headlight bulb cover by turn-
ing it clockwise.
Turn signal light
1. Remove the turn signal light bulb cover
by turning it counterclockwise.
2. Remove the socket from the assembly
by turning the socket counterclockwise
until the tabs on the socket align with
the slots on the assembly.
3. Insert a new bulb by inserting it into the
socket and rotating it until it locks into
place.
4. Install the socket in the assembly by
aligning the tabs on the socket with the
slots in the assembly. Push the socket
into the assembly and turn the socket
clockwise.
5. Install the turn signal light bulb cover
by turning it clockwise.
Parking(Position) light
1. Remove the socket from the assembly
by pulling it straight out.
2. Remove the bulb from the socket by
pulling it out.
3. Insert a new bulb by inserting it into the
socket.
4. Install the socket in the assembly by
pushing it in.
OBA073047R
Headlight
Parking(Position)
light Turn signal light
Page 324 of 343
Maintenance
72 7
Front fog light bulb replacement
1. Reach your hand into the back of the
front bumper.
2. Disconnect the power connector from
the socket.
3. Remove the bulb-socket from the
housing by turning the socket counter-
clockwise until the tabs on the socket
align with the slots on the housing.
4. Install the new bulb-socket into the
housing by aligning the tabs on the
socket with the slots in the housing.
Push the socket into the housing and
turn the socket clockwise.
5. Connect the power connector to the
socket.
6. Reinstall the front bumper under cover.
Side repeater light bulb replace-
ment
If the light bulb does not operate, we rec-
ommend that the vehicle be checked by
an authorized HYUNDAI dealer.
Rear combination light bulb
replacement
(1) Stop and tail light
(2) Back up light
(3) Rear turn signal light
OBA073019R
OBA073020
OBA074049
■5 Door
■4 Door
Page 325 of 343

773
Maintenance
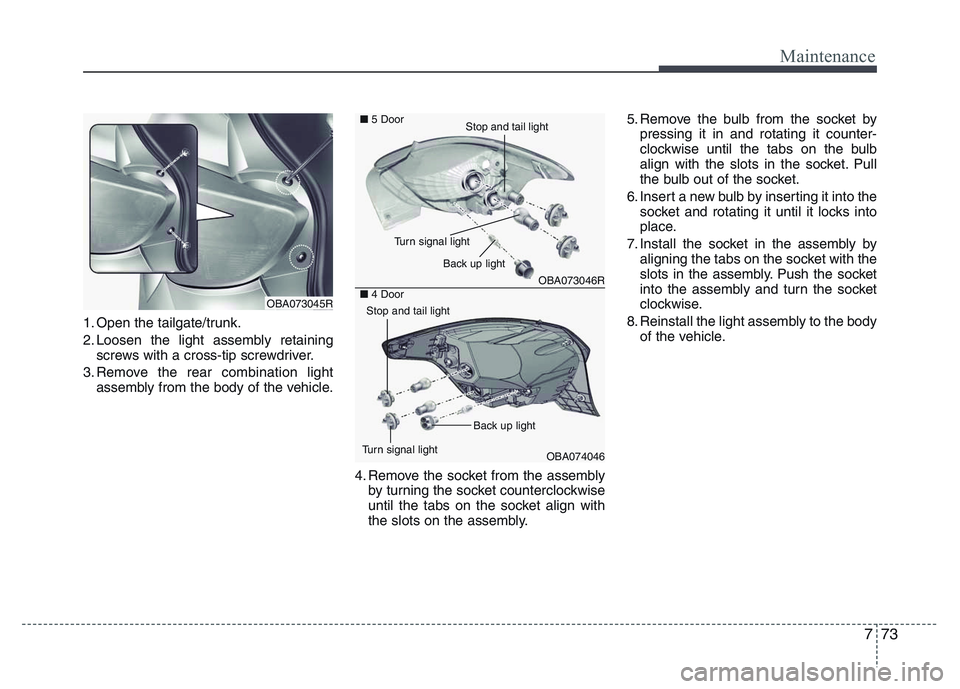
1. Open the tailgate/trunk.
2. Loosen the light assembly retaining
screws with a cross-tip screwdriver.
3. Remove the rear combination light
assembly from the body of the vehicle.
4. Remove the socket from the assembly
by turning the socket counterclockwise
until the tabs on the socket align with
the slots on the assembly.5. Remove the bulb from the socket by
pressing it in and rotating it counter-
clockwise until the tabs on the bulb
align with the slots in the socket. Pull
the bulb out of the socket.
6. Insert a new bulb by inserting it into the
socket and rotating it until it locks into
place.
7. Install the socket in the assembly by
aligning the tabs on the socket with the
slots in the assembly. Push the socket
into the assembly and turn the socket
clockwise.
8. Reinstall the light assembly to the body
of the vehicle.
OBA073045R
OBA073046R
OBA074046 ■5 Door
■4 Door
Back up light
Turn signal light
Stop and tail light
Turn signal lightBack up light
Stop and tail light
Page 326 of 343
Maintenance
74 7
Rear fog light bulb replacement
(if equipped)
If the light does not operate, we recom-
mend that the system be checked by an
authorized HYUNDAI dealer.
High mounted stop light replace-
ment
If the light does not operate, we recom-
mend that the system be checked by an
authorized HYUNDAI dealer.
License plate light bulb replace-
ment
1. Using a flat-blade screwdriver, remove
the light assembly from the body of the
vehicle by prying the housing and
pulling the assembly out.
2. Separate the socket and the lens part
by turning the socket counterclockwise
until the tabs on the socket align with
the slots on the lens part.
3. Remove the bulb by pulling it straight
out.
4. Insert a new bulb in the socket.
5. Reassemble the socket and the hous-
ing part.
6. Reinstall the light assembly to the body
of the vehicle.
OBA073022
OBA073021
OBA074021
■5 Door
■4 Door
Page 343 of 343
87
Specifications & Consumer information
The tires supplied on your new vehicle
are chosen to provide the best perform-
ance for normal driving.
The tire label located on the driver's side
center pillar gives the tire pressures rec-
ommended for your vehicle.The engine number is stamped on the
engine block as shown in the drawing.A compressor label informs you the type
of compressor your vehicle is equipped
with such as model, supplier part num-
ber, production number, refrigerant (1)
and refrigerant oil (2).
OBA073010
TIRE SPECIFICATION AND
PRESSURE LABEL
OHDC081001
AIR CONDITIONER
COMPRESSOR LABEL ENGINE NUMBER
OBA083003