Page 489 of 534
7-64
Maintenance
Fuse NameFuse rating Protected Component
FUSE
DCT2 40A Not Used
S/FUEL PUPMP 15A Not Used
ABS 1 40A ESC Module, Multipurpose Check Connector
ABS 2 30A ESC Module, Multipurpose Check Connector
POWER OUTLET 1 40A Power Outlet Relay
Fuse Name Fuse rating Protected Component
ECU 5 10A PCM
VACUUM PUMP 15A Not Used
SPARE 20A -
ABS 3 10A ESC Module, Multipurpose Check Connector
TCU 2 15A Transmission Range Switch, E/R Junction Block (Fuse : B/UP LAMP)
ECU 4 15A PCM
ECU 3 15A PCM
FUEL PUMP 20A Fuel Pump Relay
SENAOR 2 10A Canister Close Valve, Purge Control Solenoid Valve, Variable Intake Solenoid Valve, E/R Junction
Block (Cooling Fan 1/2 Relay)
ECU2 10A Not Used
ECU1 20A PCM
INJECTOR 15A Injector #1/#2/#3/#4
SENSOR 1 15A Oxygen Sensor (UP/DOWN)
IGN COIL 20A Ignition Coil #1/#2/#3/#4
SENSOR 3 10A Fuel Pump Relay
HORN 20A Horn Relay
Page 492 of 534

7-67
7
Maintenance
8. Connect the headlamp bulb sock-et-connector.
9. Install the headlamp bulb cover by turning it clockwise.
Information
The headlamp aiming should be
adjusted after an accident or after the
headlamp assembly is reinstalled at an
authorized HYUNDAI dealer.
Parking lamp/Daytime running
lamp (LED type)
Your vehicle is equipped with LED
lamps. LED lamps do not have
replaceable bulbs. If the LED lamp
does not operate, have the vehicle
checked by an authorized HYUNDAI
dealer.
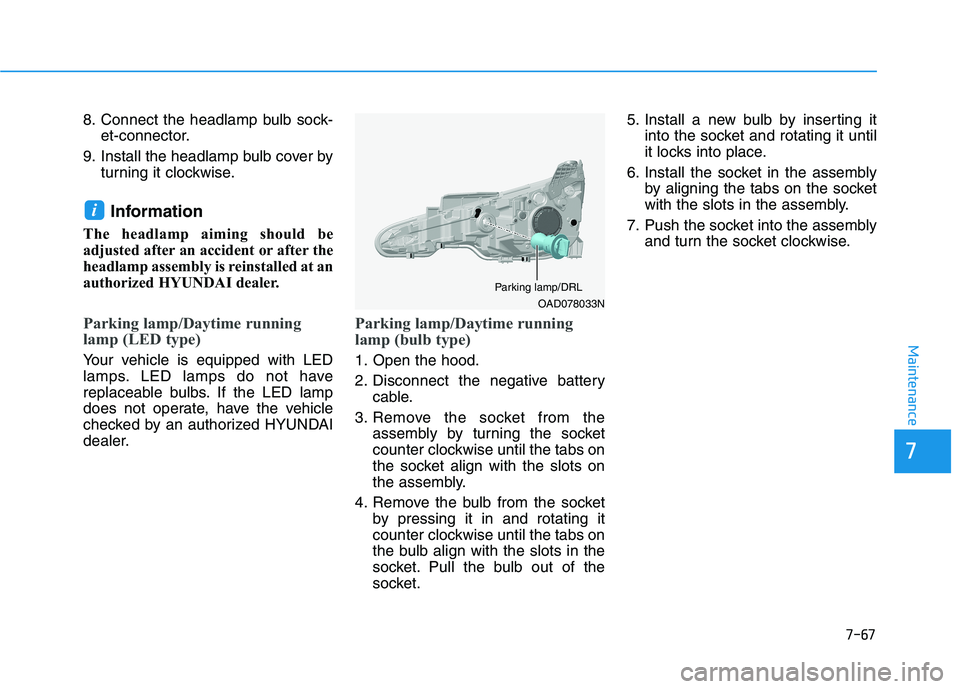
Parking lamp/Daytime running
lamp (bulb type)
1. Open the hood.
2. Disconnect the negative battery cable.
3. Remove the socket from the assembly by turning the socket
counter clockwise until the tabs on
the socket align with the slots on
the assembly.
4. Remove the bulb from the socket by pressing it in and rotating it
counter clockwise until the tabs on
the bulb align with the slots in the
socket. Pull the bulb out of the
socket. 5. Install a new bulb by inserting it
into the socket and rotating it until
it locks into place.
6. Install the socket in the assembly by aligning the tabs on the socket
with the slots in the assembly.
7. Push the socket into the assembly and turn the socket clockwise.
i
OAD078033N
Parking lamp/DRL
Page 496 of 534
7-71
7
Maintenance
3. Loosen the assembly retainingnuts.
4. Remove the rear combination light assembly from the body of the
vehicle.
Turn signal light (Type A/Type B)
5. Remove the socket from theassembly by turning the socket
counterclockwise until the tabs on
the socket align with the slots on
the assembly. 6. Remove the bulb from the socket
by pressing it in and rotating it
counterclockwise until the tabs on
the bulb align with the slots in the
socket. Pull the bulb out of the
socket.
7. Insert a new bulb by inserting it into the socket and rotating it until
it locks into place.
8. Install the socket in the assembly by aligning the tabs on the socket
with the slots in the assembly.
Push the socket into the assembly
and turn the socket clockwise.
OAD075051
OAD078050N
OAD078080N
■Type A
OAD078081N
■Type B
Turn signal
Stop/Tail
Turn signal
Side
marker
Page 497 of 534
7-72
Maintenance
Stop/Tail light and Side marker
(Type A)
5. Remove the socket from theassembly by turning the socket
counterclockwise until the tabs on
the socket align with the slots on
the assembly.
6. Remove the bulb by pulling it out.
7. Inset a new bulb by insetring it into the socket.
8. Install the socket in the assembly by aligning the tabs on the socket
with the slots in the assembly.
Push the socket into the assembly
and turn the socket clockwise.
Stop/Tail light and Side marker
(Type B)
Your vehicle is equipped with LED
lamps. LED lamps do not have
replaceable bulbs. If the LED lamp
does not operate, have the vehicle
checked by an authorized HYUNDAI
dealer.
Inside lamp
Tail light (Type A)
1. Open the trunk.
2. Loosen the retaining screw of thetrunk lid cover and then remove
the cover. 3. Disconnect the connector and
then remove the nuts by turning
the nuts counter clockwise.
OAD075055
OAD078052N
Page 498 of 534
7-73
7
Maintenance
4. Take the light assembly out. 5.Remove the socket from the
assembly by turning the socket
counterclockwise until the tabs on
the socket align with the slots on
the assembly.
6. Remove the bulb by pulling it out.
7. Insert a new bulb by inserting it into the socket.
8. Install the light assembly to the trunk.
9. Reinstall the nuts and connector and then the trunk lid cover by
pushing in the screw.
Stop/Tail light (Type B)
Your vehicle is equipped with LED
lamps. LED lamps do not have
replaceable bulbs. If the LED lamp
does not operate, have the vehicle
checked by an authorized HYUNDAI
dealer.
Backup lamp (Type A/Type B)
If the light bulb does not operate,
have the vehicle checked by an
authorized HYUNDAI dealer.
OAD078056NOAD078069NTail
Page 499 of 534
7-74
Maintenance
High Mounted Stop Light Replacement
1. Open the trunk.2. Remove the socket by turning it
counterclockwise until the tabs on
the socket align with the slots.
3. Remove the bulb from the socket by pressing it in and rotating it
counterclockwise until the tabs on
the bulb align with the slots in the
socket. Pull the bulb out of the
socket.
4. Insert a new bulb by inserting it into the socket and rotating it until
it locks into place.
5. Install the socket in the assembly by aligning the tabs on the socket
with the slots in the assembly.
Push the socket into the assembly
and turn the socket clockwise.
License Plate Light Bulb Replacement
1. Remove the cover by pressing itas direction of the arrows.
2. Remove the bulb by pulling it straight out.
3. Install a new bulb.
4. Reinstall in the reverse order.
OAD078043NOAD078041N
OAD075042
Page 500 of 534
7-75
7
Maintenance
1. Using a flat-blade screwdriver,gently pry the lens from the interi- or lamp housing.
2. Remove the bulb by pulling it straight out.
3. Install a new bulb in the socket.
4. Align the lens tabs with the interi- or lamp housing notches and snap
the lens into place.
Use care not to dirty or damage
lens, lens tab, and plastic hous-ings.
NOTICE
■ Map lamp
OAD075044
OAD075045
■Luggage room lamp
■Vanity mirror lamp (if equipped)
OAD078047N
OAD075046
■ Room lamp
Interior Light Bulb Replacement
Prior to working on the Interior
Lights, ensure that the "OFF"
button is depressed to avoid
burning your fingers or receiv-
ing an electric shock.
WARNING
Page 507 of 534

7-82
Maintenance
Caring for the leather seats- Vacuum the seat periodically toremove dust and sand on the
seat. It will prevent abrasion ordamage of the leather and main-
tain its quality.
- Wipe the natural leather seat cover often with dry or soft cloth.
- Use of proper leather protective may prevent abrasion of the
cover and helps maintain the
color. Be sure to read the instruc-tions and consult a specialistwhen using leather coating or
protective agent.
- Light colored (beige, cream beige) leather is easily contami-
nated and the stain is noticeable.
Clean the seats frequently.
- Avoid wiping with wet cloth. It may cause the surface to crack. Cleaning the leather seats
- Remove all contaminationsinstantly. Refer to instructions
below for removal of each con-taminant.
- Cosmetic products (sunscreen, foundation, etc.)
Apply cleansing cream on a clothand wipe the contaminate spot.
Wipe off the cream with a wet
cloth and remove water with a drycloth.
- Beverages (coffee, soft drink, etc.)
Apply a small amount of neutraldetergent and wipe until contami-
nations do not smear.
- Oil Remove oil instantly with
absorbable cloth and wipe with
stain remover used only for natu-
ral leather.
- Chewing gum
Harden the gum with ice and
remove gradually.
Wrinkles or abrasions which
appear naturally from usage
are not covered by warranty.
Belts with metallic acces-
sories, zippers or keys inside
the back pocket may damagethe seat fabric.
Make sure not to wet the seat.
It may change the nature of
natural leather.
Jeans or clothes which could
bleach may contaminate the
surface of the seat coveringfabric.
CAUTION