Page 33 of 472
To reinstall the headrest :
1. Put the headrest poles (2) into the
holes while pressing the release
button (1).
2. Recline the seatback (4) with the
recline lever (3).
3. Adjust the headrest to the appro-
priate height.
Seatback pocket (if equipped)
2-13
Safety system of your vehicle
2
Always make sure the headrest
locks into position after rein-
stalling and adjusting it properly.
WARNING
OGS038010L
OGS038012L
■Type A
■Type B
Seatback pockets
Do not put heavy or sharp
objects in the seatback pockets.
In an accident they could come
loose from the pocket and
injure vehicle occupants.
WARNING
OGC034023
Page 34 of 472

2-14
Safety system of your vehicle
Rear seats
Headrest
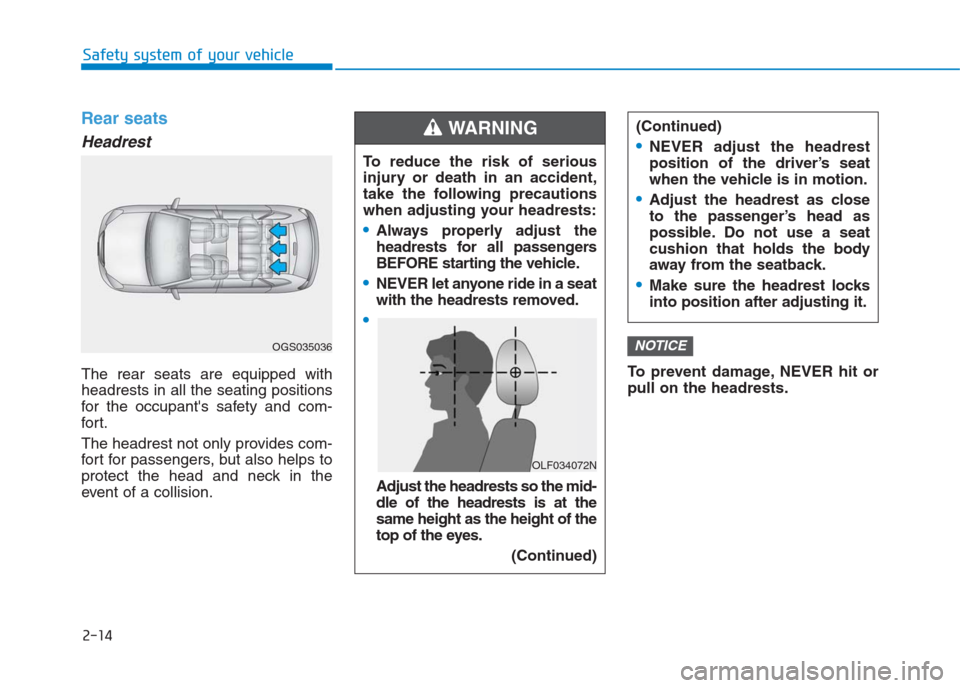
The rear seats are equipped with
headrests in all the seating positions
for the occupant's safety and com-
for t.
The headrest not only provides com-
fort for passengers, but also helps to
protect the head and neck in the
event of a collision.To prevent damage, NEVER hit or
pull on the headrests.
NOTICE
(Continued)
NEVER adjust the headrest
position of the driver’s seat
when the vehicle is in motion.
Adjust the headrest as close
to the passenger’s head as
possible. Do not use a seat
cushion that holds the body
away from the seatback.
Make sure the headrest locks
into position after adjusting it.
To reduce the risk of serious
injury or death in an accident,
take the following precautions
when adjusting your headrests:
Always properly adjust the
headrests for all passengers
BEFORE starting the vehicle.
NEVER let anyone ride in a seat
with the headrests removed.
Adjust the headrests so the mid-
dle of the headrests is at the
same height as the height of the
top of the eyes.
(Continued)
WARNING
OLF034072N
OGS035036
Page 35 of 472

2-15
Safety system of your vehicle
2
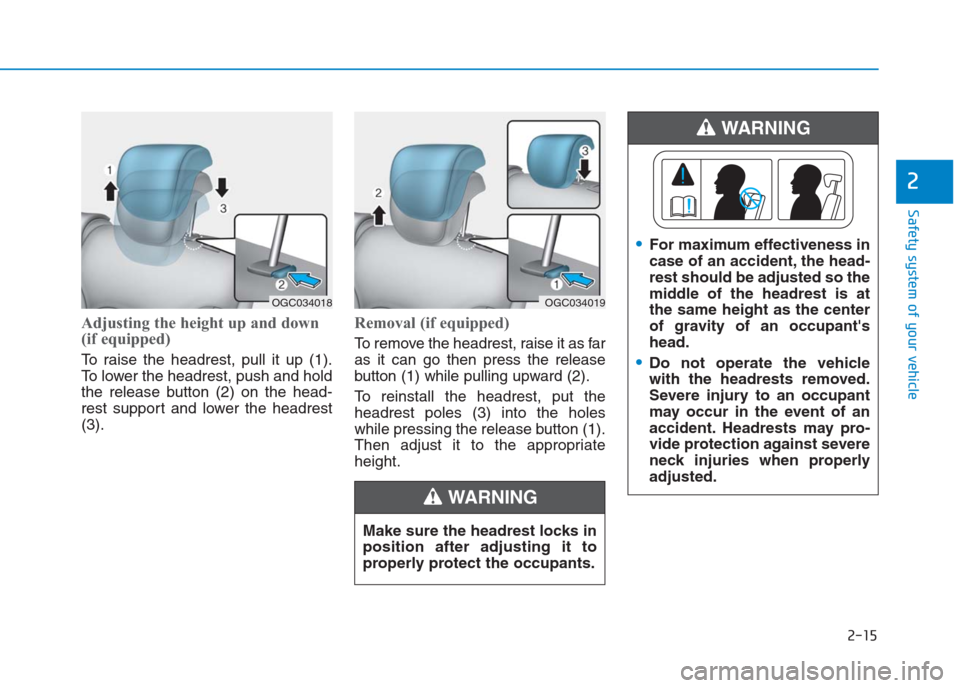
Adjusting the height up and down
(if equipped)
To raise the headrest, pull it up (1).
To lower the headrest, push and hold
the release button (2) on the head-
rest support and lower the headrest
(3).
Removal (if equipped)
To remove the headrest, raise it as far
as it can go then press the release
button (1) while pulling upward (2).
To reinstall the headrest, put the
headrest poles (3) into the holes
while pressing the release button (1).
Then adjust it to the appropriate
height.
Make sure the headrest locks in
position after adjusting it to
properly protect the occupants.
WARNING
OGC034018OGC034019
For maximum effectiveness in
case of an accident, the head-
rest should be adjusted so the
middle of the headrest is at
the same height as the center
of gravity of an occupant's
head.
Do not operate the vehicle
with the headrests removed.
Severe injury to an occupant
may occur in the event of an
accident. Headrests may pro-
vide protection against severe
neck injuries when properly
adjusted.
WARNING
Page 36 of 472

2-16
Safety system of your vehicle
Folding the rear seat
The rear seatbacks (or cushions)
may be folded to facilitate carrying
long items or to increase the luggage
capacity of the vehicle.
Type A
1. Set the front seatback to the
upright position and if necessary,
slide the front seat forward.
2. Insert the rear lap/shoulder belt
plate into the holder on the seat
and side trim. It will prevent the
lap/shoulder belt from interfering
with the seatback when folding.
3. Pull up both sides of the seatback
lever and fold the seatback toward
the front of the vehicle.
To use the rear seat, lift and push up
the seatback backward. Push the
seatback firmly until it clicks into
place. Make sure the seatback is
locked in place.
OGS035031
OGS035013
OGS035014
Never allow passengers to sit
on top of the folded down
seatback while the vehicle is
moving as this is not a proper
seating position and no seat
belts are available for use.
This could result in serious
injury or death in case of an
accident or sudden stop.
Objects carried on the folded
down seatback should not
extend higher than the top of
the front seats. This could
allow cargo to slide forward
and cause injury or damage
during sudden stops.
WARNING
Page 37 of 472
2-17
Safety system of your vehicle
2
When returning the rear seatbacks to
the upright position, remember to
return the rear shoulder belts to their
proper position.
Type B
1. Insert the rear seat belt webbing in
the guide to prevent the seat belt
from being damaged.
2. Set the front seatback to the
upright position and if necessary,
slide the front seat forward.
3. Lower the rear headrests to the
lowest position.4. Pull up the seatback lever, then
fold the seat toward the front of the
vehicle.5. To use the rear seat, lift and push
up the seatback backward. Push
the seatback firmly until it clicks
into place. Make sure the seatback
is locked in place.
When returning the rear seatbacks to
the upright position, remember to
return the rear shoulder belts to their
proper position.
OGC034006
OGS035037OGC034009
Page 38 of 472

2-18
Safety system of your vehicle
When returning the rear seat-
backs to the upright position,
remember to return the rear
shoulder belts to their proper
position.
Routing the seat belt webbing
through the rear seat belt guides
will help keep the seat belts from
being trapped behind or under
the seats.
NOTICE
Cargo
Cargo should always be secured
to prevent it from being thrown
about the vehicle in a collision
and causing injury to the vehicle
occupants. Do not place objects
in the rear seats, since they can-
not be properly secured and may
hit the front seat occupants in a
collision.
WARNING
When you return the rear seat-
back to its upright position after
being folded down:
Be careful not to damage the
seat belt webbing or buckle. Do
not allow the seat belt webbing
or buckle to get caught or
pinched in the rear seat. Ensure
that the seatback is completely
locked into its upright position
by pushing on the top of the
seatback. Otherwise, in an acci-
dent or sudden stop, the seat
could fold down and allow
cargo to enter the passenger
compartment, which could
result in serious injury or death.
WARNING
Cargo loading
Make sure the engine is off, the
manual transaxle is in R
(Reverse) or 1st, and the parking
brake is securely applied when-
ever loading or unloading cargo.
Failure to take these steps may
allow the vehicle to move if the
shift lever is inadvertently moved
to another position.
WARNING
Page 41 of 472

2-21
Safety system of your vehicle
2
Seat belt warning
As a reminder to the driver's seat belt
warning light and passenger's seat
belt warning light (if equipped) will illu-
minate for approximately 6 seconds
each time you turn the ignition switch
ON regardless of belt fastening.
If the driver’s seat belt or the front
passenger’s seat belt is not fastened
when the ignition switch is turned ON
or if it is disconnected after the igni-
tion switch is turned ON, the seat
belt warning light will illuminate until
the belt is fastened.If you continue not to fasten the seat
belt and you drive over 9 km/h, the
illuminated warning light will start to
blink until you drive under 6 km/h.
If you continue not to fasten the seat
belt and you drive over 20 km/h (12
mph) the seat belt warning chime will
sound for approximately 100 sec-
onds and the corresponding warning
light will blink.
Information
• You can find the front passenger’s
seat belt warning light on the clus-
ter. (if equipped)
• Although the front passenger seat is
not occupied, the seat belt warning
light will blink or illuminate for 6
seconds. (if equipped)
• The front passenger's seat belt
warning may operate when luggage
is placed on the front passenger seat.
(if equipped)
Lap/shoulder belt
To fasten your seat belt:
To fasten your seat belt, pull it out of
the retractor and insert the metal tab
(1) into the buckle (2). There will be
an audible "click" when the tab locks
into the buckle.
i
OGC034042ODH033055
Page 42 of 472

2-22
Safety system of your vehicle
You should place the lap belt (1) por-
tion across your hips and the shoul-
der belt (2) portion across your
chest.
The seat belt automatically adjusts to
the proper length only after the lap
belt portion is adjusted manually so
that it fits snugly around your hips. If
you lean forward in a slow, easy
motion, the belt will extend and let
you move around. If there is a sud-
den stop or impact, however, the belt
will lock into position. It will also lock
if you try to lean forward too quickly.
Information
If you are not able to pull out the safe-
ty belt from the retractor, firmly pull
the belt out and release it. After
release, you will be able to pull the belt
out smoothly.
Height adjustment (if equipped)
You can adjust the height of the shoul-
der belt anchor to one of 3 positions
for maximum comfort and safety.
The height of the adjusting seat belt
should not be too close to your neck.
You will not be getting the most effec-
tive protection. The shoulder portion
should be adjusted so that it lies
across your chest and midway over
your shoulder near the door and not
your neck.
i
OGC034026
■Front seat
ODH033053