2018 GMC SIERRA ECO mode
[x] Cancel search: ECO modePage 2 of 20

2
Audio Next/Previous Favorite Station Controls (behind steering wheel)
Cruise Control/ Collision AlertF/Heated Steering WheelF Buttons
Power Mirror Control/Door Lock Switch/Window Buttons
Audio Volume Controls (behind steering wheel)
Voice Recognition Buttons/ Customizable Driver Display Controls
Tilt Steering Wheel Lever
Telescoping Steering Wheel Control
Memory Seat Controls
Instrument Panel Illumination Control/Exterior Lamp Control4WD ControlFTow/Haul ButtonCustomizable Driver Display
Turn Signal/Windshield Wipers Lever
Integrated Trailer Brake ControlF
INSTRUMENT PANEL
Low Fuel
Traction Control Off
Engine Coolant Temperature
Brake System
Cruise Control Set
Forward Collision Alert
StabiliTrak Active
StabiliTrak Off
Security
Tow/Haul Mode
Hill Descent Control
Lights On Reminder
Airbag Readiness
Check Engine
Symbols
Page 7 of 20

7
LIGHTING
Automatic Headlamp System
Rotate the knob to activate the exterior lights.
Off/On
AUTO Automatic Headlamp System
Automatically activates the Daytime Running Lamps (DRLs) or the headlamps and other exterior lamps depending on outside light conditions.
Parking Lamps
Headlamps
Fog Lamps
Press to turn the fog lamps on or off.
Instrument Panel Lighting
Instrument Panel Brightness
Rotate the thumbwheel to adjust the instrument panel lighting.
Cargo Lamp
Cargo Box Lamp
With the vehicle in Park, press to turn the cargo lamp and under-rail pickup box lights on or off. The button indicator will illuminate when the lights are on.
See Lighting in your Owner’s Manual.
INTELLIBEAM SYSTEMF (LD MODELS ONLY)
The IntelliBeam system automatically turns the high-beam headlamps on/of\
f based on traffic conditions when the lamp control is in the AUTO position and the system \
is activated, indicated by a green indicator on the instrument cluster. A blue indicator appears when the
high-beam headlamps are on.
The system is turned off if the high/low-beam changer or the flash-to-\
pass feature is used.
Activate the high/low-beam changer on and then off within 2 seconds to t\
urn on the IntelliBeam system.
Note: IntelliBeam activates the high-beam headlamps only when driving over 25\
mph.
See Lighting in your Owner’s Manual.
F Optional equipment F Optional equipment
Page 10 of 20

10
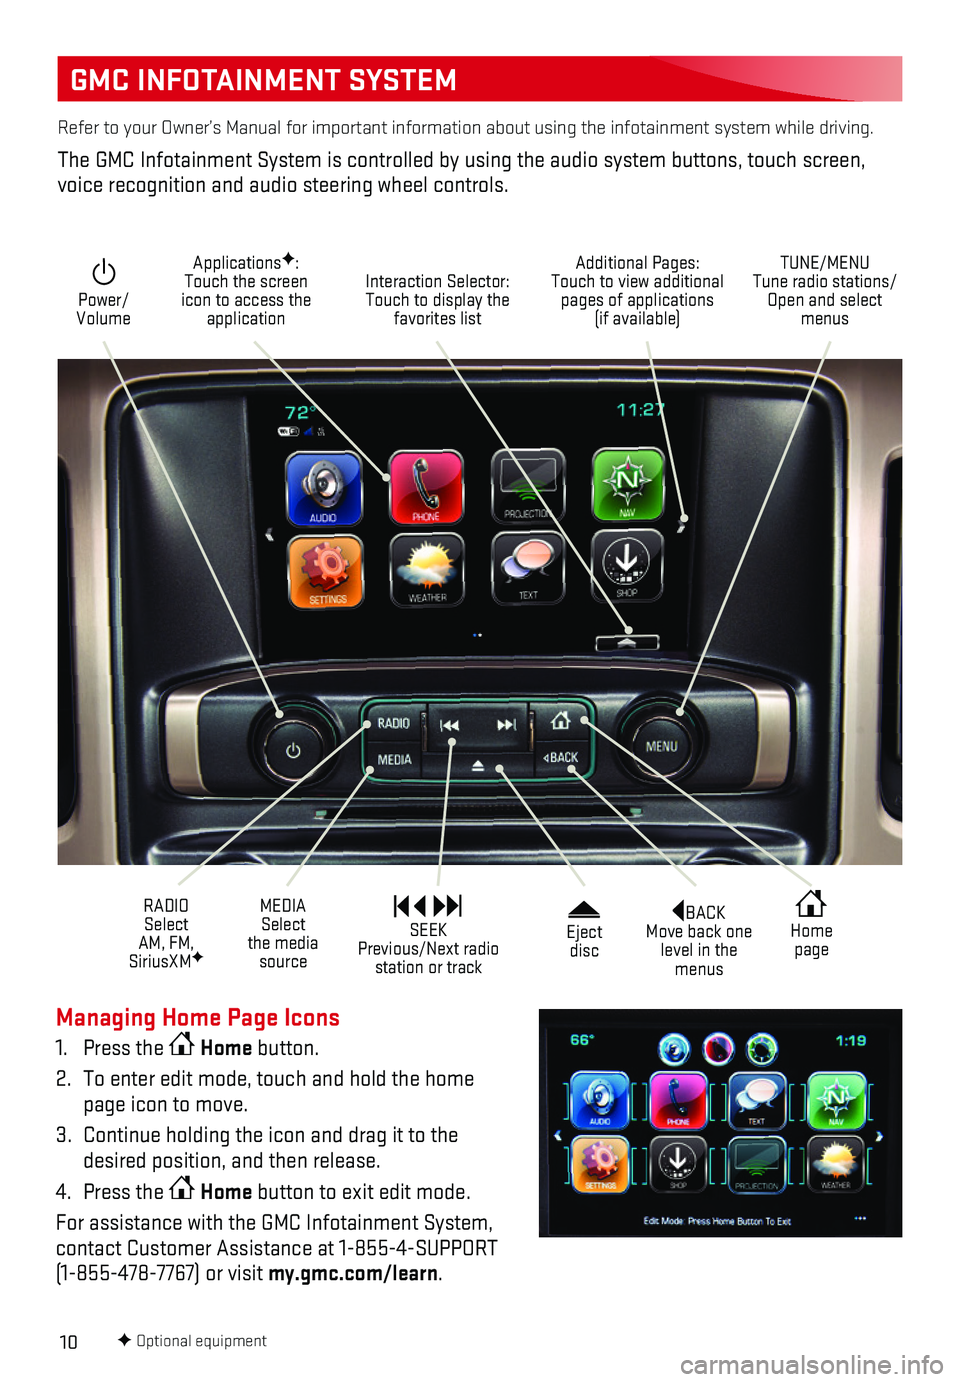
GMC INFOTAINMENT SYSTEM
BACK Move back one level in the menus
Home page
Eject disc
Power/ Volume
Additional Pages: Touch to view additional pages of applications (if available)
TUNE/MENU Tune radio stations/Open and select menus
Interaction Selector: Touch to display the favorites list
ApplicationsF: Touch the screen icon to access the application
RADIO Select AM, FM, SiriusXMF
MEDIA Select the media source
SEEK Previous/Next radio station or track
Refer to your Owner’s Manual for important information about using th\
e infotainment system while driving.
The GMC Infotainment System is controlled by using the audio system butt\
ons, touch screen, voice recognition and audio steering wheel controls.
F Optional equipment
Managing Home Page Icons
1. Press the Home button.
2. To enter edit mode, touch and hold the home page icon to move.
3. Continue holding the icon and drag it to the desired position, and then release.
4. Press the Home button to exit edit mode.
For assistance with the GMC Infotainment System, contact Customer Assistance at 1-855-4-SUPPORT (1-855-478-7767) or visit my.gmc.com/learn.
Page 15 of 20

15
CRUISE CONTROL
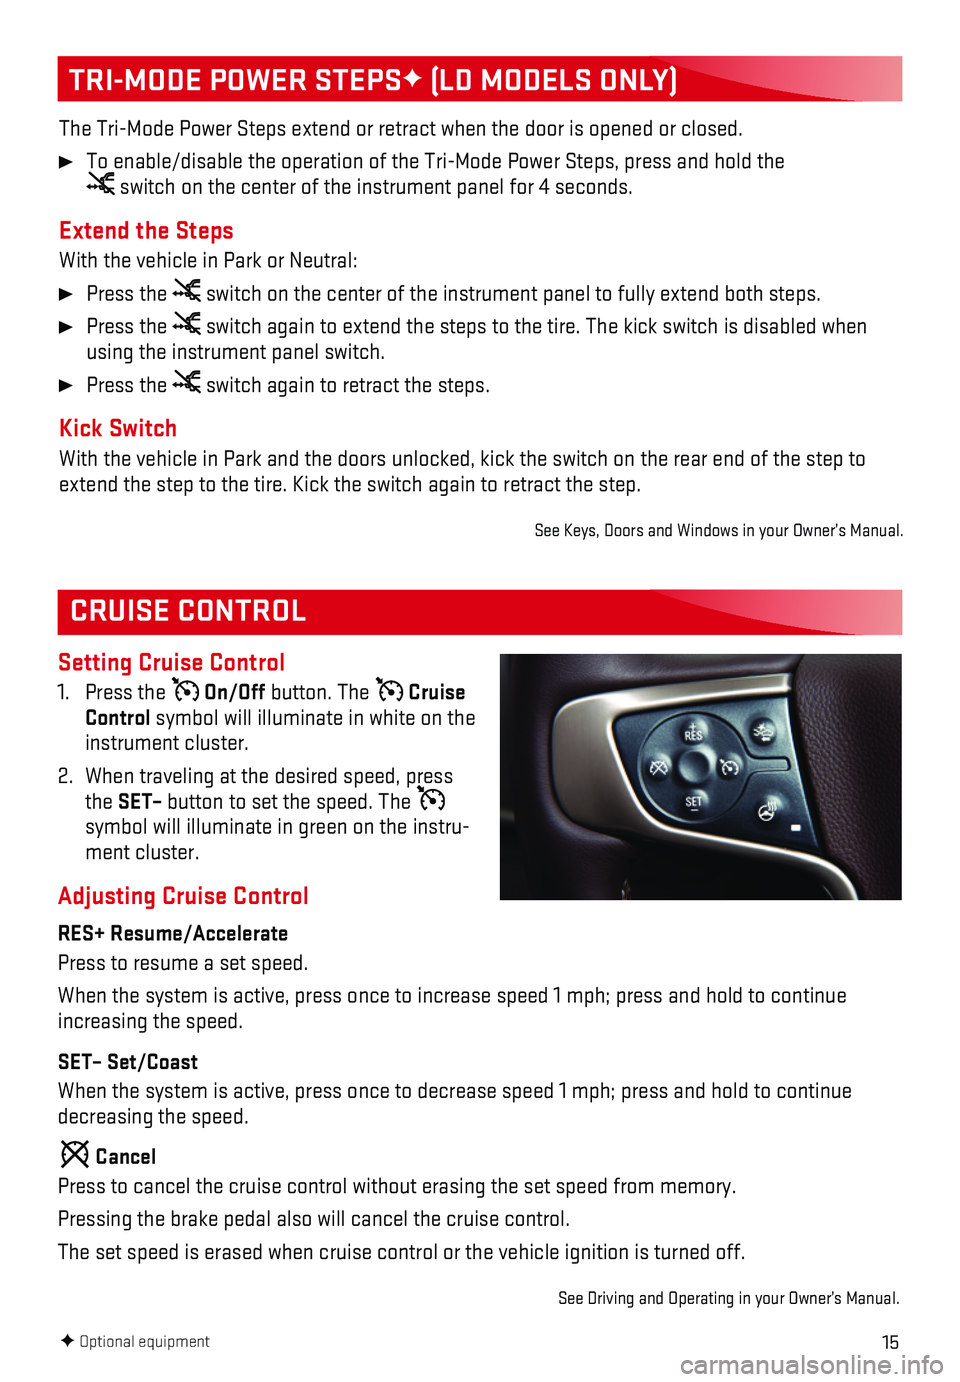
Setting Cruise Control
1. Press the On/Off button. The Cruise Control symbol will illuminate in white on the instrument cluster.
2. When traveling at the desired speed, press the SET– button to set the speed. The symbol will illuminate in green on the instru-ment cluster.
Adjusting Cruise Control
RES+ Resume/Accelerate
Press to resume a set speed.
When the system is active, press once to increase speed 1 mph; press and\
hold to continue increasing the speed.
SET– Set/Coast
When the system is active, press once to decrease speed 1 mph; press and\
hold to continue decreasing the speed.
Cancel
Press to cancel the cruise control without erasing the set speed from me\
mory.
Pressing the brake pedal also will cancel the cruise control.
The set speed is erased when cruise control or the vehicle ignition is t\
urned off.
See Driving and Operating in your Owner’s Manual.
TRI-MODE POWER STEPSF (LD MODELS ONLY)
The Tri-Mode Power Steps extend or retract when the door is opened or cl\
osed.
To enable/disable the operation of the Tri-Mode Power Steps, press and h\
old the switch on the center of the instrument panel for 4 seconds.
Extend the Steps
With the vehicle in Park or Neutral:
Press the switch on the center of the instrument panel to fully extend both steps\
.
Press the switch again to extend the steps to the tire. The kick switch is disabl\
ed when using the instrument panel switch.
Press the switch again to retract the steps.
Kick Switch
With the vehicle in Park and the doors unlocked, kick the switch on the \
rear end of the step to extend the step to the tire. Kick the switch again to retract the step.
See Keys, Doors and Windows in your Owner’s Manual.
F Optional equipment
Page 17 of 20

17
DRIVER ASSISTANCE SYSTEMS
F Optional equipment
Hill Descent Control sets and maintains vehicle speed from 2–14 mph w\
hile descending a steep incline in a forward or reverse gear.
1. Press the Hill Descent Control button on the center of the instrument panel. Vehicle speed must be below 31 mph to enable the system. The Hill Descent Contro\
l symbol will
illuminate on the instrument cluster.
2. Increase or decrease speed by applying the accelerator or brake pedal or\
use the Cruise Control +/– buttons on the steering wheel. The adjusted speed becomes\
the new set speed. The symbol flashes when the system is actively applying the brakes to maintain vehicle speed.
See Driving and Operating in your Owner’s Manual.
HILL DESCENT CONTROL
The traction control system limits wheelspin and the StabiliTrak® stability control system assists with directional control of the vehicle in difficult driving conditions. Both systems turn on auto-matically every time the vehicle is started.
Turn off traction control if the vehicle is stuck and rocking the vehicl\
e is required.
Press the Traction Control/StabiliTrak Off button on the center of the instrument panel to turn traction control off or back on. The Traction Control Off light will illuminate on the instrument cluster when the system is off.
See Driving and Operating in your Owner’s Manual.
TRACTION CONTROL AND STABILITRAK SYSTEMS
DIESEL EXHAUST BRAKE (DIESEL MODELS ONLY)
The engine exhaust brake enhances the vehicle brake system by automatica\
lly downshifting the transmission, depending on the length of time the brakes are applied.
Press the Diesel Exhaust Brake button on the center of the instrument panel to turn the system on or off.
See your Duramax Diesel Owner’s Manual.
Front and/or Rear Parking Assist
During low-speed parking maneuvers, the system provides “distance to \
closest object”
information on the Driver Information Center and the Safety Alert Seat p\
ulses or a beep sounds (if selected). When an object is very close, the Safety Alert Seat pul\
ses 5 times or beeps sound (if selected).
To turn the system on or off, press the Parking Assist button on the center of the instrument panel.See Driving and Operating in your Owner’s Manual.
Page 19 of 20

19
Sunroof Controls
The sunroof controls are located on the over-head console.
SLIDETILT Express Open/
SLIDE TILT
Close
Fully press the rear of the SLIDE switch to express open the sunroof. Gently press and hold the switch to partially open the sunroof.
Fully press the front of the SLIDE switch to express close the sunroof. Gently press and hold the switch to partially close the sunroof.
SLIDETILTVent/
SLIDE TILT
Close
Press the rear of the TILT switch to vent the sunroof from the closed position.
Press the front of the TILT switch to close the sunroof.
Sunshade
Open and close the sunshade manually by pulling it rearward or forward.
See Keys, Doors and Windows in your Owner’s Manual.
POWER REAR WINDOWF
SUNROOFF
The power rear window switch is located on the overhead console.
Press the switch to open the rear window.
Pull the switch to close the rear
window.
Note: The power rear window cannot be operated manually.
See Keys, Doors and Windows in your Owner’s Manual.F Optional equipment
TIRE PRESSURE MONITOR (SINGLE REAR WHEEL MODELS ONLY)
The Low Tire Pressure warning light on the instrument cluster illuminates wh\
en one or more of the vehicle’s tires is significantly underinflated. Fill the t\
ires to the proper tire pressures listed on the Tire and Loading Information label, located below the driver’s\
door latch. Current tire pressures can be viewed on the Driver Information Center.
The Tire Fill Alert provides visual and audible alerts to help when infl\
ating a tire to the recom-mended tire pressure.
Refer to your Owner’s Manual for information about normal monthly tir\
e maintenance.
See Vehicle Care in your Owner’s Manual.