2018 FORD TRANSIT light
[x] Cancel search: lightPage 148 of 521

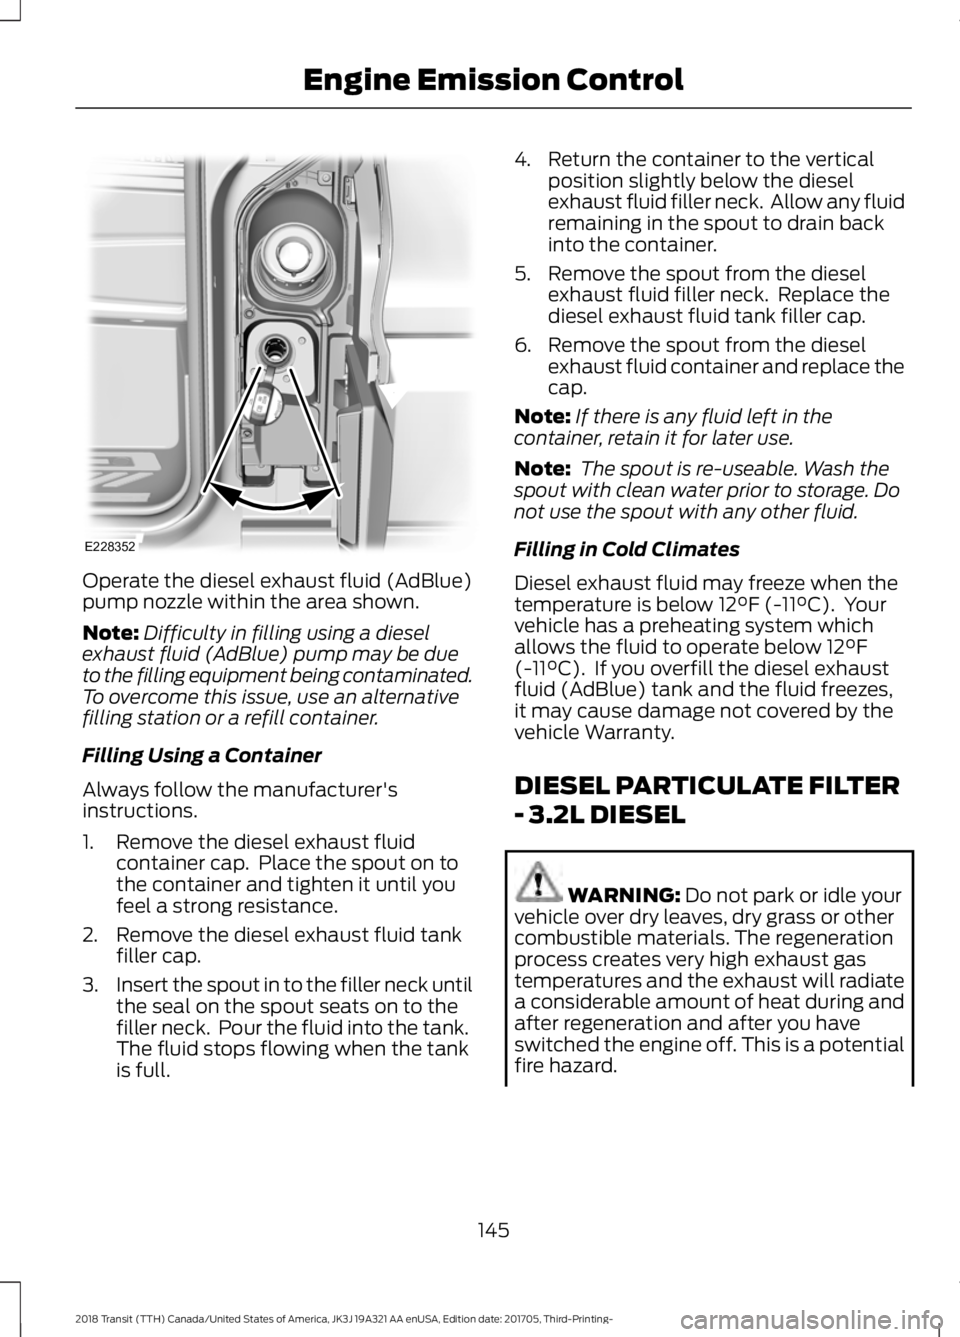
Operate the diesel exhaust fluid (AdBlue)
pump nozzle within the area shown.
Note:
Difficulty in filling using a diesel
exhaust fluid (AdBlue) pump may be due
to the filling equipment being contaminated.
To overcome this issue, use an alternative
filling station or a refill container.
Filling Using a Container
Always follow the manufacturer's
instructions.
1. Remove the diesel exhaust fluid container cap. Place the spout on to
the container and tighten it until you
feel a strong resistance.
2. Remove the diesel exhaust fluid tank filler cap.
3. Insert the spout in to the filler neck until
the seal on the spout seats on to the
filler neck. Pour the fluid into the tank.
The fluid stops flowing when the tank
is full. 4. Return the container to the vertical
position slightly below the diesel
exhaust fluid filler neck. Allow any fluid
remaining in the spout to drain back
into the container.
5. Remove the spout from the diesel exhaust fluid filler neck. Replace the
diesel exhaust fluid tank filler cap.
6. Remove the spout from the diesel exhaust fluid container and replace the
cap.
Note: If there is any fluid left in the
container, retain it for later use.
Note: The spout is re-useable. Wash the
spout with clean water prior to storage. Do
not use the spout with any other fluid.
Filling in Cold Climates
Diesel exhaust fluid may freeze when the
temperature is below 12°F (-11°C). Your
vehicle has a preheating system which
allows the fluid to operate below
12°F
(-11°C). If you overfill the diesel exhaust
fluid (AdBlue) tank and the fluid freezes,
it may cause damage not covered by the
vehicle Warranty.
DIESEL PARTICULATE FILTER
- 3.2L DIESEL WARNING:
Do not park or idle your
vehicle over dry leaves, dry grass or other
combustible materials. The regeneration
process creates very high exhaust gas
temperatures and the exhaust will radiate
a considerable amount of heat during and
after regeneration and after you have
switched the engine off. This is a potential
fire hazard.
145
2018 Transit (TTH) Canada/United States of America, JK3J 19A321 AA enUSA, Edition date: 201705, Third-Printing- Engine Emission ControlE228352
Page 152 of 521

Use the manual regeneration feature
when:
•
You are not able to drive in a manner
that allows effective automatic
cleaning. See Diesel Particulate
Filter Automatic Regeneration.
• You choose to manually start the
regeneration process when the engine
is idling.
Note: Changes in the engine or exhaust
sound may be heard during the regeneration
process.
Note: During regeneration at low speed or
engine idle, you may smell a hot metallic
odor and could notice a clicking metallic
sound. This is due to the high temperatures
reached during the regeneration process.
This is normal. Starting Manual Regeneration
You can only start manual regeneration
with the engine running at normal
operating temperature using the
information display. See Information
Messages (page 103).
Note: During the use of manual
regeneration, you may observe a light
amount of white smoke. This is normal.
Note: If you press any pedal during manual
regeneration the engine may turn off. To
protect the exhaust system you may not be
able to restart the engine for 10 minutes. If a warning illuminates you may
not be able to start manual
regeneration.
To start manual regeneration, from the main menu scroll to: Action and Description
Message
Press the
OK button or the right arrow button.
Settings
Press the
OK button or the right arrow button.
Exhaust Filter Full Clean
Soon
Select one of the following:
Press the
OK button or the right arrow button.
Exhaust Filter at Limit
Clean Now Follow the prompts regarding exhaust position as required
to start manual regeneration. Make sure you understand each
prompt. The information display confirms that regeneration
has started and when it is completed.
Press the
OK button or the right arrow button.
Exhaust Filter Over-
loaded Clean Now Follow the prompts regarding exhaust position as required
to start manual regeneration. Make sure you understand each
prompt. The information display confirms that regeneration
has started and when it is completed.
Note: You cannot use the manual regeneration until the diesel particulate filter load
percentage has reached 100 percent. The diesel particulate filter load percentage fluctuates
when driving due to automatic regeneration.
149
2018 Transit (TTH) Canada/United States of America, JK3J 19A321 AA enUSA, Edition date: 201705, Third-Printing- Engine Emission Control
Page 157 of 521

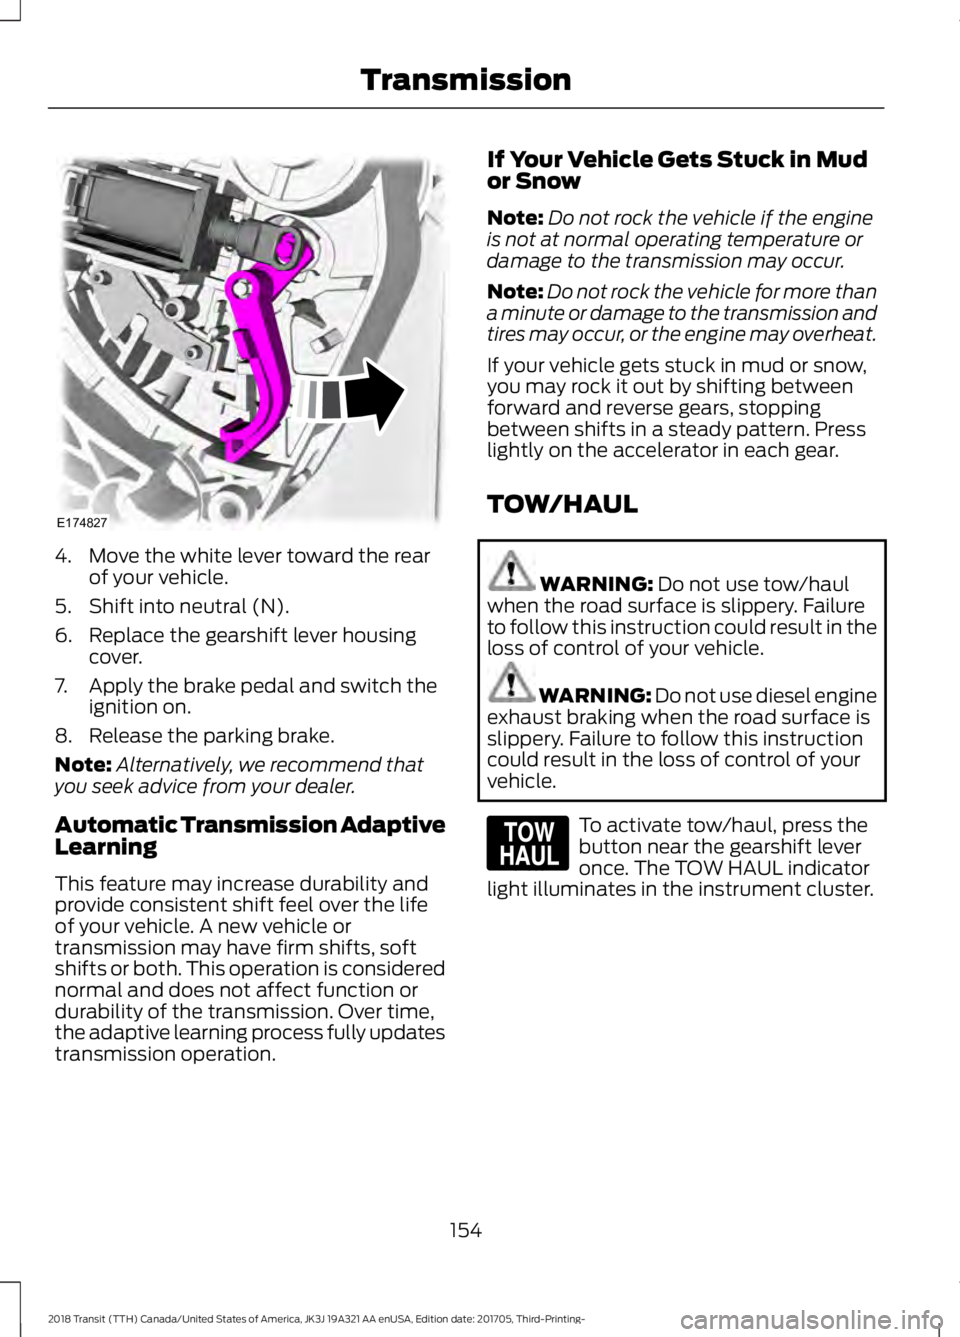
4. Move the white lever toward the rear
of your vehicle.
5. Shift into neutral (N).
6. Replace the gearshift lever housing cover.
7. Apply the brake pedal and switch the ignition on.
8. Release the parking brake.
Note: Alternatively, we recommend that
you seek advice from your dealer.
Automatic Transmission Adaptive
Learning
This feature may increase durability and
provide consistent shift feel over the life
of your vehicle. A new vehicle or
transmission may have firm shifts, soft
shifts or both. This operation is considered
normal and does not affect function or
durability of the transmission. Over time,
the adaptive learning process fully updates
transmission operation. If Your Vehicle Gets Stuck in Mud
or Snow
Note:
Do not rock the vehicle if the engine
is not at normal operating temperature or
damage to the transmission may occur.
Note: Do not rock the vehicle for more than
a minute or damage to the transmission and
tires may occur, or the engine may overheat.
If your vehicle gets stuck in mud or snow,
you may rock it out by shifting between
forward and reverse gears, stopping
between shifts in a steady pattern. Press
lightly on the accelerator in each gear.
TOW/HAUL WARNING: Do not use tow/haul
when the road surface is slippery. Failure
to follow this instruction could result in the
loss of control of your vehicle. WARNING:
Do not use diesel engine
exhaust braking when the road surface is
slippery. Failure to follow this instruction
could result in the loss of control of your
vehicle. To activate tow/haul, press the
button near the gearshift lever
once. The TOW HAUL indicator
light illuminates in the instrument cluster.
154
2018 Transit (TTH) Canada/United States of America, JK3J 19A321 AA enUSA, Edition date: 201705, Third-Printing- TransmissionE174827 E161509
Page 158 of 521

The tow/haul feature:
•
Delays upshifts to reduce the frequency
of transmission shifting.
• Provides engine braking in all forward
gears, which will slow your vehicle and
assist you in controlling your vehicle
when descending a grade.
• Depending on driving conditions and
load conditions, may downshift the
transmission, slow your vehicle and
control your vehicle speed when
descending a hill, without pressing the
accelerator pedal. The amount of
downshift braking provided will vary
based upon the amount the brake
pedal is pressed.
The tow/haul feature improves
transmission operation when towing a
trailer or a heavy load. All transmission
gear ranges are available when using
tow/haul.
To deactivate the tow/haul feature and
return to normal driving mode, press the
button near the gearshift lever twice. The
TOW HAUL light will deactivate. Tow/haul
also deactivates when you power down
your vehicle.
155
2018 Transit (TTH) Canada/United States of America, JK3J 19A321 AA enUSA, Edition date: 201705, Third-Printing- Transmission
Page 159 of 521

GENERAL INFORMATION
Note:
Occasional brake noise is normal. If
a metal-to-metal, continuous grinding or
continuous squeal sound is present, the
brake linings may be worn-out. Have the
system checked by an authorized dealer. If
your vehicle has continuous vibration or
shudder in the steering wheel while braking,
have it checked by an authorized dealer.
Note: Brake dust may accumulate on the
wheels, even under normal driving
conditions. Some dust is inevitable as the
brakes wear and does not contribute to
brake noise. See Cleaning the Wheels
(page 266). See
Warning Lamps and
Indicators (page 95).
Wet brakes result in reduced braking
efficiency. Gently press the brake pedal a
few times when driving from a car wash or
standing water to dry the brakes.
Brake Over Accelerator
In the event the accelerator pedal
becomes stuck or entrapped, apply steady
and firm pressure to the brake pedal to
slow the vehicle and reduce engine power.
If you experience this condition, apply the
brakes and bring your vehicle to a safe
stop. Move the gearshift lever to park (P),
switch the engine off and apply the parking
brake. Inspect the accelerator pedal for
any interference. If none are found and the
condition persists, have your vehicle towed
to the nearest authorized dealer.
Brake Assist
Brake assist detects when you brake
rapidly by measuring the rate at which you
press the brake pedal. It provides
maximum braking efficiency as long as you
press the pedal, and can reduce stopping
distances in critical situations. Anti-lock Brake System
This system helps you maintain steering
control during emergency stops by keeping
the brakes from locking. This lamp momentarily
illuminates when you turn the
ignition on. If the light does not
illuminate during start up, remains on or
flashes, the system may be disabled. Have
the system checked by an authorized
dealer. If the system is disabled, normal
braking is still effective. If the
brake warning lamp illuminates
when you release the parking brake, have
the system checked by an authorized
dealer.
HINTS ON DRIVING WITH
ANTI-LOCK BRAKES
The anti-lock braking system does not
eliminate the risks when:
• You drive too closely to the vehicle in
front of you.
• Your vehicle is hydroplaning.
• You take corners too fast.
• The road surface is poor.
Note: If the system activates, the brake
pedal may pulse and may travel further.
Maintain pressure on the brake pedal. You
may also hear a noise from the system. This
is normal.
156
2018 Transit (TTH) Canada/United States of America, JK3J 19A321 AA enUSA, Edition date: 201705, Third-Printing- BrakesE138644 E138644
Page 160 of 521

PARKING BRAKE - VEHICLES
WITH: MECHANICAL PARKING
BRAKE
Center Parking Brake
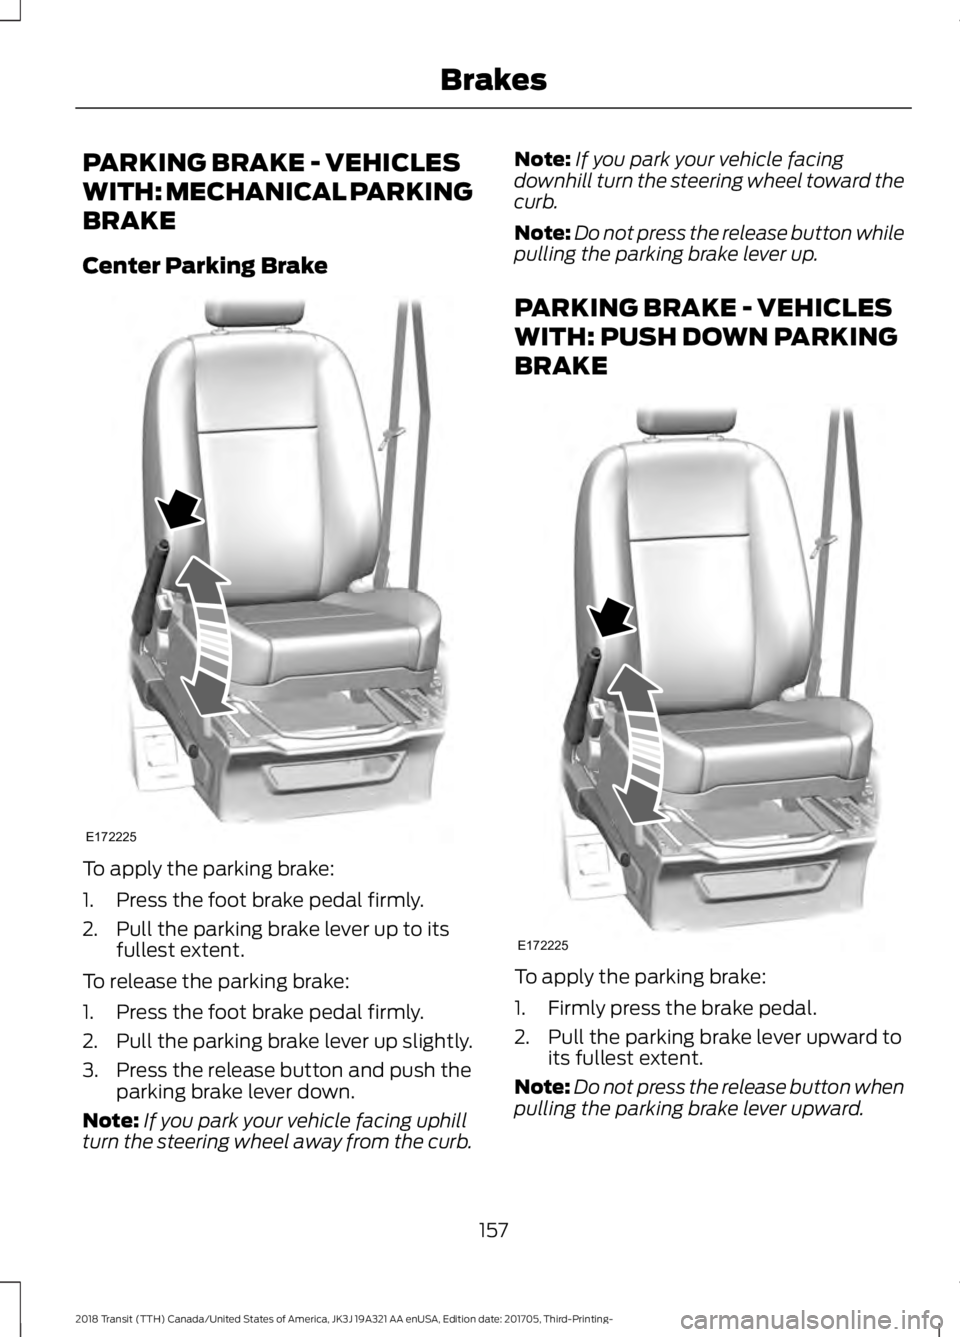
To apply the parking brake:
1. Press the foot brake pedal firmly.
2. Pull the parking brake lever up to its
fullest extent.
To release the parking brake:
1. Press the foot brake pedal firmly.
2. Pull the parking brake lever up slightly.
3. Press the release button and push the parking brake lever down.
Note: If you park your vehicle facing uphill
turn the steering wheel away from the curb. Note:
If you park your vehicle facing
downhill turn the steering wheel toward the
curb.
Note: Do not press the release button while
pulling the parking brake lever up.
PARKING BRAKE - VEHICLES
WITH: PUSH DOWN PARKING
BRAKE To apply the parking brake:
1. Firmly press the brake pedal.
2. Pull the parking brake lever upward to
its fullest extent.
Note: Do not press the release button when
pulling the parking brake lever upward.
157
2018 Transit (TTH) Canada/United States of America, JK3J 19A321 AA enUSA, Edition date: 201705, Third-Printing- BrakesE172225 E172225
Page 161 of 521

Note:
If you park your vehicle on a hill and
facing uphill, shift into park (P) and turn the
steering wheel away from the curb.
Note: If you park your vehicle on a hill and
facing downhill, shift into park (P) and turn
the steering wheel toward the curb.
Note: If required, you can lower the parking
brake lever to the fully down position, for
example to swivel the seat. Push the parking
brake lever downward without pressing the
release button. The parking brake remains
applied until you release it.
Note: A warning lamp illuminates when you
apply the parking brake.
To release the parking brake:
1. Firmly press the brake pedal.
2. Pull the parking brake lever upward to its fullest extent.
3. Press the release button and push the parking brake lever downward.
HILL START ASSIST WARNING: The system does not
replace the parking brake. When you leave
your vehicle, always apply the parking
brake. WARNING:
You must remain in your
vehicle when the system turns on. At all
times, you are responsible for controlling
your vehicle, supervising the system and
intervening, if required. Failure to take care
may result in the loss of control of your
vehicle, serious personal injury or death. WARNING:
The system will turn off
if a malfunction is apparent or if you rev
the engine excessively. Failure to take care
may result in the loss of control of your
vehicle, serious personal injury or death. The system makes it easier to pull away
when your vehicle is on a slope without the
need to use the parking brake.
When the system is active, your vehicle will
remain stationary on the slope for two to
three seconds after you release the brake
pedal. This allows time to move your foot
from the brake to the accelerator pedal.
The system releases the brakes
automatically once the engine has
developed sufficient drive to prevent your
vehicle from rolling down the slope. This
is an advantage when pulling away on a
slope, for example from a car park ramp,
traffic lights or when reversing uphill into
a parking space.
Note:
The system will not operate if the
parking brake is applied.
Note: There is no warning light to indicate
the system is either on or off.
Using Hill Start Assist
1. Press the brake pedal to bring your vehicle to a complete standstill. Keep
the brake pedal pressed.
2. If the sensors detect that your vehicle is on a slope, the system will activate
automatically.
3. When you remove your foot from the brake pedal, your vehicle will remain
on the slope without rolling away for
approximately two to three seconds.
This hold time will automatically be
extended if you are in the process of
driving off.
4. Drive off in the normal manner. The system will release the brakes
automatically.
Note: When you remove your foot from the
brake pedal and press the pedal again when
the system is active, you will experience
significantly reduced brake pedal travel. This
is normal.
158
2018 Transit (TTH) Canada/United States of America, JK3J 19A321 AA enUSA, Edition date: 201705, Third-Printing- Brakes
Page 163 of 521

PRINCIPLE OF OPERATION
The traction control system helps avoid
drive wheel spin and loss of traction.
If your vehicle begins to slide, the system
applies the brakes to individual wheels
and, when needed, reduces engine power
at the same time. If the wheels spin when
accelerating on slippery or loose surfaces,
the system reduces engine power in order
to increase traction.
USING TRACTION CONTROL
WARNING: The stability and traction
control light illuminates steadily if the
system detects a failure. Make sure you
did not manually disable the traction
control system using the information
display controls or the switch. If the
stability control and traction control light
is still illuminating steadily, have the
system serviced by an authorized dealer
immediately. Operating your vehicle with
the traction control disabled could lead to
an increased risk of loss of vehicle control,
vehicle rollover, personal injury and death.
The system automatically turns on each
time you switch the ignition on.
If your vehicle is stuck in mud or snow,
switching traction control off may be
beneficial as this allows the wheels to spin.
Note: When you switch traction control off,
stability control remains fully active.
Switching the System Off
When you switch the system off or on, a
message appears in the information
display showing system status.
You can switch the system off by either
using the information display controls or
the switch. Using the Information Display
Controls
You can switch this feature off or on in the
information display. See General
Information (page 99).
Using a Switch
(If Equipped)
Use the traction control switch on the
instrument panel to switch the system off
or on.
System Indicator Lights and
Messages The stability and traction control
light:
• Temporarily illuminates on engine
start-up.
• Flashes when a driving condition
activates either of the systems.
• Illuminates if a problem occurs in either
of the systems. The stability and traction control
off light temporarily illuminates
on engine start-up and stays on
when you switch the traction control
system off.
160
2018 Transit (TTH) Canada/United States of America, JK3J 19A321 AA enUSA, Edition date: 201705, Third-Printing- Traction ControlE138639 E130458