2018 FORD FUSION ENERGI tow
[x] Cancel search: towPage 79 of 538

GENERAL INFORMATION
Condensation in the Exterior FrontLamps and Rear Lamps
Exterior front lamps and rear lamps havevents to accommodate normal changesin air pressure.
Condensation can be a natural by-productof this design. When moist air enters thelamp assembly through the vents, there isa possibility that condensation can occurwhen the temperature is cold. Whennormal condensation occurs, a fine mistcan form on the interior of the lens. Thefine mist eventually clears and exitsthrough the vents during normal operation.
Clearing time may take as long as 48 hoursunder dry weather conditions.
Examples of acceptable condensation are:
•The presence of a fine mist (no streaks,drip marks or large droplets).
•A fine mist covers less than 50% of thelens.
Examples of unacceptable condensationare:
•A water puddle inside the lamp.
•Streaks, drip marks or large dropletspresent on the interior of the lens.
If you see any unacceptable condensation,have your vehicle checked by an authorizeddealer.
LIGHTING CONTROL
Off.A
Parking lamps, instrument panellamps, license plate lamps andtail lamps.
B
Headlamps.C
Headlamp High Beam
Push the lever away from you to switchthe high beam on.
Push the lever forward again or pull thelever toward you to switch the high beamsoff.
76
Fusion Energi / Fusion Hybrid (CC7) Hybrid Electric Vehicle (HEV)/Plug-In Hybrid Electric Vehicle (PHEV), Canada/United States of America, enUSA, Edition date: 201705, Second Printing
LightingE142449 E162679
Page 80 of 538

Headlamp Flasher
Slightly pull the lever toward you andrelease it to flash the headlamps.
AUTOLAMPS
WARNING
The system does not relieve you ofyour responsibility to drive with duecare and attention. You may need tooverride the system if it does not turn theheadlamps on in low visibility conditions,for example daytime fog.
When the lighting control is in theautolamps position, the headlamps turnon in low light situations, or when thewipers turn on.
The headlamps remain on for a period oftime after you switch the ignition off. Usethe information display controls to adjustthe period of time that the headlampsremain on.
Note: If you switch the autolamps on, youcannot switch the high beams on until thesystem turns the low beams on.
Windshield Wiper ActivatedHeadlamps
When you switch the autolamps on, theheadlamps turn on within 10 seconds ofswitching the wipers on. They turn offapproximately 60 seconds after you switchthe windshield wipers off.
The headlamps do not turn on with thewipers:
•During a single wipe.
•When using the windshield washers.
•If the wipers are in intermittent mode.
Note:If you switch the autolamps and theautowipers on, the headlamps turn on whenthe windshield wipers continuously operate.
INSTRUMENT LIGHTING
DIMMER
Note:When disconnecting the battery orwhen it runs out of charge, the illuminatedcomponents turn to the maximum setting.
77
Fusion Energi / Fusion Hybrid (CC7) Hybrid Electric Vehicle (HEV)/Plug-In Hybrid Electric Vehicle (PHEV), Canada/United States of America, enUSA, Edition date: 201705, Second Printing
LightingE162680 E142451
Page 88 of 538
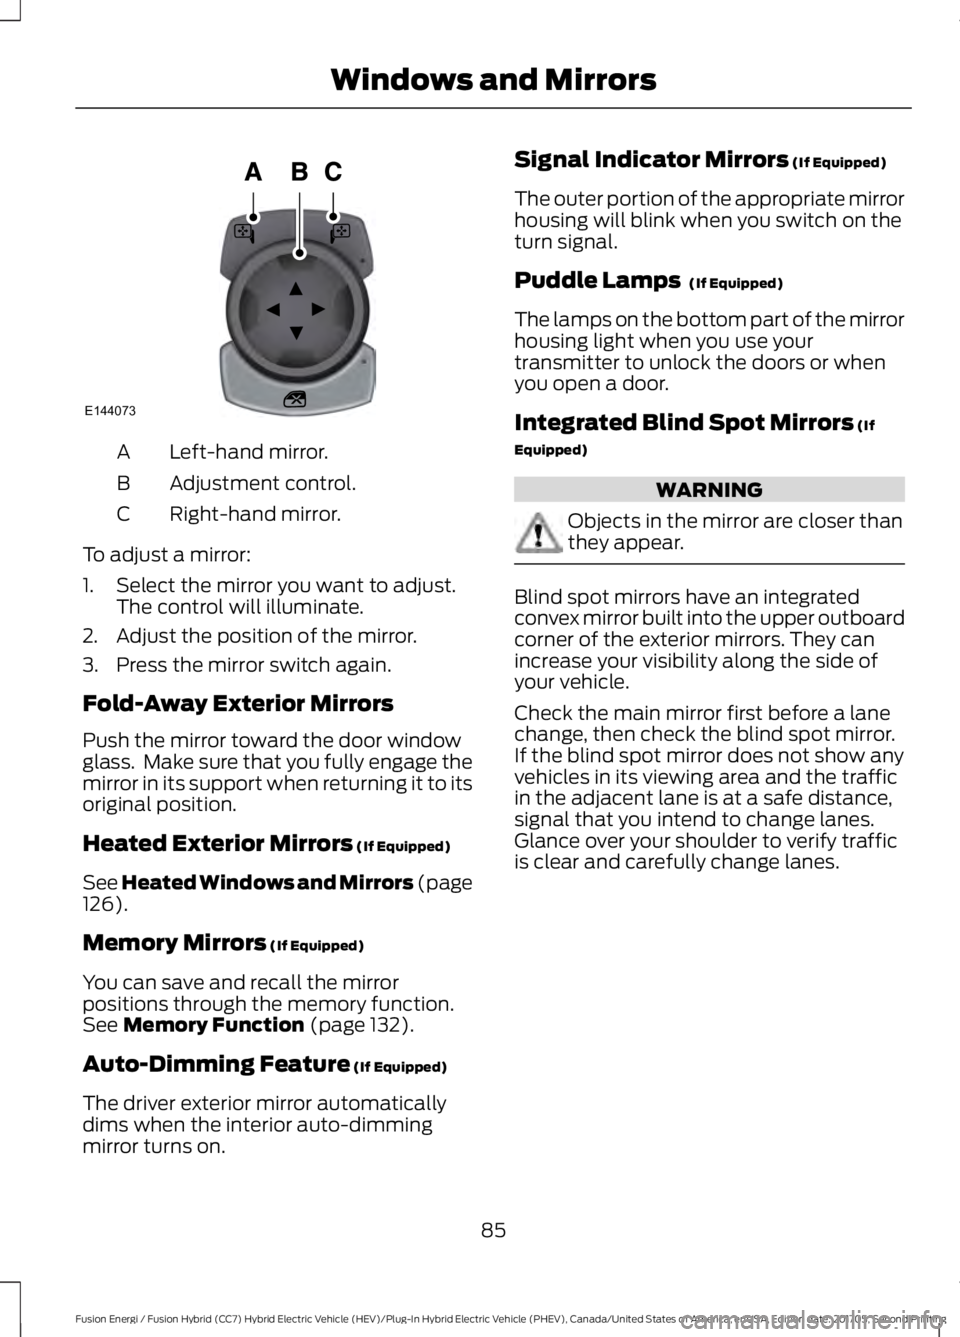
Left-hand mirror.A
Adjustment control.B
Right-hand mirror.C
To adjust a mirror:
1. Select the mirror you want to adjust.The control will illuminate.
2. Adjust the position of the mirror.
3. Press the mirror switch again.
Fold-Away Exterior Mirrors
Push the mirror toward the door windowglass. Make sure that you fully engage themirror in its support when returning it to itsoriginal position.
Heated Exterior Mirrors (If Equipped)
See Heated Windows and Mirrors (page126).
Memory Mirrors (If Equipped)
You can save and recall the mirrorpositions through the memory function.See Memory Function (page 132).
Auto-Dimming Feature (If Equipped)
The driver exterior mirror automaticallydims when the interior auto-dimmingmirror turns on.
Signal Indicator Mirrors (If Equipped)
The outer portion of the appropriate mirrorhousing will blink when you switch on theturn signal.
Puddle Lamps (If Equipped)
The lamps on the bottom part of the mirrorhousing light when you use yourtransmitter to unlock the doors or whenyou open a door.
Integrated Blind Spot Mirrors (If
Equipped)
WARNING
Objects in the mirror are closer thanthey appear.
Blind spot mirrors have an integratedconvex mirror built into the upper outboardcorner of the exterior mirrors. They canincrease your visibility along the side ofyour vehicle.
Check the main mirror first before a lanechange, then check the blind spot mirror.If the blind spot mirror does not show anyvehicles in its viewing area and the trafficin the adjacent lane is at a safe distance,signal that you intend to change lanes.Glance over your shoulder to verify trafficis clear and carefully change lanes.
85
Fusion Energi / Fusion Hybrid (CC7) Hybrid Electric Vehicle (HEV)/Plug-In Hybrid Electric Vehicle (PHEV), Canada/United States of America, enUSA, Edition date: 201705, Second Printing
Windows and MirrorsE144073
Page 89 of 538
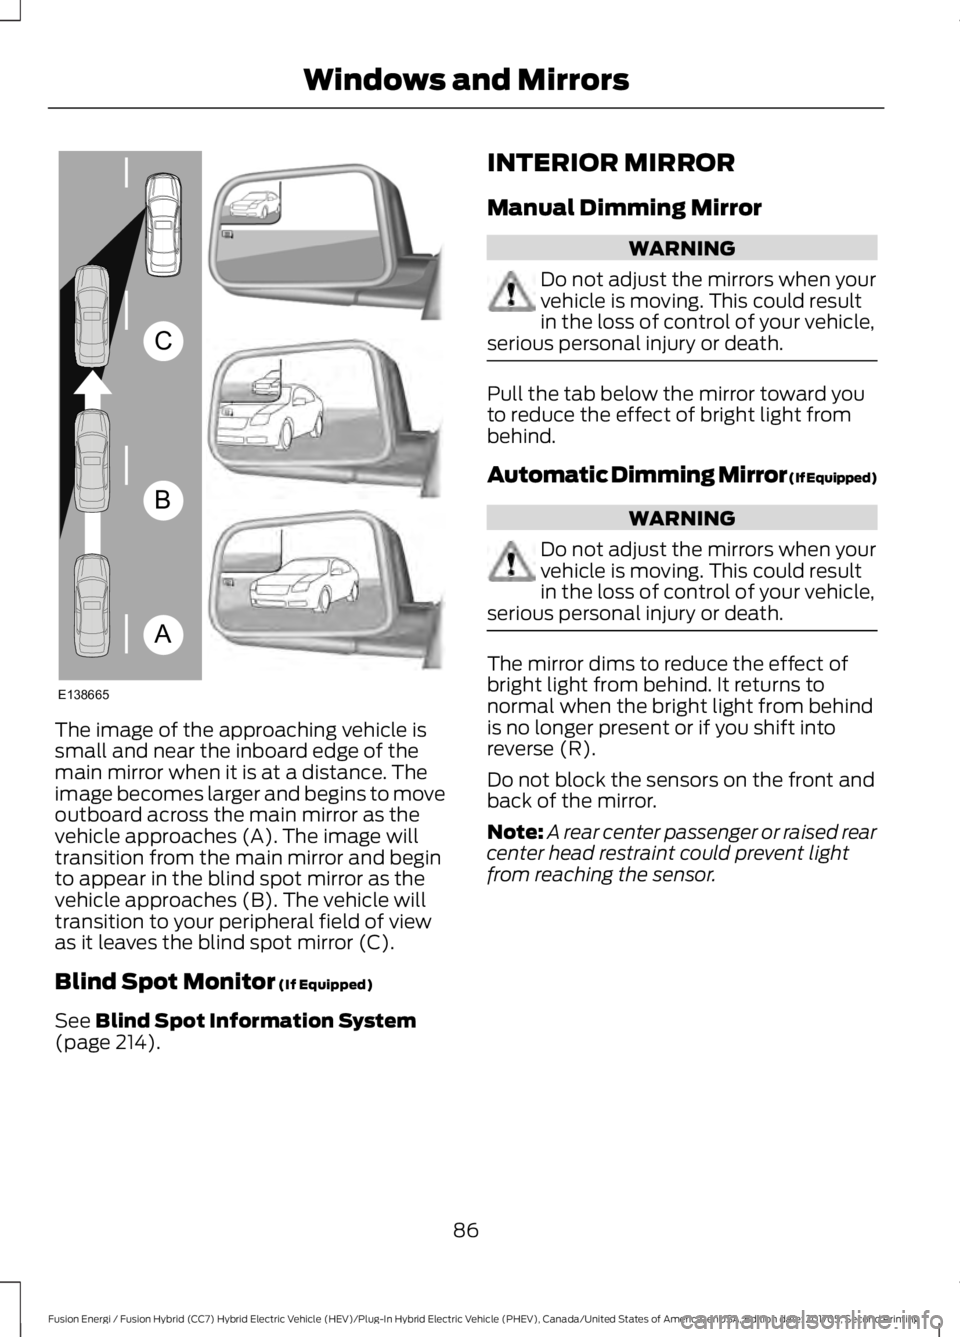
The image of the approaching vehicle issmall and near the inboard edge of themain mirror when it is at a distance. Theimage becomes larger and begins to moveoutboard across the main mirror as thevehicle approaches (A). The image willtransition from the main mirror and beginto appear in the blind spot mirror as thevehicle approaches (B). The vehicle willtransition to your peripheral field of viewas it leaves the blind spot mirror (C).
Blind Spot Monitor (If Equipped)
See Blind Spot Information System(page 214).
INTERIOR MIRROR
Manual Dimming Mirror
WARNING
Do not adjust the mirrors when yourvehicle is moving. This could resultin the loss of control of your vehicle,serious personal injury or death.
Pull the tab below the mirror toward youto reduce the effect of bright light frombehind.
Automatic Dimming Mirror (If Equipped)
WARNING
Do not adjust the mirrors when yourvehicle is moving. This could resultin the loss of control of your vehicle,serious personal injury or death.
The mirror dims to reduce the effect ofbright light from behind. It returns tonormal when the bright light from behindis no longer present or if you shift intoreverse (R).
Do not block the sensors on the front andback of the mirror.
Note:A rear center passenger or raised rearcenter head restraint could prevent lightfrom reaching the sensor.
86
Fusion Energi / Fusion Hybrid (CC7) Hybrid Electric Vehicle (HEV)/Plug-In Hybrid Electric Vehicle (PHEV), Canada/United States of America, enUSA, Edition date: 201705, Second Printing
Windows and MirrorsA
B
C
E138665
Page 90 of 538
SUN VISORS
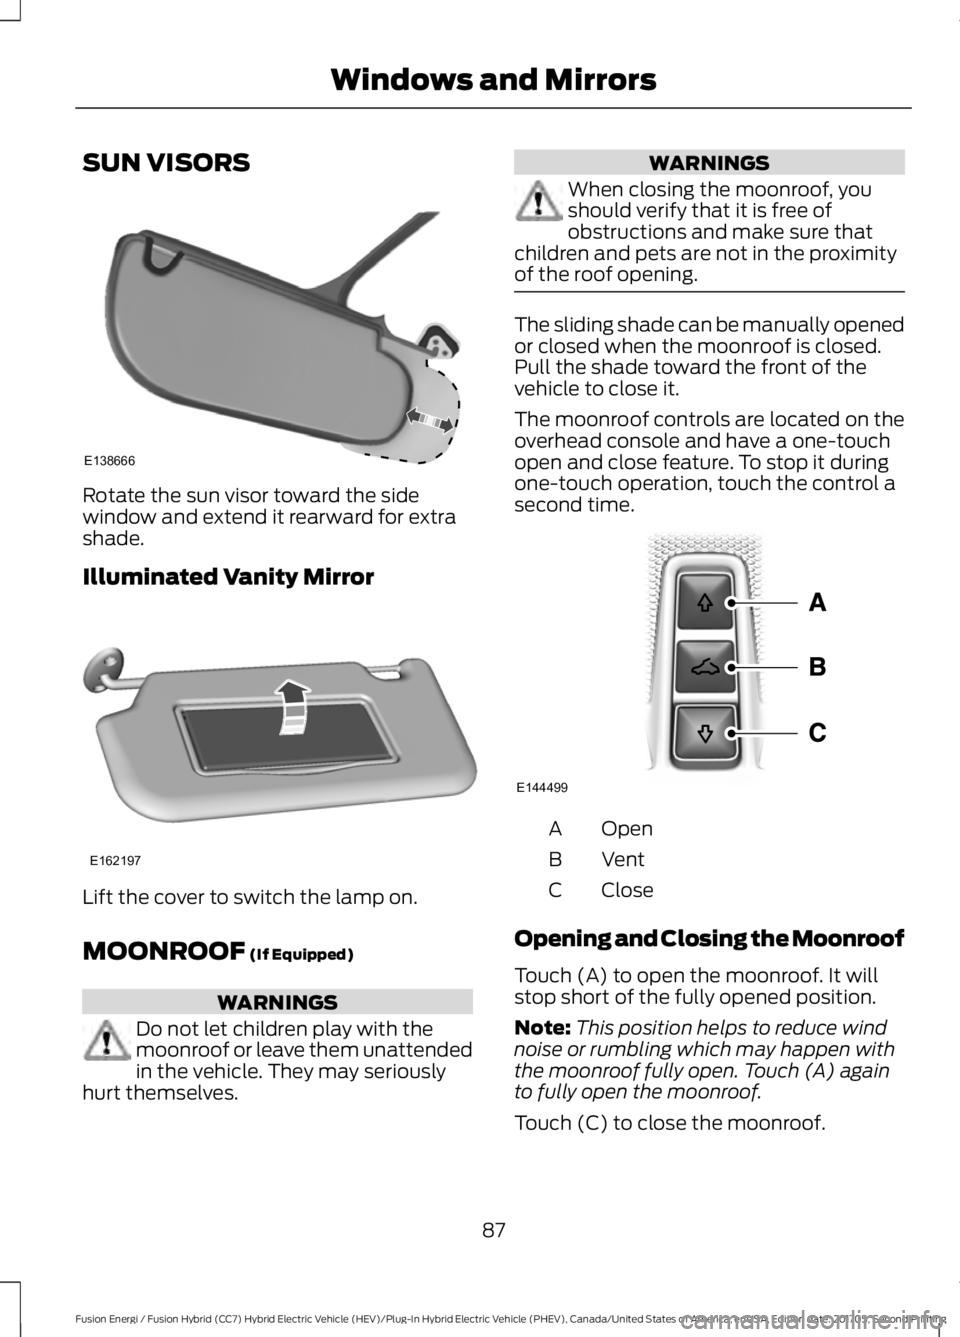
Rotate the sun visor toward the sidewindow and extend it rearward for extrashade.
Illuminated Vanity Mirror
Lift the cover to switch the lamp on.
MOONROOF (If Equipped)
WARNINGS
Do not let children play with themoonroof or leave them unattendedin the vehicle. They may seriouslyhurt themselves.
WARNINGS
When closing the moonroof, youshould verify that it is free ofobstructions and make sure thatchildren and pets are not in the proximityof the roof opening.
The sliding shade can be manually openedor closed when the moonroof is closed.Pull the shade toward the front of thevehicle to close it.
The moonroof controls are located on theoverhead console and have a one-touchopen and close feature. To stop it duringone-touch operation, touch the control asecond time.
OpenA
VentB
CloseC
Opening and Closing the Moonroof
Touch (A) to open the moonroof. It willstop short of the fully opened position.
Note:This position helps to reduce windnoise or rumbling which may happen withthe moonroof fully open. Touch (A) againto fully open the moonroof.
Touch (C) to close the moonroof.
87
Fusion Energi / Fusion Hybrid (CC7) Hybrid Electric Vehicle (HEV)/Plug-In Hybrid Electric Vehicle (PHEV), Canada/United States of America, enUSA, Edition date: 201705, Second Printing
Windows and MirrorsE138666 E162197 E144499
Page 93 of 538

An optional small battery gauge is providedfor Hybrid vehicles and for Hybrid Modeonly in Energi vehicles. This can be enabledin the Settings menu under Battery Display.See General Information (page 97). Thefill level, or State of Charge, indicates theamount of energy stored in the highvoltage battery as a percent of total energycapacity. The level increases or decreasesas the battery charges and dischargesduring normal operation.
Regen Display
A circular arrow symbol displays whenenergy is being recaptured through theregenerative braking system. Regen Displaycan be disabled in the Settings menu. SeeGeneral Information (page 97).
Fuel Gauge:
Note:The fuel gauge may vary slightlywhen your vehicle is moving or on a gradient.
Switch the ignition on. The fuel gaugeindicates approximately how much fuel isin the fuel tank. The arrow adjacent to thefuel pump symbol indicates on which sideof your vehicle the fuel filler door is located.
The needle should move toward F whenyou refuel your vehicle. If the needle pointsto E after adding fuel, this indicates yourvehicle needs service soon.
After refueling some variability in needleposition is normal:
•It may take a short time for the needleto reach full after leaving the gasstation. This is normal and dependsupon the slope of pavement at the gasstation.
•The fuel amount dispensed into thetank is a little less or more than thegauge indicated. This is normal anddepends upon the slope of pavementat the gas station.
•If the gas station nozzle shuts offbefore the tank is full, try a differentgas pump nozzle.
•There is a small reserve left in the tankwhen the fuel gauge reaches empty.
Low Fuel Reminder
A low fuel level reminder displays andsounds when the distance to emptyreaches 75 mi (120 km) for MyKey, and at50 mi (80 km), 25 mi (40 km), 12 mi(20 km) and 0 mi (0 km) for all vehiclekeys.
Variations:
Note:The low fuel reminder can appear atdifferent fuel gauge positions depending onfuel economy conditions. This variation isnormal.
Vehicle Settings and Personalization
Display/Trip
See General Information (page 97).
Information
See General Information (page 97).
Settings
See General Information (page 97).
Brake Coach Display:
The Brake Coach appears after the vehiclehas come to a stop. It coaches you to brakein a manner which maximizes the amountof energy returned through theregenerative braking system. The percentdisplayed is an indication of theregenerative braking efficiency with 100%representing the maximum amount ofenergy recovery.
You can switch this feature on or off in theinformation displays settings menu. SeeGeneral Information (page 97).
90
Fusion Energi / Fusion Hybrid (CC7) Hybrid Electric Vehicle (HEV)/Plug-In Hybrid Electric Vehicle (PHEV), Canada/United States of America, enUSA, Edition date: 201705, Second Printing
Instrument Cluster
Page 133 of 538
The front head restraints tilt for extracomfort.
1. Adjust the seat backrest to an uprightdriving or riding position.
2.Pivot the head restraint forward towardyour head to the desired position.
After the head restraint reaches theforward-most tilt position, pivot it forwardagain to release it to the rearward, un-tiltedposition.
MANUAL SEATS (If Equipped)
WARNINGS
Do not adjust the driver seat orseatback when your vehicle ismoving.
Rock the seat backward and forwardafter releasing the lever to make surethat it is fully engaged.
Reclining the seatback can cause anoccupant to slide under the seat'ssafety belt, resulting in severepersonal injuries in the event of a crash.
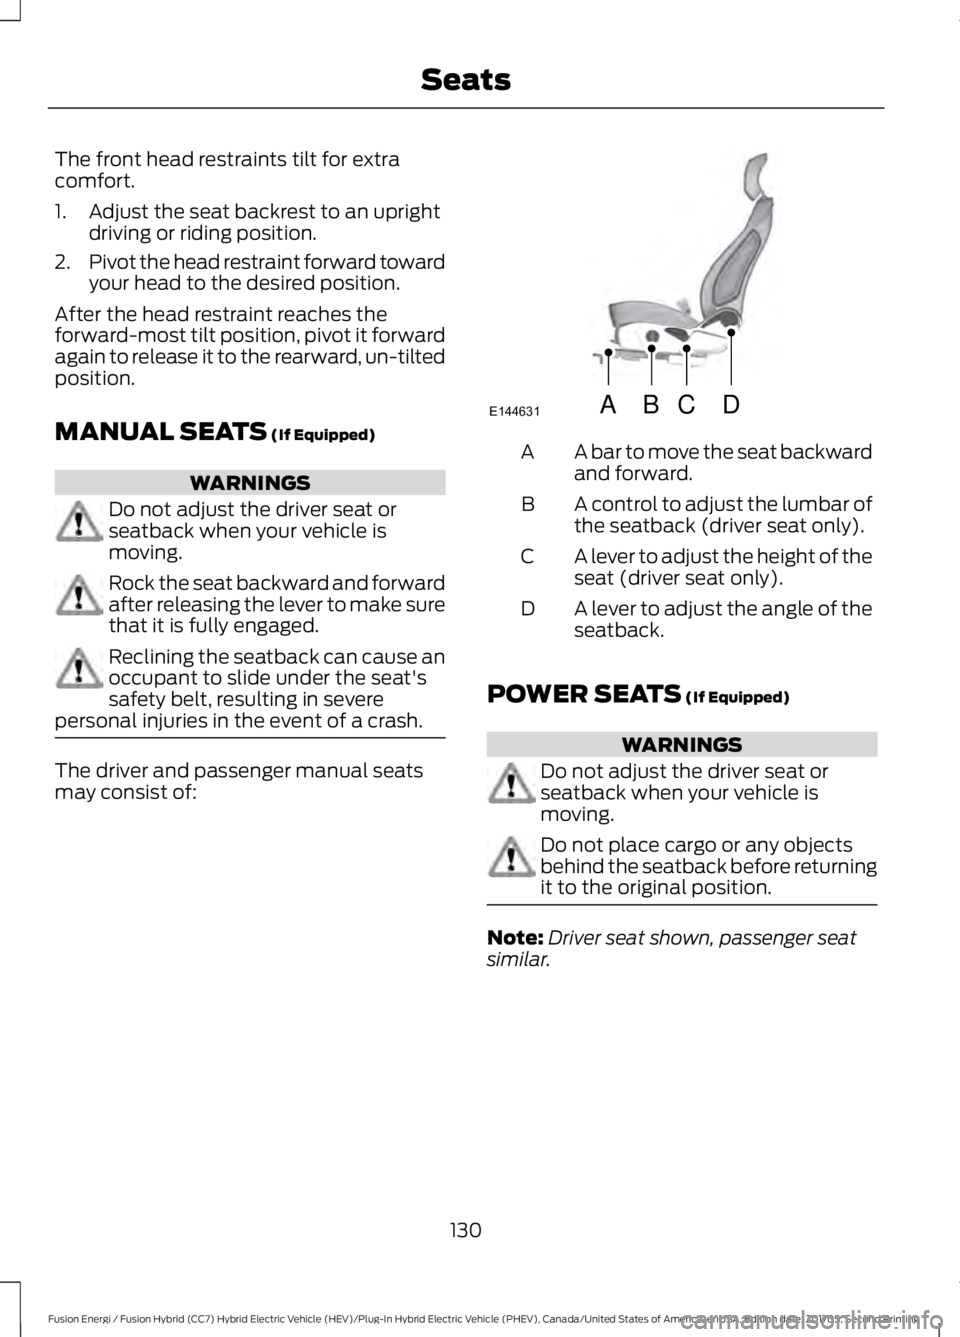
The driver and passenger manual seatsmay consist of:
A bar to move the seat backwardand forward.A
A control to adjust the lumbar ofthe seatback (driver seat only).B
A lever to adjust the height of theseat (driver seat only).C
A lever to adjust the angle of theseatback.D
POWER SEATS (If Equipped)
WARNINGS
Do not adjust the driver seat orseatback when your vehicle ismoving.
Do not place cargo or any objectsbehind the seatback before returningit to the original position.
Note:Driver seat shown, passenger seatsimilar.
130
Fusion Energi / Fusion Hybrid (CC7) Hybrid Electric Vehicle (HEV)/Plug-In Hybrid Electric Vehicle (PHEV), Canada/United States of America, enUSA, Edition date: 201705, Second Printing
SeatsABCD
E144631
Page 137 of 538
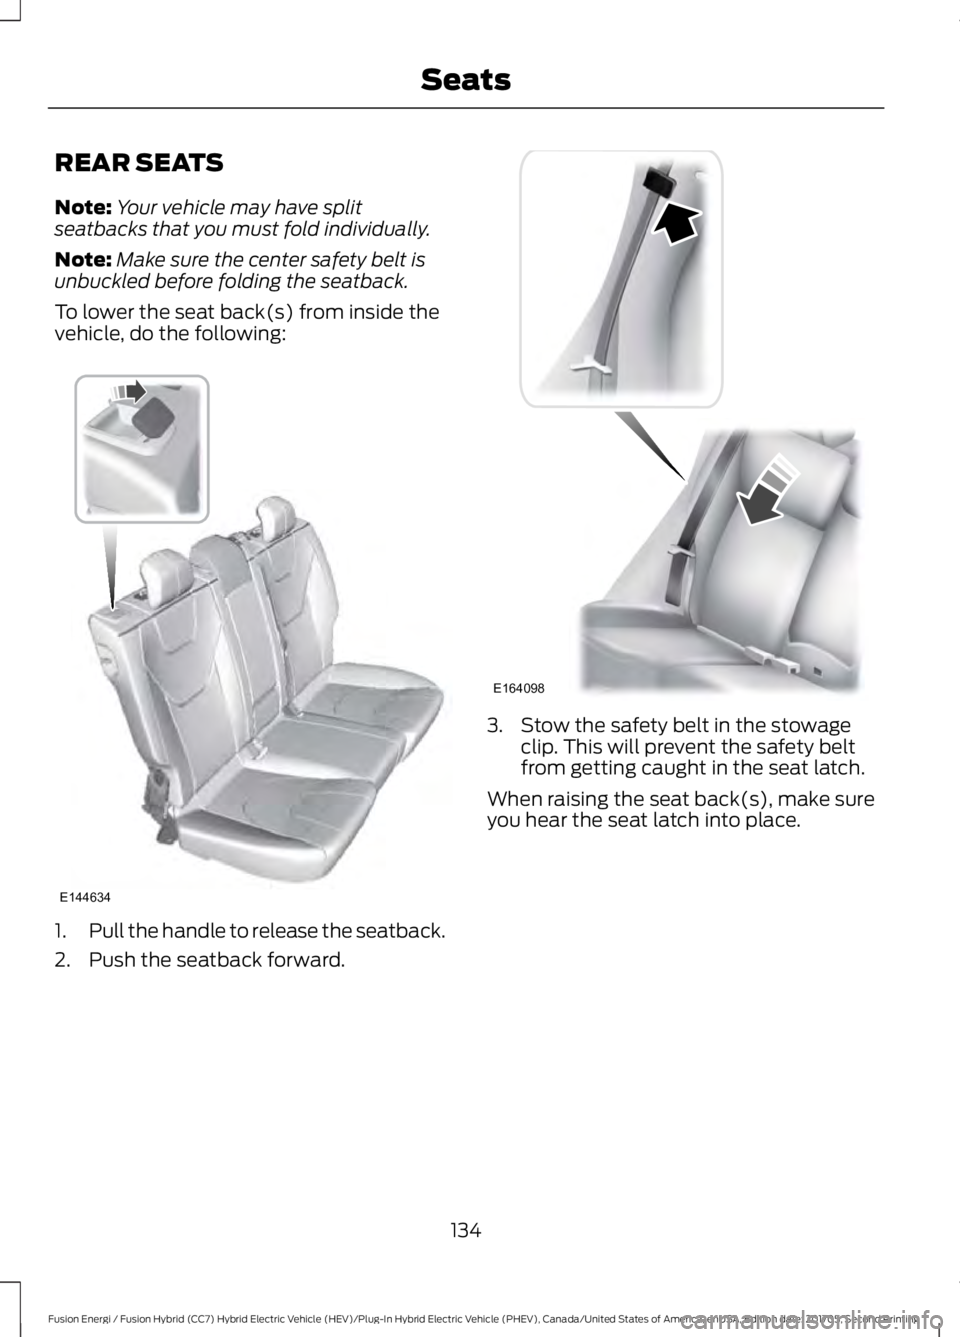
REAR SEATS
Note:Your vehicle may have splitseatbacks that you must fold individually.
Note:Make sure the center safety belt isunbuckled before folding the seatback.
To lower the seat back(s) from inside thevehicle, do the following:
1.Pull the handle to release the seatback.
2. Push the seatback forward.
3. Stow the safety belt in the stowageclip. This will prevent the safety beltfrom getting caught in the seat latch.
When raising the seat back(s), make sureyou hear the seat latch into place.
134
Fusion Energi / Fusion Hybrid (CC7) Hybrid Electric Vehicle (HEV)/Plug-In Hybrid Electric Vehicle (PHEV), Canada/United States of America, enUSA, Edition date: 201705, Second Printing
SeatsE144634 E164098