2018 FORD FUSION ENERGI height
[x] Cancel search: heightPage 39 of 538
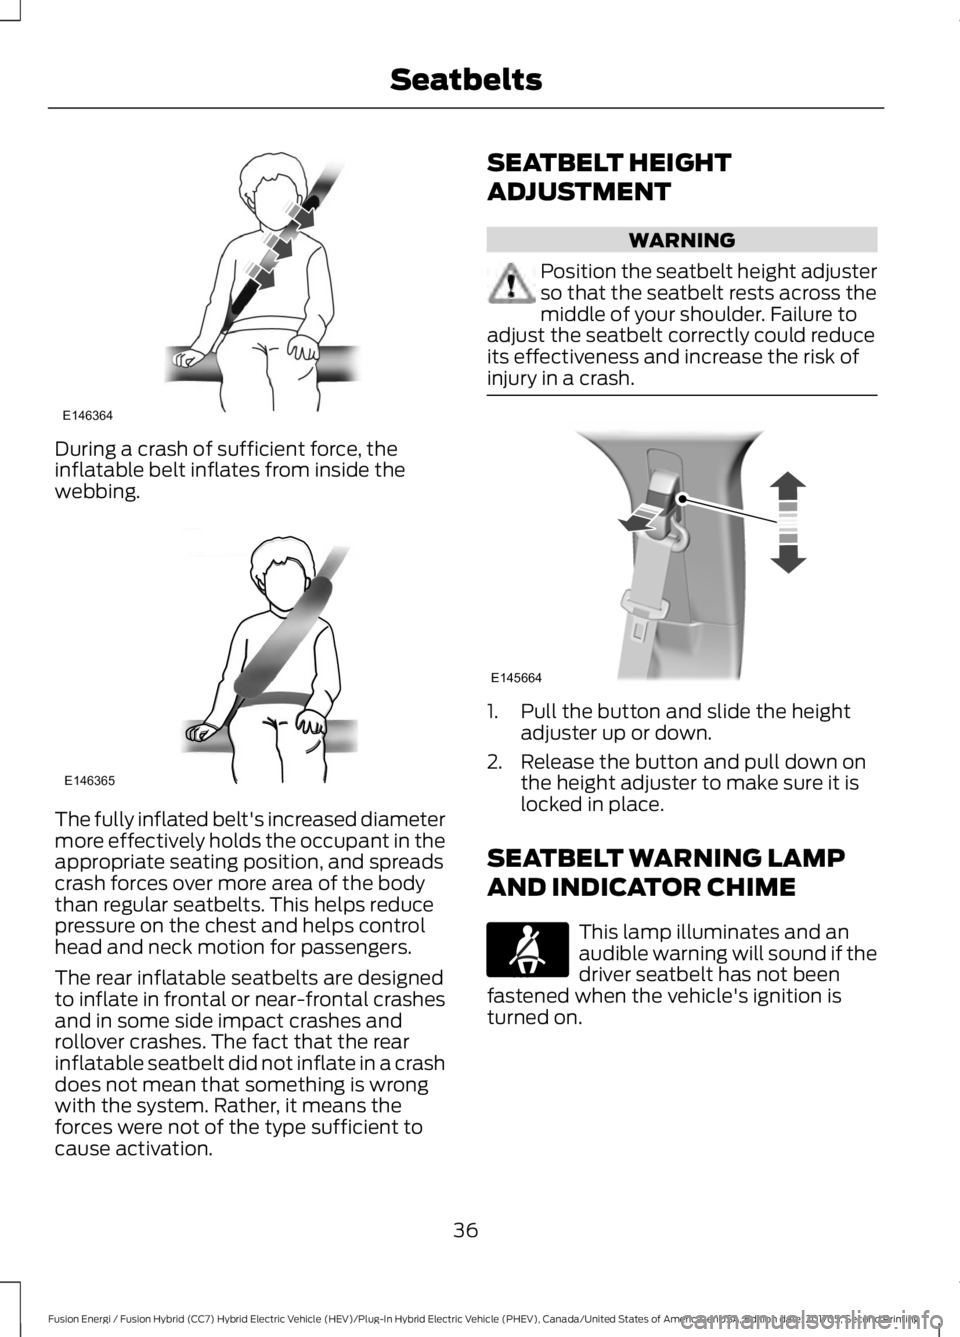
During a crash of sufficient force, theinflatable belt inflates from inside thewebbing.
The fully inflated belt's increased diametermore effectively holds the occupant in theappropriate seating position, and spreadscrash forces over more area of the bodythan regular seatbelts. This helps reducepressure on the chest and helps controlhead and neck motion for passengers.
The rear inflatable seatbelts are designedto inflate in frontal or near-frontal crashesand in some side impact crashes androllover crashes. The fact that the rearinflatable seatbelt did not inflate in a crashdoes not mean that something is wrongwith the system. Rather, it means theforces were not of the type sufficient tocause activation.
SEATBELT HEIGHT
ADJUSTMENT
WARNING
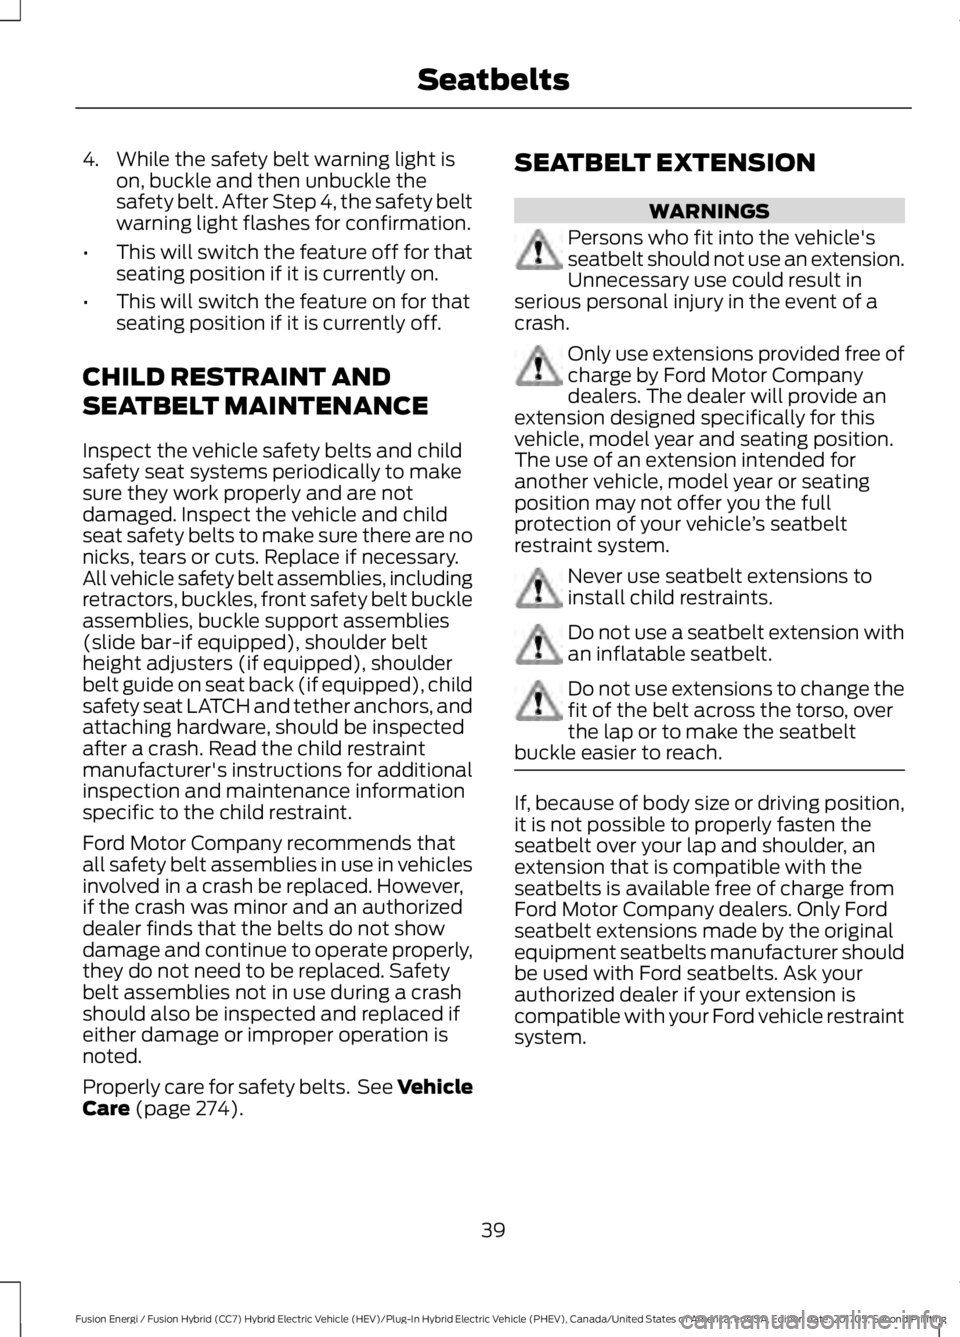
Position the seatbelt height adjusterso that the seatbelt rests across themiddle of your shoulder. Failure toadjust the seatbelt correctly could reduceits effectiveness and increase the risk ofinjury in a crash.
1. Pull the button and slide the heightadjuster up or down.
2. Release the button and pull down onthe height adjuster to make sure it islocked in place.
SEATBELT WARNING LAMP
AND INDICATOR CHIME
This lamp illuminates and anaudible warning will sound if thedriver seatbelt has not beenfastened when the vehicle's ignition isturned on.
36
Fusion Energi / Fusion Hybrid (CC7) Hybrid Electric Vehicle (HEV)/Plug-In Hybrid Electric Vehicle (PHEV), Canada/United States of America, enUSA, Edition date: 201705, Second Printing
SeatbeltsE146364 E146365 E145664 E71880
Page 42 of 538
4. While the safety belt warning light ison, buckle and then unbuckle thesafety belt. After Step 4, the safety beltwarning light flashes for confirmation.
•This will switch the feature off for thatseating position if it is currently on.
•This will switch the feature on for thatseating position if it is currently off.
CHILD RESTRAINT AND
SEATBELT MAINTENANCE
Inspect the vehicle safety belts and childsafety seat systems periodically to makesure they work properly and are notdamaged. Inspect the vehicle and childseat safety belts to make sure there are nonicks, tears or cuts. Replace if necessary.All vehicle safety belt assemblies, includingretractors, buckles, front safety belt buckleassemblies, buckle support assemblies(slide bar-if equipped), shoulder beltheight adjusters (if equipped), shoulderbelt guide on seat back (if equipped), childsafety seat LATCH and tether anchors, andattaching hardware, should be inspectedafter a crash. Read the child restraintmanufacturer's instructions for additionalinspection and maintenance informationspecific to the child restraint.
Ford Motor Company recommends thatall safety belt assemblies in use in vehiclesinvolved in a crash be replaced. However,if the crash was minor and an authorizeddealer finds that the belts do not showdamage and continue to operate properly,they do not need to be replaced. Safetybelt assemblies not in use during a crashshould also be inspected and replaced ifeither damage or improper operation isnoted.
Properly care for safety belts. See VehicleCare (page 274).
SEATBELT EXTENSION
WARNINGS
Persons who fit into the vehicle'sseatbelt should not use an extension.Unnecessary use could result inserious personal injury in the event of acrash.
Only use extensions provided free ofcharge by Ford Motor Companydealers. The dealer will provide anextension designed specifically for thisvehicle, model year and seating position.The use of an extension intended foranother vehicle, model year or seatingposition may not offer you the fullprotection of your vehicle’s seatbeltrestraint system.
Never use seatbelt extensions toinstall child restraints.
Do not use a seatbelt extension withan inflatable seatbelt.
Do not use extensions to change thefit of the belt across the torso, overthe lap or to make the seatbeltbuckle easier to reach.
If, because of body size or driving position,it is not possible to properly fasten theseatbelt over your lap and shoulder, anextension that is compatible with theseatbelts is available free of charge fromFord Motor Company dealers. Only Fordseatbelt extensions made by the originalequipment seatbelts manufacturer shouldbe used with Ford seatbelts. Ask yourauthorized dealer if your extension iscompatible with your Ford vehicle restraintsystem.
39
Fusion Energi / Fusion Hybrid (CC7) Hybrid Electric Vehicle (HEV)/Plug-In Hybrid Electric Vehicle (PHEV), Canada/United States of America, enUSA, Edition date: 201705, Second Printing
Seatbelts
Page 82 of 538

The other lighting control switch positionsdo not turn on the daytime running lamps.
If the daytime running lamps are off in theinformation display, the lamps stay off inall switch positions.
AUTOMATIC HIGH BEAM
CONTROL (If Equipped)
WARNING
The system does not relieve you ofyour responsibility to drive with duecare and attention. You may need tooverride the system if it does not turn thehigh beams on or off.
The system turns on high beams if it is darkenough and no other traffic is present. If itdetects an approaching vehicle’sheadlamps or tail lamps, or street lightingahead, the system turns off high beamsbefore they can distract other road users.Low beams remain on.
Note:The system may not operate properlyif the sensor is blocked. Keep the windshieldfree from obstruction or damage.
Note:The system may not operate properlyin cold or inclement conditions. You canswitch on the high beams by overriding thesystem.
Note:If the system detects a blockage, forexample bird droppings, bug splatter, snowor ice, the system goes into low beam modeuntil you clear the blockage. A message mayappear in the information display if thecamera is blocked.
Note:Using much larger tires or equippingvehicle accessories such as snowplows canmodify your vehicle's ride height anddegrade automatic high beam controlperformance.
A camera sensor, centrally mountedbehind the windshield of your vehicle,continuously monitors conditions to turnthe high beams on and off.
Once the system is active, the high beamsturn on if:
•The ambient light level is low enough.
•There is no traffic in front of yourvehicle.
•The vehicle speed is greater thanapproximately 32 mph (51 km/h).
The high beams turn off if:
•The ambient light level is high enoughthat high beams are not required.
•The system detects an approachingvehicle's headlamps or tail lamps.
•The vehicle speed falls belowapproximately 27 mph (44 km/h).
•The system detects severe rain, snowor fog.
•The camera is blocked.
Switching the System On and Off
Switch the system on using the informationdisplay. See Information Displays (page97).
Switch the lighting control to theautolamps position. See Autolamps(page 77).
79
Fusion Energi / Fusion Hybrid (CC7) Hybrid Electric Vehicle (HEV)/Plug-In Hybrid Electric Vehicle (PHEV), Canada/United States of America, enUSA, Edition date: 201705, Second Printing
LightingE142451
Page 133 of 538
The front head restraints tilt for extracomfort.
1. Adjust the seat backrest to an uprightdriving or riding position.
2.Pivot the head restraint forward towardyour head to the desired position.
After the head restraint reaches theforward-most tilt position, pivot it forwardagain to release it to the rearward, un-tiltedposition.
MANUAL SEATS (If Equipped)
WARNINGS
Do not adjust the driver seat orseatback when your vehicle ismoving.
Rock the seat backward and forwardafter releasing the lever to make surethat it is fully engaged.
Reclining the seatback can cause anoccupant to slide under the seat'ssafety belt, resulting in severepersonal injuries in the event of a crash.
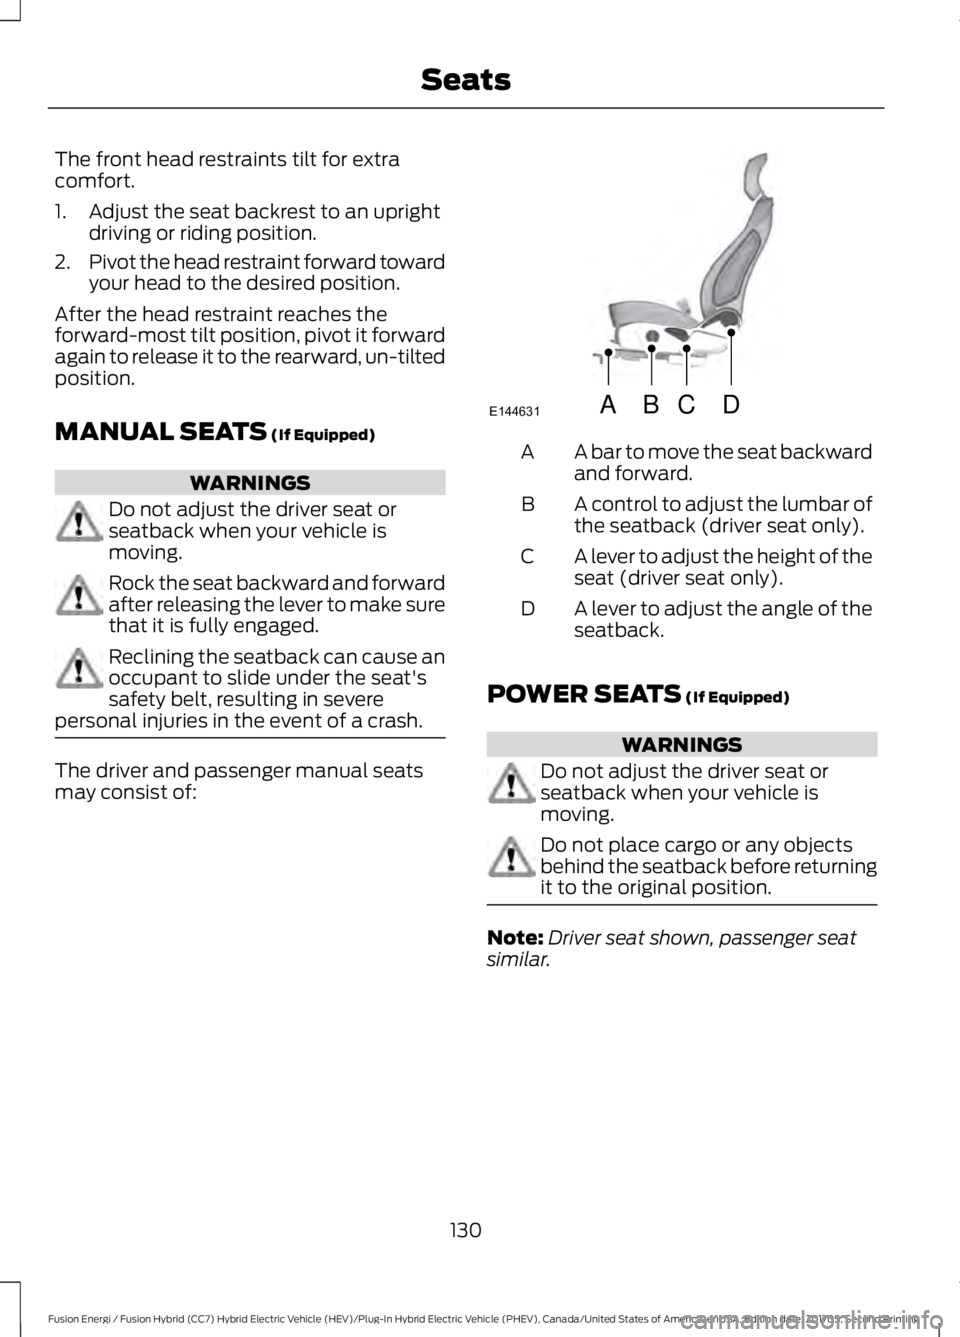
The driver and passenger manual seatsmay consist of:
A bar to move the seat backwardand forward.A
A control to adjust the lumbar ofthe seatback (driver seat only).B
A lever to adjust the height of theseat (driver seat only).C
A lever to adjust the angle of theseatback.D
POWER SEATS (If Equipped)
WARNINGS
Do not adjust the driver seat orseatback when your vehicle ismoving.
Do not place cargo or any objectsbehind the seatback before returningit to the original position.
Note:Driver seat shown, passenger seatsimilar.
130
Fusion Energi / Fusion Hybrid (CC7) Hybrid Electric Vehicle (HEV)/Plug-In Hybrid Electric Vehicle (PHEV), Canada/United States of America, enUSA, Edition date: 201705, Second Printing
SeatsABCD
E144631
Page 272 of 538

Clean the wiper blades with washer fluidor water applied with a soft sponge orcloth.
CHANGING THE WIPER
BLADES
The wiper arms can be manually movedwhen the ignition is off. This allows for easeof blade replacement and cleaning underthe blades.
1. Pull the wiper blade and arm awayfrom the glass. Press the lockingbuttons together.
2. Rotate and remove the wiper blade.
3. Install in the reverse order.
Note:Make sure that the wiper blade locksinto place. Lower the wiper arm and bladeback to the windshield. The wiper arms willautomatically return to their normal positionwhen the ignition is turned on.
Replace wiper blades at least once peryear for optimum performance.
Poor wiper quality can be improved bycleaning the wiper blades and thewindshield.
ADJUSTING THE HEADLAMPS
Vertical Aim Adjustment
The headlamps on your vehicle areproperly aimed at the assembly plant. Ifyour vehicle has been in an accident, thealignment of your headlamps should bechecked by your authorized dealer.
Headlamp Aiming Target
8 feet (2.4 meters)A
Center height of lamp to groundB
25 feet (7.6 meters)C
Horizontal reference lineD
Vertical Aim Adjustment Procedure
1. Park the vehicle directly in front of awall or screen on a level surface,approximately 25 ft (7.6 m) away.
2. Measure the height of the headlampbulb center from the ground and markan 8 ft (2.4 m) horizontal reference lineon the vertical wall or screen at thisheight.
Note:To see a clearer light pattern foradjusting, you may want to block the lightfrom one headlamp while adjusting theother.
269
Fusion Energi / Fusion Hybrid (CC7) Hybrid Electric Vehicle (HEV)/Plug-In Hybrid Electric Vehicle (PHEV), Canada/United States of America, enUSA, Edition date: 201705, Second Printing
MaintenanceE129990
1
1 2 E142592
Page 293 of 538

Information Contained on theTire Sidewall
Both U.S. and Canada Federalregulations require tiremanufacturers to placestandardized information on thesidewall of all tires. Thisinformation identifies anddescribes the fundamentalcharacteristics of the tire and alsoprovides a U.S. DOT TireIdentification Number for safetystandard certification and in caseof a recall.
Information on P Type Tires
P215/65R15 95H is an example ofa tire size, load index and speedrating. The definitions of theseitems are listed below. (Note thatthe tire size, load index and speedrating for your vehicle may bedifferent from this example.)
A.P: Indicates a tire, designatedby the Tire and Rim Association,that may be used for service oncars, sport utility vehicles,minivans and light trucks.Note: Ifyour tire size does not begin witha letter this may mean it isdesignated by either the EuropeanTire and Rim TechnicalOrganization or the Japan TireManufacturing Association.
B.215: Indicates the nominalwidth of the tire in millimetersfrom sidewall edge to sidewalledge. In general, the larger thenumber, the wider the tire.
C.65: Indicates the aspect ratiowhich gives the tire's ratio ofheight to width.
D.R: Indicates a radial type tire.
E.15: Indicates the wheel or rimdiameter in inches. If you changeyour wheel size, you will have topurchase new tires to match thenew wheel diameter.
F.95: Indicates the tire's loadindex. It is an index that relates tohow much weight a tire can carry.You may find this information inyour owner’s manual. If not,contact a local tire dealer.
Note:You may not find thisinformation on all tires because itis not required by federal law.
290
Fusion Energi / Fusion Hybrid (CC7) Hybrid Electric Vehicle (HEV)/Plug-In Hybrid Electric Vehicle (PHEV), Canada/United States of America, enUSA, Edition date: 201705, Second Printing
Wheels and TiresH
I
J
KL
M
A
B
CDEFG
E142543
Page 297 of 538

T type tires have some additionalinformation beyond those of Ptype tires; these differences aredescribed below:
A.T: Indicates a type of tire,designated by the Tire and RimAssociation, that is intended fortemporary service on cars,sport-utility vehicles, minivans andlight trucks.
B.145: Indicates the nominalwidth of the tire in millimetersfrom sidewall edge to sidewalledge. In general, the larger thenumber, the wider the tire.
C.80: Indicates the aspect ratiowhich gives the tire's ratio ofheight to width. Numbers of 70 orlower indicate a short sidewall.
D.D: Indicates a diagonal type tire.
R: Indicates a radial type tire.
E.16: Indicates the wheel or rimdiameter in inches. If you changeyour wheel size, you will have topurchase new tires to match thenew wheel diameter.
Location of the Tire Label
You will find a Tire Labelcontaining tire inflation pressureby tire size and other importantinformation located on the B-Pillaror the edge of the driver’s door.
Inflating Your Tires
Safe operation of your vehiclerequires that your tires areproperly inflated. Remember thata tire can lose up to half of its airpressure without appearing flat.
Every day before you drive, checkyour tires. If one looks lower thanthe others, use a tire gauge tocheck pressure of all tires andadjust if required.
At least once a month and beforelong trips, inspect each tire andcheck the tire pressure with a tiregauge (including spare, ifequipped). Inflate all tires to theinflation pressure recommended
by Ford Motor Company.
294
Fusion Energi / Fusion Hybrid (CC7) Hybrid Electric Vehicle (HEV)/Plug-In Hybrid Electric Vehicle (PHEV), Canada/United States of America, enUSA, Edition date: 201705, Second Printing
Wheels and TiresA
BCDE
E142545
Page 300 of 538
Inspecting Your Tires andWheel Valve Stems
Periodically inspect the tire treadsfor uneven or excessive wear andremove objects such as stones,nails or glass that may be wedgedin the tread grooves. Check the tireand valve stems for holes, cracks,or cuts that may permit airleakage and repair or replace thetire and replace the valve stem.Inspect the tire sidewalls forcracking, cuts, bruises and othersigns of damage or excessivewear. If internal damage to the tireis suspected, have the tiredemounted and inspected in caseit needs to be repaired or replaced.For your safety, tires that aredamaged or show signs ofexcessive wear should not be usedbecause they are more likely toblow out or fail.
Improper or inadequate vehiclemaintenance can cause tires towear abnormally. Inspect all yourtires, including the spare,frequently, and replace them ifone or more of the followingconditions exist:
Tire Wear
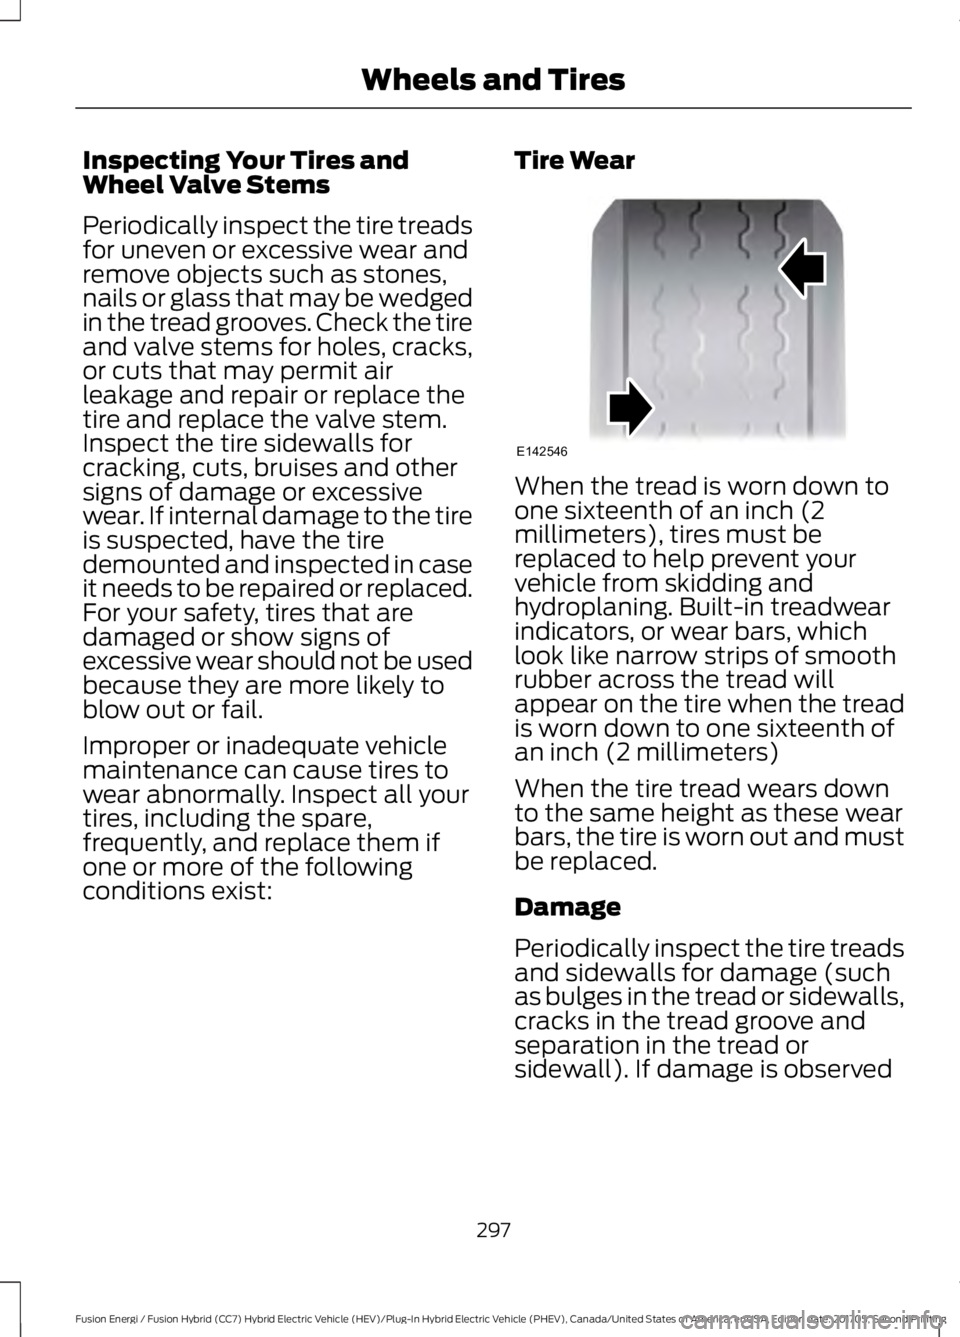
When the tread is worn down toone sixteenth of an inch (2millimeters), tires must bereplaced to help prevent yourvehicle from skidding andhydroplaning. Built-in treadwearindicators, or wear bars, whichlook like narrow strips of smoothrubber across the tread willappear on the tire when the treadis worn down to one sixteenth ofan inch (2 millimeters)
When the tire tread wears downto the same height as these wearbars, the tire is worn out and mustbe replaced.
Damage
Periodically inspect the tire treadsand sidewalls for damage (suchas bulges in the tread or sidewalls,cracks in the tread groove andseparation in the tread orsidewall). If damage is observed
297
Fusion Energi / Fusion Hybrid (CC7) Hybrid Electric Vehicle (HEV)/Plug-In Hybrid Electric Vehicle (PHEV), Canada/United States of America, enUSA, Edition date: 201705, Second Printing
Wheels and TiresE142546