2018 FORD FIESTA ECO mode
[x] Cancel search: ECO modePage 161 of 449
BREAKING-IN
You need to break in new tires for
approximately 300 mi (480 km). During
this time, your vehicle may exhibit some
unusual driving characteristics.
Avoid driving too fast during the first
1,000 mi (1,600 km)
. Vary your speed
frequently and change up through the
gears early. Do not labor the engine.
Do not tow during the first
1,000 mi
(1,600 km).
ECONOMICAL DRIVING
Fuel economy is affected by several things
such as how you drive, the conditions you
drive under and how you maintain your
vehicle.
There are some things to keep in mind that
may improve your fuel economy:
• Accelerate and slow down in a smooth,
moderate fashion.
• Drive at steady speeds.
• Anticipate stops; slowing down may
eliminate the need to stop.
• Combine errands and minimize
stop-and-go driving (When running
errands, go to the furthest destination
first and then work your way back
home).
• Close the windows for high-speed
driving.
• Drive at reasonable speeds.
• Keep the tires properly inflated and use
only the recommended size.
• Use the recommended engine oil.
• Perform all regularly scheduled
maintenance. There are also some things you may want
to avoid doing because they reduce your
fuel economy:
•
Avoid sudden or hard accelerations.
• Avoid revving the engine before turning
off the car.
• Avoid long idle periods.
• Do not warm up your vehicle on cold
mornings.
• Reduce the use of air conditioning and
heat.
• Avoid using speed control in hilly
terrain.
• Do not rest your foot on the brake
pedal while driving.
• Avoid carrying unnecessary weight.
• Avoid adding particular accessories to
your vehicle (e.g. bug deflectors,
rollbars/light bars, running boards, ski
racks).
• Avoid driving with the wheels out of
alignment.
DRIVING THROUGH WATER WARNING:
Do not drive through
flowing or deep water as you may lose
control of your vehicle.
Note: Driving through standing water can
cause vehicle damage.
Note: Engine damage can occur if water
enters the air filter.
Before driving through standing water,
check the depth. Never drive through water
that is higher than the bottom of the front
rocker area of your vehicle.
158
2018 Fiesta (CCT) Canada/United States of America, JE8J 19A321 AB enUSA, Edition date: 201706, First-Printing Driving Hints
Page 166 of 449
WARNING: Do not connect the end
of the second cable to the negative (-)
terminal of the battery to be jumped. A
spark may cause an explosion of the gases
that surround the battery.
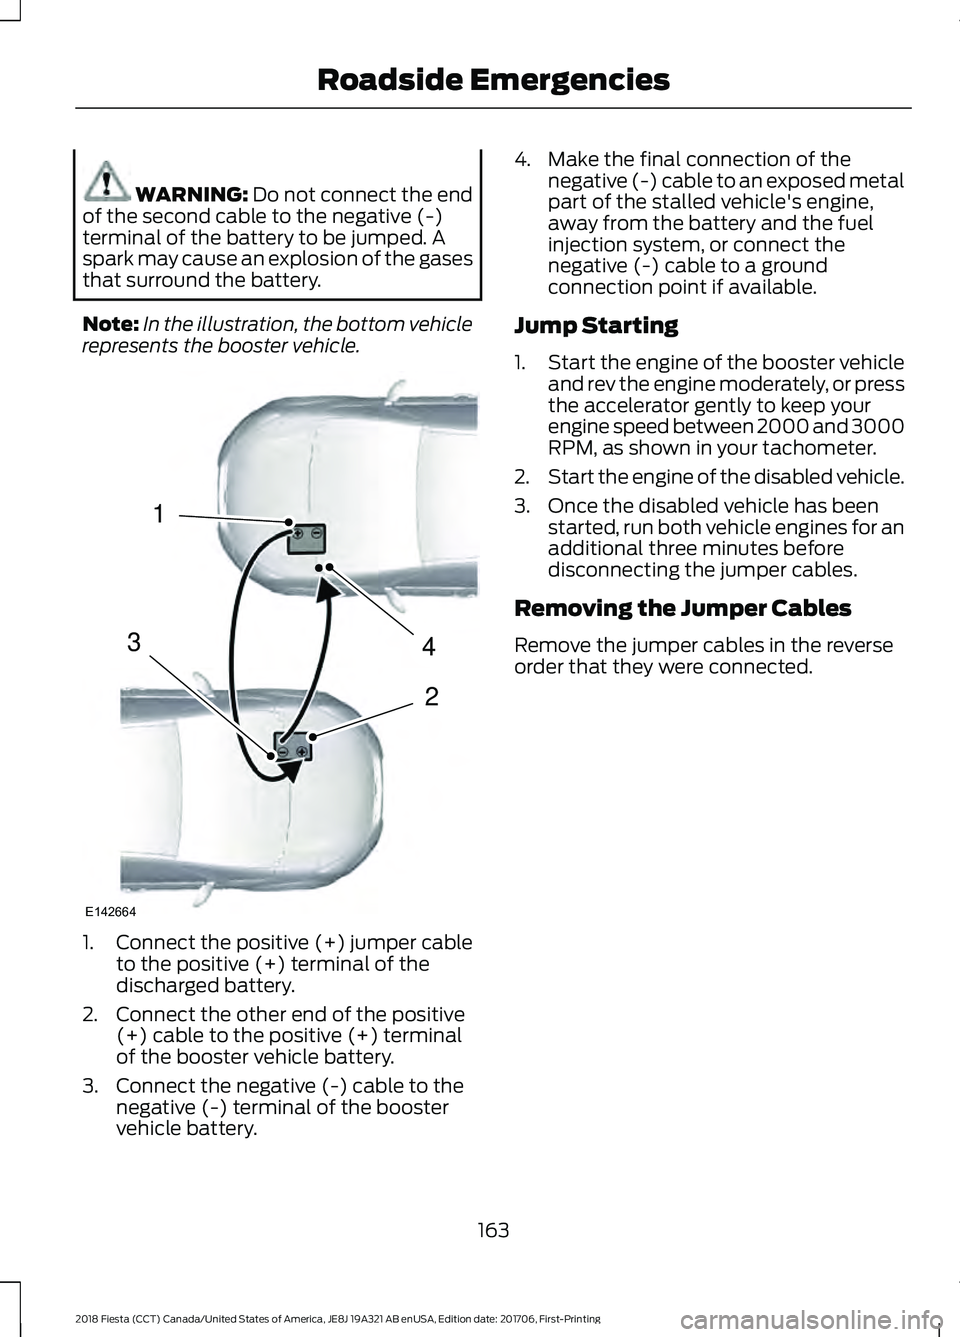
Note: In the illustration, the bottom vehicle
represents the booster vehicle. 1.
Connect the positive (+) jumper cable
to the positive (+) terminal of the
discharged battery.
2. Connect the other end of the positive (+) cable to the positive (+) terminal
of the booster vehicle battery.
3. Connect the negative (-) cable to the negative (-) terminal of the booster
vehicle battery. 4. Make the final connection of the
negative (-) cable to an exposed metal
part of the stalled vehicle's engine,
away from the battery and the fuel
injection system, or connect the
negative (-) cable to a ground
connection point if available.
Jump Starting
1. Start the engine of the booster vehicle
and rev the engine moderately, or press
the accelerator gently to keep your
engine speed between 2000 and 3000
RPM, as shown in your tachometer.
2. Start the engine of the disabled vehicle.
3. Once the disabled vehicle has been started, run both vehicle engines for an
additional three minutes before
disconnecting the jumper cables.
Removing the Jumper Cables
Remove the jumper cables in the reverse
order that they were connected.
163
2018 Fiesta (CCT) Canada/United States of America, JE8J 19A321 AB enUSA, Edition date: 201706, First-Printing Roadside Emergencies4
2
1
3
E142664
Page 194 of 449
When Fail-Safe Mode Is Activated
WARNING: Fail-safe mode is for use
during emergencies only. Operate your
vehicle in fail-safe mode only as long as
necessary to bring your vehicle to rest in a
safe location and seek immediate repairs.
When in fail-safe mode, your vehicle will
have limited power, will not be able to
maintain high-speed operation, and may
completely shut down without warning,
potentially losing engine power, power
steering assist, and power brake assist,
which may increase the possibility of a
crash resulting in serious injury. WARNING:
Do not remove the
coolant reservoir cap when the cooling
system is hot. Wait 10 minutes for the
cooling system to cool down. Cover the
coolant reservoir cap with a thick cloth to
prevent the possibility of scalding and
slowly remove the cap. Failure to follow
this instruction could result in personal
injury.
Your vehicle has limited engine power
when in the fail-safe mode, drive your
vehicle with caution. Your vehicle does not
maintain high-speed operation and the
engine may operate poorly.
Remember that the engine is capable of
automatically shutting down to prevent
engine damage. In this situation:
1. Pull off the road as soon as safely possible and switch the engine off.
2. If you are a member of a roadside assistance program, we recommend
that you contact your roadside
assistance service provider.
3. If this is not possible, wait a short period for the engine to cool. 4. Check the coolant level. If the coolant
level is at or below the minimum mark,
add prediluted coolant immediately.
5. When the engine temperature cools, you can re-start the engine. Have your
vehicle checked as soon as possible to
minimize engine damage.
Note: Driving your vehicle without repair
increases the chance of engine damage.
Engine Coolant Temperature
Management
(If Equipped) WARNING:
To reduce the risk of
crash and injury, be prepared that the
vehicle speed may reduce and the vehicle
may not be able to accelerate with full
power until the coolant temperature
reduces.
If you tow a trailer with your vehicle, the
engine may temporarily reach a higher
temperature during severe operating
conditions, for example ascending a long
or steep grade in high ambient
temperatures.
At this time, you may notice the coolant
temperature gauge moves toward the red
zone and a message may appear in the
information display.
You may notice a reduction in vehicle
speed caused by reduced engine power in
order to manage the engine coolant
temperature. Your vehicle may enter this
mode if certain high-temperature and
high-load conditions take place. The
amount of speed reduction depends on
vehicle loading, grade and ambient
temperature. If this occurs, there is no
need to stop your vehicle. You can
continue to drive.
191
2018 Fiesta (CCT) Canada/United States of America, JE8J 19A321 AB enUSA, Edition date: 201706, First-Printing Maintenance
Page 261 of 449
GENERAL INFORMATION
Radio Frequencies and Reception
Factors
Note:
Listening to loud audio for long
periods of time could damage your hearing. Radio reception factors
The further you travel away from an FM station, the weaker
the signal and the weaker the reception.
Distance and Strength
Hills, mountains, tall buildings, bridges, tunnels, freeway
overpasses, parking garages, dense tree foliage and
thunderstorms can interfere with the reception.
Terrain
When you pass near a radio transmission tower, a stronger
signal can override a weaker signal and can cause interfer-
ence in the audio system.
Station overload
CD and CD Player Information
Note: CD units play commercially pressed
4.7 in (12 cm) audio compact discs only. Due
to technical incompatibility, certain
recordable and re-recordable compact discs
may not function correctly when used in
Ford CD players.
Note: Do not insert CDs with homemade
paper (adhesive) labels into the CD player
as the label may peel and cause the CD to
become jammed. You should use a
permanent felt tip marker rather than
adhesive labels on your homemade CDs.
Ballpoint pens may damage CDs. Ask an
authorized dealer for more information.
Note: Do not use any irregularly shaped
discs or discs with a scratch protection film
attached.
Always handle discs by their edges only.
Clean the disc with an approved CD
cleaner only. Wipe it from the center of
the disc toward the edge. Do not clean in
a circular motion.
Do not expose discs to direct sunlight or
heat sources for extended periods. MP3 and WMA Track and Folder
Structure
Audio systems capable of recognizing and
playing MP3 and WMA individual tracks
and folder structures work as follows:
•
There are two different modes for MP3
and WMA disc playback: MP3 and
WMA track mode (system default) and
MP3 and WMA folder mode.
• MP3 and WMA track mode ignores any
folder structure on the MP3 and WMA
disc. The player numbers each MP3
and WMA track on the disc (noted by
the MP3 or WMA file extension) from
T001 to a maximum of T255. The
maximum number of playable MP3 and
WMA files may be less depending on
the structure of the CD and exact
model of radio present.
258
2018 Fiesta (CCT) Canada/United States of America, JE8J 19A321 AB enUSA, Edition date: 201706, First-Printing Audio System
Page 262 of 449
•
MP3 and WMA folder mode represents
a folder structure consisting of one
level of folders. The CD player numbers
all MP3 and WMA tracks on the disc
(noted by the MP3 or WMA file
extension) and all folders containing
MP3 and WMA files, from F001 (folder)
T001 (track) to F253 T255.
• Creating discs with only one level of
folders helps with navigation through
the disc files.
If you are burning your own MP3 and WMA
discs, it is important to understand how
the system reads the structures you create.
While various files may be present, (files
with extensions other than MP3 and
WMA), only files with the MP3 and WMA
extension are played; other files are
ignored by the system. This enables you to
use the same MP3 and WMA disc for a
variety of tasks on your work computer,
home computer and your in-vehicle
system. In track mode, the system displays and
plays the structure as if it were only one
level deep (all MP3 and WMA files play,
regardless of being in a specific folder). In
folder mode, the system only plays the
MP3 and WMA files in the current folder.
AUDIO UNIT - VEHICLES WITH:
AM/FM/CD WARNING: Driving while distracted
can result in loss of vehicle control, crash
and injury. We strongly recommend that
you use extreme caution when using any
device that may take your focus off the
road. Your primary responsibility is the safe
operation of your vehicle. We recommend
against the use of any hand-held device
while driving and encourage the use of
voice-operated systems when possible.
Make sure you are aware of all applicable
local laws that may affect the use of
electronic devices while driving.
259
2018 Fiesta (CCT) Canada/United States of America, JE8J 19A321 AB enUSA, Edition date: 201706, First-Printing Audio System
Page 264 of 449
Seek down: Press the button to
go to the next station down the
radio frequency band or the
previous track on a CD.
J
MENU: Press the button to
access different audio system
features.
K
INFO:
Press the button to
access radio or CD information.
L
SOUND:
Press the button to
adjust the sound settings for
bass, treble, middle, balance and
fade.
M
MEDIA:
Press the button to
access the AUX and SYNC
features, it will also cancel the
menu or list browsing.
N
RADIO:
Press the button to
select different radio bands, it
will also cancel the menu or list
browsing.
O
Sound Button
This will allow you to adjust the sound
settings (for example bass, middle and
treble).
1. Press the
SOUND button.
2. Use the up and down arrow buttons to
select the required setting.
3. Use the left and right arrow buttons to
make the necessary adjustment. The
display indicates the level selected.
4. Press the
OK button to confirm the
new settings.
Waveband Button
Press the
RADIO button to select from the
wavebands available.
You can use the selector to return to radio
reception when you have been listening to
another source. Alternatively, press the left arrow button
to display the available wavebands. Scroll
to the required waveband and press
OK.
Station Tuning Control
Seek Tuning
Select a waveband and briefly press one
of the seek buttons. The unit will stop at
the first station it finds in the direction you
have chosen.
Manual Tuning
1. Press the
MENU button.
2. Select RADIO mode and then Manual.
3. Use the left and right arrow buttons to
tune down or up the waveband in small
increments or press and hold to
increment quickly, until you find a
station you want to listen to.
4. Press
OK to continue listening to a
station.
Scan Tuning
Scan allows you to listen to a few seconds
of each station detected.
1. Press the
MENU button.
2. Select
RADIO mode and then Scan.
3. Use the seek buttons to scan up or down the selected waveband.
4. Press
OK to continue listening to a
station.
Station Preset Buttons
This feature allows you to store your
favorite stations, they can be recalled by
selecting the appropriate waveband and
pressing one of the preset buttons.
1. Select a waveband.
2. Tune to the station required.
261
2018 Fiesta (CCT) Canada/United States of America, JE8J 19A321 AB enUSA, Edition date: 201706, First-Printing Audio System
Page 268 of 449
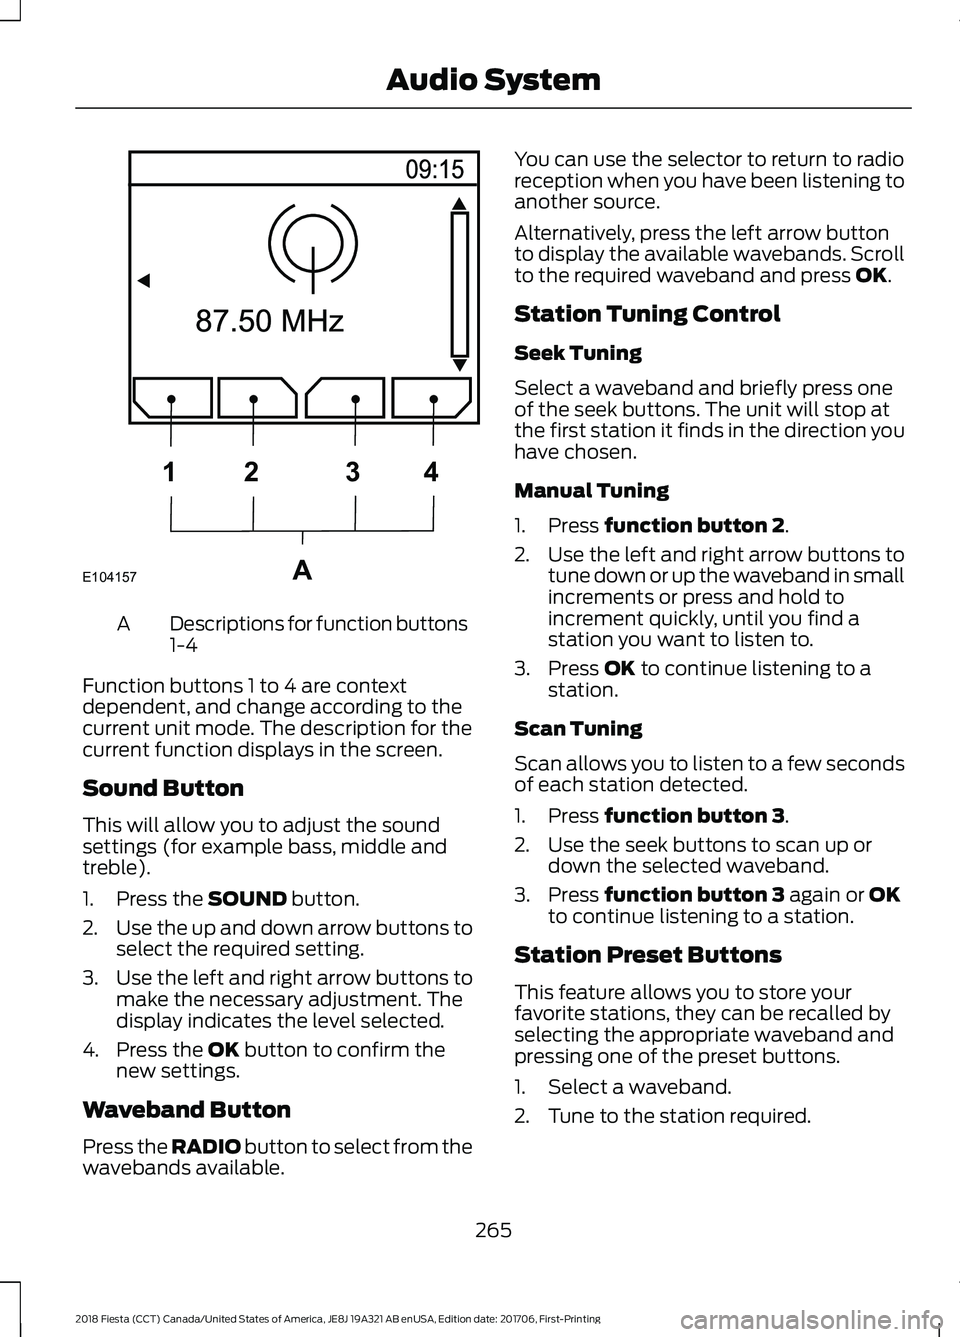
Descriptions for function buttons
1-4
A
Function buttons 1 to 4 are context
dependent, and change according to the
current unit mode. The description for the
current function displays in the screen.
Sound Button
This will allow you to adjust the sound
settings (for example bass, middle and
treble).
1. Press the SOUND button.
2. Use the up and down arrow buttons to
select the required setting.
3. Use the left and right arrow buttons to
make the necessary adjustment. The
display indicates the level selected.
4. Press the
OK button to confirm the
new settings.
Waveband Button
Press the
RADIO button to select from the
wavebands available. You can use the selector to return to radio
reception when you have been listening to
another source.
Alternatively, press the left arrow button
to display the available wavebands. Scroll
to the required waveband and press
OK.
Station Tuning Control
Seek Tuning
Select a waveband and briefly press one
of the seek buttons. The unit will stop at
the first station it finds in the direction you
have chosen.
Manual Tuning
1. Press
function button 2.
2. Use the left and right arrow buttons to
tune down or up the waveband in small
increments or press and hold to
increment quickly, until you find a
station you want to listen to.
3. Press
OK to continue listening to a
station.
Scan Tuning
Scan allows you to listen to a few seconds
of each station detected.
1. Press
function button 3.
2. Use the seek buttons to scan up or down the selected waveband.
3. Press
function button 3 again or OK
to continue listening to a station.
Station Preset Buttons
This feature allows you to store your
favorite stations, they can be recalled by
selecting the appropriate waveband and
pressing one of the preset buttons.
1. Select a waveband.
2. Tune to the station required.
265
2018 Fiesta (CCT) Canada/United States of America, JE8J 19A321 AB enUSA, Edition date: 201706, First-Printing Audio SystemE104157A
1
2 34
Page 270 of 449
AUDIO UNIT - VEHICLES WITH:
TOUCHSCREEN DISPLAY
WARNING: Driving while distracted
can result in loss of vehicle control, crash
and injury. We strongly recommend that
you use extreme caution when using any
device that may take your focus off the road. Your primary responsibility is the safe
operation of your vehicle. We recommend
against the use of any hand-held device
while driving and encourage the use of
voice-operated systems when possible.
Make sure you are aware of all applicable
local laws that may affect the use of
electronic devices while driving.
Note:
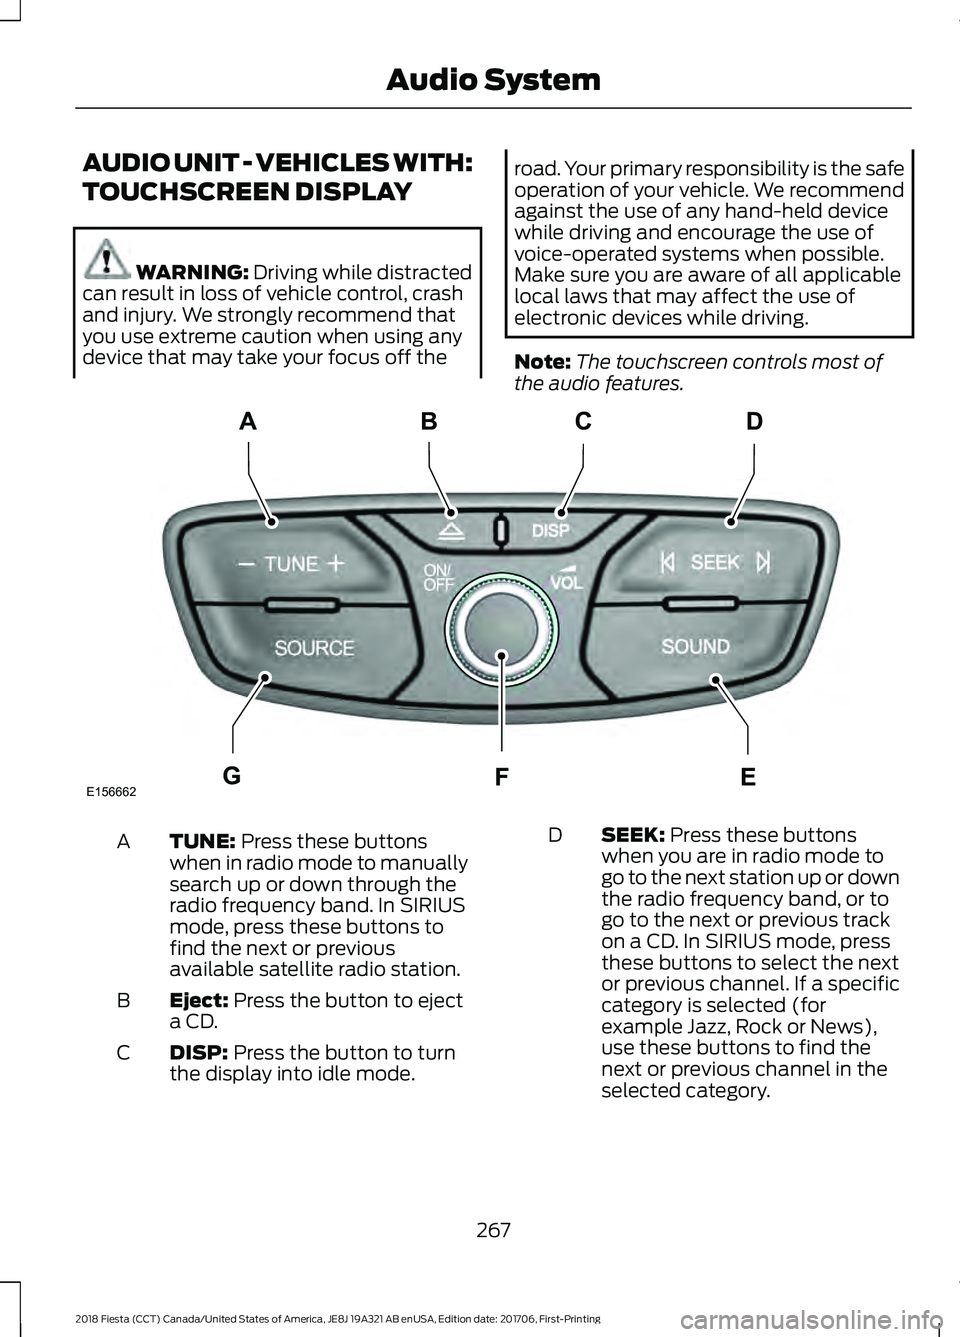
The touchscreen controls most of
the audio features. TUNE:
Press these buttons
when in radio mode to manually
search up or down through the
radio frequency band. In SIRIUS
mode, press these buttons to
find the next or previous
available satellite radio station.
A
Eject:
Press the button to eject
a CD.
B
DISP:
Press the button to turn
the display into idle mode.
C SEEK:
Press these buttons
when you are in radio mode to
go to the next station up or down
the radio frequency band, or to
go to the next or previous track
on a CD. In SIRIUS mode, press
D
these buttons to select the next
or previous channel. If a specific
category is selected (for
example Jazz, Rock or News),
use these buttons to find the
next or previous channel in the
selected category.
267
2018 Fiesta (CCT) Canada/United States of America, JE8J 19A321 AB enUSA, Edition date: 201706, First-Printing Audio SystemE156662
CD
GEF
B
A