2018 FORD F450 SUPER DUTY steering
[x] Cancel search: steeringPage 334 of 656
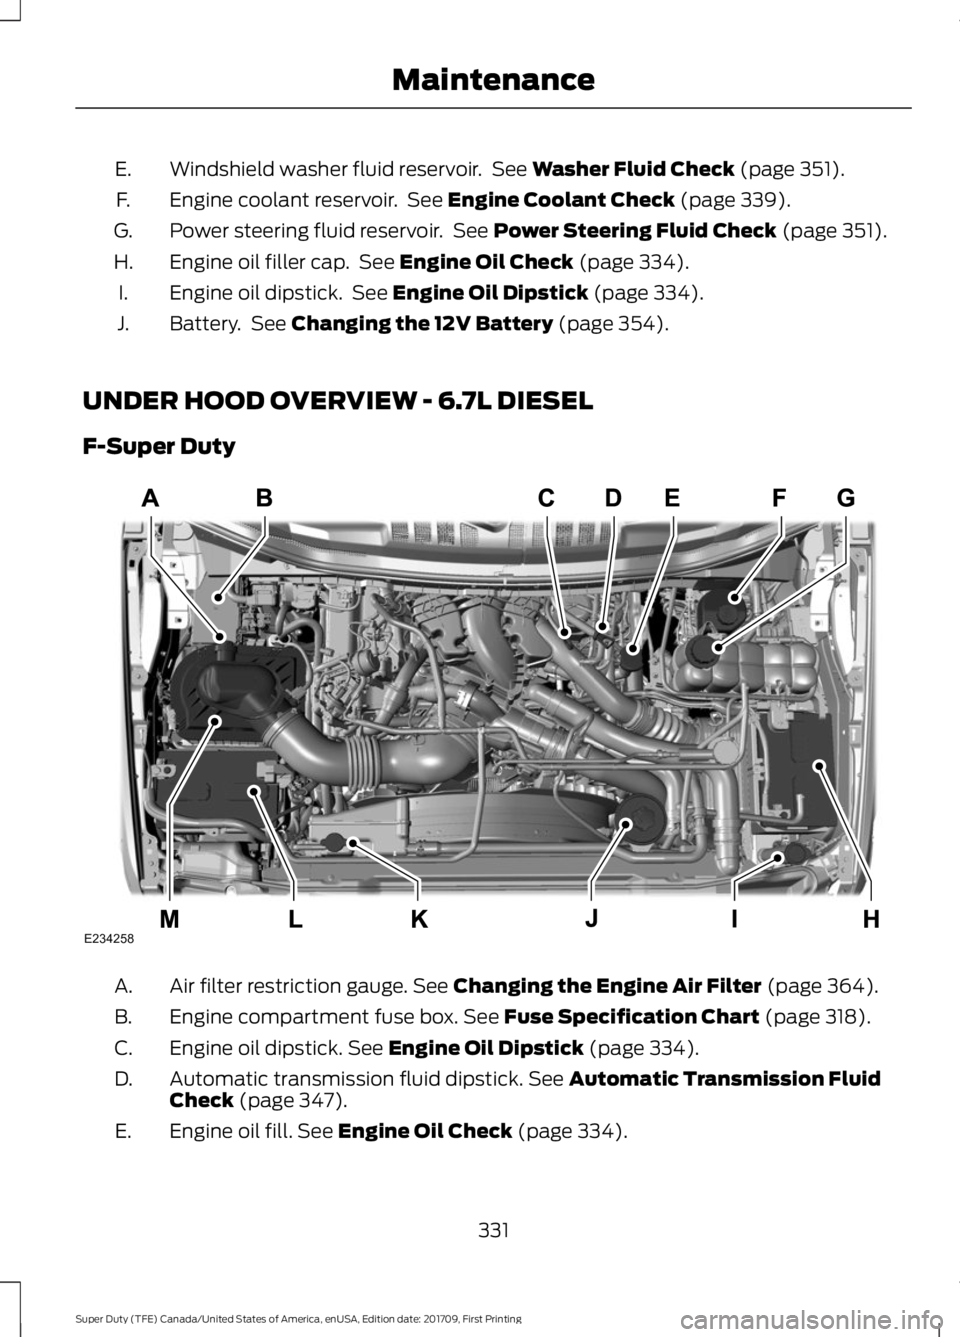
Windshield washer fluid reservoir. See Washer Fluid Check (page 351).
E.
Engine coolant reservoir. See
Engine Coolant Check (page 339).
F.
Power steering fluid reservoir. See
Power Steering Fluid Check (page 351).
G.
Engine oil filler cap. See
Engine Oil Check (page 334).
H.
Engine oil dipstick. See
Engine Oil Dipstick (page 334).
I.
Battery. See
Changing the 12V Battery (page 354).
J.
UNDER HOOD OVERVIEW - 6.7L DIESEL
F-Super Duty Air filter restriction gauge.
See Changing the Engine Air Filter (page 364).
A.
Engine compartment fuse box.
See Fuse Specification Chart (page 318).
B.
Engine oil dipstick.
See Engine Oil Dipstick (page 334).
C.
Automatic transmission fluid dipstick.
See Automatic Transmission Fluid
Check (page 347).
D.
Engine oil fill.
See Engine Oil Check (page 334).
E.
331
Super Duty (TFE) Canada/United States of America, enUSA, Edition date: 201709, First Printing MaintenanceE234258
Page 335 of 656
Brake fluid reservoir. See Brake Fluid Check (page 350).
F.
Engine cooling system coolant reservoir (primary high-temperature cooling
system).
See Engine Coolant Check (page 343).
G.
Battery.
See Changing the 12V Battery (page 354).
H.
Windshield washer fluid reservoir.
See Washer Fluid Check (page 351).
I.
Power steering fluid reservoir.
See Power Steering Fluid Check (page 351).
J.
Secondary cooling system coolant reservoir.
See Engine Coolant Check (page
343).
K.
Battery.
See Changing the 12V Battery (page 354).
L.
Air filter assembly.
See Changing the Engine Air Filter (page 364).
M.
Scheduled Maintenance
The recommended scheduled
maintenance services are required because
they are considered essential to the life
and performance of your vehicle. See
Normal Scheduled Maintenance (page
585
). Use only recommended fuel, lubricants,
fluids and service parts conforming to Ford
specifications. Motorcraft® parts are
designed and built for best performance
in your vehicle. See
Capacities and
Specifications (page 433).
332
Super Duty (TFE) Canada/United States of America, enUSA, Edition date: 201709, First Printing Maintenance
Page 336 of 656
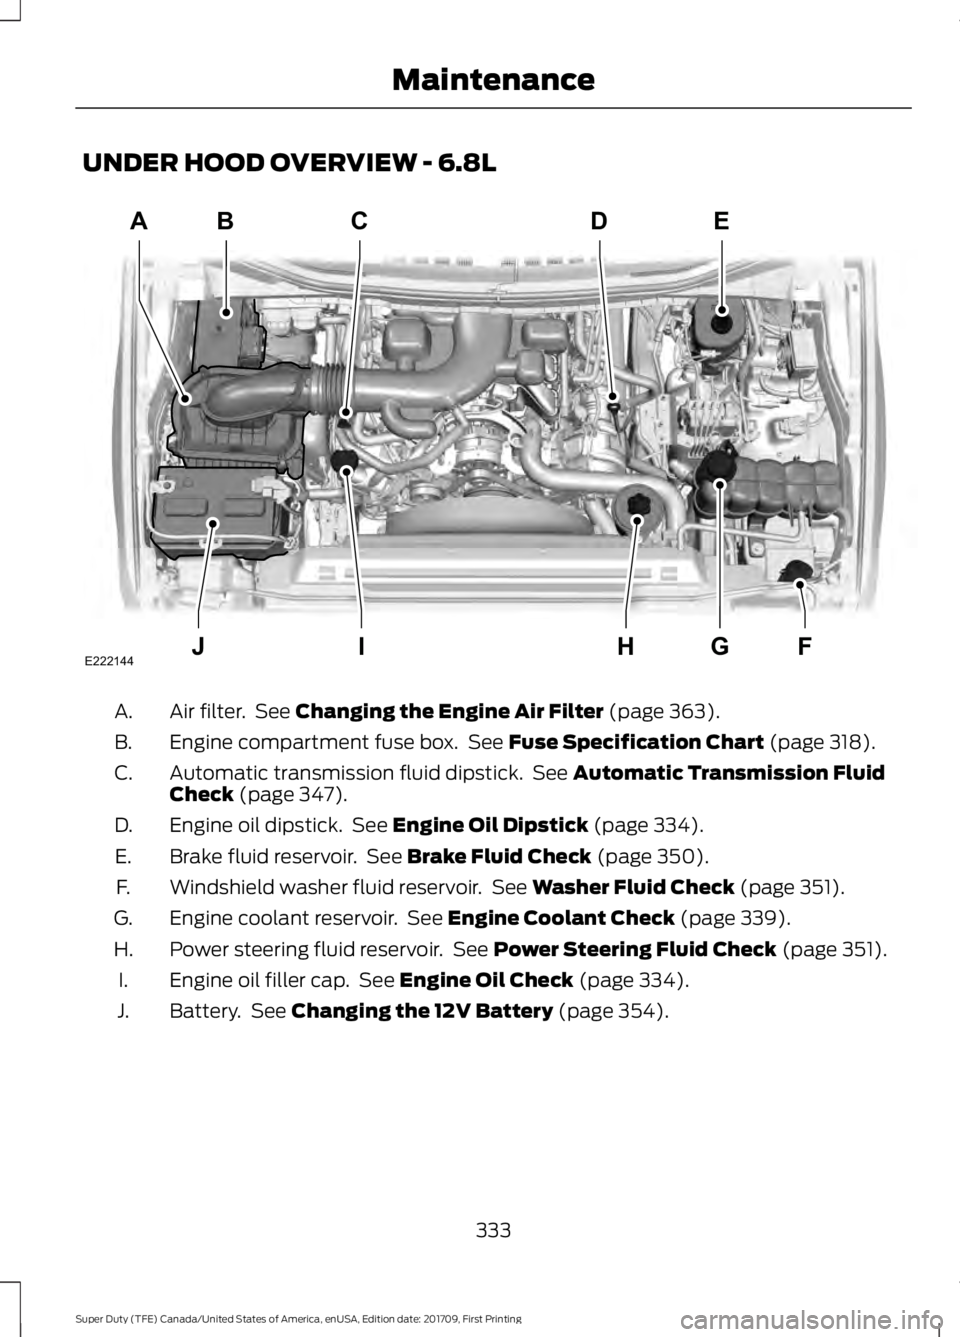
UNDER HOOD OVERVIEW - 6.8L
Air filter. See Changing the Engine Air Filter (page 363).
A.
Engine compartment fuse box. See
Fuse Specification Chart (page 318).
B.
Automatic transmission fluid dipstick. See
Automatic Transmission Fluid
Check (page 347).
C.
Engine oil dipstick. See
Engine Oil Dipstick (page 334).
D.
Brake fluid reservoir. See
Brake Fluid Check (page 350).
E.
Windshield washer fluid reservoir. See
Washer Fluid Check (page 351).
F.
Engine coolant reservoir. See
Engine Coolant Check (page 339).
G.
Power steering fluid reservoir. See
Power Steering Fluid Check (page 351).
H.
Engine oil filler cap. See
Engine Oil Check (page 334).
I.
Battery. See
Changing the 12V Battery (page 354).
J.
333
Super Duty (TFE) Canada/United States of America, enUSA, Edition date: 201709, First Printing MaintenanceABC
JFGI
ED
E222144
H
Page 341 of 656

Filter cover.
A
Filter element.
B
Filter housing.
C
1. Clean the filter cover and remove the bolts.
2. Carefully remove the filter cover.
3. Remove used filter element from the filter housing and carefully dispose of
it.
4. Make sure that the sealing surfaces on
the filter housing and cover are clean
and free of debris.
5. Install the new filter element.
6. Install the filter cover.
7. Install the bolts finger-tight. 8.
Fully tighten all of the bolts to between
3–4 lb.ft (4.5–6 Nm) in the sequence
shown.
9. Record the engine mileage and update
the service log accordingly.
OIL CHANGE INDICATOR
RESET
Use the information display controls on
the steering wheel to reset the oil change
indicator.
From the main menu scroll to: Action and description
Message
Press the right arrow button,
then from this menu scroll
to the following message.
Settings
Press the right arrow button,
then from this menu scroll
to the following message.
Conveni-
ence
Press the right arrow button,
then from this menu scroll
to the following message.
Oil Life
Reset
338
Super Duty (TFE) Canada/United States of America, enUSA, Edition date: 201709, First Printing MaintenanceE211403
A
B
C E211404
165
4
32
7
Page 344 of 656
Severe Climates
If you drive in extremely cold climates:
•
It may be necessary to increase the
coolant concentration above 50%.
• A coolant concentration of 60%
provides improved freeze point
protection. Coolant concentrations
above 60% decrease the overheat
protection characteristics of the
coolant and may cause engine
damage.
If you drive in extremely hot climates:
• It may be necessary to decrease the
coolant concentration to 40%.
• A coolant concentration of 40%
provides improved overheat
protection. Coolant concentrations
below 40% decrease the freeze and
corrosion protection characteristics of
the coolant and may cause engine
damage.
Vehicles driven year-round in non-extreme
climates should use prediluted coolant for
optimum cooling system and engine
protection.
Fail-Safe Cooling
Fail-safe cooling allows you to temporarily
drive your vehicle before any incremental
component damage occurs. The fail-safe
distance depends on ambient
temperature, vehicle load and terrain.
How Fail-Safe Cooling Works
If the engine begins to overheat, the
coolant temperature gauge moves toward
the red zone: A warning lamp illuminates and
a message may appear in the
information display. If the engine reaches a preset
over-temperature condition, the engine
automatically switches to alternating
cylinder operation. Each disabled cylinder
acts as an air pump and cools the engine.
When this occurs, your vehicle still
operates, however:
•
Engine power is limited.
• The air conditioning system turns off.
Continued operation increases the engine
temperature, causing the engine to
completely shut down. Your steering and
braking effort increases in this situation.
When the engine temperature cools, you
can re-start the engine. Have your vehicle
checked as soon as possible to minimize
engine damage.
When Fail-Safe Mode Is Activated WARNINGS
Fail-safe mode is for use during
emergencies only. Operate your
vehicle in fail-safe mode only as long
as necessary to bring your vehicle to rest
in a safe location and seek immediate
repairs. When in fail-safe mode, your
vehicle will have limited power, will not be
able to maintain high-speed operation, and
may completely shut down without
warning, potentially losing engine power,
power steering assist, and power brake
assist, which may increase the possibility
of a crash resulting in serious injury. Never remove the coolant reservoir
cap when the engine is running or
hot.
Your vehicle has limited engine power
when in the fail-safe mode, drive your
vehicle with caution. Your vehicle does not
maintain high-speed operation and the
engine may operate poorly.
341
Super Duty (TFE) Canada/United States of America, enUSA, Edition date: 201709, First Printing Maintenance
Page 354 of 656
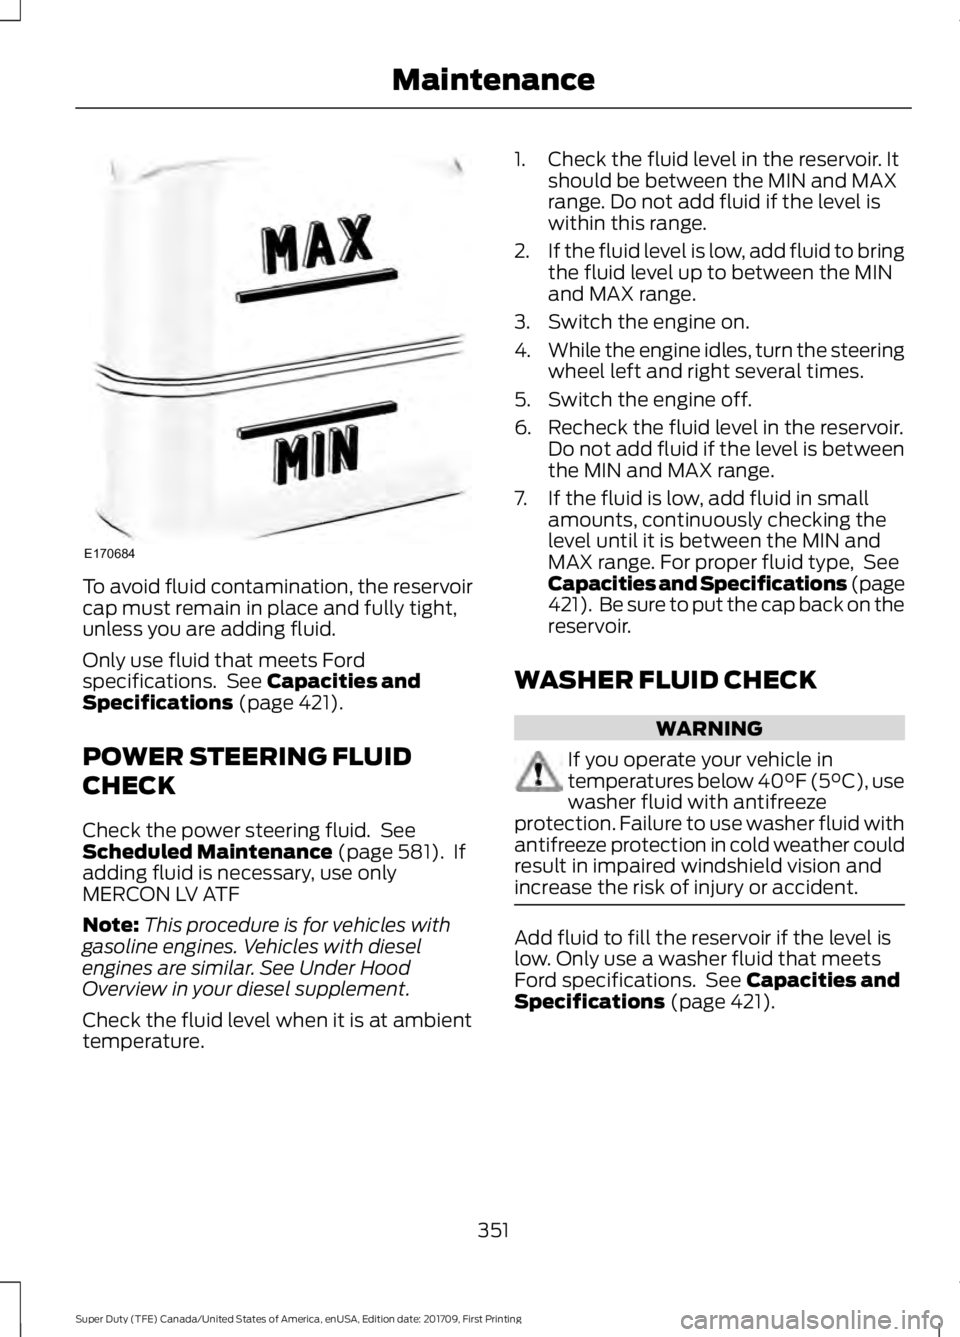
To avoid fluid contamination, the reservoir
cap must remain in place and fully tight,
unless you are adding fluid.
Only use fluid that meets Ford
specifications. See Capacities and
Specifications (page 421).
POWER STEERING FLUID
CHECK
Check the power steering fluid. See
Scheduled Maintenance
(page 581). If
adding fluid is necessary, use only
MERCON LV ATF
Note: This procedure is for vehicles with
gasoline engines. Vehicles with diesel
engines are similar. See Under Hood
Overview in your diesel supplement.
Check the fluid level when it is at ambient
temperature. 1. Check the fluid level in the reservoir. It
should be between the MIN and MAX
range. Do not add fluid if the level is
within this range.
2. If the fluid level is low, add fluid to bring
the fluid level up to between the MIN
and MAX range.
3. Switch the engine on.
4. While the engine idles, turn the steering
wheel left and right several times.
5. Switch the engine off.
6. Recheck the fluid level in the reservoir. Do not add fluid if the level is between
the MIN and MAX range.
7. If the fluid is low, add fluid in small amounts, continuously checking the
level until it is between the MIN and
MAX range. For proper fluid type, See
Capacities and Specifications (page
421). Be sure to put the cap back on the
reservoir.
WASHER FLUID CHECK WARNING
If you operate your vehicle in
temperatures below 40°F (5°C), use
washer fluid with antifreeze
protection. Failure to use washer fluid with
antifreeze protection in cold weather could
result in impaired windshield vision and
increase the risk of injury or accident. Add fluid to fill the reservoir if the level is
low. Only use a washer fluid that meets
Ford specifications. See
Capacities and
Specifications (page 421).
351
Super Duty (TFE) Canada/United States of America, enUSA, Edition date: 201709, First Printing MaintenanceE170684
Page 358 of 656

5. Run the engine until it reaches normal
operating temperature. While the
engine is warming up, complete the
following: Reset the clock. Reset the
power windows bounce-back feature.
See Windows and Mirrors (page 98).
Reset the radio station presets. See
Audio System (page 446).
6. Allow the engine to idle for at least one
minute.
7. Drive the vehicle at least 10 mi (16 km)
to completely relearn the idle trim and
fuel trim strategy.
Note: If you do not allow the engine to
relearn the idle and fuel trim strategy, the
idle quality of your vehicle may be adversely
affected until the engine computer
eventually relearns the idle trim and fuel
trim strategy.
Note: For flexible fuel vehicles, if you are
operating on E85, you may experience poor
starts or an inability to start the engine and
driveability problems until the fuel trim and
ethanol content have been relearned.
Make sure that you dispose of old batteries
in an environmentally friendly way. Seek
advice from your local authority about
recycling old batteries.
If storing your vehicle for more than 30
days without recharging the battery, we
recommend that you disconnect the
battery cables to maintain battery charge
for quick starting.
Battery Management System
(If
Equipped)
The battery management system monitors
battery conditions and takes actions to
extend battery life. If excessive battery
drain is detected, the system temporarily
disables some electrical systems to
protect the battery. Systems included are:
•
Heated rear window.
• Heated seats.
• Climate control.
• Heated steering wheel.
• Audio unit.
• Navigation system.
A message may appear in the information
displays to alert you that battery
protection actions are active. These
messages are only for notification that an
action is taking place, and not intended to
indicate an electrical problem or that the
battery requires replacement.
After battery replacement, or in some
cases after charging the battery with an
external charger, the battery management
system requires eight hours of vehicle sleep
time to relearn the battery state of charge.
During this time your vehicle must remain
fully locked with the ignition switched off.
Note: Prior to relearning the battery state
of charge, the battery management system
may temporarily disable some electrical
systems.
Electrical Accessory Installation
To make sure the battery management
system works correctly, do not connect an
electrical device ground connection
directly to the battery negative post. This
can cause inaccurate measurements of
the battery condition and potential
incorrect system operation.
Note: If you add electrical accessories or
components to the vehicle, it may adversely
affect battery performance and durability.
This may also affect the performance of
other electrical systems in the vehicle.
355
Super Duty (TFE) Canada/United States of America, enUSA, Edition date: 201709, First Printing Maintenance
Page 378 of 656
For fabric, carpets, cloth seats and seats
equipped with side airbags:
•
Remove dust and loose dirt with a
vacuum cleaner.
• Remove light stains and soil with
Motorcraft Professional Strength
Carpet & Upholstery Cleaner.
• If grease or tar is present on the
material, spot-clean the area first with
Motorcraft Spot and Stain Remover. In
Canada, use Motorcraft Multi-Purpose
Cleaner.
• If a ring forms on the fabric after spot
cleaning, clean the entire area
immediately (but do not oversaturate)
or the ring will set.
• Do not use household cleaning
products or glass cleaners, which can
stain and discolor the fabric and affect
the flame retardant abilities of the seat
materials.
CLEANING THE INSTRUMENT
PANEL AND INSTRUMENT
CLUSTER LENS WARNING
Do not use chemical solvents or
strong detergents when cleaning the
steering wheel or instrument panel
to avoid contamination of the airbag
system. Note:
Follow the same procedure as
cleaning leather seats for cleaning leather
instrument panels and leather interior trim
surfaces. See Cleaning Leather Seats
(page 376).
Clean the instrument panel and cluster
lens with a clean, damp and soft cloth,
then use a clean, dry and soft cloth to dry
these areas. •
Avoid cleaners or polishes that increase
the gloss of the upper portion of the
instrument panel. The dull finish in this
area helps protect you from
undesirable windshield reflection.
• Do not use any household cleaning
products or glass cleaners as these
may damage the finish of the
instrument panel, interior trim and
cluster lens.
• Wash or wipe your hands clean if you
have been in contact with certain
products such as insect repellent and
suntan lotion to avoid possible damage
to the interior painted surfaces.
• Do not allow air fresheners and hand
sanitizers to spill onto interior surfaces.
If a spill occurs, wipe off immediately.
Your warranty may not cover these
damages.
If a staining liquid like coffee or juice has
been spilled on the instrument panel or on
interior trim surfaces:
1. Wipe up spilled liquid using a clean, soft cloth as quickly as possible.
2. Use Motorcraft Premium Leather and Vinyl Cleaner or a commercially
available leather cleaning product for
automotive interiors. Test any cleaner
or stain remover on an inconspicuous
area.
3. Alternatively, wipe the surface with a clean, soft cloth and a mild soap and
water solution. Dry the area with a
clean, soft cloth.
4. If necessary, apply more soap and water solution or cleaning product to
a clean, soft cloth and press it onto the
soiled area. Allow this to set at room
temperature for 30 minutes.
5. Remove the soaked cloth, then with a clean, damp cloth, use a rubbing
motion for 60 seconds on the soiled
area.
375
Super Duty (TFE) Canada/United States of America, enUSA, Edition date: 201709, First Printing Vehicle Care