2018 FORD F450 SUPER DUTY buttons
[x] Cancel search: buttonsPage 260 of 656
Setting up a Blind Spot Trailer
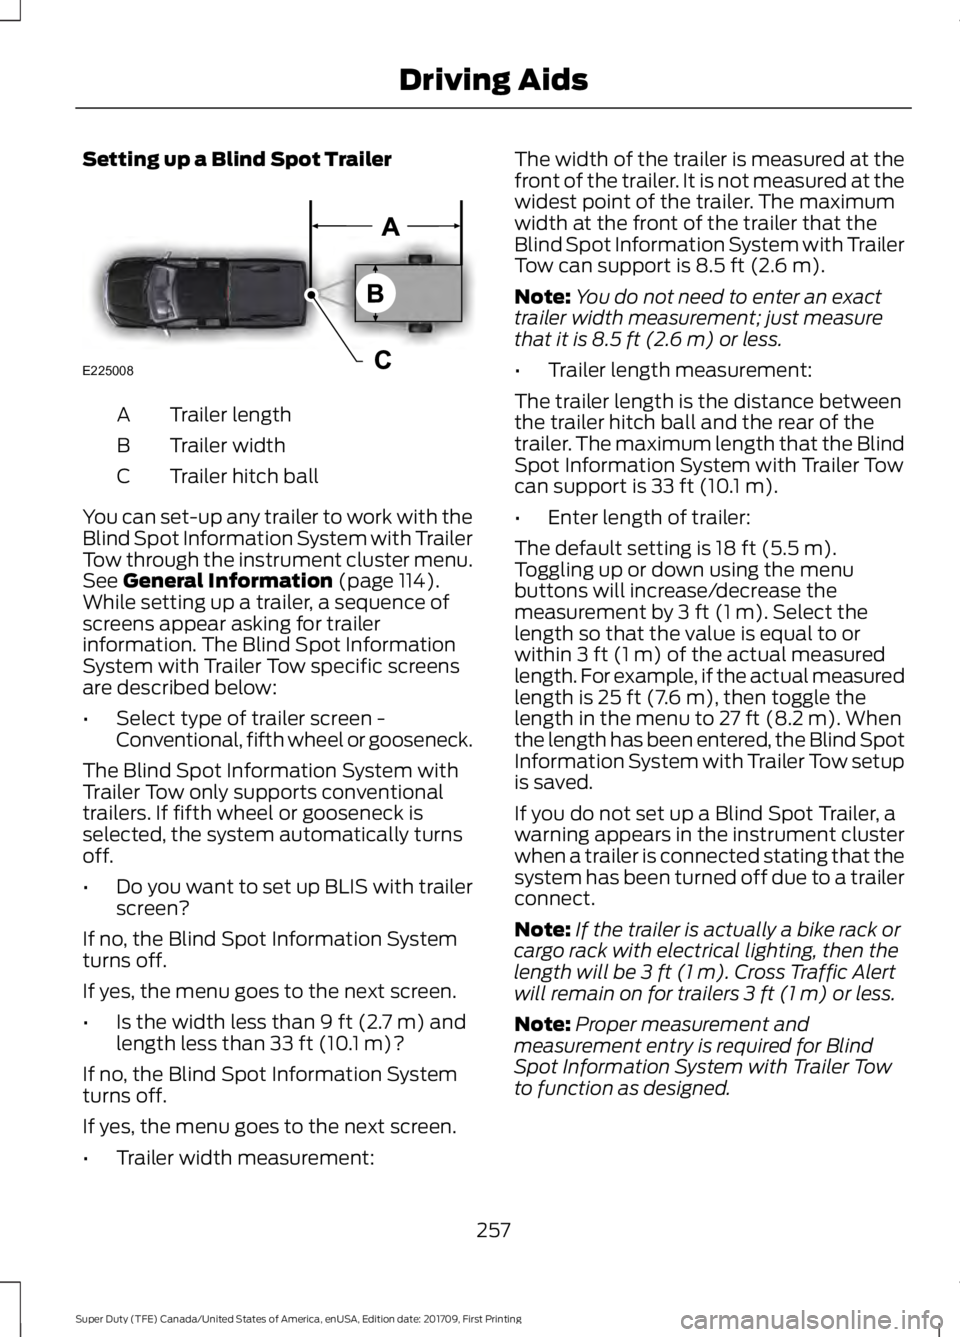
Trailer length
A
Trailer width
B
Trailer hitch ball
C
You can set-up any trailer to work with the
Blind Spot Information System with Trailer
Tow through the instrument cluster menu.
See General Information (page 114).
While setting up a trailer, a sequence of
screens appear asking for trailer
information. The Blind Spot Information
System with Trailer Tow specific screens
are described below:
• Select type of trailer screen -
Conventional, fifth wheel or gooseneck.
The Blind Spot Information System with
Trailer Tow only supports conventional
trailers. If fifth wheel or gooseneck is
selected, the system automatically turns
off.
• Do you want to set up BLIS with trailer
screen?
If no, the Blind Spot Information System
turns off.
If yes, the menu goes to the next screen.
• Is the width less than
9 ft (2.7 m) and
length less than 33 ft (10.1 m)?
If no, the Blind Spot Information System
turns off.
If yes, the menu goes to the next screen.
• Trailer width measurement: The width of the trailer is measured at the
front of the trailer. It is not measured at the
widest point of the trailer. The maximum
width at the front of the trailer that the
Blind Spot Information System with Trailer
Tow can support is
8.5 ft (2.6 m).
Note: You do not need to enter an exact
trailer width measurement; just measure
that it is
8.5 ft (2.6 m) or less.
• Trailer length measurement:
The trailer length is the distance between
the trailer hitch ball and the rear of the
trailer. The maximum length that the Blind
Spot Information System with Trailer Tow
can support is
33 ft (10.1 m).
• Enter length of trailer:
The default setting is
18 ft (5.5 m).
Toggling up or down using the menu
buttons will increase/decrease the
measurement by
3 ft (1 m). Select the
length so that the value is equal to or
within
3 ft (1 m) of the actual measured
length. For example, if the actual measured
length is
25 ft (7.6 m), then toggle the
length in the menu to 27 ft (8.2 m). When
the length has been entered, the Blind Spot
Information System with Trailer Tow setup
is saved.
If you do not set up a Blind Spot Trailer, a
warning appears in the instrument cluster
when a trailer is connected stating that the
system has been turned off due to a trailer
connect.
Note: If the trailer is actually a bike rack or
cargo rack with electrical lighting, then the
length will be
3 ft (1 m). Cross Traffic Alert
will remain on for trailers 3 ft (1 m) or less.
Note: Proper measurement and
measurement entry is required for Blind
Spot Information System with Trailer Tow
to function as designed.
257
Super Duty (TFE) Canada/United States of America, enUSA, Edition date: 201709, First Printing Driving AidsE225008
Page 295 of 656
Note:
The integrated Ford brake controller
is compatible with trailers equipped with
electric-actuated drum brakes and
electric-over hydraulic brake systems.
Note: The integrated Ford brake controller
does not control hydraulic surge-style
brakes. When used properly, the trailer brake
controller assists in smooth and effective
trailer braking by powering the trailer
’s
electric or electric-over-hydraulic brakes
with a proportional output based on the
towing vehicle ’s brake pressure.
You can adjust the amount of initial trailer
brake output by selecting one of three
settings through the message center.
Ford has tested the trailer brake controller
to be compatible with several major
brands of electric-over-hydraulic trailer
brakes. Contact an authorized dealer for
information on which brands you can use.
The controller user interface consists of
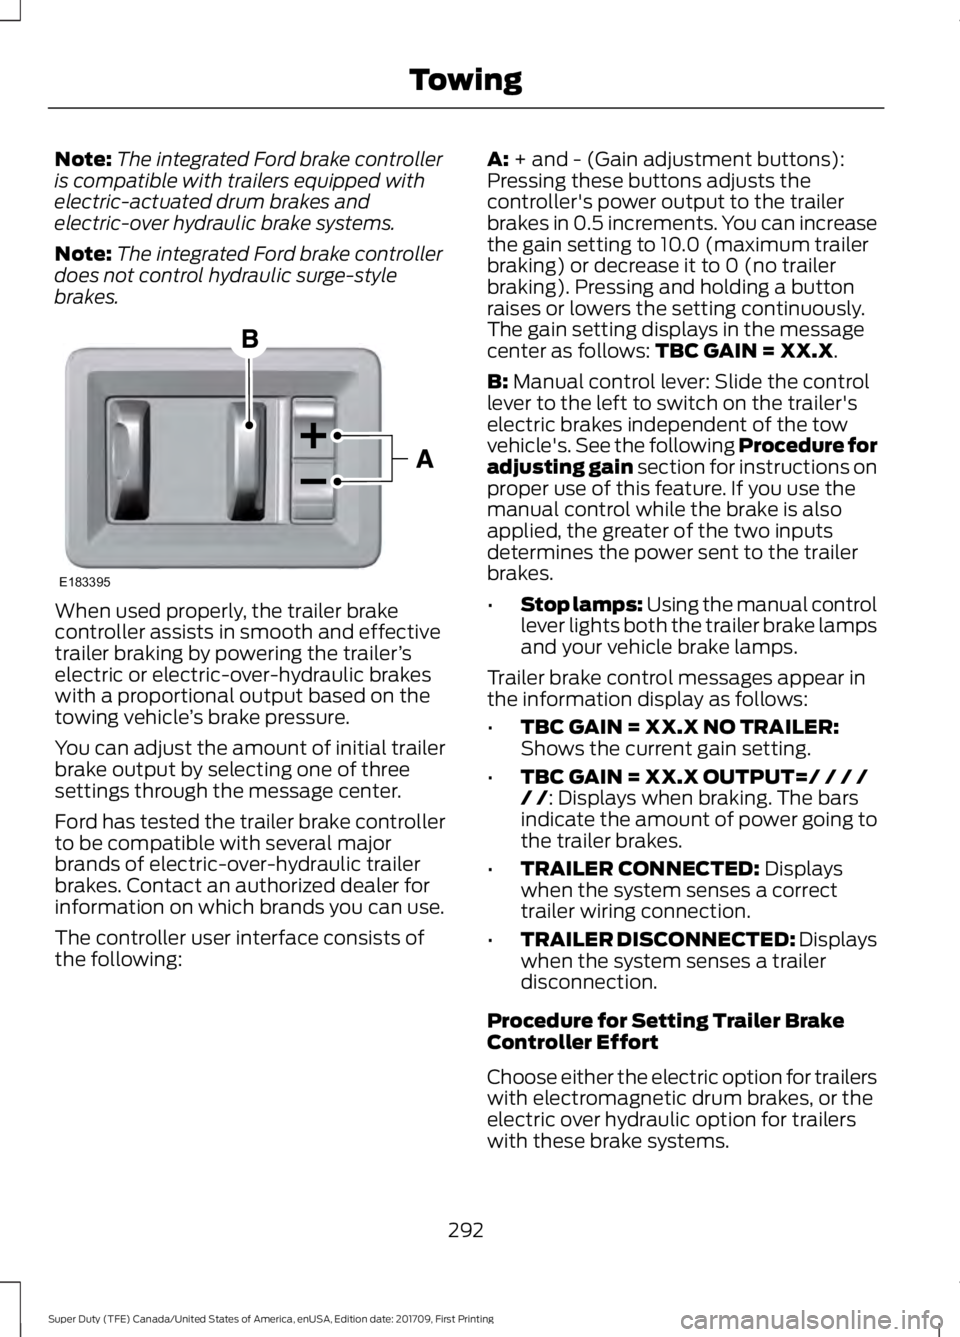
the following: A: + and - (Gain adjustment buttons):
Pressing these buttons adjusts the
controller's power output to the trailer
brakes in 0.5 increments. You can increase
the gain setting to 10.0 (maximum trailer
braking) or decrease it to 0 (no trailer
braking). Pressing and holding a button
raises or lowers the setting continuously.
The gain setting displays in the message
center as follows:
TBC GAIN = XX.X.
B:
Manual control lever: Slide the control
lever to the left to switch on the trailer's
electric brakes independent of the tow
vehicle's. See the following Procedure for
adjusting gain section for instructions on
proper use of this feature. If you use the
manual control while the brake is also
applied, the greater of the two inputs
determines the power sent to the trailer
brakes.
• Stop lamps: Using the manual control
lever lights both the trailer brake lamps
and your vehicle brake lamps.
Trailer brake control messages appear in
the information display as follows:
• TBC GAIN = XX.X NO TRAILER:
Shows the current gain setting.
• TBC GAIN = XX.X OUTPUT=/ / / /
/ /
: Displays when braking. The bars
indicate the amount of power going to
the trailer brakes.
• TRAILER CONNECTED:
Displays
when the system senses a correct
trailer wiring connection.
• TRAILER DISCONNECTED: Displays
when the system senses a trailer
disconnection.
Procedure for Setting Trailer Brake
Controller Effort
Choose either the electric option for trailers
with electromagnetic drum brakes, or the
electric over hydraulic option for trailers
with these brake systems.
292
Super Duty (TFE) Canada/United States of America, enUSA, Edition date: 201709, First Printing TowingE183395
Page 296 of 656
Trailer Brake Effort Setting
The trailer brake controller allows the user
to customize how aggressively the trailer
brakes engage. The default value is the low
setting and is the recommended setting
for most trailers. If your trailer's brakes
require more initial voltage, or if you prefer
more aggressive trailer braking, then select
either the medium or the high setting.
Procedure for Setting Trailer Brake
Controller Mode
Choose the low, medium or high setting
for the required initial trailer brake output.
Procedure for Adjusting Gain
Note:
Only perform this procedure in a
traffic-free environment at speeds of
approximately 20– 25 mph (30–40 km/h).
The gain setting adjusts the trailer brake
controller for the specific towing condition.
You should change the setting as towing
conditions change. Changes to towing
conditions include trailer load, vehicle load,
road conditions and weather.
The gain should be set to provide the
maximum trailer braking assistance while
making sure the trailer wheels do not lock
when using the brakes. Locked trailer
wheels may lead to trailer instability.
1. Make sure the trailer brakes are in good
working condition, functioning normally
and properly adjusted. See your trailer
dealer if necessary.
2. Hook up the trailer and make the electrical connections according to the
trailer manufacturer's instructions.
3. When you plug in a trailer with electric or electric-over-hydraulic brakes, a
confirmation message appears in the
information display. 4. Use the gain adjustment (+ and -)
buttons to increase or decrease the
gain setting to the desired starting
point. A gain setting of 6.0 is a good
starting point for heavier loads.
5. In a traffic-free environment, tow the trailer on a dry, level surface at a speed
of
20– 25 mph (30–40 km/h) and
squeeze the manual control lever
completely.
6. If the trailer wheels lock up, indicated by squealing tires, reduce the gain
setting. If the trailer wheels turn freely,
increase the gain setting. Repeat Steps
5 and 6 until the gain setting is at a
point just below trailer wheel lock-up.
If towing a heavier trailer, trailer wheel
lock-up may not be attainable even
with the maximum gain setting of 10.
Information Display Warning Messages
Note: An authorized dealer can diagnose
the trailer brake controller to determine
exactly which trailer fault has occurred.
However, your Ford warranty does not cover
this diagnosis if the fault is with the trailer.
TRAILER BRAKE MODULE FAULT
Displays in response to faults sensed by
the trailer brake controller, accompanied
by a single tone. If this message appears,
contact an authorized dealer as soon as
possible for diagnosis and repair. The
controller may still function, but with
degraded performance.
WIRING FAULT ON TRAILER
Displays when there is a short circuit on
the electric brake output wire.
If this message displays, with no trailer
connected, the problem is with your vehicle
wiring or trailer brake controller. Contact
an authorized dealer.
293
Super Duty (TFE) Canada/United States of America, enUSA, Edition date: 201709, First Printing Towing
Page 452 of 656
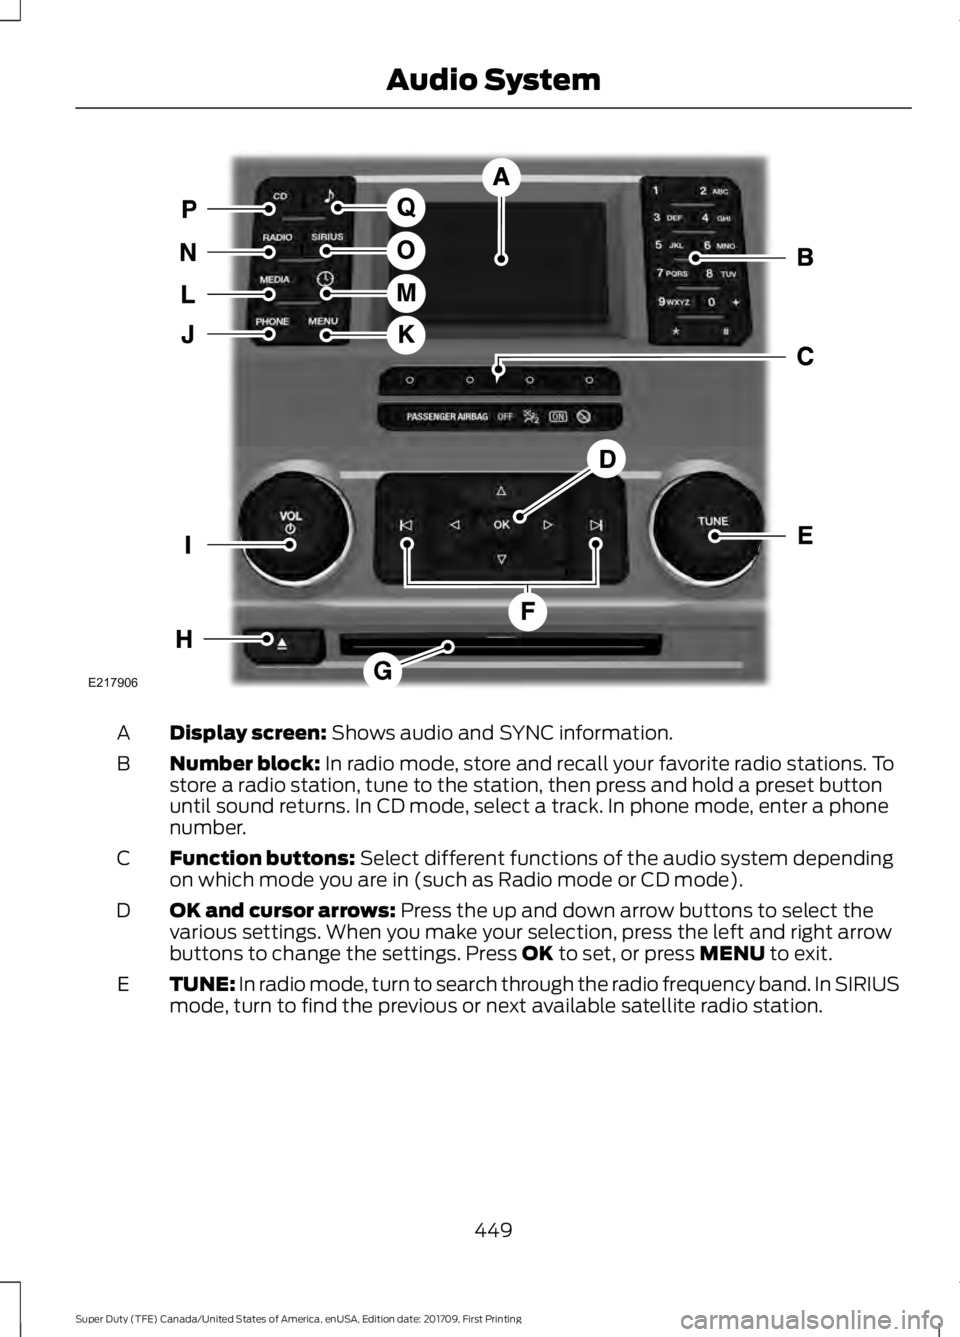
Display screen: Shows audio and SYNC information.
A
Number block:
In radio mode, store and recall your favorite radio stations. To
store a radio station, tune to the station, then press and hold a preset button
until sound returns. In CD mode, select a track. In phone mode, enter a phone
number.
B
Function buttons:
Select different functions of the audio system depending
on which mode you are in (such as Radio mode or CD mode).
C
OK and cursor arrows:
Press the up and down arrow buttons to select the
various settings. When you make your selection, press the left and right arrow
buttons to change the settings. Press
OK to set, or press MENU to exit.
D
TUNE: In radio mode, turn to search through the radio frequency band. In SIRIUS
mode, turn to find the previous or next available satellite radio station.
E
449
Super Duty (TFE) Canada/United States of America, enUSA, Edition date: 201709, First Printing Audio SystemE217906
Page 453 of 656

Seek, Fast Forward and Reverse: In radio mode, select a frequency band
and press either button. The system stops at the first station it finds in that
direction. In SIRIUS mode, press to select the next or previous satellite radio
station. If you select a specific category (such as jazz, rock or news), press to
find the next or previous station in the category you select. In CD mode, press
to select the next or previous track. Press and hold to move quickly forward or
backward through the current track.
F
CD slot:
Insert a CD.
G
Eject:
Press to eject a CD.
H
Vol and Power:
Turn to adjust the volume. Press to switch the system on and
off.
I
PHONE:
Press to access the phone features of the SYNC system. See your
SYNC information.
J
MENU:
Press to access different audio system features. See Menu Structure.
K
MEDIA:
Press to open the media source menu. You can press this multiple
times to change to CD or to a SYNC-Media device or scroll through the media
sources using the arrow buttons. Press
OK to select a source.
L
Clock: Press to access the clock setting. Use the center arrow controls to change
the hours and minutes. You can also set the clock by pressing
MENU and
scrolling to Clock Settings. If not in phone mode, press to display the clock.
M
RADIO:
Press to listen to the radio or change radio stations. Press the function
buttons below the radio screen to select different radio functions.
N
SIRIUS:
Press to listen to SIRIUS satellite radio.
O
CD:
Press to listen to a CD. Press the function buttons below the radio screen
to select on-screen options of Repeat or Shuffle.
P
SOUND:
Press to access settings for Treble, Midrange, Bass, Fade and Balance.
Use the up and down arrow buttons to select the various settings. When you
make your selection, press the left and right arrow buttons to change the
settings. Press
OK to set or press MENU to exit. Sound settings can be set for
each audio source independently.
Q
Menu Structure
Note: Depending on your system, some
options may appear slightly different.
Press
MENU. Press the up and down arrow buttons to
scroll through the options.
Press the right arrow to enter a menu.
Press the left arrow to exit a menu.
Press OK to confirm a selection.
450
Super Duty (TFE) Canada/United States of America, enUSA, Edition date: 201709, First Printing Audio System
Page 467 of 656

To adjust this setting press the voice button, when prompted say:
Action and Description
Voice Command
voice settings
Then any of the following: When enabled, this feature will prompt you
to confirm any voice initiated call command
prior to the call being placed.
phone confirmation on
The system will make a best guess; you
may still occasionally be asked to confirm
settings.
phone confirmation off
Changing the Voice Settings
In addition to using voice commands to
change the voice settings, you can also use
the menu in the audio display.
To change the voice settings press the
Menu button then select: Menu Item
SYNC-Settings
Voice settings
Note: Depending on the current climate
control settings, the fan speed may
automatically go down while issuing voice
commands or while making and receiving
phone calls via SYNC to reduce the amount
of background noise in the vehicle. The fan
speed will automatically return to normal
operation once the voice session ends. Fan
speed can also be adjusted normally during
a voice session, simply press fan buttons (or
turn fan knob) to increase or decrease fan
speed to desired setting. To disable this automatic fan speed
reduction feature during voice sessions,
press and hold the climate control AC and
Recirculated air buttons simultaneously,
release and then increase fan speed within
2 seconds. To re-enable this feature, repeat
the above sequence.
USING SYNC™ WITH YOUR
PHONE
Hands-free calling is one of the main
features of SYNC. While the system
supports a variety of features, many are
dependent on your cellular phone's
functionality. At a minimum, most cellular
phones with Bluetooth wireless technology
support the following functions:
•
Answering an incoming call.
• Ending a call.
• Using privacy mode.
• Dialing a number.
• Redialing.
• Call waiting notification.
• Caller ID.
464
Super Duty (TFE) Canada/United States of America, enUSA, Edition date: 201709, First Printing SYNC™ (If Equipped)
Page 475 of 656

Sending a Text Message
Note:
You can only send a text message to
one recipient at a time.
1. Select the send option when the desired selection highlights in the audio
display.
2. Select the confirmation option when the contact appears.
3. Press the OK button again to confirm when the system asks if you want to
send the message. A pre-defined
signature appears on each text
message. Note:
You can send text messages either
by choosing a contact from the phonebook
and selecting the text option from the audio
display or by replying to a received message
in the inbox.
Accessing Your Phone Settings
These are phone-dependent features. Your
phone settings allow you to access and
adjust features such as your ring tone and
text message notification, modify your
phonebook, and set up automatic
download.
1. Press the PHONE button.
2. Scroll until the phone settings option appears, and then press the OK button.
Scroll to select from the following options: Description and action
Menu Item
If this option is checked, the system uses the cellular phone
as the master when there is more than one cellular phone
paired to the system. This option can be changed for all
cellular phones (not only the active phone) using the
Bluetooth Devices menu.
Set as master
See the cellular phone name, provider name, cellular
phone number, and signal level. When done, press the left
arrow buttons to return to the phone status menu.
Phone status
Select which ringtone sounds during an incoming call (one
of the system's tones or your cellular phone's). If your
phone supports in-band ringing, your phone's ringtone
sounds when you choose the cellular phone ringtone
option.
Set ringtone
1. Press the
OK button to select and scroll to hear each
ringtone.
2. Press the
OK button to select a ringtone.
Have the option of hearing an audible tone to notify you
when a text message arrives. Press the
OK button to
switch the audible tone off or on.
Text msg notify
Modify the contents of your phonebook (such as add,
delete or download). Press the
OK button to select and
scroll between the choices in the phonebook preferences
table below.
Phonebook pref.
472
Super Duty (TFE) Canada/United States of America, enUSA, Edition date: 201709, First Printing SYNC™
(If Equipped)
Page 478 of 656
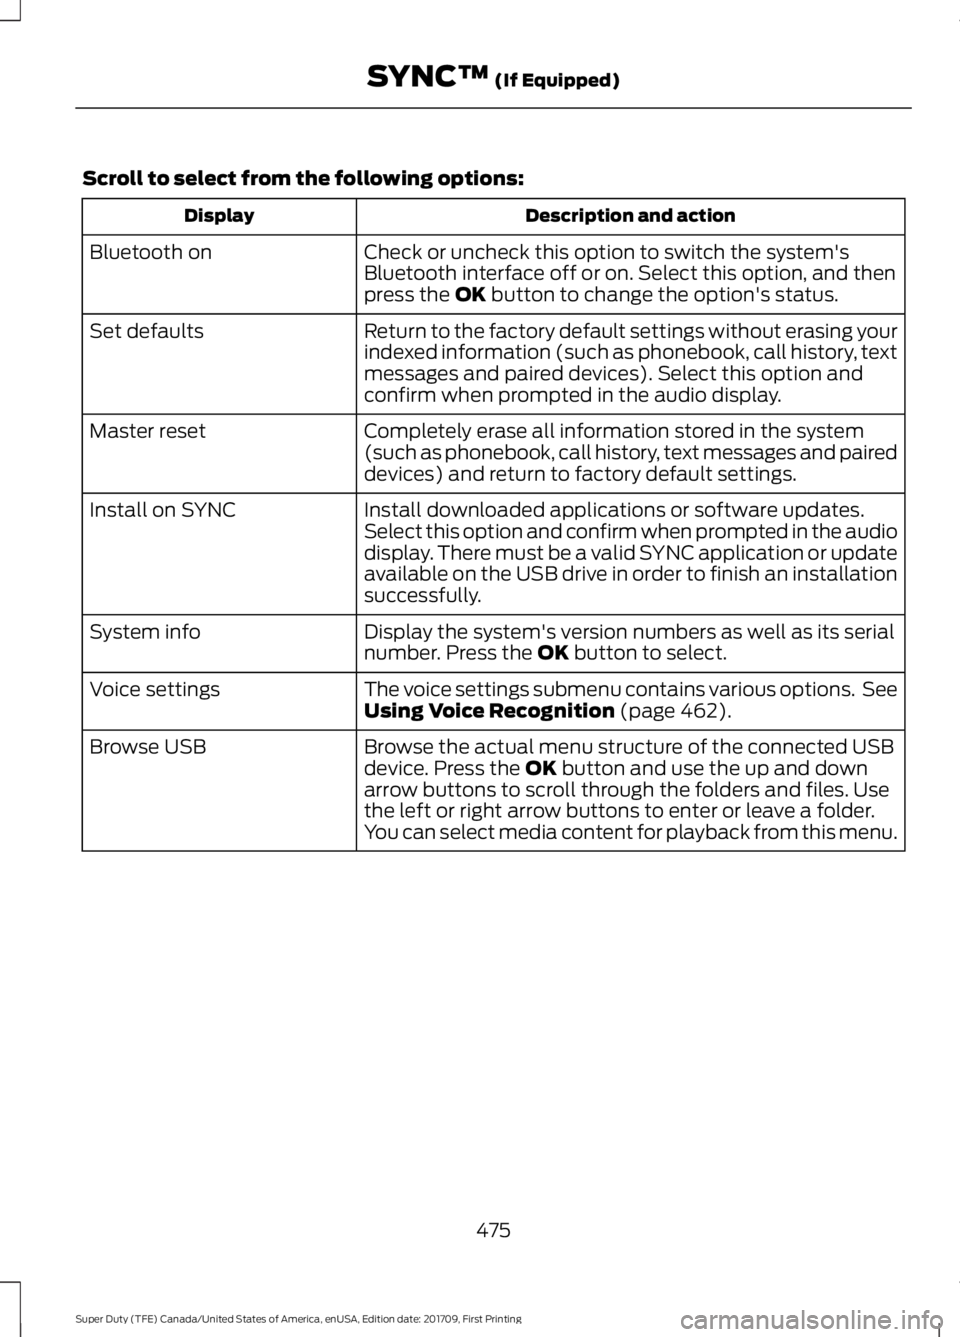
Scroll to select from the following options:
Description and action
Display
Check or uncheck this option to switch the system's
Bluetooth interface off or on. Select this option, and then
press the OK button to change the option's status.
Bluetooth on
Return to the factory default settings without erasing your
indexed information (such as phonebook, call history, text
messages and paired devices). Select this option and
confirm when prompted in the audio display.
Set defaults
Completely erase all information stored in the system
(such as phonebook, call history, text messages and paired
devices) and return to factory default settings.
Master reset
Install downloaded applications or software updates.
Select this option and confirm when prompted in the audio
display. There must be a valid SYNC application or update
available on the USB drive in order to finish an installation
successfully.
Install on SYNC
Display the system's version numbers as well as its serial
number. Press the
OK button to select.
System info
The voice settings submenu contains various options. See
Using Voice Recognition
(page 462).
Voice settings
Browse the actual menu structure of the connected USB
device. Press the
OK button and use the up and down
arrow buttons to scroll through the folders and files. Use
the left or right arrow buttons to enter or leave a folder.
You can select media content for playback from this menu.
Browse USB
475
Super Duty (TFE) Canada/United States of America, enUSA, Edition date: 201709, First Printing SYNC™
(If Equipped)