2018 FORD F250 SUPER DUTY jump
[x] Cancel search: jumpPage 7 of 656
Using Adaptive Cruise Control...............246
Driving Aids
Lane Keeping System.................................252
Blind Spot Information System
.............254
Cross Traffic Alert
........................................259
Steering............................................................261
Collision Warning System........................263
Load Carrying
Load Limit
......................................................266
Bed Ramps
.....................................................270
Towing
Towing a Trailer.............................................273
Trailer Reversing Aids..................................275
Trailer Sway Control...................................282
Recommended Towing Weights...........283
Essential Towing Checks..........................287
Towing the Vehicle on Four Wheels......296
Driving Hints
Breaking-In....................................................299
Economical Driving.....................................299
Driving Through Water..............................300
Floor Mats......................................................300
Snowplowing
.................................................301
Roadside Emergencies
Roadside Assistance.................................304
Hazard Flashers...........................................305
Fuel Shutoff..................................................305
Jump Starting the Vehicle........................306
Post-Crash Alert System
..........................308
Transporting the Vehicle
..........................308
Towing Points
...............................................309
Customer Assistance
Getting the Services You Need.................311 In California (U.S. Only)..............................312
The Better Business Bureau (BBB) Auto
Line Program (U.S. Only).......................313
Utilizing the Mediation/Arbitration Program (Canada Only)........................314
Getting Assistance Outside the U.S. and Canada
.........................................................314
Ordering Additional Owner's Literature.....................................................315
Reporting Safety Defects (U.S. Only).............................................................316
Reporting Safety Defects (Canada Only).............................................................316
Fuses
Fuse Specification Chart...........................318
Changing a Fuse...........................................327
Maintenance
General Information
...................................329
Opening and Closing the Hood
..............329
Under Hood Overview - 6.2L..................330
Under Hood Overview - 6.7L Diesel.......331
Under Hood Overview - 6.8L
...................333
Engine Oil Dipstick - 6.2L/6.8L...............334
Engine Oil Dipstick - 6.7L Diesel.............334
Engine Oil Check - 6.2L/6.8L..................334
Engine Oil Check - 6.7L Diesel................335
Changing the Engine Oil and Oil Filter..............................................................336
Changing the Crankcase Vent Filter Element.......................................................337
Oil Change Indicator Reset
......................338
Engine Coolant Check - 6.2L/6.8L........339
Engine Coolant Check - 6.7L Diesel......343
Automatic Transmission Fluid Check............................................................347
Transfer Case Fluid Check.......................350
Brake Fluid Check........................................350
Power Steering Fluid Check
......................351
Washer Fluid Check.....................................351
4
Super Duty (TFE) Canada/United States of America, enUSA, Edition date: 201709, First Printing Table of Contents
Page 201 of 656
•
Incorrect fuel for climatic conditions.
• Incorrect engine oil viscosity for
climactic conditions.
Note: Some vehicles have a lifetime fuel
filter that is integrated with the fuel tank.
Regular maintenance or replacement is not
needed.
Note: If these checks do not help you
correct the concern, have your vehicle
checked as soon as possible.
Noise Emissions Warranty,
Prohibited Tampering Acts and
Maintenance
On January 1, 1978, Federal regulation
became effective governing the noise
emission on trucks over 10,000 lb
(4,536 kg) Gross Vehicle Weight Rating
(GVWR). The preceding statements
concerning prohibited tampering acts and
maintenance, and the noise warranty
found in the Warranty Guide, are
applicable to complete chassis cabs over
10,000 lb (4,536 kg)
GVWR.
CATALYTIC CONVERTER WARNINGS
Do not park, idle or drive your vehicle
on dry grass or other dry ground
cover. The emission system heats up
the engine compartment and exhaust
system, creating the risk of fire. The normal operating temperature
of the exhaust system is very high.
Never work around or attempt to
repair any part of the exhaust system until
it has cooled. Use special care when
working around the catalytic converter.
The catalytic converter heats up to a very
high temperature after only a short period
of engine operation and stays hot after the
engine is switched off. WARNINGS
Exhaust leaks may result in entry of
harmful and potentially lethal fumes
into the passenger compartment. If
you smell exhaust fumes inside your
vehicle, have your vehicle inspected
immediately. Do not drive if you smell
exhaust fumes. Your vehicle has various emission control
components and a catalytic converter that
enables it to comply with applicable
exhaust emission standards.
To make sure that the catalytic converter
and other emission control components
continue to work properly:
•
Do not crank the engine for more than
10 seconds at a time.
• Do not run the engine with a spark plug
lead disconnected.
• Do not push-start or tow-start your
vehicle. Use booster cables. See Jump
Starting the Vehicle (page 306).
• Use only the specified fuel listed.
• Do not switch the ignition off when your
vehicle is moving.
• Avoid running out of fuel.
• Have the items listed in scheduled
maintenance information performed
according to the specified schedule.
Note: Resulting component damage may
not be covered by the vehicle Warranty.
The scheduled maintenance items listed
in scheduled maintenance information are
essential to the life and performance of
your vehicle and to its emissions system.
If you use anything other than Ford,
Motorcraft or Ford-authorized parts for
maintenance replacements or for service
of components affecting emission control,
such non-Ford parts should be equivalent
to genuine Ford Motor Company parts in
performance and durability.
198
Super Duty (TFE) Canada/United States of America, enUSA, Edition date: 201709, First Printing Engine Emission Control
Page 307 of 656
ROADSIDE ASSISTANCE
Vehicles Sold in the United States:
Getting Roadside Assistance
To fully assist you should you have a
vehicle concern, Ford Motor Company
offers a complimentary roadside
assistance program. This program is
separate from the New Vehicle Limited
Warranty.
The service is available:
•
24 hours a day, seven days a week.
• For the coverage period listed on the
Roadside Assistance Card included in
your Owner's Manual portfolio.
Roadside Assistance covers:
• A flat tire change with a good spare
(except vehicles supplied with a tire
inflation kit).
• Battery jump start.
• Lock-out assistance (key replacement
cost is the customer's responsibility).
• Fuel delivery — independent service
contractors, if not prohibited by state,
local or municipal law, shall deliver up
to 2 gal (8 L) of gasoline or 5 gal (20 L)
of diesel fuel to a disabled vehicle.
Roadside Assistance limits fuel delivery
service to two no-charge occurrences
within a 12-month period.
• Winch out — available within 100 ft
(30 m) of a paved or county
maintained road, no recoveries. •
Towing — independent service
contractors, if not prohibited by state,
local or municipal law, shall tow Ford
eligible vehicles to an authorized dealer
within
35 mi (56 km) of the
disablement location or to the nearest
authorized dealer. If a member
requests a tow to an authorized dealer
that is more than
35 mi (56 km) from
the disablement location, the member
shall be responsible for any mileage
costs in excess of
35 mi (56 km).
• Roadside Assistance includes up to
$200 for a towed trailer if the disabled
eligible vehicle requires service at the
nearest authorized dealer. If the towing
vehicle is operational but the trailer is
not, then the trailer does not qualify for
any roadside services.
Vehicles Sold in the United States:
Using Roadside Assistance
Complete the roadside assistance
identification card and place it in your
wallet for quick reference. This card is in
the owner's information portfolio in the
glove compartment.
United States vehicle customers who
require Roadside Assistance, call
1-800-241-3673.
If you need to arrange roadside assistance
for yourself, Ford Motor Company
reimburses a reasonable amount for
towing to the nearest dealership within
35 mi (56 km)
. To obtain reimbursement
information, United States vehicle
customers call 1-800-241-3673.
Customers need to submit their original
receipts.
304
Super Duty (TFE) Canada/United States of America, enUSA, Edition date: 201709, First Printing Roadside Emergencies
Page 309 of 656
If your vehicle has a push button start
system:
1. Press START/STOP to switch off your
vehicle.
2. Press the brake pedal and START/STOP
to switch on your
vehicle.
3. Remove your foot from the brake pedal
and press
START/STOP to switch off
your vehicle.
4. You can attempt to start the vehicle by pressing the brake pedal and
START/STOP
, or press START/STOP
without pressing the brake pedal.
JUMP STARTING THE VEHICLE WARNINGS
Batteries normally produce explosive
gases which can cause personal
injury. Therefore, do not allow
flames, sparks or lighted substances to
come near the battery. When working near
the battery, always shield your face and
protect your eyes. Always provide correct
ventilation. Keep batteries out of reach of
children. Batteries contain sulfuric
acid. Avoid contact with skin, eyes or
clothing. Shield your eyes when working
near the battery to protect against possible
splashing of acid solution. In case of acid
contact with skin or eyes, flush
immediately with water for a minimum of
15 minutes and get prompt medical
attention. If acid is swallowed, call a
physician immediately. Use only adequately sized cables
with insulated clamps.
Preparing Your Vehicle
Do not attempt to push-start your
automatic transmission vehicle. Note:
Attempting to push-start a vehicle
with an automatic transmission may cause
transmission damage.
Note: Use only a 12-volt supply to start your
vehicle.
Note: Do not disconnect the battery of the
disabled vehicle as this could damage the
vehicle electrical system.
Park the booster vehicle close to the hood
of the disabled vehicle, making sure the
two vehicles do not touch.
Connecting the Jumper Cables WARNINGS
Do not attach the cables to fuel lines,
engine rocker covers, the intake
manifold or electrical components
as grounding points. Stay clear of moving
parts. To avoid reverse polarity
connections, make sure that you correctly
identify the positive (+) and negative (-)
terminals on both the disabled and booster
vehicles before connecting the cables. Do not attach the end of the positive
cable to the studs or L-shaped eyelet
located above the positive (+)
terminal of your vehicle ’s battery. High
current may flow through and cause
damage to the fuses. Do not connect the end of the
second cable to the negative (-)
terminal of the battery to be jumped.
A spark may cause an explosion of the
gases that surround the battery. Note:
In the illustration, the bottom vehicle
represents the booster vehicle.
306
Super Duty (TFE) Canada/United States of America, enUSA, Edition date: 201709, First Printing Roadside Emergencies
Page 310 of 656
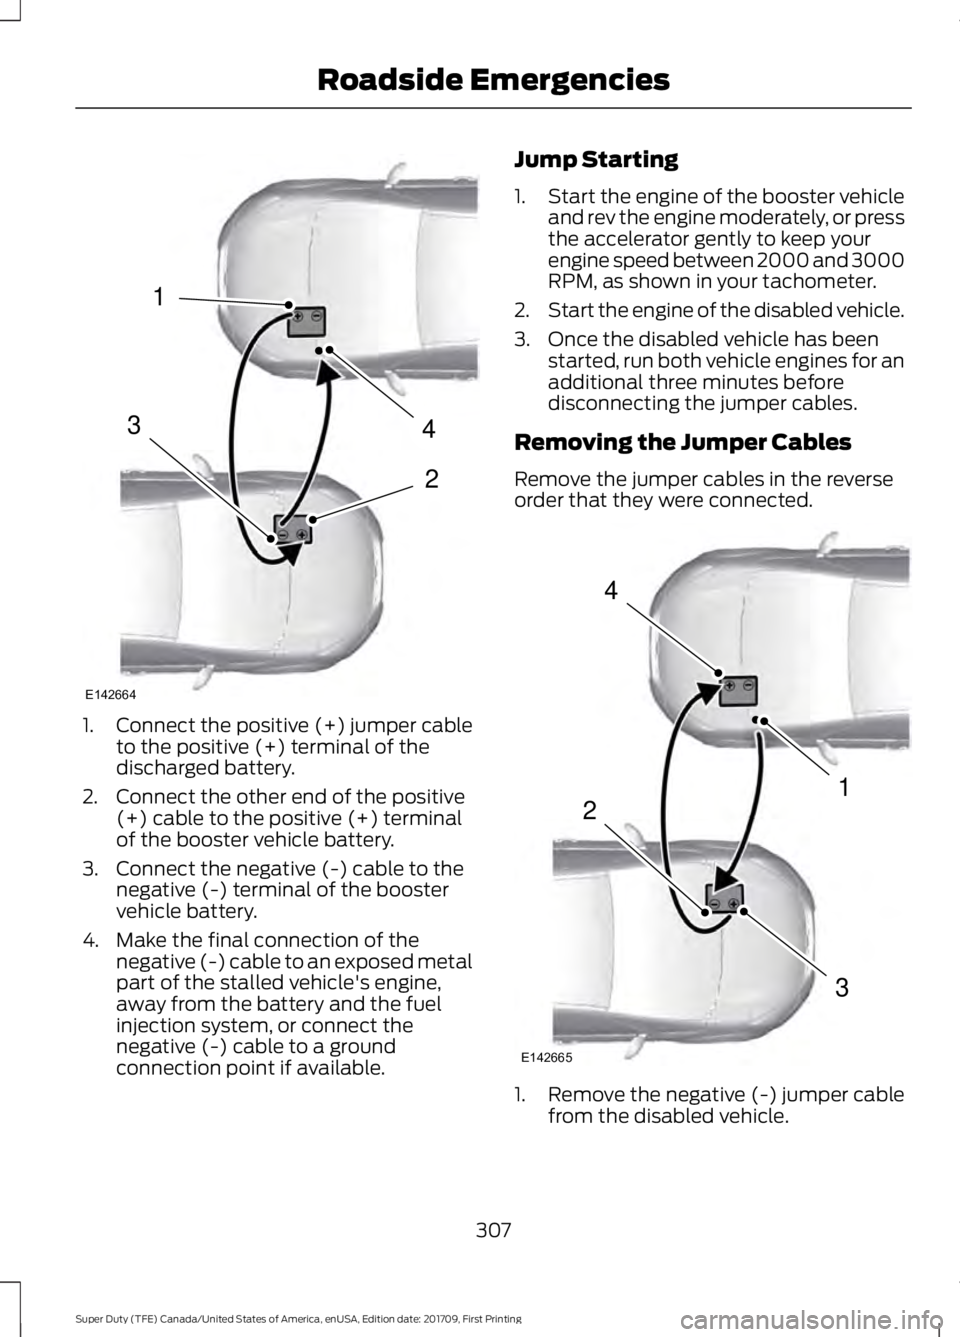
1.
Connect the positive (+) jumper cable
to the positive (+) terminal of the
discharged battery.
2. Connect the other end of the positive (+) cable to the positive (+) terminal
of the booster vehicle battery.
3. Connect the negative (-) cable to the negative (-) terminal of the booster
vehicle battery.
4. Make the final connection of the negative (-) cable to an exposed metal
part of the stalled vehicle's engine,
away from the battery and the fuel
injection system, or connect the
negative (-) cable to a ground
connection point if available. Jump Starting
1.
Start the engine of the booster vehicle
and rev the engine moderately, or press
the accelerator gently to keep your
engine speed between 2000 and 3000
RPM, as shown in your tachometer.
2. Start the engine of the disabled vehicle.
3. Once the disabled vehicle has been started, run both vehicle engines for an
additional three minutes before
disconnecting the jumper cables.
Removing the Jumper Cables
Remove the jumper cables in the reverse
order that they were connected. 1. Remove the negative (-) jumper cable
from the disabled vehicle.
307
Super Duty (TFE) Canada/United States of America, enUSA, Edition date: 201709, First Printing Roadside Emergencies4
2
1
3
E142664 4
1
3
2
E142665
Page 311 of 656
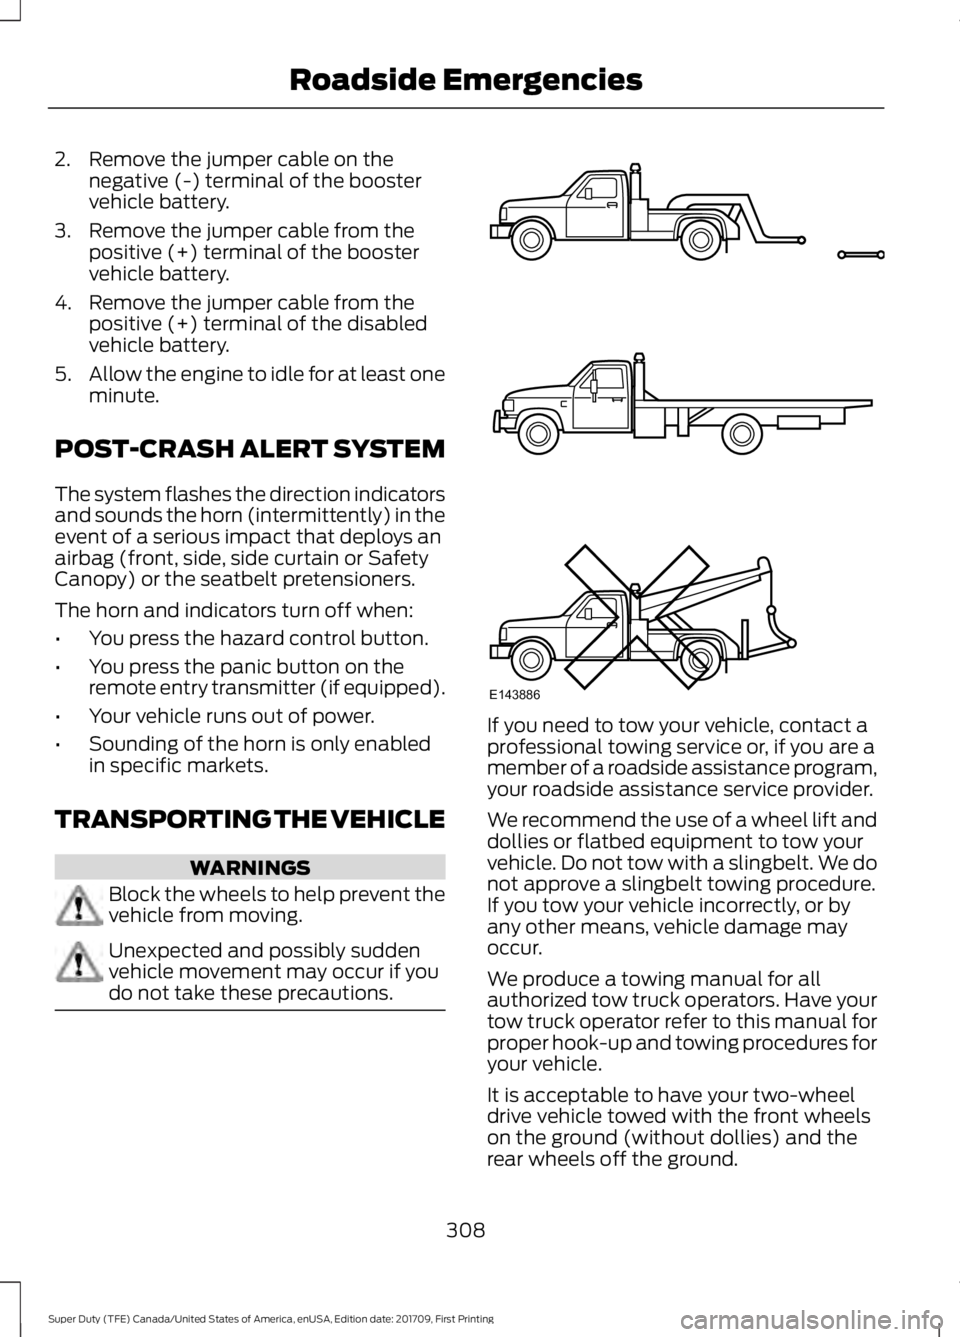
2. Remove the jumper cable on the
negative (-) terminal of the booster
vehicle battery.
3. Remove the jumper cable from the positive (+) terminal of the booster
vehicle battery.
4. Remove the jumper cable from the positive (+) terminal of the disabled
vehicle battery.
5. Allow the engine to idle for at least one
minute.
POST-CRASH ALERT SYSTEM
The system flashes the direction indicators
and sounds the horn (intermittently) in the
event of a serious impact that deploys an
airbag (front, side, side curtain or Safety
Canopy) or the seatbelt pretensioners.
The horn and indicators turn off when:
• You press the hazard control button.
• You press the panic button on the
remote entry transmitter (if equipped).
• Your vehicle runs out of power.
• Sounding of the horn is only enabled
in specific markets.
TRANSPORTING THE VEHICLE WARNINGS
Block the wheels to help prevent the
vehicle from moving.
Unexpected and possibly sudden
vehicle movement may occur if you
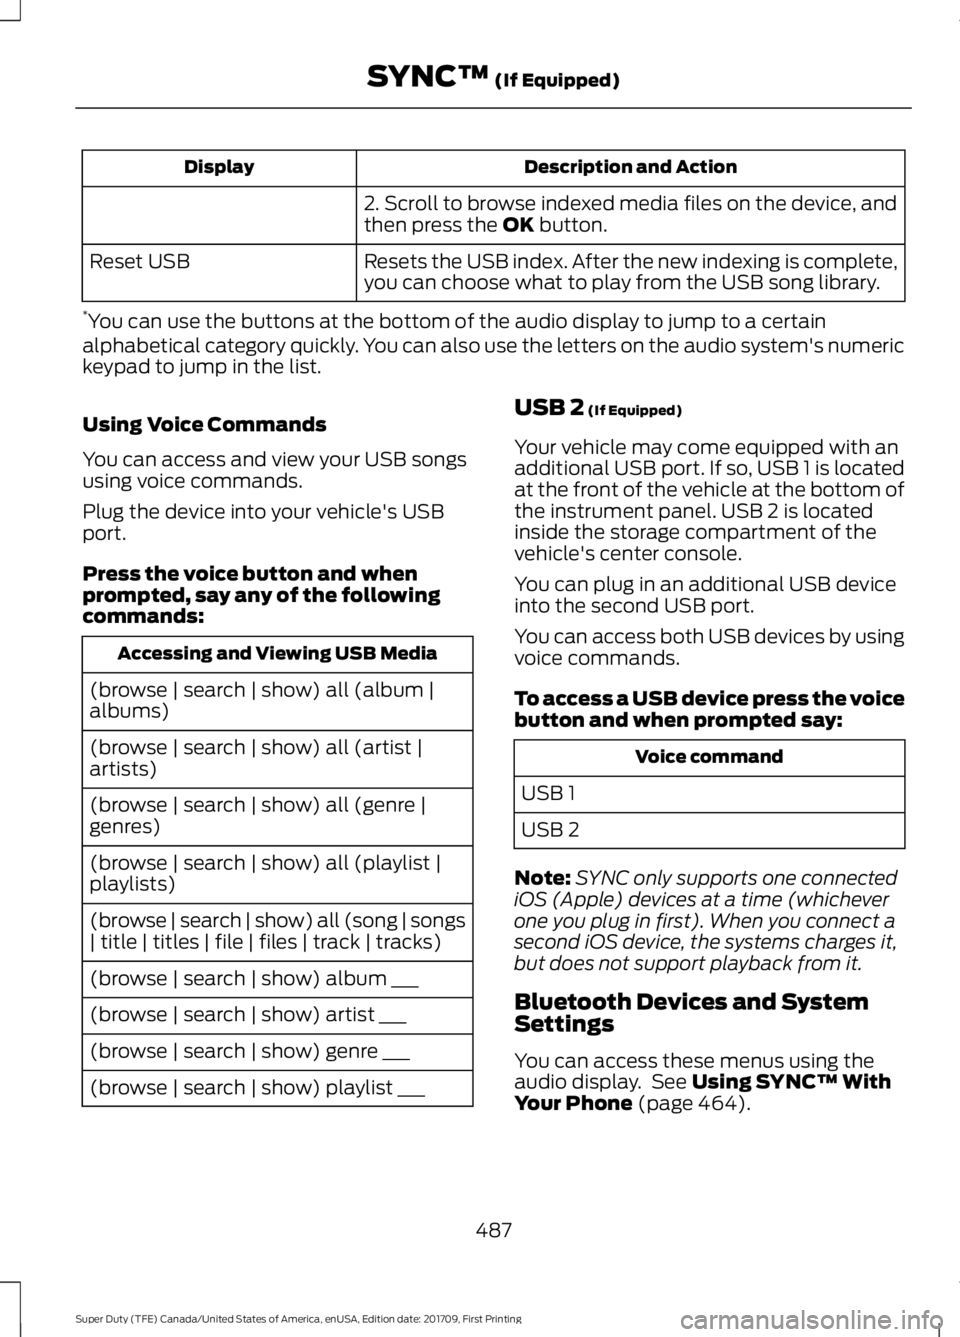
do not take these precautions. If you need to tow your vehicle, contact a
professional towing service or, if you are a
member of a roadside assistance program,
your roadside assistance service provider.
We recommend the use of a wheel lift and
dollies or flatbed equipment to tow your
vehicle. Do not tow with a slingbelt. We do
not approve a slingbelt towing procedure.
If you tow your vehicle incorrectly, or by
any other means, vehicle damage may
occur.
We produce a towing manual for all
authorized tow truck operators. Have your
tow truck operator refer to this manual for
proper hook-up and towing procedures for
your vehicle.
It is acceptable to have your two-wheel
drive vehicle towed with the front wheels
on the ground (without dollies) and the
rear wheels off the ground.
308
Super Duty (TFE) Canada/United States of America, enUSA, Edition date: 201709, First Printing Roadside EmergenciesE143886
Page 473 of 656

Description and action
Display
Enter numbers using the audio system's numeric keypad.
Dial a number
Access your downloaded phonebook.
Phonebook
1. Press the OK button to confirm and enter. You can use
the options at the bottom of the screen to access an
alphabetical category quickly. You can also use the letters
on the audio system's numeric keypad to jump in the list.
2. Scroll through your phonebook contacts.
3. Press the
OK button again when the desired selection
appears in the audio display.
4. Press the OK button or dial button to call the selection.
Access any previously dialed, received or missed calls.
Call History
1. Press the
OK button to select.
2. Scroll to select incoming, outgoing or missed calls. Press
the
OK button to make your selection.
3. Press the OK button or dial button to call the selection.
Select 1 of 10 speed dial entries. To set a speed dial entry,
go to the phonebook and then press and hold one of the
numbers on the audio system's numeric keypad.
Speed Dial
Send, download and delete text messages.
Text messaging
Access the option for Bluetooth Device menu listings (add,
connect, set as primary, on or off, delete).
BT Devices
View various settings and features on your phone.
Phone settings
Text Messaging
Note: This is a phone-dependent feature.
SYNC allows you to receive, send,
download and delete text messages. The
system can also read incoming text
messages to you so that you do not have
to take your eyes off the road.
Receiving a Text Message
Note: This is a phone-dependent feature.
Your phone must support downloading text
messages using Bluetooth to receive
incoming text messages. Note:
This is a speed-dependent feature
and is only available when your vehicle is
traveling at
3 mph (5 km/h) or less.
When a new message arrives, an audible
tone sounds and the audio display
indicates you have a new message.
To hear the message you can say: Description and
action
Voice command
Select this option
to have the system
read the message
to you.
(listen to | read)
([text] message)
470
Super Duty (TFE) Canada/United States of America, enUSA, Edition date: 201709, First Printing SYNC™
(If Equipped)
Page 490 of 656
Description and Action
Display
2. Scroll to browse indexed media files on the device, and
then press the OK button.
Resets the USB index. After the new indexing is complete,
you can choose what to play from the USB song library.
Reset USB
* You can use the buttons at the bottom of the audio display to jump to a certain
alphabetical category quickly. You can also use the letters on the audio system's numeric
keypad to jump in the list.
Using Voice Commands
You can access and view your USB songs
using voice commands.
Plug the device into your vehicle's USB
port.
Press the voice button and when
prompted, say any of the following
commands: Accessing and Viewing USB Media
(browse | search | show) all (album |
albums)
(browse | search | show) all (artist |
artists)
(browse | search | show) all (genre |
genres)
(browse | search | show) all (playlist |
playlists)
(browse | search | show) all (song | songs
| title | titles | file | files | track | tracks)
(browse | search | show) album ___
(browse | search | show) artist ___
(browse | search | show) genre ___
(browse | search | show) playlist ___ USB 2
(If Equipped)
Your vehicle may come equipped with an
additional USB port. If so, USB 1 is located
at the front of the vehicle at the bottom of
the instrument panel. USB 2 is located
inside the storage compartment of the
vehicle's center console.
You can plug in an additional USB device
into the second USB port.
You can access both USB devices by using
voice commands.
To access a USB device press the voice
button and when prompted say: Voice command
USB 1
USB 2
Note: SYNC only supports one connected
iOS (Apple) devices at a time (whichever
one you plug in first). When you connect a
second iOS device, the systems charges it,
but does not support playback from it.
Bluetooth Devices and System
Settings
You can access these menus using the
audio display. See
Using SYNC™ With
Your Phone (page 464).
487
Super Duty (TFE) Canada/United States of America, enUSA, Edition date: 201709, First Printing SYNC™
(If Equipped)