2018 FORD F250 SUPER DUTY warning
[x] Cancel search: warningPage 148 of 656
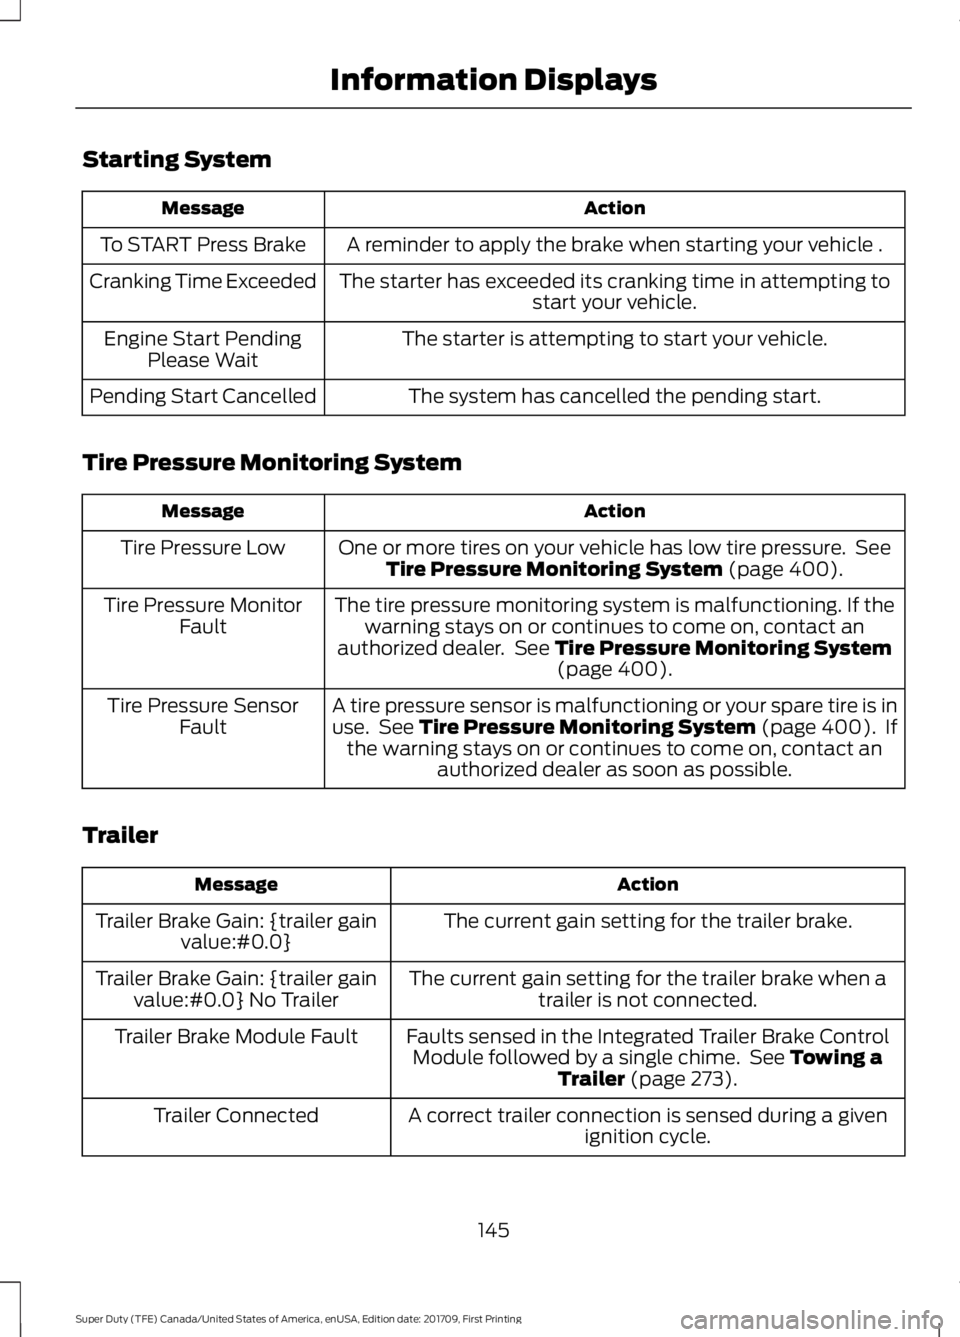
Starting System
Action
Message
A reminder to apply the brake when starting your vehicle .
To START Press Brake
The starter has exceeded its cranking time in attempting tostart your vehicle.
Cranking Time Exceeded
The starter is attempting to start your vehicle.
Engine Start Pending
Please Wait
The system has cancelled the pending start.
Pending Start Cancelled
Tire Pressure Monitoring System Action
Message
One or more tires on your vehicle has low tire pressure. SeeTire Pressure Monitoring System (page 400).
Tire Pressure Low
The tire pressure monitoring system is malfunctioning. If thewarning stays on or continues to come on, contact an
authorized dealer. See
Tire Pressure Monitoring System (page 400).
Tire Pressure Monitor
Fault
A tire pressure sensor is malfunctioning or your spare tire is in
use. See Tire Pressure Monitoring System (page 400). Ifthe warning stays on or continues to come on, contact an authorized dealer as soon as possible.
Tire Pressure Sensor
Fault
Trailer Action
Message
The current gain setting for the trailer brake.
Trailer Brake Gain: {trailer gain
value:#0.0}
The current gain setting for the trailer brake when atrailer is not connected.
Trailer Brake Gain: {trailer gain
value:#0.0} No Trailer
Faults sensed in the Integrated Trailer Brake ControlModule followed by a single chime. See
Towing a
Trailer (page 273).
Trailer Brake Module Fault
A correct trailer connection is sensed during a givenignition cycle.
Trailer Connected
145
Super Duty (TFE) Canada/United States of America, enUSA, Edition date: 201709, First Printing Information Displays
Page 149 of 656
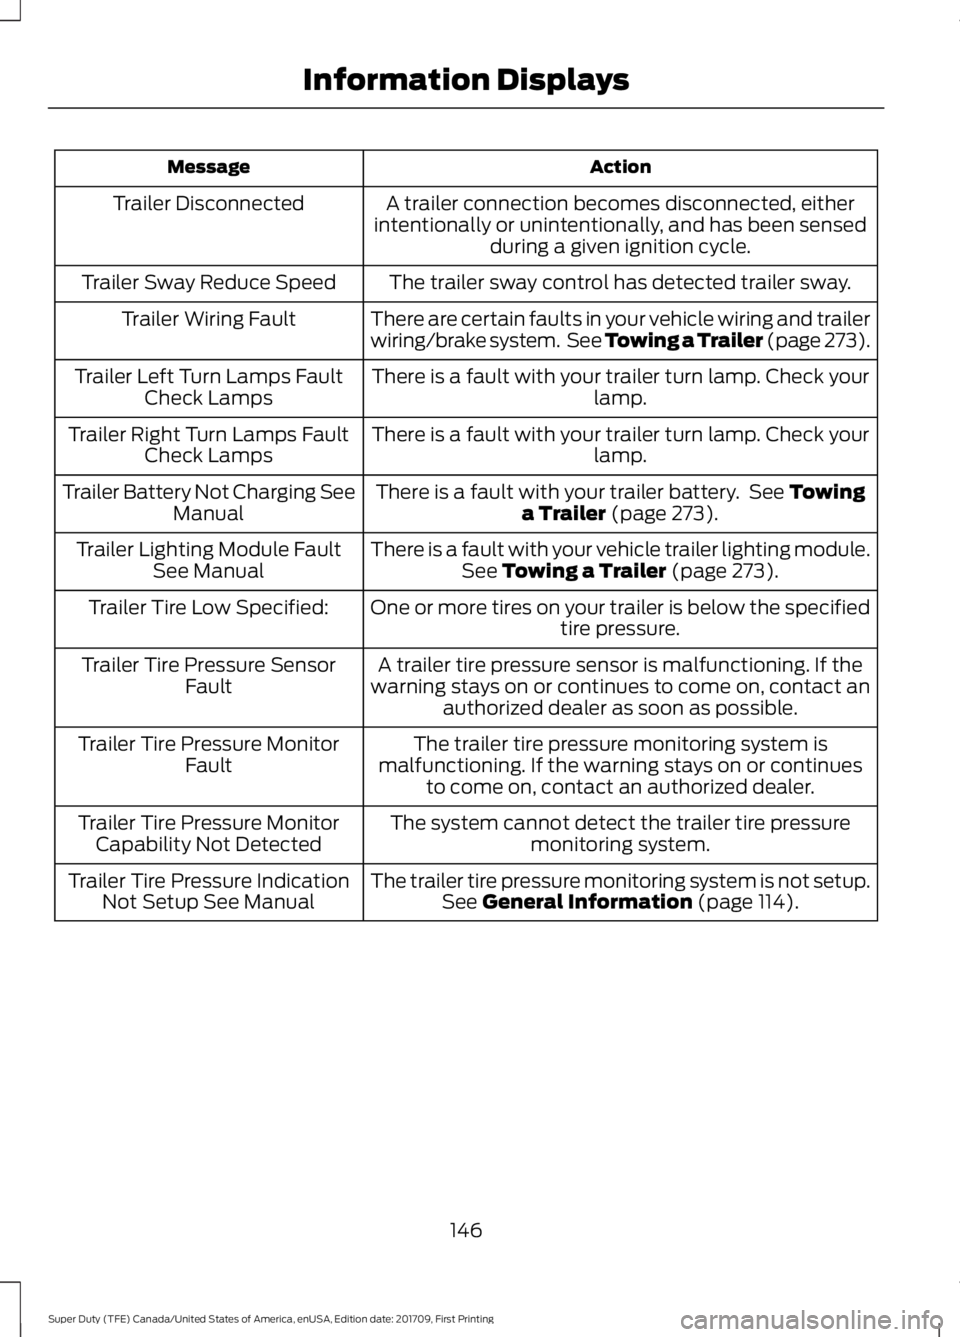
Action
Message
A trailer connection becomes disconnected, either
intentionally or unintentionally, and has been sensed during a given ignition cycle.
Trailer Disconnected
The trailer sway control has detected trailer sway.
Trailer Sway Reduce Speed
There are certain faults in your vehicle wiring and trailer
wiring/brake system. See Towing a Trailer (page 273).
Trailer Wiring Fault
There is a fault with your trailer turn lamp. Check yourlamp.
Trailer Left Turn Lamps Fault
Check Lamps
There is a fault with your trailer turn lamp. Check yourlamp.
Trailer Right Turn Lamps Fault
Check Lamps
There is a fault with your trailer battery. See
Towing
a Trailer (page 273).
Trailer Battery Not Charging See
Manual
There is a fault with your vehicle trailer lighting module.See
Towing a Trailer (page 273).
Trailer Lighting Module Fault
See Manual
One or more tires on your trailer is below the specifiedtire pressure.
Trailer Tire Low Specified:
A trailer tire pressure sensor is malfunctioning. If the
warning stays on or continues to come on, contact an authorized dealer as soon as possible.
Trailer Tire Pressure Sensor
Fault
The trailer tire pressure monitoring system is
malfunctioning. If the warning stays on or continues to come on, contact an authorized dealer.
Trailer Tire Pressure Monitor
Fault
The system cannot detect the trailer tire pressuremonitoring system.
Trailer Tire Pressure Monitor
Capability Not Detected
The trailer tire pressure monitoring system is not setup.See
General Information (page 114).
Trailer Tire Pressure Indication
Not Setup See Manual
146
Super Duty (TFE) Canada/United States of America, enUSA, Edition date: 201709, First Printing Information Displays
Page 159 of 656
SITTING IN THE CORRECT
POSITION
WARNINGS
Sitting improperly, out of position or
with the seatback reclined too far
can take weight off the seat cushion
and affect the decision of the passenger
sensing system, resulting in serious injury
or death in the event of a crash. Always sit
upright against your seat back, with your
feet on the floor. Do not recline the seatback as this
can cause the occupant to slide
under the safety belt, resulting in
serious injury in the event of a crash. Do not place objects higher than the
seatback to reduce the risk of serious
injury in the event of a crash or during
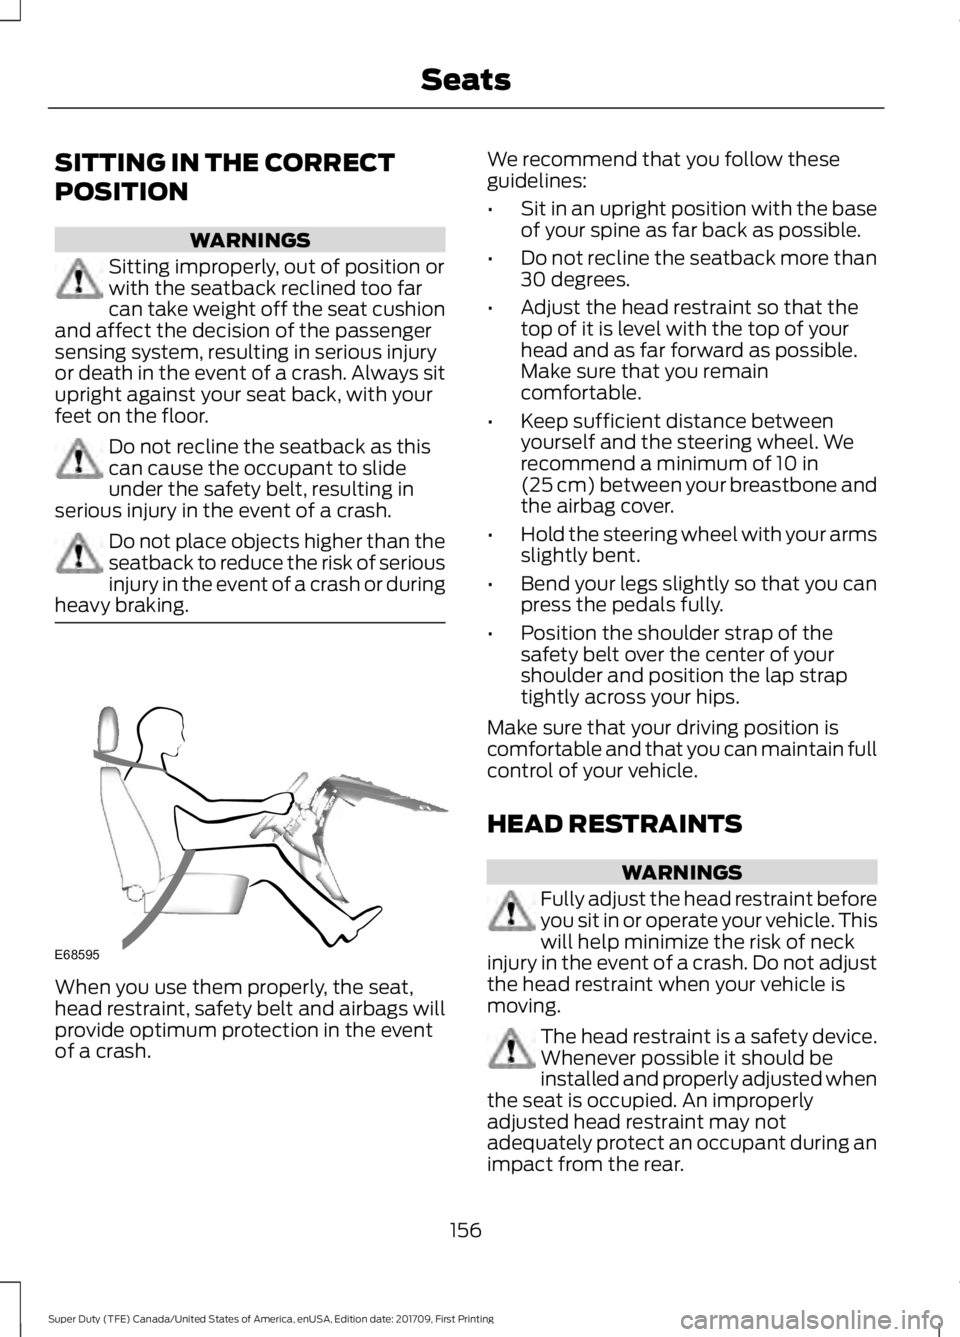
heavy braking. When you use them properly, the seat,
head restraint, safety belt and airbags will
provide optimum protection in the event
of a crash. We recommend that you follow these
guidelines:
•
Sit in an upright position with the base
of your spine as far back as possible.
• Do not recline the seatback more than
30 degrees.
• Adjust the head restraint so that the
top of it is level with the top of your
head and as far forward as possible.
Make sure that you remain
comfortable.
• Keep sufficient distance between
yourself and the steering wheel. We
recommend a minimum of 10 in
(25 cm) between your breastbone and
the airbag cover.
• Hold the steering wheel with your arms
slightly bent.
• Bend your legs slightly so that you can
press the pedals fully.
• Position the shoulder strap of the
safety belt over the center of your
shoulder and position the lap strap
tightly across your hips.
Make sure that your driving position is
comfortable and that you can maintain full
control of your vehicle.
HEAD RESTRAINTS WARNINGS
Fully adjust the head restraint before
you sit in or operate your vehicle. This
will help minimize the risk of neck
injury in the event of a crash. Do not adjust
the head restraint when your vehicle is
moving. The head restraint is a safety device.
Whenever possible it should be
installed and properly adjusted when
the seat is occupied. An improperly
adjusted head restraint may not
adequately protect an occupant during an
impact from the rear.
156
Super Duty (TFE) Canada/United States of America, enUSA, Edition date: 201709, First Printing SeatsE68595
Page 160 of 656
WARNINGS
Install the head restraint properly to
help minimize the risk of neck injury
in the event of a crash.
Note:
Adjust the seatback to an upright
driving position before adjusting the head
restraint. Adjust the head restraint so that
the top of it is level with the top of your head
and as far forward as possible. Make sure
that you remain comfortable. If you are
extremely tall, adjust the head restraint to
its highest position.
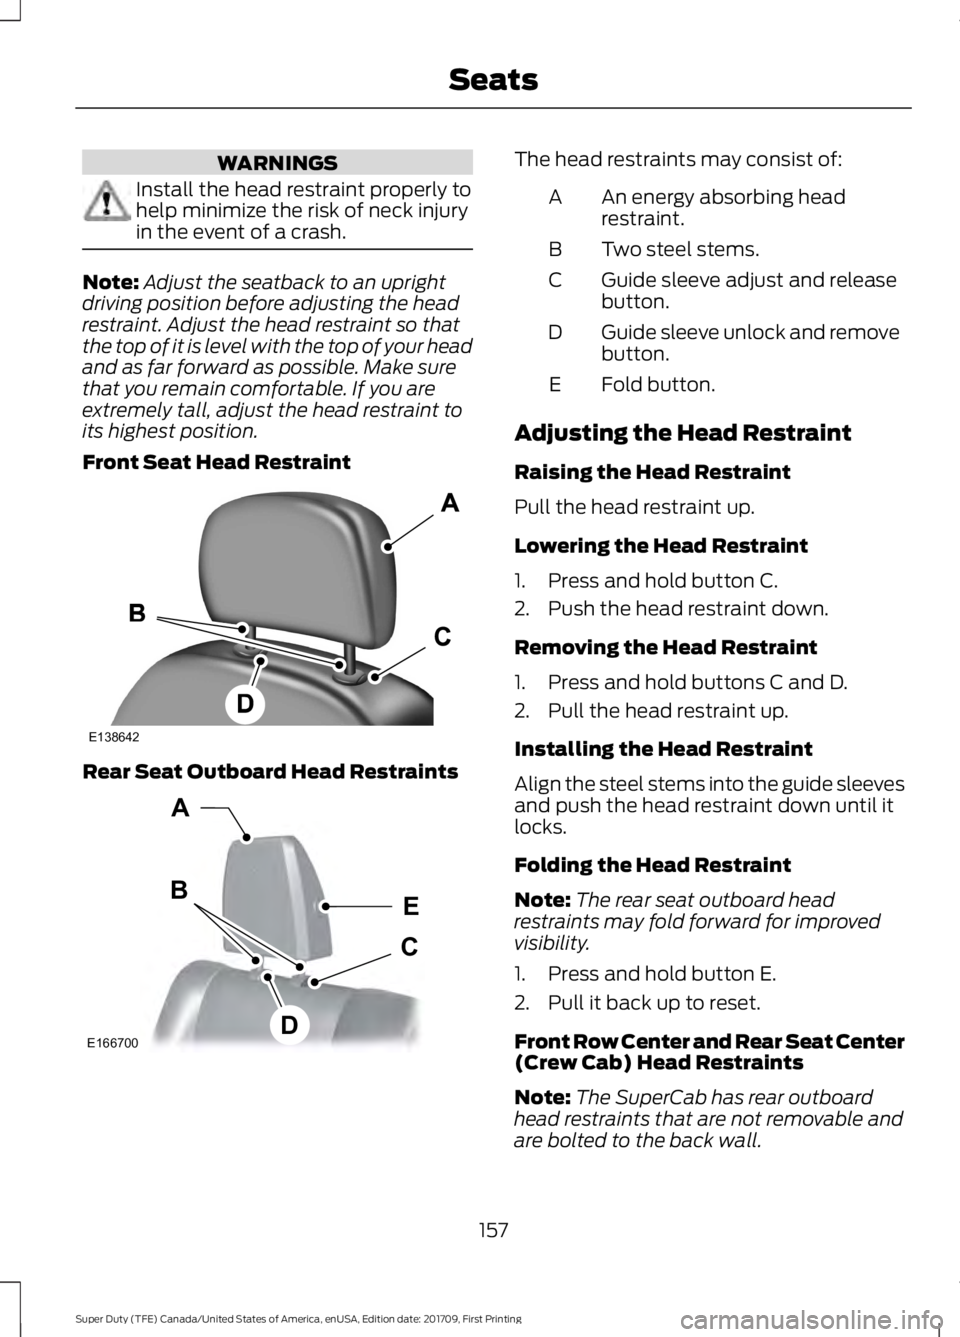
Front Seat Head Restraint Rear Seat Outboard Head Restraints The head restraints may consist of:
An energy absorbing head
restraint.
A
Two steel stems.
B
Guide sleeve adjust and release
button.
C
Guide sleeve unlock and remove
button.
D
Fold button.
E
Adjusting the Head Restraint
Raising the Head Restraint
Pull the head restraint up.
Lowering the Head Restraint
1. Press and hold button C.
2. Push the head restraint down.
Removing the Head Restraint
1. Press and hold buttons C and D.
2. Pull the head restraint up.
Installing the Head Restraint
Align the steel stems into the guide sleeves
and push the head restraint down until it
locks.
Folding the Head Restraint
Note: The rear seat outboard head
restraints may fold forward for improved
visibility.
1. Press and hold button E.
2. Pull it back up to reset.
Front Row Center and Rear Seat Center
(Crew Cab) Head Restraints
Note: The SuperCab has rear outboard
head restraints that are not removable and
are bolted to the back wall.
157
Super Duty (TFE) Canada/United States of America, enUSA, Edition date: 201709, First Printing SeatsE138642 E166700
E
D
C
B
A
Page 161 of 656
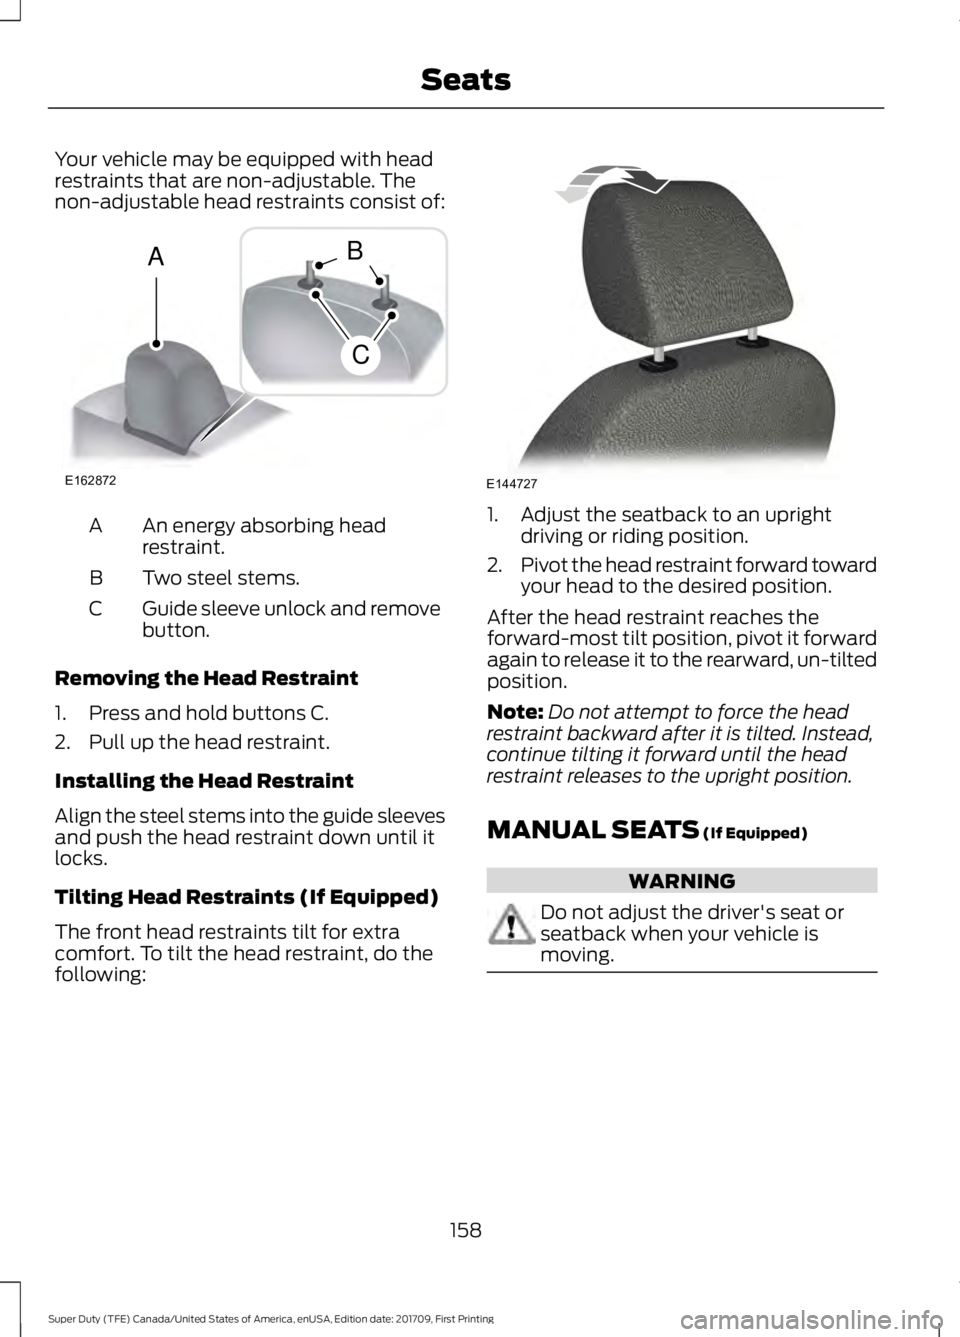
Your vehicle may be equipped with head
restraints that are non-adjustable. The
non-adjustable head restraints consist of:
An energy absorbing head
restraint.
A
Two steel stems.
B
Guide sleeve unlock and remove
button.
C
Removing the Head Restraint
1. Press and hold buttons C.
2. Pull up the head restraint.
Installing the Head Restraint
Align the steel stems into the guide sleeves
and push the head restraint down until it
locks.
Tilting Head Restraints (If Equipped)
The front head restraints tilt for extra
comfort. To tilt the head restraint, do the
following: 1. Adjust the seatback to an upright
driving or riding position.
2. Pivot the head restraint forward toward
your head to the desired position.
After the head restraint reaches the
forward-most tilt position, pivot it forward
again to release it to the rearward, un-tilted
position.
Note: Do not attempt to force the head
restraint backward after it is tilted. Instead,
continue tilting it forward until the head
restraint releases to the upright position.
MANUAL SEATS (If Equipped) WARNING
Do not adjust the driver's seat or
seatback when your vehicle is
moving.
158
Super Duty (TFE) Canada/United States of America, enUSA, Edition date: 201709, First Printing SeatsE162872
A
C
B E144727
Page 162 of 656
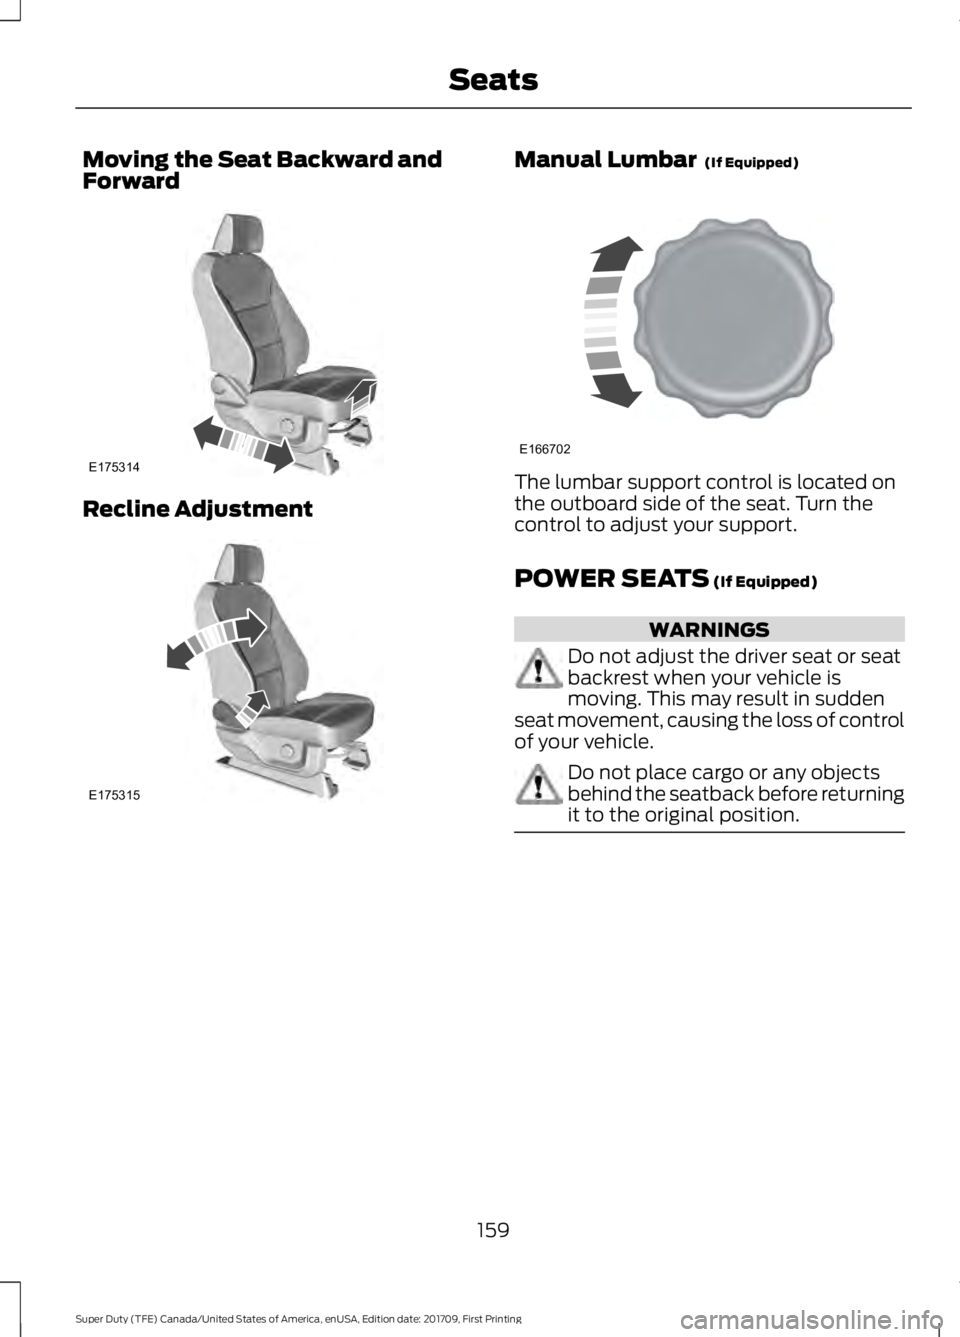
Moving the Seat Backward and
Forward
Recline Adjustment Manual Lumbar (If Equipped)
The lumbar support control is located on
the outboard side of the seat. Turn the
control to adjust your support.
POWER SEATS
(If Equipped)
WARNINGS
Do not adjust the driver seat or seat
backrest when your vehicle is
moving. This may result in sudden
seat movement, causing the loss of control
of your vehicle. Do not place cargo or any objects
behind the seatback before returning
it to the original position.
159
Super Duty (TFE) Canada/United States of America, enUSA, Edition date: 201709, First Printing SeatsE175314 E175315 E166702
Page 164 of 656
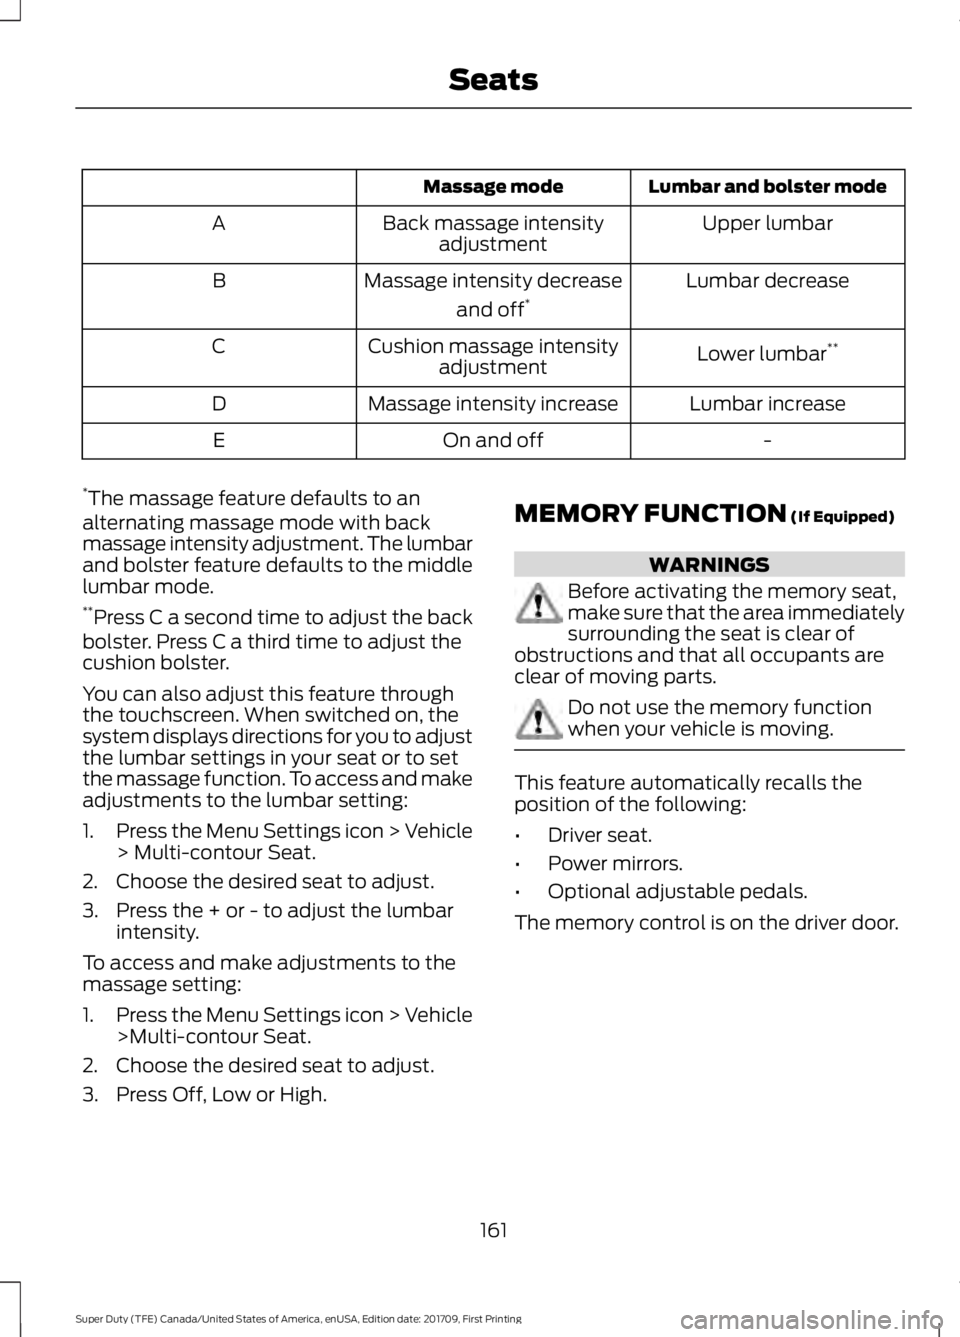
Lumbar and bolster mode
Massage mode
Upper lumbar
Back massage intensity
adjustment
A
Lumbar decrease
Massage intensity decrease
and off*
B
Lower lumbar**
Cushion massage intensity
adjustment
C
Lumbar increase
Massage intensity increase
D
-
On and off
E
* The massage feature defaults to an
alternating massage mode with back
massage intensity adjustment. The lumbar
and bolster feature defaults to the middle
lumbar mode.
** Press C a second time to adjust the back
bolster. Press C a third time to adjust the
cushion bolster.
You can also adjust this feature through
the touchscreen. When switched on, the
system displays directions for you to adjust
the lumbar settings in your seat or to set
the massage function. To access and make
adjustments to the lumbar setting:
1. Press the Menu Settings icon > Vehicle
> Multi-contour Seat.
2. Choose the desired seat to adjust.
3. Press the + or - to adjust the lumbar intensity.
To access and make adjustments to the
massage setting:
1. Press the Menu Settings icon > Vehicle
>Multi-contour Seat.
2. Choose the desired seat to adjust.
3. Press Off, Low or High. MEMORY FUNCTION (If Equipped) WARNINGS
Before activating the memory seat,
make sure that the area immediately
surrounding the seat is clear of
obstructions and that all occupants are
clear of moving parts. Do not use the memory function
when your vehicle is moving.
This feature automatically recalls the
position of the following:
•
Driver seat.
• Power mirrors.
• Optional adjustable pedals.
The memory control is on the driver door.
161
Super Duty (TFE) Canada/United States of America, enUSA, Edition date: 201709, First Printing Seats
Page 166 of 656
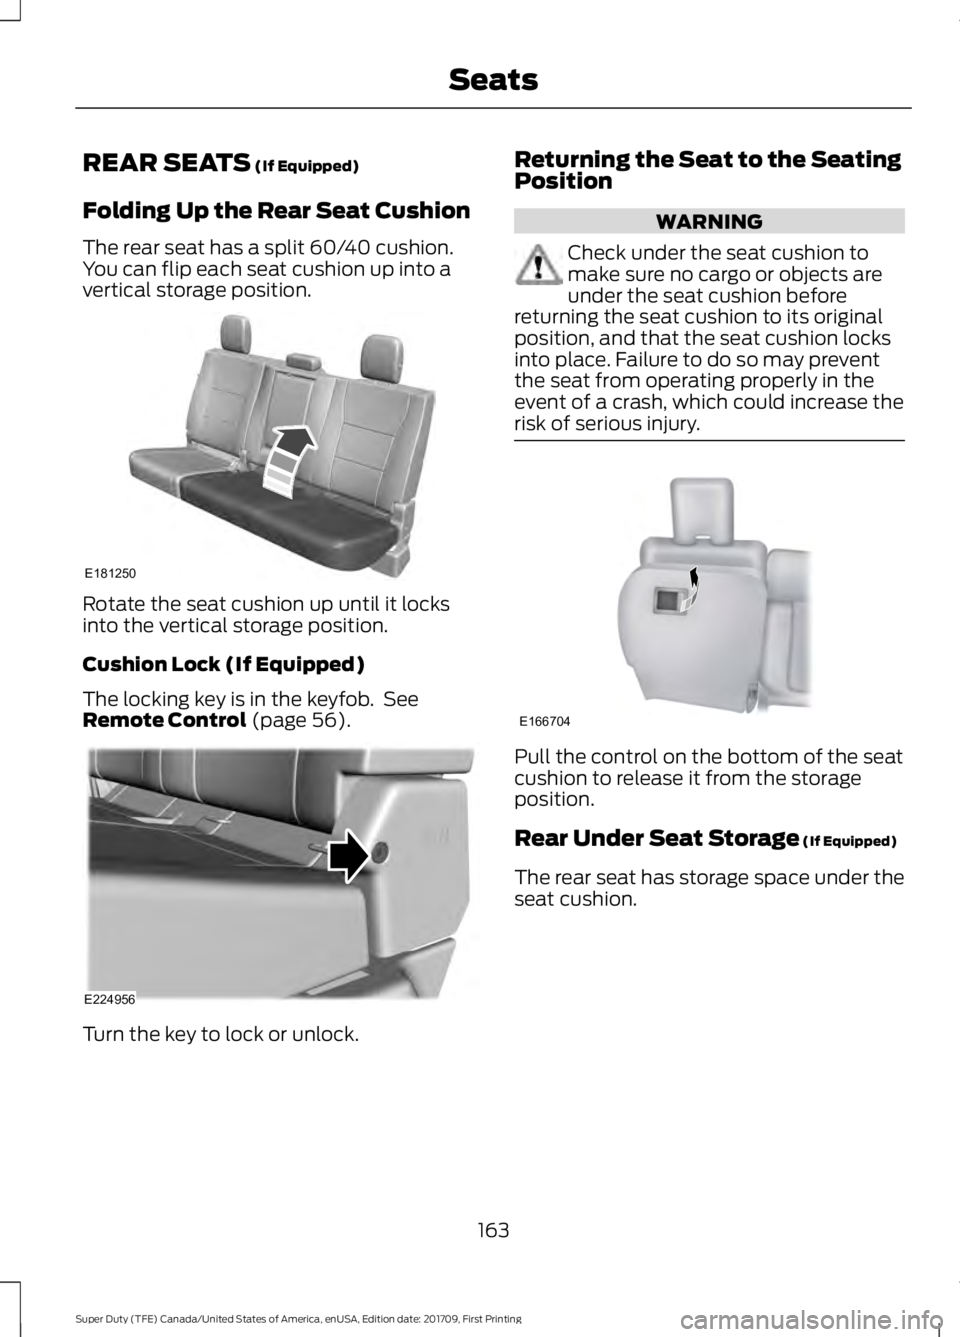
REAR SEATS (If Equipped)
Folding Up the Rear Seat Cushion
The rear seat has a split 60/40 cushion.
You can flip each seat cushion up into a
vertical storage position. Rotate the seat cushion up until it locks
into the vertical storage position.
Cushion Lock (If Equipped)
The locking key is in the keyfob. See
Remote Control
(page 56).
Turn the key to lock or unlock. Returning the Seat to the Seating
Position WARNING
Check under the seat cushion to
make sure no cargo or objects are
under the seat cushion before
returning the seat cushion to its original
position, and that the seat cushion locks
into place. Failure to do so may prevent
the seat from operating properly in the
event of a crash, which could increase the
risk of serious injury. Pull the control on the bottom of the seat
cushion to release it from the storage
position.
Rear Under Seat Storage
(If Equipped)
The rear seat has storage space under the
seat cushion.
163
Super Duty (TFE) Canada/United States of America, enUSA, Edition date: 201709, First Printing SeatsE181250 E224956 E166704