2018 FORD F250 SUPER DUTY key
[x] Cancel search: keyPage 184 of 656
preventing engine damage due to lack of
proper lubrication. After the 30 second
warm-up period, the accelerator pedal will
be operational again and a message
appears informing you the vehicle is ok to
drive.
When you start the engine in extremely
cold temperatures -15°F (-26°C), we
recommend that you allow the engine to
idle for several minutes before you drive
the vehicle.
Before starting the engine check the
following:
• Make sure all occupants have fastened
their seatbelts.
• Make sure the headlamps and
electrical accessories are off.
• Make sure the parking brake is on.
• Make sure the transmission is in park
(P).
Note: Do not press the accelerator during
starting.
Vehicles with an Ignition Key
Note: Do not touch the accelerator pedal.
1. Fully depress the brake pedal.
2. Turn the key to position
C
Note: A message will appear Engine Start
Pending, Please Wait.
3. Wait until the engine glow-plug indicator turns off.
4. Turn the key to position
D to start the
engine.
5. When the engine starts, release the brake pedal.
Do not crank the engine for more than 10
seconds as starter damage may occur. If
the engine does not start, switch the
ignition off and wait 30 seconds before
trying again. Vehicles with Keyless Start
Note:
Do not touch the accelerator pedal.
Note: If the push button ignition switch is
pressed again prior to the engine starting
the ignition will switch to accessory mode
and will not start.
Note: If the brake pedal is released before
the engine has started, follow the engine
start sequence again.
1. Fully depress the brake pedal.
2. Press the center of the push button ignition switch.
Note: A message will appear Engine Start
Pending, Please Wait.
3. When the engine starts, release the brake pedal.
Diesel Engine Fast Start Glow Plug
System
The diesel engine glow system consists of:
• Eight glow plugs (one per cylinder)
• Glow Plug Control Module
• Engine Coolant Temperature sensor
• Barometric pressure sensor
• Environmental temperature sensor
The powertrain and glow plug control
modules electronically control the glow
plug system. After you switch the ignition
on, the glow plug control module
immediately energizes the glow plugs. The
glow plug control module uses the engine
coolant temperature, barometric pressure
sensor and environmental temperature
sensor to determine how long the glow
plugs stay energized. The required time for
the glow plugs to be energized decreases
as the coolant temperature, barometric
pressure and environmental temperature
increase.
181
Super Duty (TFE) Canada/United States of America, enUSA, Edition date: 201709, First Printing Starting and Stopping the Engine
Page 185 of 656
Automatic Engine Shutdown
If your vehicle is equipped with a keyless
ignition, it has a feature that automatically
shuts down the engine if it has been idling
for an extended period. The ignition also
turns off in order to save battery power.
Before the engine shuts down, a message
appears in the information display showing
a timer counting down from 30 seconds.
If you do not intervene within 30 seconds,
the engine shuts down. Another message
appears in the information display to
inform you that the engine has shut down
in order to save fuel. Start your vehicle as
you normally do.
Cold Weather Starting
WARNINGS
Do not use starting fluid, for example
ether, in the air intake system. Such
fluid could cause immediate
explosive damage to the engine and
possible personal injury. Do not add gasoline, gasohol, alcohol
or kerosene to diesel fuel. This
creates a serious fire hazard and
causes engine performance problems. We recommend that the engine block
heater be used for starting when the
temperature is -9°F (-23°C) or colder. See
Engine Block Heater (page 185).
When operating in cold weather, you may
use Motorcraft® cetane improvers or
non-alcohol-based cetane improvers from
a reputable manufacturer as needed. Switch the ignition on. Do not
start the engine until the
glow-plug indicator turns off. When the glow plug pre-heat indicator
turns off, turn the key to start. After you
start the engine, the glow plugs may
remain on for a period. If you do not start
the engine before the glow plug activation
time ends, you will need to reset the glow
plugs by switching the ignition off. After
the engine starts, allow it to idle for about
15 seconds. This protects the engine. Do
not increase engine speed until the oil
pressure gauge indicates normal pressure.
Cold Weather Operation
Note:
Idling in cold weather does not heat
the engine to its normal operating
temperature. Long periods of idling,
especially in cold weather, can cause a
buildup of deposits which can cause engine
damage.
Change to a lighter grade engine oil to
make starting easier under these
conditions. Refer to engine oil
specifications. See
Capacities and
Specifications (page 433).
Diesel fuel is adjusted seasonally for cold
temperatures. Diesel fuel which has not
been properly formulated for the ambient
conditions may gel which can clog the fuel
filters. One indication that the fuel filter(s)
may be clogged is if the engine starts, stalls
after a short time, and then does not
restart. If you have been using biodiesel,
you may need to use a fuel with lower
biodiesel content, try another brand, or
discontinue using biodiesel. Do not use
alcohol based additives to correct fuel
gelling. This may result in damage to the
fuel injectors and system. Use the proper
anti-gel and performance improvement
product. See
Capacities and
Specifications (page 433).
182
Super Duty (TFE) Canada/United States of America, enUSA, Edition date: 201709, First Printing Starting and Stopping the Engine
Page 188 of 656
Operation in Standing Water
Ingestion of water into the diesel engine
can result in immediate and severe
damage to the engine. If driving through
water, slow down to avoid splashing water
into the intake. If the engine stalls, and you
suspect ingestion of water into the engine,
do not try to restart the engine. Consult
your dealer for service immediately.
Your fuel tank vents to the atmosphere by
valves on top of the tank and through the
fuel cap. If water reaches the top of the
tank, the valves may pull water into the
fuel tank. Water in the fuel can cause
performance issues and damage the fuel
injection system.
SWITCHING OFF THE ENGINE
- 6.7L DIESEL
Switch the ignition off.
To help prolong engine life, we
recommended you allow the engine to idle
for three to five minutes, especially after
any of the following:
•
Continuous engine speed.
• High ambient temperature.
• High GVW or GCW operation, for
example heavy loads or trailers.
This allows the turbo charged engine to
cool down.
ENGINE IDLE SHUTDOWN
Your vehicle may be equipped with an
engine idle shutdown system. This system
automatically shuts down your engine
when it has been idling in P (Park) or N
(Neutral) for five minutes (parking brake
set) or 15 minutes (parking brake not set).
When the engine idle shutdown process
has started: •
A chime sounds and the information
display will show ENGINE TURNS OFF
IN 30 (seconds) and start counting
down
• You can restart the five or 15-minute
timer by changing the position of the
accelerator pedal, brake pedal or the
park brake within the final 30 seconds
• When the timer reaches zero, the
engine shuts down and this message
will appear in your information display
ENGINE TURNED OFF
• One minute after the engine has shut
down, the electrical system simulates
key off, even though the ignition is still
in the on position, initiating normal
accessory delay period
• You must move the ignition to the off
position to reset the system before
restarting your vehicle.
The engine idle shutdown idle timer does
not start if:
• The engine is operating in power
take-off mode.
• The engine coolant temperature is
below 60°F (16°C).
• The exhaust emission control device is
regenerating.
ENGINE BLOCK HEATER
(If
Equipped) WARNINGS
Failure to follow engine block heater
instructions could result in property
damage or serious personal injury.
Do not use your heater with
ungrounded electrical systems or
two-pronged adapters. There is a risk
of electrical shock. 185
Super Duty (TFE) Canada/United States of America, enUSA, Edition date: 201709, First Printing Starting and Stopping the Engine
Page 195 of 656
•
Fuels containing metallic-based
additives, including manganese-based
compounds.
• Fuels containing the octane booster
additive, methylcyclopentadienyl
manganese tricarbonyl (MMT).
• Leaded fuel (using leaded fuel is
prohibited by law).
The use of fuels with metallic compounds
such as methylcyclopentadienyl
manganese tricarbonyl (commonly known
as MMT), which is a manganese-based
fuel additive, will impair engine
performance and affect the emission
control system.
Do not be concerned if the engine
sometimes knocks lightly. However, if the
engine knocks heavily while using fuel with
the recommended octane rating, contact
an authorized dealer to prevent any engine
damage.
RUNNING OUT OF FUEL
Avoid running out of fuel because this
situation may have an adverse effect on
engine components.
If you have run out of fuel:
• You may need to cycle the ignition from
off to on several times after refueling
to allow the fuel system to pump the
fuel from the tank to the engine. On
restarting, cranking time will take a few
seconds longer than normal. With
keyless ignition, just start the engine.
Crank time will be longer than usual.
• Normally, adding 1 gal (4 L) of fuel is
enough to restart the engine. If the
vehicle is out of fuel and on a steep
grade, more than
1 gal (4 L) may be
required. REFUELING - GASOLINE WARNINGS
Fuel vapor burns violently and a fuel
fire can cause severe injuries.
Read and follow all the instructions
on the pump island.
Turn off your engine when you are
refueling.
Do not smoke if you are near fuel or
refueling your vehicle.
Keep sparks, flames and smoking
materials away from fuel.
Stay outside your vehicle and do not
leave the fuel pump unattended
when refueling your vehicle. This is
against the law in some places. Keep children away from the fuel
pump; never let children pump fuel.
Do not use personal electronic
devices while refueling.
Wait at least 10 seconds before
removing the fuel pump nozzle to
allow any residual fuel to drain into
the fuel tank. Stop refueling after the fuel pump
nozzle automatically shuts off for the
second time. Failure to follow this
will fill the expansion space in the fuel tank
and could lead to fuel overflowing. Do not remove the fuel pump nozzle
from its fully inserted position when
refueling.
192
Super Duty (TFE) Canada/United States of America, enUSA, Edition date: 201709, First Printing Fuel and Refueling
Page 197 of 656
WARNINGS
When refueling always shut the
engine off and never allow sparks or
open flames near the fuel tank filler
valve. Never smoke or use a cell phone
while refueling. Fuel vapor is extremely
hazardous under certain conditions. Avoid
inhaling excess fumes. Stop refueling after the fuel pump
nozzle automatically shuts off for the
second time. Failure to follow this
will fill the expansion space in the fuel tank
and could lead to fuel overflowing. The fuel system may be under
pressure. If the fuel filler cap is
venting vapor or if you hear a hissing
sound, wait until it stops before completely
removing the fuel filler cap. Otherwise, fuel
may spray out and injure you or others. If you do not use the proper fuel filler
cap, excessive pressure or vacuum
in the fuel tank may damage the fuel
system or cause the fuel cap to disengage
in a collision, which may result in possible
personal injury. Note:
If you must replace the fuel filler cap,
replace it with a fuel filler cap designed for
your vehicle. The vehicle Warranty may be
void for any damage to the fuel tank or fuel
system if the correct genuine Ford or
Motorcraft® fuel filler cap is not used.
Fueling Tips
If air is allowed to enter the fuel system the
engine automatically purges any trapped
air. To purge the air sooner: prior to engine
start, prime the system by turning the key
to on for 30 seconds then to off. Repeat
this several times. The engine may run
rough and produce white smoke while air
is in the system. This is normal.
Use only clean, approved containers that
will prevent the entry of dirt or water
whenever you store diesel fuel. Diesel fuel must not be stored in a
galvanized container. The fuel will dissolve
the zinc in the galvanized container. The
zinc will then remain in the fuel. If you run
the contaminated fuel through the engine,
the zinc will deposit in the fuel injectors
causing expensive-to-repair damage.
Diesel fuel dispensing nozzle fill rate
Your vehicle has a fuel fill pipe that is able
to accept fuel up to 20 gal (76 L) per
minute from an 1.2 in (30 mm)
fuel-dispensing nozzle. Pumping fuel at
greater flow rates may result in premature
nozzle shut-off or spit back.
Truck stops have pumps and nozzles
designed for larger, heavy-duty trucks.
When refueling at truck stops: if the nozzle
shuts off repeatedly when refueling, wait
5– 10 seconds; then use a slower rate of
flow, do not depress the nozzle trigger as
far.
Refueling
When fueling your vehicle do the following:
1. Fully open the fuel tank filler door until
it engages and remove the fuel tank
filler cap. The fuel tank filler cap has
an indexed design with a 1/4 turn
on/off feature. Carefully turn the filler
cap counterclockwise until it spins off.
194
Super Duty (TFE) Canada/United States of America, enUSA, Edition date: 201709, First Printing Fuel and Refueling
Page 203 of 656
Your vehicle may not pass the I/M test if
the service engine soon indicator is on or
not working properly (bulb is burned out),
or if the OBD-II system has determined
that some of the emission control systems
have not been properly checked. In this
case, the vehicle is not ready for I/M
testing.
If the vehicle
’s engine or transmission has
just been serviced, or the battery has
recently run down or been replaced, the
OBD-II system may indicate that the
vehicle is not ready for I/M testing. To
determine if the vehicle is ready for I/M
testing, turn the ignition key to the on
position for 15 seconds without cranking
the engine. If the service engine soon
indicator blinks eight times, it means that
the vehicle is not ready for I/M testing; if
the service engine soon indicator stays on
solid, it means that your vehicle is ready
for I/M testing.
The OBD-II system checks the emission
control system during normal driving. A
complete check may take several days.
If the vehicle is not ready for I/M testing,
you can perform the following driving cycle
consisting of mixed city and highway
driving:
1. 15 minutes of steady driving on an expressway or highway followed by 20
minutes of stop-and-go driving with at
least four 30-second idle periods.
2. Allow your vehicle to sit for at least eight hours with the ignition off. Then,
start the vehicle and complete the
above driving cycle. The vehicle must
warm up to its normal operating
temperature. Once started, do not turn
off the vehicle until the above driving
cycle is complete.
If the vehicle is still not ready for I/M
testing, you need to repeat the above
driving cycle. SELECTIVE CATALYTIC
REDUCTANT SYSTEM - DIESEL
Your vehicle may have a selective catalytic
reduction system. The system helps reduce
emission levels of oxides of nitrogen from
the exhaust system. The system
automatically injects diesel exhaust fluid
into the exhaust system to enable correct
selective catalytic reduction system
function.
Note:
Selective catalytic reduction systems
are not fitted to vehicles in markets where
only high-sulfur diesel fuel is available.
Diesel Exhaust Fluid Level
In order for the system to operate correctly
you must maintain the diesel exhaust fluid
level.
A warning message appears in the
information display when the diesel
exhaust fluid level is low. If a warning
message appears, refill the diesel exhaust
fluid tank as soon as possible. See
Information Messages (page 131).
Filling the Diesel Exhaust Fluid
Tank WARNINGS
Keep diesel exhaust fluid out of
reach of children. Avoid contact with
skin, eyes or clothing. In case of
contact with your eyes, flush immediately
with water and get prompt medical
attention. In case of contact with your skin,
clean immediately with soap and water. If
you swallow any diesel exhaust fluid, drink
plenty of water, call a physician
immediately.
200
Super Duty (TFE) Canada/United States of America, enUSA, Edition date: 201709, First Printing Engine Emission Control
Page 213 of 656
AUTOMATIC TRANSMISSION
WARNINGS
Always fully apply the parking brake.
Make sure you shift into park (P) for
vehicles with an automatic
transmission. Switch the ignition off and
remove the key whenever you leave your
vehicle. When your vehicle is stationary, keep
the brake pedal fully pressed when
shifting gears. Failure to follow this
instruction could result in personal injury,
death or property damage. Note:
You may not be able to shift out of
park (P) unless the intelligent access key is
inside your vehicle.
Understanding the Shift Positions
of Your Automatic Transmission
(If Equipped) Putting your vehicle in or out of gear:
1. Fully press down the brake pedal.
2. Move the gearshift lever into the
desired gear.
3. When you are finished driving, come to
a complete stop.
4. Move the gearshift lever and securely latch it in park (P). Park (P)
This position locks the transmission and
prevents the rear wheels from turning.
Reverse (R)
With the gearshift lever in reverse (R), your
vehicle moves backward. Always come to
a complete stop before shifting into and
out of reverse (R).
Neutral (N)
With the gearshift lever in neutral (N), your
vehicle can be started and is free to roll.
Hold the brake pedal down when in this
position.
Drive (D)
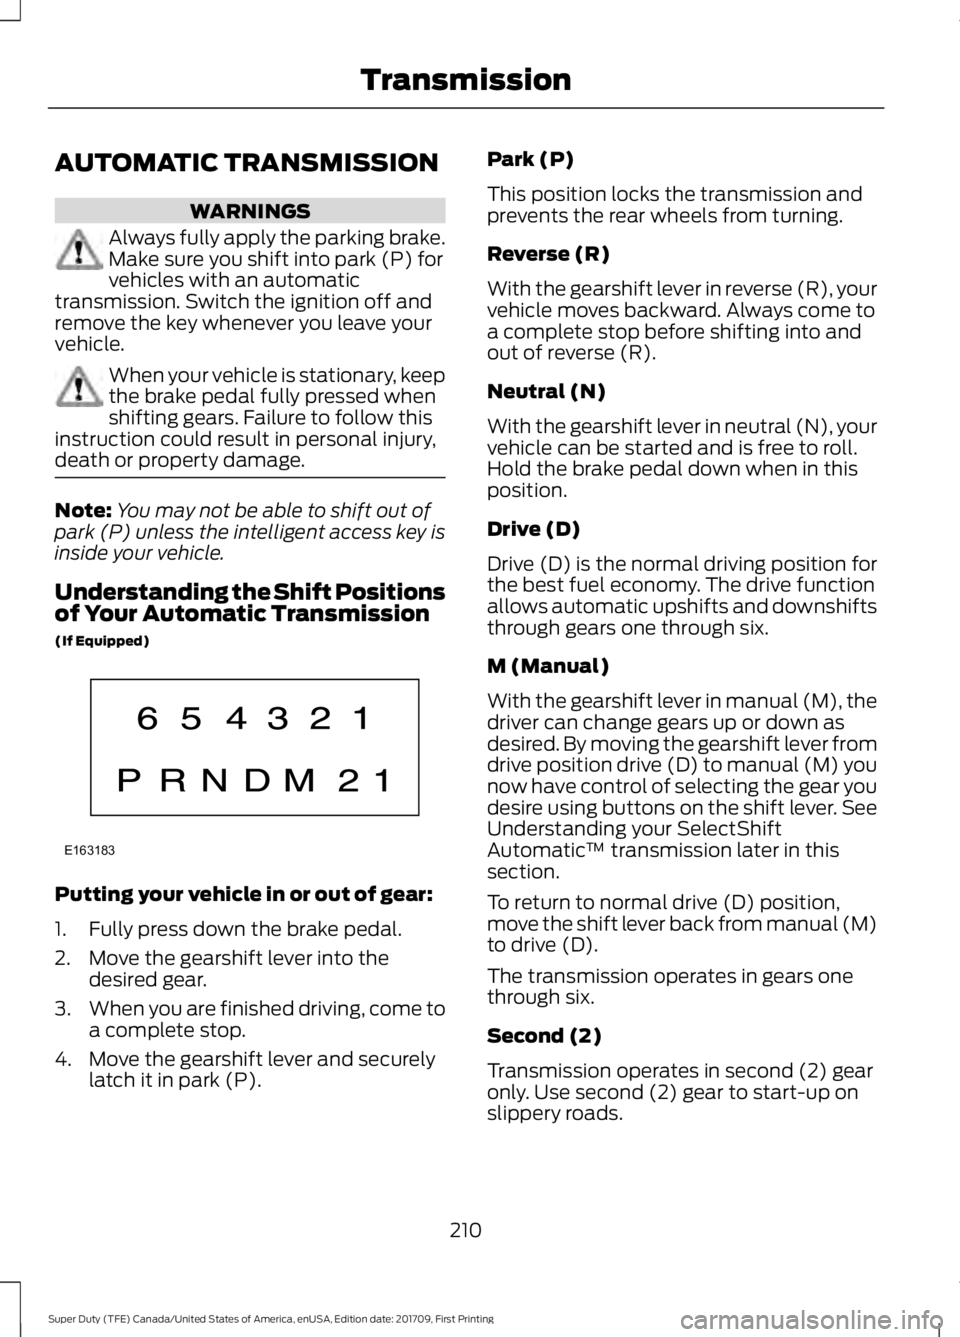
Drive (D) is the normal driving position for
the best fuel economy. The drive function
allows automatic upshifts and downshifts
through gears one through six.
M (Manual)
With the gearshift lever in manual (M), the
driver can change gears up or down as
desired. By moving the gearshift lever from
drive position drive (D) to manual (M) you
now have control of selecting the gear you
desire using buttons on the shift lever. See
Understanding your SelectShift
Automatic
™ transmission later in this
section.
To return to normal drive (D) position,
move the shift lever back from manual (M)
to drive (D).
The transmission operates in gears one
through six.
Second (2)
Transmission operates in second (2) gear
only. Use second (2) gear to start-up on
slippery roads.
210
Super Duty (TFE) Canada/United States of America, enUSA, Edition date: 201709, First Printing TransmissionE163183
Page 216 of 656
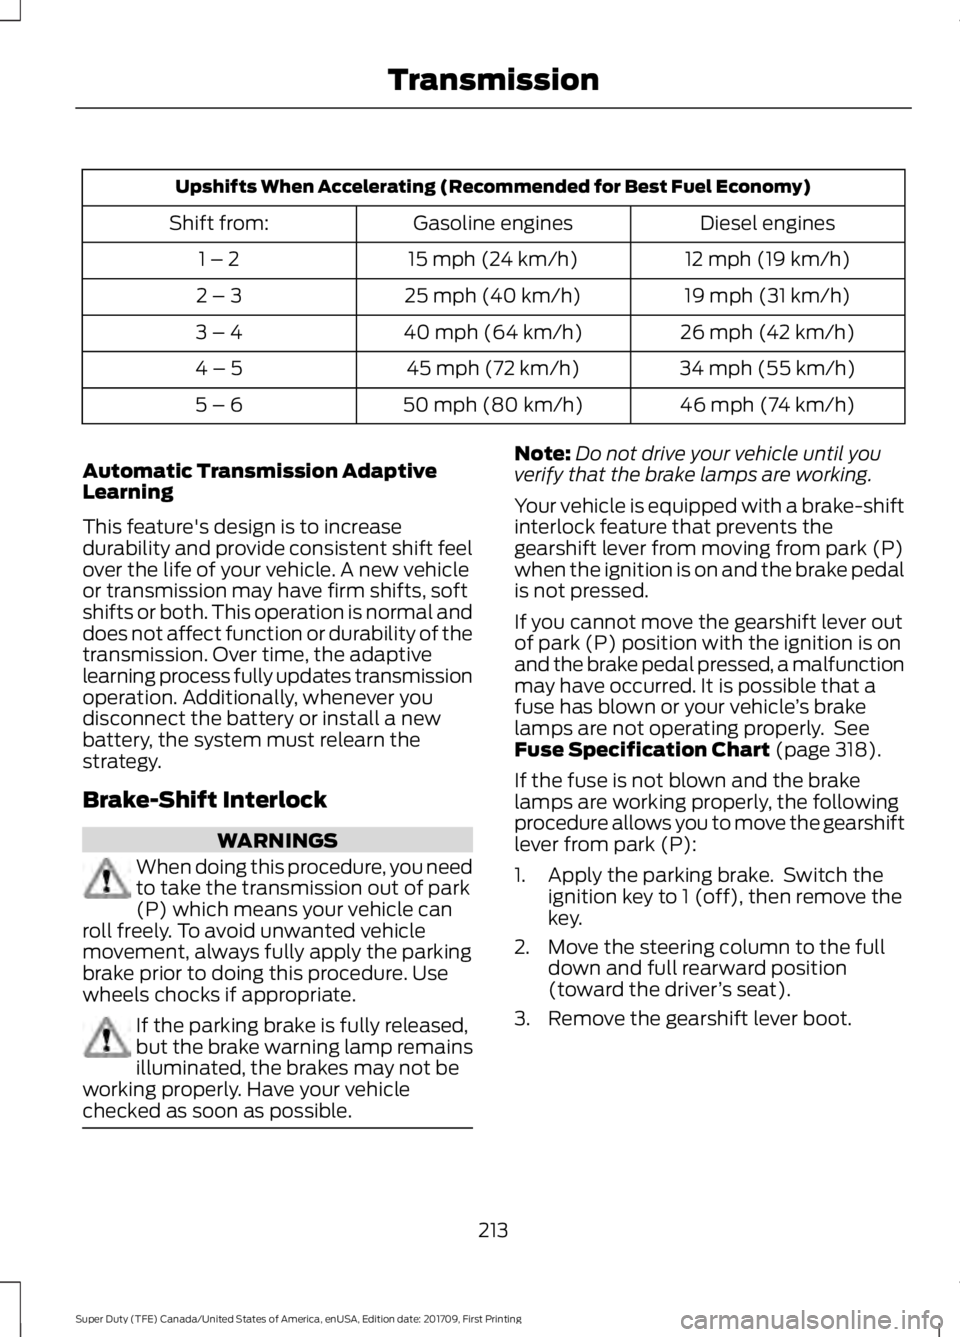
Upshifts When Accelerating (Recommended for Best Fuel Economy)
Diesel engines
Gasoline engines
Shift from:
12 mph (19 km/h)
15 mph (24 km/h)
1 – 2
19 mph (31 km/h)
25 mph (40 km/h)
2 – 3
26 mph (42 km/h)
40 mph (64 km/h)
3 – 4
34 mph (55 km/h)
45 mph (72 km/h)
4 – 5
46 mph (74 km/h)
50 mph (80 km/h)
5 – 6
Automatic Transmission Adaptive
Learning
This feature's design is to increase
durability and provide consistent shift feel
over the life of your vehicle. A new vehicle
or transmission may have firm shifts, soft
shifts or both. This operation is normal and
does not affect function or durability of the
transmission. Over time, the adaptive
learning process fully updates transmission
operation. Additionally, whenever you
disconnect the battery or install a new
battery, the system must relearn the
strategy.
Brake-Shift Interlock WARNINGS
When doing this procedure, you need
to take the transmission out of park
(P) which means your vehicle can
roll freely. To avoid unwanted vehicle
movement, always fully apply the parking
brake prior to doing this procedure. Use
wheels chocks if appropriate. If the parking brake is fully released,
but the brake warning lamp remains
illuminated, the brakes may not be
working properly. Have your vehicle
checked as soon as possible. Note:
Do not drive your vehicle until you
verify that the brake lamps are working.
Your vehicle is equipped with a brake-shift
interlock feature that prevents the
gearshift lever from moving from park (P)
when the ignition is on and the brake pedal
is not pressed.
If you cannot move the gearshift lever out
of park (P) position with the ignition is on
and the brake pedal pressed, a malfunction
may have occurred. It is possible that a
fuse has blown or your vehicle ’s brake
lamps are not operating properly. See
Fuse Specification Chart (page 318).
If the fuse is not blown and the brake
lamps are working properly, the following
procedure allows you to move the gearshift
lever from park (P):
1. Apply the parking brake. Switch the ignition key to 1 (off), then remove the
key.
2. Move the steering column to the full down and full rearward position
(toward the driver ’s seat).
3. Remove the gearshift lever boot.
213
Super Duty (TFE) Canada/United States of America, enUSA, Edition date: 201709, First Printing Transmission