2018 FORD F250 SUPER DUTY key
[x] Cancel search: keyPage 80 of 656
2.
Switch the ignition from off to on. Keep
the ignition on for at least 3 seconds,
but no more than 10 seconds.
3. Switch the ignition off and remove the
first coded key from the ignition.
4. After at least 3 seconds but within 10 seconds of switching the ignition off,
insert the second previously coded key
into the ignition.
5. Switch the ignition from off to on. Keep
the ignition on for at least 3 seconds,
but no more than 10 seconds.
6. Switch the ignition off and remove the
second previously programmed coded
key from the ignition.
7. After at least 3 seconds but within 10 seconds of switching the ignition off
and removing the previously
programmed coded key, insert the new
unprogrammed key into the ignition.
8. Switch the ignition from off to on. Keep
the ignition on for at least six seconds.
9. Remove the newly programmed coded
key from the ignition.
If you have successfully programmed the
new integrated keyhead transmitter, it will
start your vehicle and operate the remote
entry system.
If programming was unsuccessful, wait 10
seconds and repeat steps 1 through 9. If
you are still unsuccessful, take your vehicle
to your authorized dealer.
Programming a Spare Intelligent
Access Key
Note: You can program a maximum of six
keys to your vehicle. All six must be
intelligent access keys.
This procedure programs both the vehicle
immobilizer keycode and the remote
control to your vehicle. You must have two previously
programmed intelligent access keys inside
your vehicle and the new unprogrammed
intelligent access key readily accessible.
Contact an authorized dealer to have the
spare key programmed if two previously
programmed keys are not available.
Make sure that the ignition is switched off
before beginning this procedure. Make sure
that you close all the doors before
beginning and that they remain closed
throughout the procedure. Carry out all
steps within 30 seconds of starting the
sequence. Stop and wait for at least one
minute before starting again if you carry
out any steps out of sequence.
Read and understand the entire procedure
before you begin.
1. Remove the key blade from the
transmitter.
77
Super Duty (TFE) Canada/United States of America, enUSA, Edition date: 201709, First Printing Security
Page 81 of 656
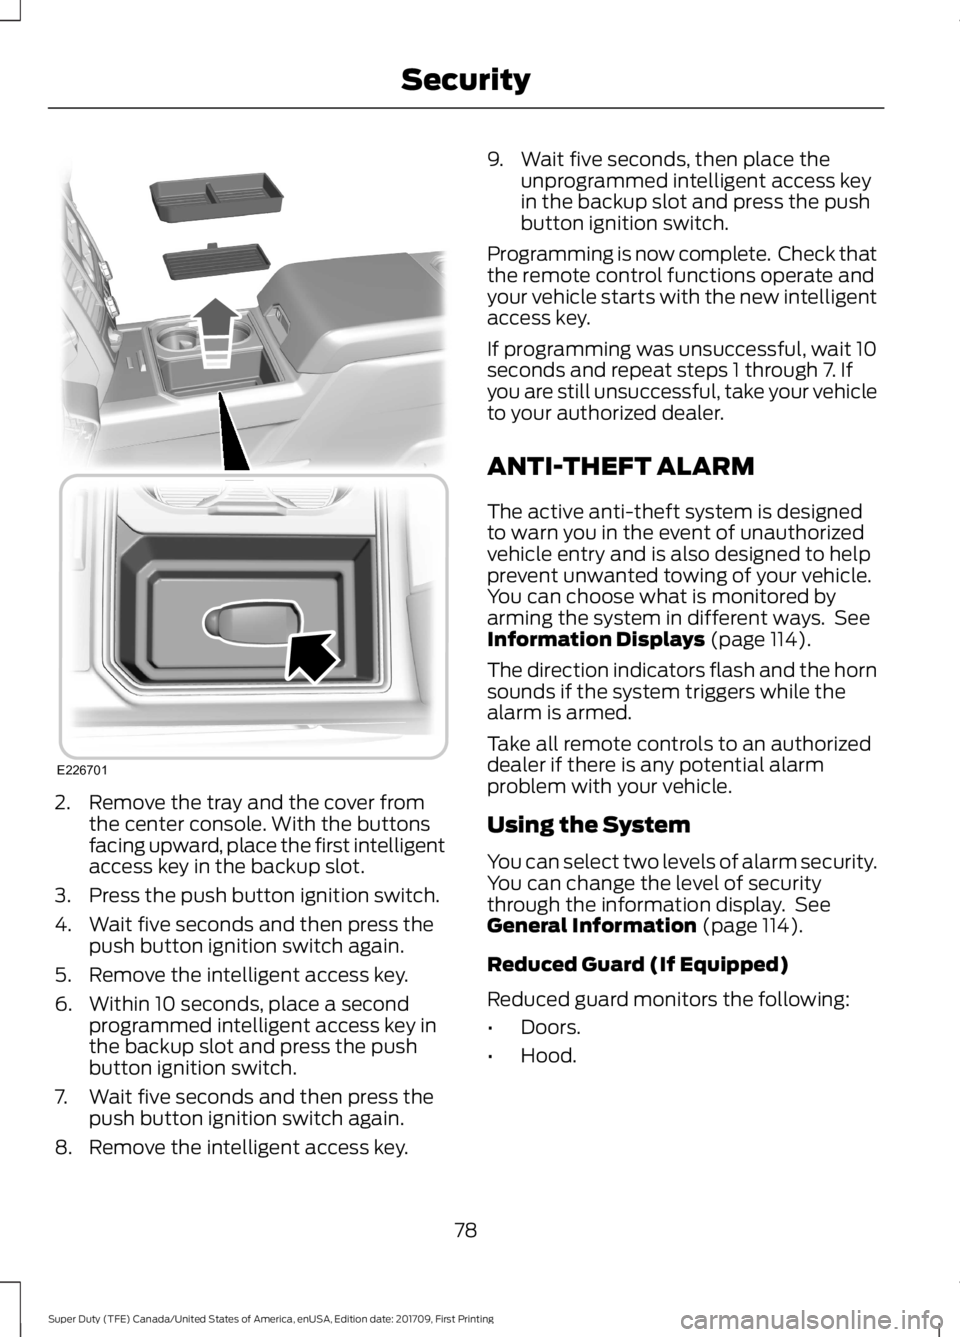
2. Remove the tray and the cover from
the center console. With the buttons
facing upward, place the first intelligent
access key in the backup slot.
3. Press the push button ignition switch.
4. Wait five seconds and then press the push button ignition switch again.
5. Remove the intelligent access key.
6. Within 10 seconds, place a second programmed intelligent access key in
the backup slot and press the push
button ignition switch.
7. Wait five seconds and then press the push button ignition switch again.
8. Remove the intelligent access key. 9. Wait five seconds, then place the
unprogrammed intelligent access key
in the backup slot and press the push
button ignition switch.
Programming is now complete. Check that
the remote control functions operate and
your vehicle starts with the new intelligent
access key.
If programming was unsuccessful, wait 10
seconds and repeat steps 1 through 7. If
you are still unsuccessful, take your vehicle
to your authorized dealer.
ANTI-THEFT ALARM
The active anti-theft system is designed
to warn you in the event of unauthorized
vehicle entry and is also designed to help
prevent unwanted towing of your vehicle.
You can choose what is monitored by
arming the system in different ways. See
Information Displays (page 114).
The direction indicators flash and the horn
sounds if the system triggers while the
alarm is armed.
Take all remote controls to an authorized
dealer if there is any potential alarm
problem with your vehicle.
Using the System
You can select two levels of alarm security.
You can change the level of security
through the information display. See
General Information
(page 114).
Reduced Guard (If Equipped)
Reduced guard monitors the following:
• Doors.
• Hood.
78
Super Duty (TFE) Canada/United States of America, enUSA, Edition date: 201709, First Printing SecurityE226701
Page 82 of 656
Full Guard (If Equipped)
Full guard monitors the following:
•
Doors.
• Hood.
• Movement inside your vehicle.
• Change in vehicle inclination, for
example, unwanted towing.
Note: Do not choose full monitor mode
when the vehicle is in transport or if
movement within the vehicle is likely to
occur.
Note: For correct operation of the interior
motion detection system, make sure you
close all the windows prior to arming the
system. This helps prevent accidental alarm
activation due to external influences.
Additionally, the interior motion sensing
system does not arm if any door is ajar.
Arming the Alarm
The alarm is ready to arm when there is
not a key in the ignition. Lock your vehicle
using the remote control or keyless entry
keypad. You can also lock your vehicle
using the lock sensor on the exterior door
handle if your vehicle is equipped with
intelligent access. See Locking and
Unlocking (page 67).
The direction indicators flash once after
you lock your vehicle. This indicates the
alarm is in the pre-armed mode. It fully
arms after 20 seconds. Disarming the Alarm
Disarm the alarm by any of the following
actions:
•
Press the power door unlock button
within the 20-second pre-armed mode.
• Unlock the doors with the remote
control or keyless entry keypad. If
equipped with intelligent access, you
can use the unlock sensor on the
exterior door handle. See
Locking and
Unlocking (page 67).
• Switch the ignition on or start your
vehicle.
• Use a key in the driver door lock
cylinder to unlock your vehicle, then
switch the ignition on within 12
seconds.
Note: Pressing the panic button on the
remote control stops the horn and direction
indicators, but does not disarm the system.
79
Super Duty (TFE) Canada/United States of America, enUSA, Edition date: 201709, First Printing Security
Page 110 of 656
Engine Oil Pressure Gauge
Indicates engine oil pressure. The needle
should stay in the normal operating range
(between L and H). If the needle falls
below the normal range, stop your vehicle,
turn off the engine and check the engine
oil level. Add oil if needed. If the oil level is
correct, have your vehicle checked by an
authorized dealer.
Engine Coolant Temperature
Gauge
WARNING
Do not remove the coolant reservoir
cap when the cooling system is hot.
Wait 10 minutes for the cooling
system to cool down. Cover the coolant
reservoir cap with a thick cloth to prevent
the possibility of scalding and slowly
remove the cap. Failure to follow this
instruction could result in personal injury. Indicates engine coolant temperature. At
normal operating temperature, the level
indicator will be in the normal range. If the
engine coolant temperature exceeds the
normal range, stop your vehicle as soon as
safely possible, switch off the engine and
let the engine cool.
Fuel Gauge
Note:
The fuel gauge may vary slightly
when your vehicle is moving or on a gradient. Switch the ignition on. The fuel gauge will
indicate approximately how much fuel is
left in the fuel tank. The arrow adjacent to
the fuel pump symbol indicates on which
side of your vehicle the fuel filler door is
located.
The needle should move toward F when
you refuel your vehicle. If the needle points
to E after adding fuel, this indicates your
vehicle needs service soon.
After refueling some variability in needle
position is normal:
•
It may take a short time for the needle
to reach F after leaving the gas station.
This is normal and depends upon the
slope of pavement at the gas station.
• The fuel amount dispensed into the
tank is a little less or more than the
gauge indicated. This is normal and
depends upon the slope of pavement
at the gas station.
• If the gas station nozzle shuts off
before the tank is full, try a different
gas pump nozzle.
Low Fuel Reminder
A low fuel reminder triggers when the
distance to empty value reaches 50 mi
(80 km) to empty, with additional
warnings at 25 mi (40 km), 10 mi (20 km)
and 0 mi (0 km) to empty, provided the
message is cleared each time. An
additional warning at
75 mi (120 km) to
empty is provided when the MyKey is being
used.
Variations:
Note: The distance-to-empty warning can appear at different fuel gauge positions depending
on fuel economy conditions. This variation is normal.
107
Super Duty (TFE) Canada/United States of America, enUSA, Edition date: 201709, First Printing Instrument Cluster
Page 115 of 656

4X4 LOW (If Equipped)
Illuminates when four-wheel
drive low is engaged. If the light
fails to display when the ignition
is turned on, or remains on, have the
system serviced immediately by your
authorized dealer.
4X4 HIGH
(If Equipped) Illuminates when four-wheel
drive high is engaged. If the light
fails to display when the ignition
is turned on, or remains on, have the
system serviced immediately by your
authorized dealer.
Diesel Engine Brake
(If Equipped) Illuminates when you switch the
manual engine brake on. See
General Information
(page
227). Illuminates when you switch the
automatic engine brake on. See
General Information
(page
227).
Diesel Exhaust Fluid
(If Equipped) With the key in the on position,
illuminates when the DEF is
contaminated, low or someone
has tampered with the DEF system. See
Selective Catalytic Reductant System
(page
200).
Wait To Start
(If Equipped) Illuminates when you switch the
ignition on as part of the
pre-start system. Wait until the
wait to start indicator turns off before
attempting to start vehicle. See
Starting
a Diesel Engine (page 180). Water In Fuel
(If Equipped) WARNING
Do not drain the water-in-fuel
separator while the engine is running.
Failure to follow this warning may
result in fire, serious injury, death or
property damage. During refueling, it is possible for
you to pump
water-contaminated diesel fuel
into your fuel tank. Your vehicle ’s fuel
system is equipped with a fuel filter and
water separator to remove water from the
fuel. The water in fuel indicator lights when
the fuel and water separator has a
significant quantity of water in it and
requires immediate draining.
If the water in fuel indicator illuminates
when the engine is running, stop your
vehicle as soon as safely possible, shut off
the engine, then drain the fuel and water
separator. See
Fuel Quality (page 189).
Allowing water to stay in the fuel system,
after the water in fuel indicator illuminates,
could result in extensive damage or failure
of the fuel injection system.
Note: Do not drain the fuel and water
separator while the engine is running. Air will
enter into the fuel system causing the engine
not to operate properly.
AUDIBLE WARNINGS AND
INDICATORS
Headlamps On Warning Chime
Sounds when you remove the key from the
ignition and open the driver's door and you
have left the headlamps or parking lamps
on.
112
Super Duty (TFE) Canada/United States of America, enUSA, Edition date: 201709, First Printing Instrument ClusterE181780 E181779 E171217 E234452 E163176
Page 116 of 656
Key in Ignition Warning Chime
Sounds when you open the driver's door
and you have left the key in the ignition.
Parking Brake On Warning Chime
Sounds when you have left the parking
brake on and drive your vehicle. If the
warning chime remains on after you have
released the parking brake, have the
system checked by your authorized dealer
immediately.
113
Super Duty (TFE) Canada/United States of America, enUSA, Edition date: 201709, First Printing Instrument Cluster
Page 117 of 656
GENERAL INFORMATION
WARNING
Driving while distracted can result in
loss of vehicle control, crash and
injury. We strongly recommend that
you use extreme caution when using any
device that may take your focus off the
road. Your primary responsibility is the safe
operation of your vehicle. We recommend
against the use of any hand-held device
while driving and encourage the use of
voice-operated systems when possible.
Make sure you are aware of all applicable
local laws that may affect the use of
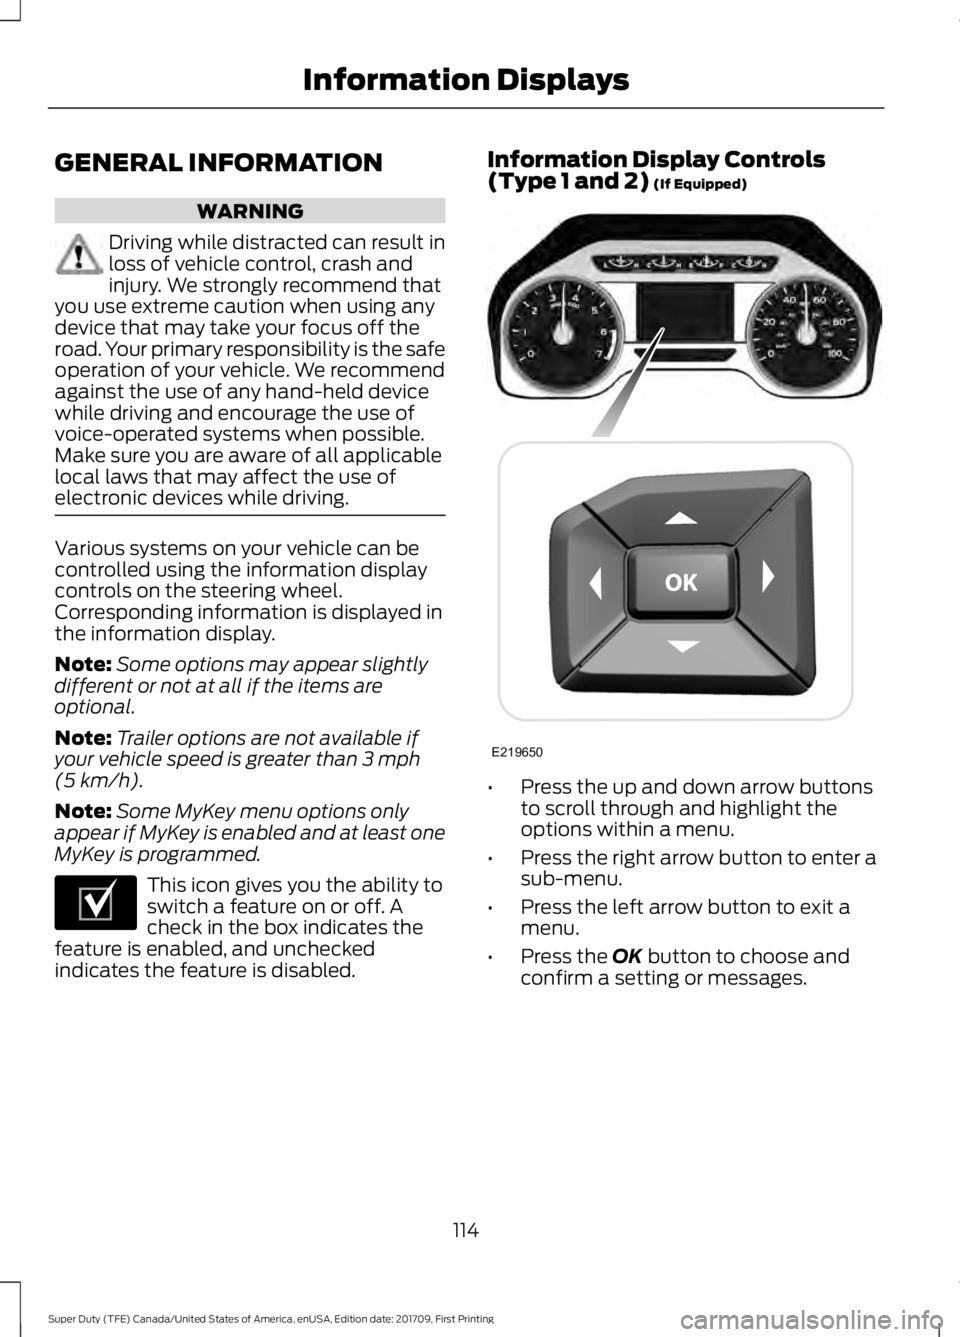
electronic devices while driving. Various systems on your vehicle can be
controlled using the information display
controls on the steering wheel.
Corresponding information is displayed in
the information display.
Note:
Some options may appear slightly
different or not at all if the items are
optional.
Note: Trailer options are not available if
your vehicle speed is greater than 3 mph
(5 km/h).
Note: Some MyKey menu options only
appear if MyKey is enabled and at least one
MyKey is programmed. This icon gives you the ability to
switch a feature on or off. A
check in the box indicates the
feature is enabled, and unchecked
indicates the feature is disabled. Information Display Controls
(Type 1 and 2)
(If Equipped)
•
Press the up and down arrow buttons
to scroll through and highlight the
options within a menu.
• Press the right arrow button to enter a
sub-menu.
• Press the left arrow button to exit a
menu.
• Press the
OK button to choose and
confirm a setting or messages.
114
Super Duty (TFE) Canada/United States of America, enUSA, Edition date: 201709, First Printing Information DisplaysE204495 E219650
Page 120 of 656
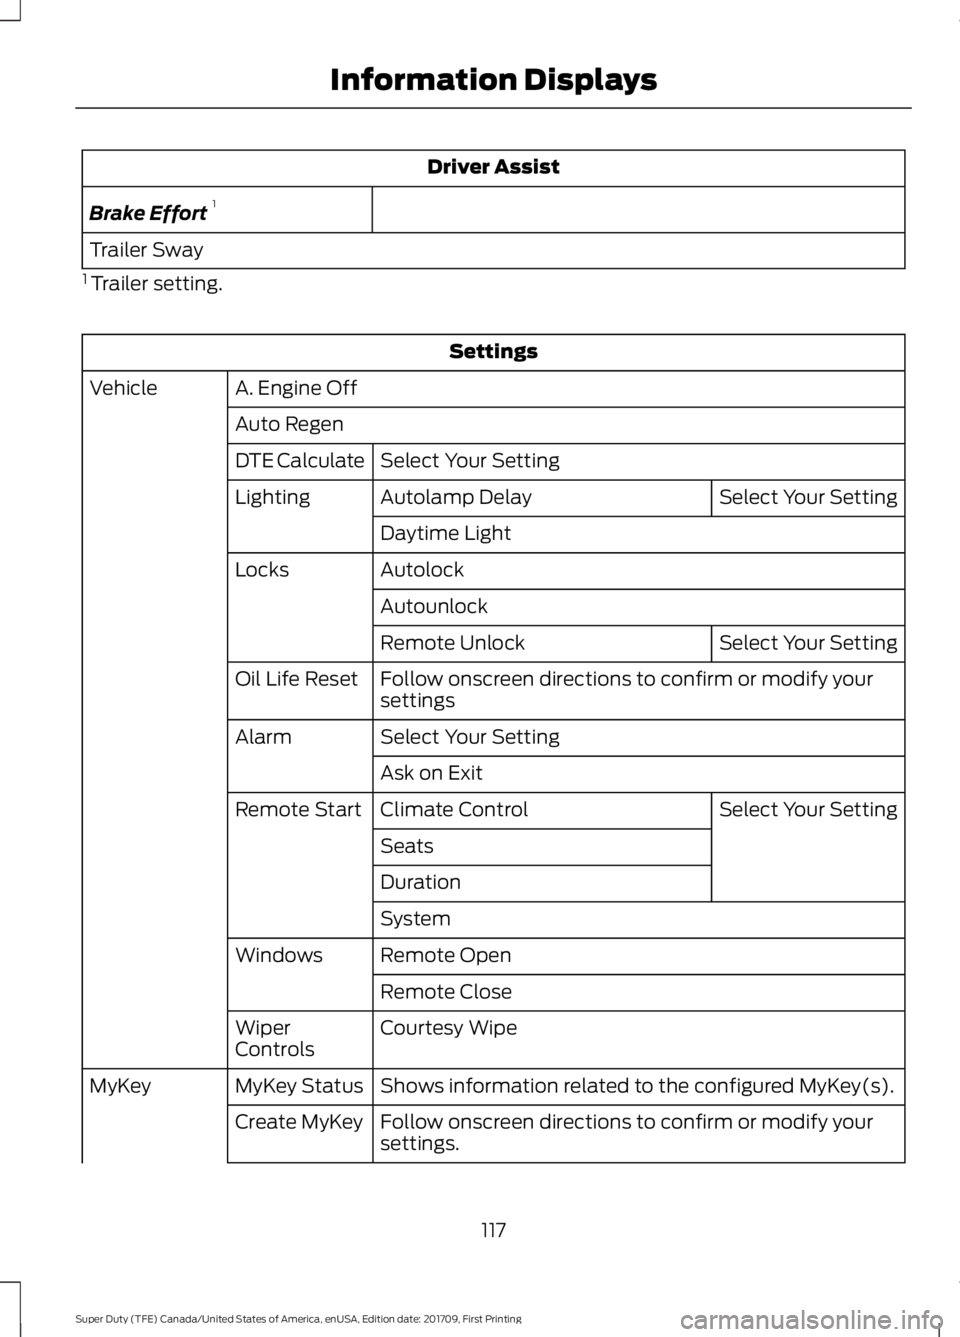
Driver Assist
Brake Effort 1
Trailer Sway
1 Trailer setting. Settings
A. Engine Off
Vehicle
Auto RegenSelect Your Setting
DTE Calculate
Select Your Setting
Autolamp Delay
Lighting
Daytime Light
Autolock
Locks
Autounlock Select Your Setting
Remote Unlock
Follow onscreen directions to confirm or modify your
settings
Oil Life Reset
Select Your Setting
Alarm
Ask on Exit Select Your Setting
Climate Control
Remote Start
Seats
Duration
System
Remote Open
Windows
Remote Close
Courtesy Wipe
Wiper
Controls
Shows information related to the configured MyKey(s).
MyKey Status
MyKey
Follow onscreen directions to confirm or modify your
settings.
Create MyKey
117
Super Duty (TFE) Canada/United States of America, enUSA, Edition date: 201709, First Printing Information Displays