2018 FORD F250 SUPER DUTY brake light
[x] Cancel search: brake lightPage 149 of 656
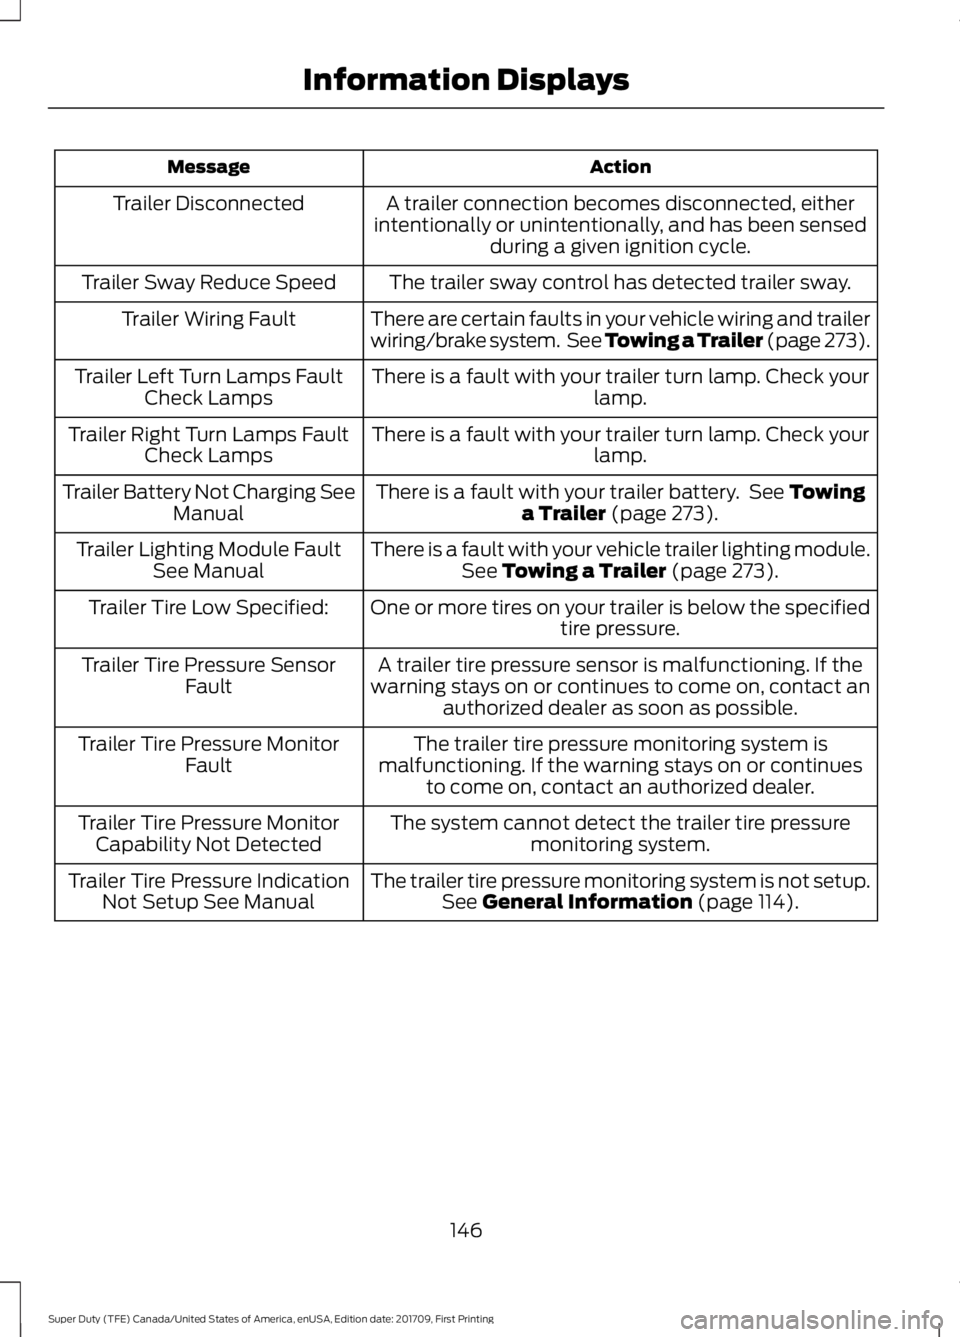
Action
Message
A trailer connection becomes disconnected, either
intentionally or unintentionally, and has been sensed during a given ignition cycle.
Trailer Disconnected
The trailer sway control has detected trailer sway.
Trailer Sway Reduce Speed
There are certain faults in your vehicle wiring and trailer
wiring/brake system. See Towing a Trailer (page 273).
Trailer Wiring Fault
There is a fault with your trailer turn lamp. Check yourlamp.
Trailer Left Turn Lamps Fault
Check Lamps
There is a fault with your trailer turn lamp. Check yourlamp.
Trailer Right Turn Lamps Fault
Check Lamps
There is a fault with your trailer battery. See
Towing
a Trailer (page 273).
Trailer Battery Not Charging See
Manual
There is a fault with your vehicle trailer lighting module.See
Towing a Trailer (page 273).
Trailer Lighting Module Fault
See Manual
One or more tires on your trailer is below the specifiedtire pressure.
Trailer Tire Low Specified:
A trailer tire pressure sensor is malfunctioning. If the
warning stays on or continues to come on, contact an authorized dealer as soon as possible.
Trailer Tire Pressure Sensor
Fault
The trailer tire pressure monitoring system is
malfunctioning. If the warning stays on or continues to come on, contact an authorized dealer.
Trailer Tire Pressure Monitor
Fault
The system cannot detect the trailer tire pressuremonitoring system.
Trailer Tire Pressure Monitor
Capability Not Detected
The trailer tire pressure monitoring system is not setup.See
General Information (page 114).
Trailer Tire Pressure Indication
Not Setup See Manual
146
Super Duty (TFE) Canada/United States of America, enUSA, Edition date: 201709, First Printing Information Displays
Page 181 of 656
D (start) - Cranks the engine.
KEYLESS STARTING
Note: The system may not function if the
intelligent access key is close to metal
objects or electronic devices, for example
keys or a cell phone.
Note: A valid intelligent access key must
be located inside your vehicle to switch the
ignition on and start your vehicle.
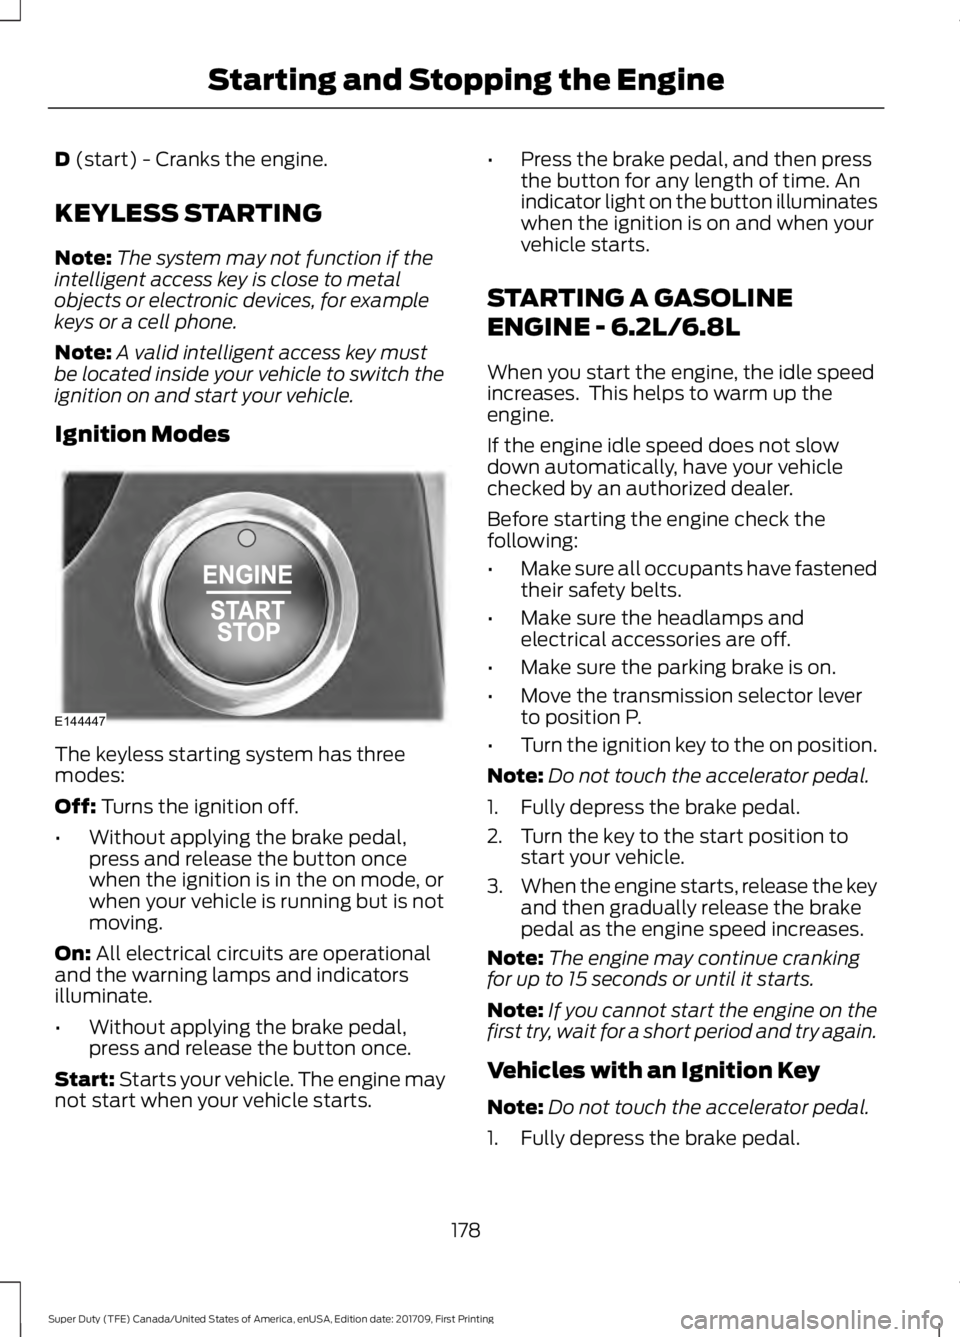
Ignition Modes The keyless starting system has three
modes:
Off:
Turns the ignition off.
• Without applying the brake pedal,
press and release the button once
when the ignition is in the on mode, or
when your vehicle is running but is not
moving.
On:
All electrical circuits are operational
and the warning lamps and indicators
illuminate.
• Without applying the brake pedal,
press and release the button once.
Start:
Starts your vehicle. The engine may
not start when your vehicle starts. •
Press the brake pedal, and then press
the button for any length of time. An
indicator light on the button illuminates
when the ignition is on and when your
vehicle starts.
STARTING A GASOLINE
ENGINE - 6.2L/6.8L
When you start the engine, the idle speed
increases. This helps to warm up the
engine.
If the engine idle speed does not slow
down automatically, have your vehicle
checked by an authorized dealer.
Before starting the engine check the
following:
• Make sure all occupants have fastened
their safety belts.
• Make sure the headlamps and
electrical accessories are off.
• Make sure the parking brake is on.
• Move the transmission selector lever
to position P.
• Turn the ignition key to the on position.
Note: Do not touch the accelerator pedal.
1. Fully depress the brake pedal.
2. Turn the key to the start position to start your vehicle.
3. When the engine starts, release the key
and then gradually release the brake
pedal as the engine speed increases.
Note: The engine may continue cranking
for up to 15 seconds or until it starts.
Note: If you cannot start the engine on the
first try, wait for a short period and try again.
Vehicles with an Ignition Key
Note: Do not touch the accelerator pedal.
1. Fully depress the brake pedal.
178
Super Duty (TFE) Canada/United States of America, enUSA, Edition date: 201709, First Printing Starting and Stopping the EngineE144447
Page 210 of 656
Operator Commanded Regeneration
Precautions and Safe Exhaust Position
WARNINGS
Do not park or idle your vehicle over
dry leaves, dry grass or other
combustible materials. The
regeneration process creates very high
exhaust gas temperatures and the exhaust
will radiate a considerable amount of heat
during and after regeneration and after you
have switched the engine off. This is a
potential fire hazard. Stay clear of the exhaust tailpipe
during regeneration. Hot exhaust
gases can burn you badly.
Make sure that the louvers located at the
tip of the exhaust are clear of any
obstructions as they are used to introduce
fresh air into the tailpipe to cool the
exhaust gases as they leave the exhaust
system.
Before you start operator commanded
regeneration, do the following:
•
Shift into park (P) and apply the
parking brake, on stable, level ground.
• Park your vehicle outside of any
structure.
• Park your vehicle 10– 15 ft (3–5 m)
away from any obstructions and away
from materials that can easily combust
or melt, for example paper, leaves,
petroleum products, fuels, plastics and
other dry organic material.
• Make sure there is a minimum of 1/8
tank of fuel.
• Make sure all fluids are at proper levels. How to Start Operator Commanded
Regeneration WARNING
Stay clear of the exhaust tailpipe
during regeneration. Hot exhaust
gases can burn you badly.
Note:
You cannot use the operator
commanded regeneration until the diesel
particulate filter load percentage has
reached 100%. The diesel particulate filter
load percentage fluctuates up and down
when driving your vehicle due to active and
passive regenerations.
Note: During the use of operator
commanded regeneration, you may observe
a light amount of white smoke. This is
normal. You may not be able to use
operator commanded
regeneration if the service engine
soon warning lamp appears in the
information display
Information Display Procedure
Start with your vehicle engine and when it
has reached the normal operating
temperature, press the information display
control button on the steering wheel. See
Information Display Control (page 85).
If a message advising that the exhaust
filter is full appears in the information
display, press the OK button as instructed.
Answer yes to this prompt and then follow
the next prompts regarding the exhaust
position required to initiate operator
commanded regeneration. Be sure to
understand each prompt. If you are not
sure what is being asked by each prompt,
contact an authorized dealer. The display
confirms the operation has started and
when it has finished.
207
Super Duty (TFE) Canada/United States of America, enUSA, Edition date: 201709, First Printing Engine Emission Control
Page 214 of 656
First (1)
•
Transmission operates in first (1) gear
only.
• Provides maximum engine braking.
• Allows upshifts by moving gearshift
lever.
• Does not downshift into first (1) gear
at high speeds; allows for first (1) gear
when vehicle reaches slower speeds.
Forced downshifts
• Allowed in drive (D) with the tow/haul
feature on or off.
• Press the accelerator to the floor.
• Allows transmission to select an
appropriate gear.
Tow/Haul Mode WARNING
Do not use tow/haul when the road
surface is slippery. Failure to follow
this instruction could result in the
loss of control of your vehicle. To activate tow/haul, press the
button on the gearshift lever
once. The TOW HAUL indicator
light illuminates in the instrument cluster. The tow/haul feature:
•
Delays upshifts to reduce the frequency
of transmission shifting.
• Provides engine braking in all forward
gears, which slows your vehicle and
assists you in controlling your vehicle
when descending a grade.
• Depending on driving conditions and
load conditions, may downshift the
transmission, slow your vehicle and
control your vehicle speed when
descending a hill, without pressing the
accelerator pedal. The amount of
downshift braking provided varies
based upon the amount you press the
brake pedal.
The tow/haul feature improves
transmission operation when towing a
trailer or a heavy load. All transmission
gear ranges are available when using
tow/haul.
Note: If your vehicle is equipped with the
Adaptive Steering System, enabling the
tow/haul feature adjusts the steering
response. In tow/haul mode the Adaptive
Steering system reduces vehicle sensitivity
to steering inputs at higher vehicle speeds
when maintaining the ease of parking and
maneuverability at low speeds. See
Steering (page 261).
To deactivate the tow/haul feature and
return to normal driving mode, press the
button on the gearshift lever when
tow/haul is active. The TOW HAUL light
deactivates. Tow/haul also deactivates
when you power down your vehicle.
211
Super Duty (TFE) Canada/United States of America, enUSA, Edition date: 201709, First Printing TransmissionE161509
Page 217 of 656
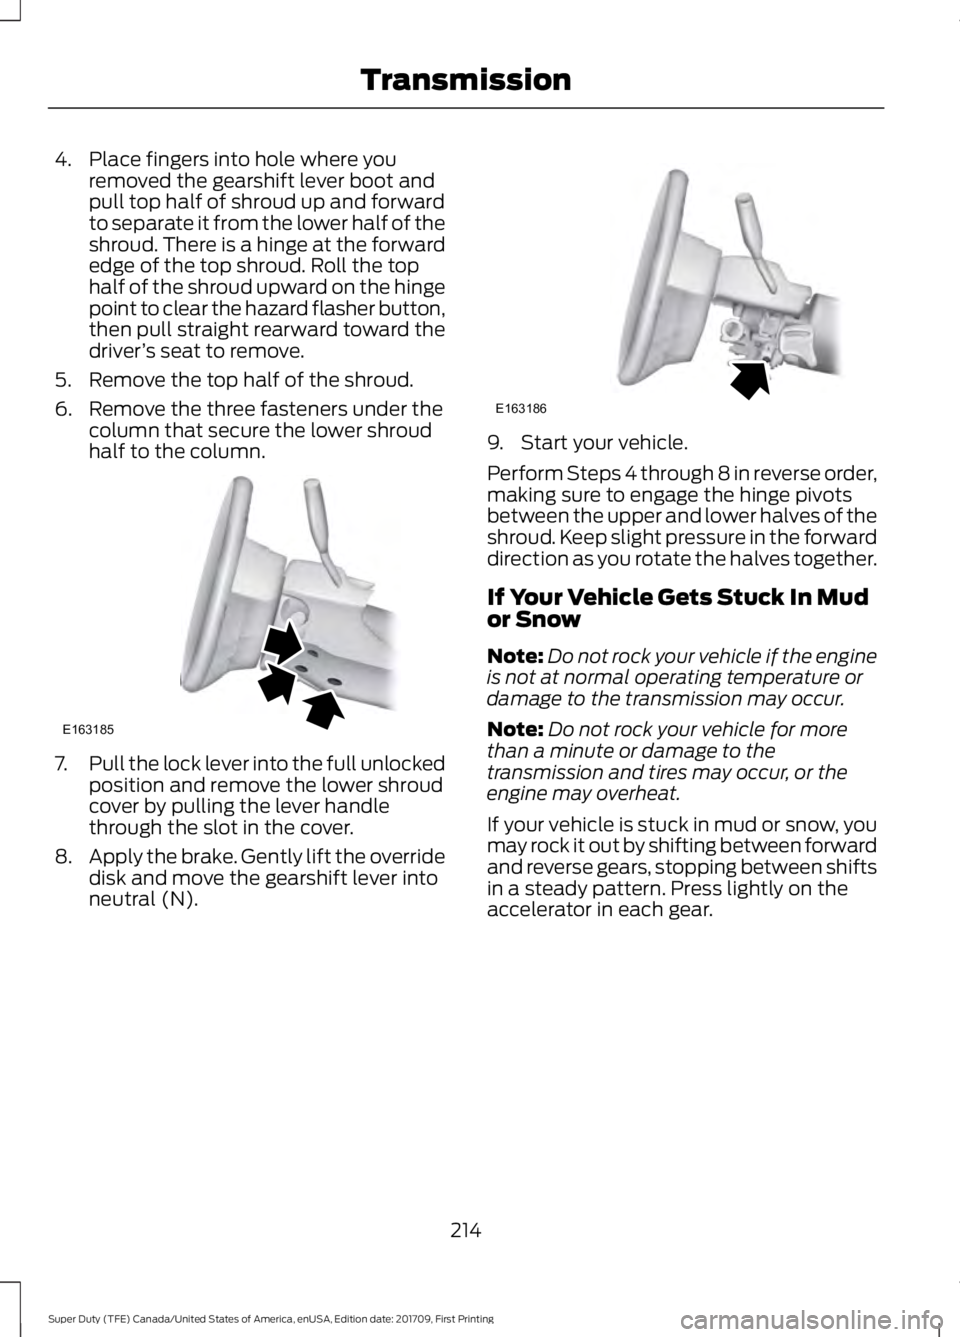
4. Place fingers into hole where you
removed the gearshift lever boot and
pull top half of shroud up and forward
to separate it from the lower half of the
shroud. There is a hinge at the forward
edge of the top shroud. Roll the top
half of the shroud upward on the hinge
point to clear the hazard flasher button,
then pull straight rearward toward the
driver ’s seat to remove.
5. Remove the top half of the shroud.
6. Remove the three fasteners under the column that secure the lower shroud
half to the column. 7.
Pull the lock lever into the full unlocked
position and remove the lower shroud
cover by pulling the lever handle
through the slot in the cover.
8. Apply the brake. Gently lift the override
disk and move the gearshift lever into
neutral (N). 9. Start your vehicle.
Perform Steps 4 through 8 in reverse order,
making sure to engage the hinge pivots
between the upper and lower halves of the
shroud. Keep slight pressure in the forward
direction as you rotate the halves together.
If Your Vehicle Gets Stuck In Mud
or Snow
Note:
Do not rock your vehicle if the engine
is not at normal operating temperature or
damage to the transmission may occur.
Note: Do not rock your vehicle for more
than a minute or damage to the
transmission and tires may occur, or the
engine may overheat.
If your vehicle is stuck in mud or snow, you
may rock it out by shifting between forward
and reverse gears, stopping between shifts
in a steady pattern. Press lightly on the
accelerator in each gear.
214
Super Duty (TFE) Canada/United States of America, enUSA, Edition date: 201709, First Printing TransmissionE163185 E163186
Page 225 of 656
After driving through mud, clean off residue
stuck to rotating driveshafts and tires.
Excess mud stuck on tires and rotating
driveshafts can cause an imbalance that
could damage drive components.
Water
If you must drive through high water, drive
slowly. Traction or brake capability may
be limited.
When driving through water, determine the
depth and avoid water higher than the
bottom of the hubs. If the ignition system
gets wet, your vehicle may stall.
Once through water, always try the brakes.
Wet brakes do not stop your vehicle as
effectively as dry brakes. Drying can be
improved by applying light pressure to the
brake pedal while moving slowly.
Note:
Driving through deep water may
damage the transmission. If the front or rear
axle is submerged in water, the axle
lubricant and power transfer unit lubricant
should be checked and changed if
necessary.
Driving on Hilly or Sloping Terrain
Although natural obstacles may make it
necessary to travel diagonally up or down
a hill or steep incline, you should always
try to drive straight up or straight down.
Note: Avoid turning on steep slopes or hills.
A danger lies in losing traction, slipping
sideways and possible vehicle roll over.
Whenever driving on a hill, determine
beforehand the route you will use. Do not
drive over the crest of a hill without seeing
what conditions are on the other side. Do
not drive in reverse over a hill without the
aid of an observer.
When climbing a steep slope or hill, start
in a lower gear rather than downshifting to
a lower gear from a higher gear once the
ascent has started. This reduces strain on
the engine and the possibility of stalling. If your vehicle stalls, do not try to turn
around because this could cause vehicle
roll over. It is better to reverse back to a
safe location.
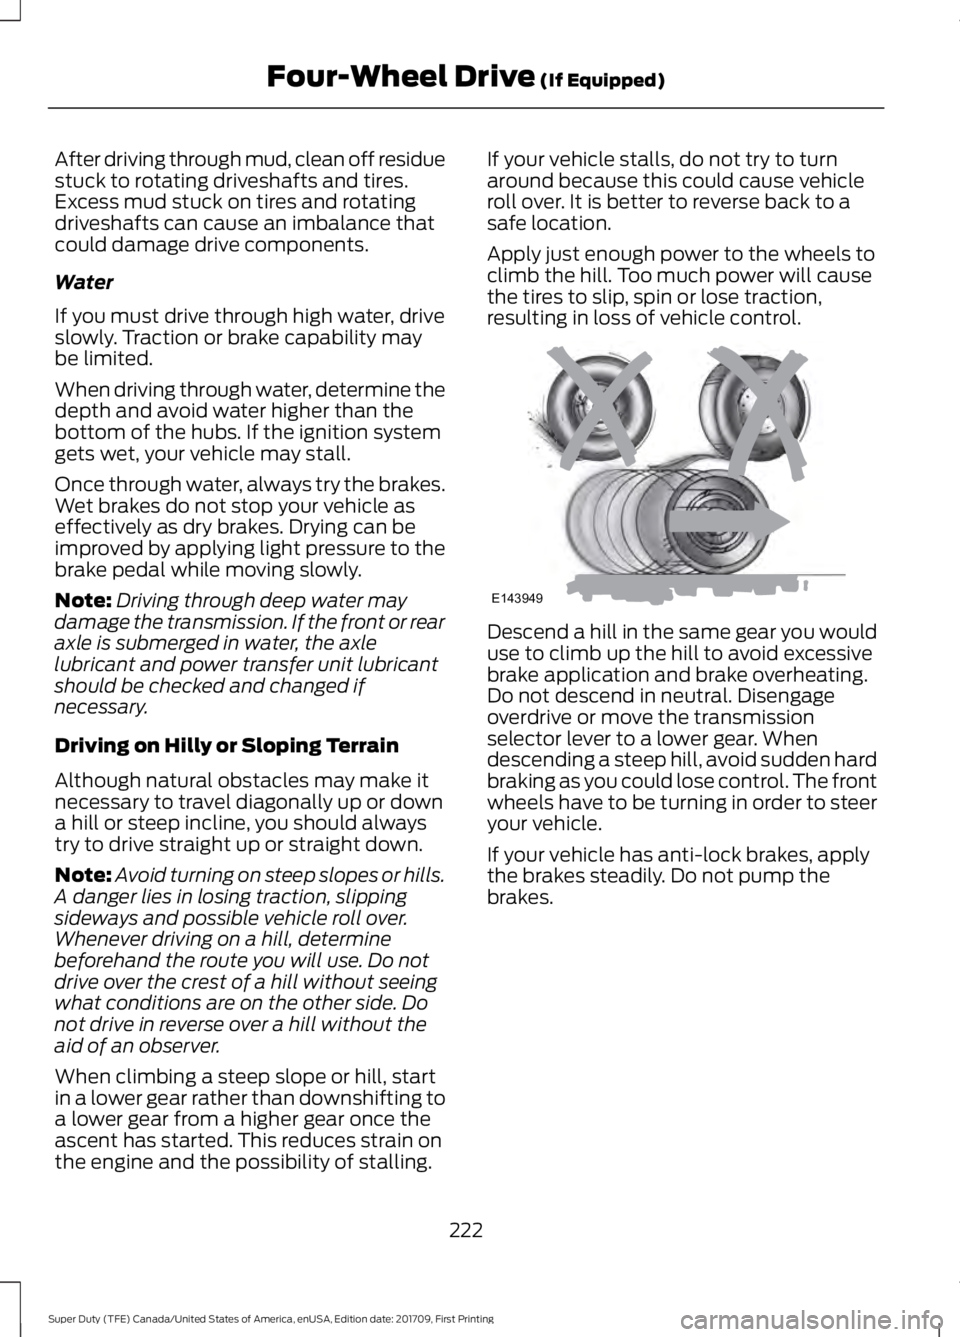
Apply just enough power to the wheels to
climb the hill. Too much power will cause
the tires to slip, spin or lose traction,
resulting in loss of vehicle control.
Descend a hill in the same gear you would
use to climb up the hill to avoid excessive
brake application and brake overheating.
Do not descend in neutral. Disengage
overdrive or move the transmission
selector lever to a lower gear. When
descending a steep hill, avoid sudden hard
braking as you could lose control. The front
wheels have to be turning in order to steer
your vehicle.
If your vehicle has anti-lock brakes, apply
the brakes steadily. Do not pump the
brakes.
222
Super Duty (TFE) Canada/United States of America, enUSA, Edition date: 201709, First Printing Four-Wheel Drive (If Equipped)E143949
Page 226 of 656
Driving on Snow and Ice
WARNING
If you are driving in slippery
conditions that require tire chains or
cables, then it is critical that you drive
cautiously. Keep speeds down, allow for
longer stopping distances and avoid
aggressive steering to reduce the chances
of a loss of vehicle control which can lead
to serious injury or death. If the rear end of
your vehicle slides while cornering, steer in
the direction of the slide until you regain
control of your vehicle. Note:
Excessive tire slippage can cause
transmission damage.
Four-wheel drive vehicles have advantages
over two-wheel drive vehicles in snow and
ice but can skid like any other vehicle.
Should you start to slide while driving on
snowy or icy roads, turn the steering wheel
in the direction of the slide until you regain
control.
Avoid sudden applications of power and
quick changes of direction on snow and
ice. Apply the accelerator slowly and
steadily when starting from a full stop.
Avoid sudden braking. Although a
four-wheel drive vehicle may accelerate
better than a two-wheel drive vehicle in
snow and ice, it will not stop any faster as
braking occurs at all four wheels. Do not
become overconfident as to road
conditions.
Make sure you allow sufficient distance
between you and other vehicles for
stopping. Drive slower than usual and
consider using one of the lower gears. In
emergency stopping situations, apply the
brake steadily. Do not pump the brake
pedal. See Hints on Driving With
Anti-Lock Brakes (page 229). If Your Vehicle Gets Stuck In Mud or
Snow WARNING
Do not spin the wheels at over
34 mph (55 km/h). The tires may fail
and injure a passenger or bystander.
If your vehicle gets stuck in mud or snow,
it may be rocked out by shifting between
forward and reverse gears, stopping
between shifts in a steady pattern. Press
lightly on the accelerator in each gear.
Note:
Do not rock your vehicle if the engine
is not at normal operating temperature,
damage to the transmission may occur.
Note: Do not rock your vehicle for more
than a minute, damage to the transmission
and tires may occur or the engine may
overheat.
Parking WARNINGS
If the parking brake is fully released,
but the brake warning lamp remains
illuminated, the brakes may not be
working properly. Have your vehicle
checked as soon as possible. Always set the parking brake and
leave your vehicle with the
transmission in park (P).
On some four-wheel drive vehicles, when
the transfer case is in the N (Neutral)
position, the engine and transmission are
disconnected from the rest of the driveline.
Therefore, the vehicle is free to roll even if
the automatic transmission is in P (Park)
or the manual transmission is in gear. Do
not leave the vehicle unattended with the
transfer case in the N (Neutral) position.
Always set the parking brake fully and turn
off the ignition when leaving the vehicle.
223
Super Duty (TFE) Canada/United States of America, enUSA, Edition date: 201709, First Printing Four-Wheel Drive
(If Equipped)
Page 230 of 656
GENERAL INFORMATION
Note:
Occasional brake noise is normal. If
a metal-to-metal, continuous grinding or
continuous squeal sound is present, the
brake linings may be worn-out. Have the
system checked by an authorized dealer. If
your vehicle has continuous vibration or
shudder in the steering wheel while braking,
have it checked by an authorized dealer.
Note: Brake dust may accumulate on the
wheels, even under normal driving
conditions. Some dust is inevitable as the
brakes wear and does not contribute to
brake noise. See Warning Lamps and
Indicators (page 108).
Wet brakes result in reduced braking
efficiency. Gently press the brake pedal a
few times when driving from a car wash or
standing water to dry the brakes.
Brake Over Accelerator
In the event the accelerator pedal
becomes stuck or entrapped, apply steady
and firm pressure to the brake pedal to
slow the vehicle and reduce engine power.
If you experience this condition, apply the
brakes and bring your vehicle to a safe
stop. Shift the transmission to park (P),
switch the engine off and apply the parking
brake. Inspect the accelerator pedal for
any interference. If none are found and the
condition persists, have your vehicle towed
to the nearest authorized dealer.
Brake Assist
Brake assist detects when you brake
rapidly by measuring the rate at which you
press the brake pedal. It provides
maximum braking efficiency as long as you
press the pedal, and can reduce stopping
distances in critical situations. Anti-lock Brake System
This system helps you maintain steering
control during emergency stops by keeping
the brakes from locking. This lamp momentarily
illuminates when you switch the
ignition on. If the light does not
illuminate during start up, remains on or
flashes, the system may be disabled. Have
the system checked by an authorized
dealer. If the anti-lock brake system is
disabled, normal braking is still effective. If the brake warning lamp
remains illuminated after you
release the parking brake, have
the system checked by an authorized
dealer.
It also illuminates momentarily when you
switch the ignition on to confirm the lamp
is functional. If it does not illuminate when
you switch the ignition on, or begins to
flash at any time, have the system checked
by an authorized dealer.
Diesel Engine Exhaust Braking
(If
Equipped) WARNINGS
Do not use tow/haul when the road
surface is slippery. Failure to follow
this instruction could result in the
loss of control of your vehicle. Do not use diesel engine exhaust
braking when the road surface is
slippery. Failure to follow this
instruction could result in the loss of
control of your vehicle. This feature increases engine braking at
higher engine speeds to provide better
grade descent control with less brake and
transmission wear and tear.
Note:
Use this when driving downhill and
carrying heavy loads or trailering.
227
Super Duty (TFE) Canada/United States of America, enUSA, Edition date: 201709, First Printing BrakesE144522 E144522