2018 FORD F-450 ECO mode
[x] Cancel search: ECO modePage 250 of 660

Changing the Set Speed
•
Press SET+ or SET- to change the set
speed in small increments.
• Press the accelerator or brake pedal
until you reach the desired speed. Press
SET+
or SET-.
• Press and hold
SET+ or SET- to
change the set speed in large
increments. Release the control when
you reach the desired speed.
The system may apply the brakes to slow
the vehicle to the new set speed. The set
speed displays continuously in the
information display when the system is
active.
Canceling the Set Speed
Press
CNCL or tap the brake pedal. The
set speed does not erase.
Resuming the Set Speed
Note: Only use resume if you are aware of
the set speed and intend to return to it.
Press
RES. Your vehicle speed returns to
the previously set speed and gap setting.
The set speed displays continuously in the
information display when the system is
active.
Automatic Cancellation
Note: If the engine speed drops too low, an
audible warning sounds and a message
appears in the information display.
Automatic braking releases.
Hilly Condition and Trailer Tow
Usage
Note: An audible alarm sounds and the
system shuts down if it applies brakes for
an extended period of time. This allows the
brakes to cool. The system functions
normally again after the brakes cool. Note:
When towing with adaptive cruise
control, switch on Tow/Haul Mode and
Diesel Engine Brake.
Note: Tow/Haul mode increases the time
gaps and allows more distance for braking.
Select a lower gear when the system is
active in situations such as prolonged
downhill driving on steep grades, for
example in mountainous areas. The
system needs additional engine braking in
these situations to reduce the load on the
vehicle ’s regular brake system to prevent
it from overheating.
Switching Adaptive Cruise Control
Off
Note: You erase the set speed and gap
setting when you switch the system off.
Press
OFF when the system is in standby
mode, or switch the ignition off.
Detection Issues WARNINGS
On rare occasions, detection issues
can occur due to the road
infrastructures, for example bridges,
tunnels and safety barriers. In these cases,
the system may brake late or
unexpectedly. At all times, you are
responsible for controlling your vehicle,
supervising the system and intervening, if
required. If the system malfunctions, have your
vehicle checked as soon as possible.
The radar sensor has a limited field of view.
It may not detect vehicles at all or detect
a vehicle later than expected in some
situations. The lead vehicle graphic does
not illuminate if the system does not
detect a vehicle in front of you.
247
Super Duty (TFE) Canada/United States of America, enUSA, Edition date: 201709, Second Printing Cruise Control
(If Equipped)
Page 252 of 660

Possible Causes and Actions for This Message Displaying:
Action
Cause
Clean the grille surface in front of the radar
or remove the object causing the obstruc-
tion.
The surface of the radar is dirty or
obstructed.
Wait a short time. It may take several
minutes for the radar to detect that it is free
from obstruction.
The surface of the radar is clean but the
message remains in the display.
Do not use the system in these conditions
because it may not detect any vehicles
ahead.
Heavy rain or snow is interfering with the
radar signals.
Do not use the system in these conditions
because it may not detect any vehicles
ahead.
Water, snow or ice on the surface of the
road may interfere with the radar signals.
Wait a short time or switch to normal cruise
control.
You are in a desert or remote area with no
other vehicles and no roadside objects.
Due to the nature of radar technology, it is possible to get a blockage warning with no
actual block. This happens, for example, when driving in sparse rural or desert
environments. A false blocked condition either self clears, or clears after you restart your
vehicle.
Switching to Normal Cruise
Control WARNING
Normal cruise control will not brake
when your vehicle is approaching
slower vehicles. Always be aware of
which mode you have selected and apply
the brakes when necessary. You can change from adaptive cruise
control to normal cruise control through
the information display. The cruise control indicator light
replaces the adaptive cruise
control indicator light if you
select normal cruise control. The gap
setting does not display, and the system
does not respond to lead vehicles.
Automatic braking remains active to
maintain set speed.
249
Super Duty (TFE) Canada/United States of America, enUSA, Edition date: 201709, Second Printing Cruise Control (If Equipped)E71340
Page 253 of 660
LANE KEEPING SYSTEM (If
Equipped) WARNING
The system is designed to aid the
driver. It is not intended to replace
your attention and judgment. You are
still responsible to drive with due care and
attention. Note:
The system works as long as the
camera can detect one lane marking at a
speed above
40 mph (64 km/h).
Note: The system may not function if the
camera is blocked or there is damage to the
windshield.
The Lane Keeping System automatically
detects and tracks the road lane markings
using a camera mounted behind the
interior review view mirror. The system
notifies you to stay in your lane when the
front camera detects an unintentional lane
change is likely to occur.
Switching the System On and Off
Note: The system on or off setting is stored
until it is manually changed, unless a MyKey
is detected. If the system detects a MyKey,
it defaults to on and the mode is set to alert.
Note: If a MyKey is detected, pressing the
button will not affect the on or off status of
the system. You can only change the mode
and intensity settings. Press the button located on the
center console to switch the
system on or off. System Settings
The system sensitivity and intensity can
be adjusted through the display screen.
See General Information (page 113). The
system remembers the last selection. You
do not need to readjust the setting each
time you turn on your vehicle.
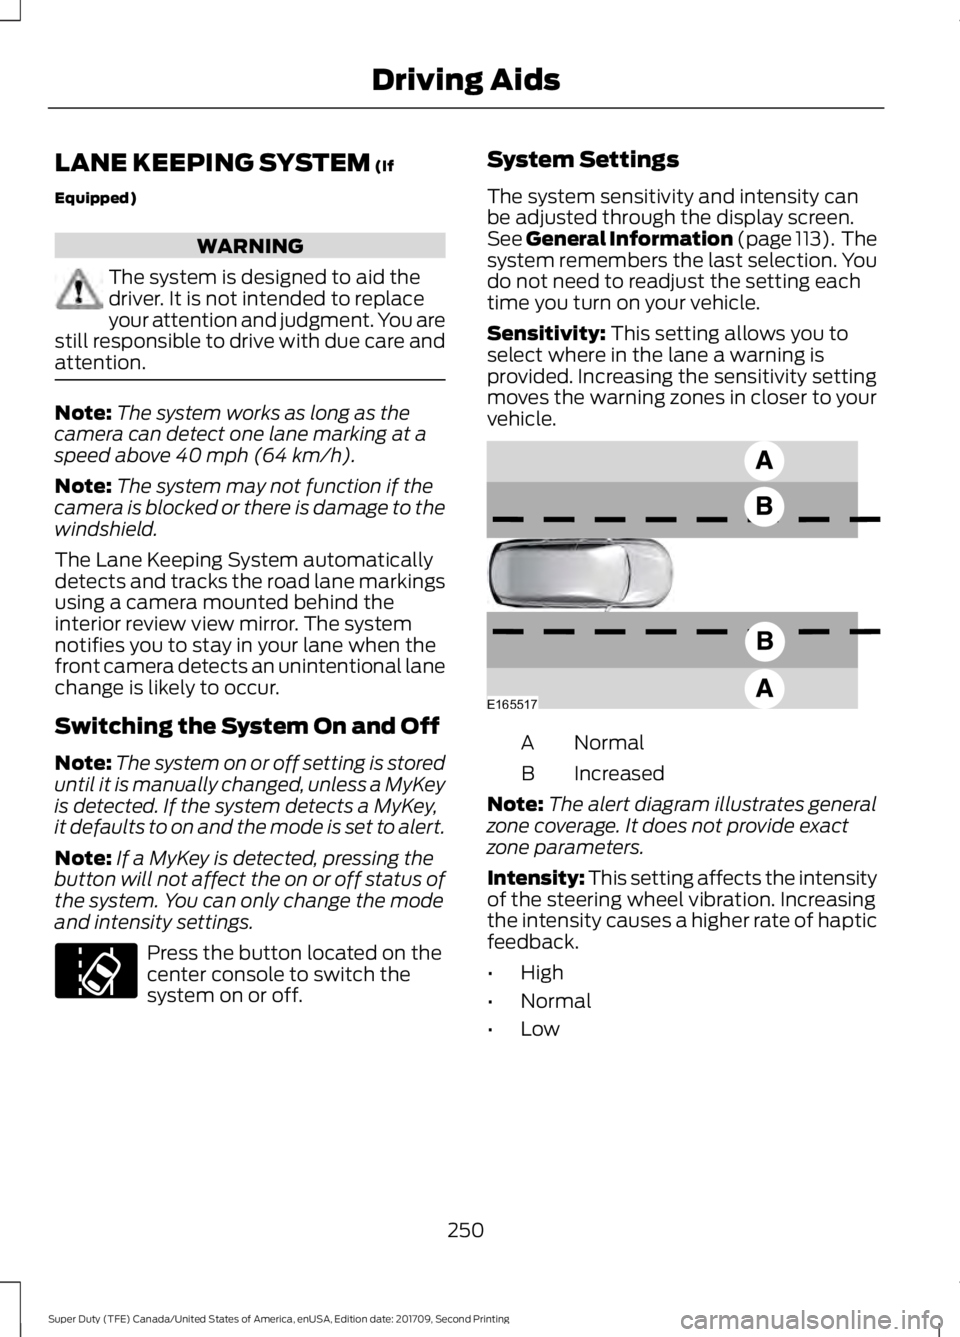
Sensitivity:
This setting allows you to
select where in the lane a warning is
provided. Increasing the sensitivity setting
moves the warning zones in closer to your
vehicle. Normal
A
Increased
B
Note: The alert diagram illustrates general
zone coverage. It does not provide exact
zone parameters.
Intensity: This setting affects the intensity
of the steering wheel vibration. Increasing
the intensity causes a higher rate of haptic
feedback.
• High
• Normal
• Low
250
Super Duty (TFE) Canada/United States of America, enUSA, Edition date: 201709, Second Printing Driving AidsE173233 E165517
Page 280 of 660
Step 5: Enter Measurements Using the
Information Display
Using the measurements you recorded,
enter the required data into the system.
Follow the on screen prompts to enter
each of the measurements taken in step
4. Use the up and down arrows to increase
or decrease the numbers as necessary.
Press OK to confirm each measurement.
Once you add the last measurement, the
information display shows all of the
entered measurements. You can choose
to confirm or change the measurements.
Step 6: Confirming the Sticker Location
Check the rear view camera display to see
if the system identifies the sticker. The
system marks the sticker with a red circle.
Confirm that the red circle shows over the
sticker image in the rear view camera
display.
Note:
If the system cannot locate the
sticker, try cleaning the camera lens. Make
sure the sticker is within the zone as
indicated in step 3.
The information display shows a
confirmation message when you
successfully confirm the target.
Calibrating the System
To complete setup, drive your vehicle
straight forward between 4– 24 mph
(6– 39 km/h), as directed by the
information display.
Note: Keep the steering wheel straight
during the calibration process. If the steering
wheel is in a turned position, the calibration
pauses. The information display prompts
you to drive straight forward to complete
the calibration.
The information display shows a message
during calibration and after calibration is
complete Note:
For best results, do not calibrate the
system at night.
Using Trailer Reverse Guidance
1. Shift into reverse (R). Press the rear camera button to expand the menu.
2. Press the trailer icon.
3. Select the applicable trailer in the information display.
4. When in trailer reverse guidance mode,
you can see the camera view on the
side your trailer is moving, or both sides
when the trailer is straight behind you.
When the views change with the trailer
direction, it is called auto mode. For
example, if you turn the trailer to the
right, you see the right side of your
vehicle and trailer. You can switch this
view manually at any time by using the
arrow keys. To return to auto mode,
press the auto button.
Note: Auto mode is the default setting.
Use the view that helps you the most when
reversing your vehicle and trailer. Normal rear view camera view.
Use this feature when you want
to see your trailer hitch or what
is directly behind your vehicle. Straight back-up mode. Use this
feature when you want to keep
your trailer completely in line
with your truck. In this mode, a steering
wheel graphic shows you which way to turn
your steering wheel to keep your trailer
straight.
Note: It may be helpful to shift your vehicle
into drive (D), pull forward and straighten
out the vehicle and trailer before engaging
straight back-up mode.
Left and right arrows let you see other
views regardless of your trailer angle. Use
them to switch views manually.
277
Super Duty (TFE) Canada/United States of America, enUSA, Edition date: 201709, Second Printing TowingE263194 E224484
Page 288 of 660
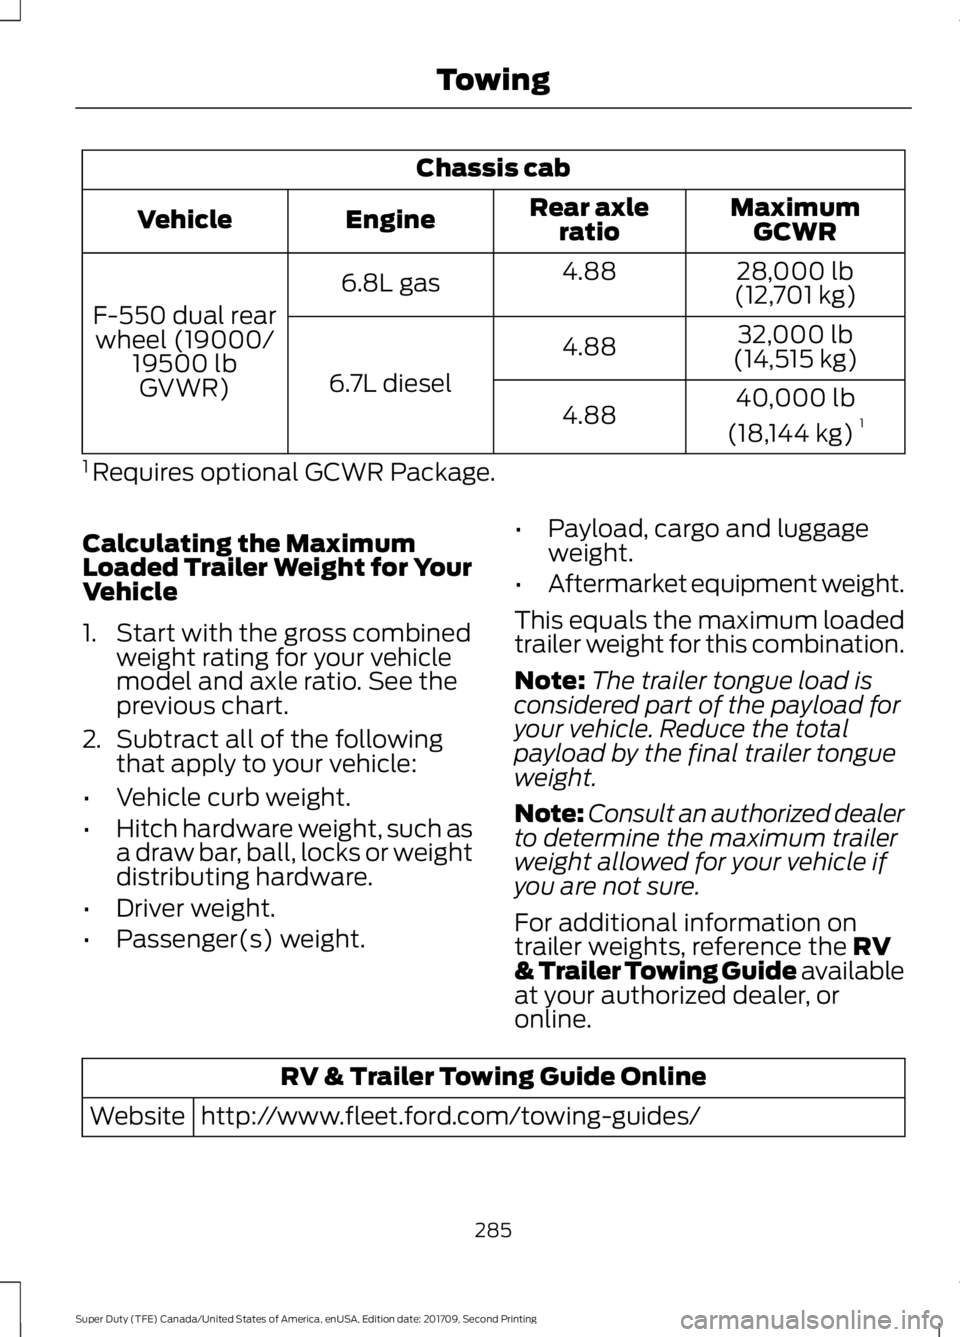
Chassis cab
MaximumGCWR
Rear axle
ratio
Engine
Vehicle
28,000 lb
(12,701 kg)
4.88
6.8L gas
F-550 dual rear wheel (19000/ 19500 lbGVWR) 32,000 lb
(14,515 kg)
4.88
6.7L diesel 40,000 lb
(18,144 kg) 1
4.88
1 Requires optional GCWR Package.
Calculating the Maximum
Loaded Trailer Weight for Your
Vehicle
1. Start with the gross combined weight rating for your vehicle
model and axle ratio. See the
previous chart.
2. Subtract all of the following
that apply to your vehicle:
• Vehicle curb weight.
• Hitch hardware weight, such as
a draw bar, ball, locks or weight
distributing hardware.
• Driver weight.
• Passenger(s) weight. •
Payload, cargo and luggage
weight.
• Aftermarket equipment weight.
This equals the maximum loaded
trailer weight for this combination.
Note: The trailer tongue load is
considered part of the payload for
your vehicle. Reduce the total
payload by the final trailer tongue
weight.
Note: Consult an authorized dealer
to determine the maximum trailer
weight allowed for your vehicle if
you are not sure.
For additional information on
trailer weights, reference the RV
& Trailer Towing Guide available
at your authorized dealer, or
online. RV & Trailer Towing Guide Online
http://www.fleet.ford.com/towing-guides/
Website
285
Super Duty (TFE) Canada/United States of America, enUSA, Edition date: 201709, Second Printing Towing
Page 295 of 660
Trailer Brake Effort Setting
The trailer brake controller allows the user
to customize how aggressively the trailer
brakes engage. The default value is the low
setting and is the recommended setting
for most trailers. If your trailer's brakes
require more initial voltage, or if you prefer
more aggressive trailer braking, then select
either the medium or the high setting.
Procedure for Setting Trailer Brake
Controller Mode
Choose the low, medium or high setting
for the required initial trailer brake output.
Procedure for Adjusting Gain
Note:
Only perform this procedure in a
traffic-free environment at speeds of
approximately 20– 25 mph (30–40 km/h).
The gain setting adjusts the trailer brake
controller for the specific towing condition.
You should change the setting as towing
conditions change. Changes to towing
conditions include trailer load, vehicle load,
road conditions and weather.
The gain should be set to provide the
maximum trailer braking assistance while
making sure the trailer wheels do not lock
when using the brakes. Locked trailer
wheels may lead to trailer instability.
1. Make sure the trailer brakes are in good
working condition, functioning normally
and properly adjusted. See your trailer
dealer if necessary.
2. Hook up the trailer and make the electrical connections according to the
trailer manufacturer's instructions.
3. When you plug in a trailer with electric or electric-over-hydraulic brakes, a
confirmation message appears in the
information display. 4. Use the gain adjustment (+ and -)
buttons to increase or decrease the
gain setting to the desired starting
point. A gain setting of 6.0 is a good
starting point for heavier loads.
5. In a traffic-free environment, tow the trailer on a dry, level surface at a speed
of
20– 25 mph (30–40 km/h) and
squeeze the manual control lever
completely.
6. If the trailer wheels lock up, indicated by squealing tires, reduce the gain
setting. If the trailer wheels turn freely,
increase the gain setting. Repeat Steps
5 and 6 until the gain setting is at a
point just below trailer wheel lock-up.
If towing a heavier trailer, trailer wheel
lock-up may not be attainable even
with the maximum gain setting of 10.
Information Display Warning Messages
Note: An authorized dealer can diagnose
the trailer brake controller to determine
exactly which trailer fault has occurred.
However, your Ford warranty does not cover
this diagnosis if the fault is with the trailer.
TRAILER BRAKE MODULE FAULT
Displays in response to faults sensed by
the trailer brake controller, accompanied
by a single tone. If this message appears,
contact an authorized dealer as soon as
possible for diagnosis and repair. The
controller may still function, but with
degraded performance.
WIRING FAULT ON TRAILER
Displays when there is a short circuit on
the electric brake output wire.
If this message displays, with no trailer
connected, the problem is with your vehicle
wiring or trailer brake controller. Contact
an authorized dealer.
292
Super Duty (TFE) Canada/United States of America, enUSA, Edition date: 201709, Second Printing Towing
Page 298 of 660
When backing down a ramp during boat
launching or retrieval:
•
Do not allow the static water level to
rise above the bottom edge of the rear
bumper.
• Do not allow waves to break higher
than 6 in (15 cm) above the bottom
edge of the rear bumper.
Exceeding these limits may allow water to
enter vehicle components:
• Causing internal damage to the
components.
• Affecting driveability, emissions, and
reliability.
Replace the rear axle lubricant anytime
the rear axle has been submerged in water.
Water may have contaminated the rear
axle lubricant, which is not normally
checked or changed unless a leak is
suspected or other axle repair is required.
TOWING THE VEHICLE ON
FOUR WHEELS WARNING
If your vehicle has a steering wheel
lock make sure the ignition is in the
accessory or on position when being
towed. Emergency Towing
If your vehicle becomes inoperable
(without access to wheel dollies,
car-hauling trailer, or flatbed transport
vehicle), it can be flat-towed (all wheels
on the ground, regardless of the powertrain
and transmission configuration) under the
following conditions:
•
Your vehicle is facing forward for
towing in a forward direction.
• Place the transmission in neutral (N).
If you cannot move the transmission
into neutral (N), you may need to
override it. See
Transmission (page
208).
• Maximum speed is 35 mph (56 km/h).
• Maximum distance is
50 mi (80 km). WARNING
If your vehicle has a steering wheel
lock make sure the ignition is in the
accessory or on position when being
towed. Recreational Towing
Note:
Put your climate control system in
recirculated air mode to prevent exhaust
fumes from entering your vehicle. See
Climate Control
(page 146).
Follow these guidelines if you have a need
for recreational towing, such as towing
your vehicle behind a motorhome. We have
designed these guidelines to prevent
damage to your transmission.
Two-wheel Drive Vehicles
Do not tow your vehicle with any wheels
on the ground, as vehicle or transmission
damage may occur. It is recommended to
tow your vehicle with all four (4) wheels
off the ground, such as when using a
car-hauling trailer. Otherwise, you cannot
tow your vehicle.
295
Super Duty (TFE) Canada/United States of America, enUSA, Edition date: 201709, Second Printing Towing
Page 301 of 660

BREAKING-IN
You need to break in new tires for
approximately 300 mi (480 km). During
this time, your vehicle may exhibit some
unusual driving characteristics.
Avoid driving too fast during the first
1,000 mi (1,600 km)
. Vary your speed
frequently and change up through the
gears early. Do not labor the engine.
Drive your new vehicle at least
1,000 mi
(1,600 km) before towing a trailer. Make
sure you use the specified engine oil. See
Capacities and Specifications
(page
427).
Do not add friction modifier compounds
or special break-in oils during the first few
thousand miles (kilometers) of operation.
These additives may prevent piston ring
seating.
ECONOMICAL DRIVING
Your fuel economy is affected by several
things, such as how you drive, the
conditions you drive under, and how you
maintain your vehicle.
You may improve your fuel economy by
keeping these things in mind:
• Accelerate and slow down in a smooth,
moderate fashion.
• Drive at steady speeds without
stopping.
• Anticipate stops; slowing down may
eliminate the need to stop.
• Combine errands and minimize
stop-and-go driving.
• Close the windows for high-speed
driving.
• Drive at reasonable speeds (traveling
at 55 mph [88 km/h] uses 15% less
fuel than traveling at 65 mph [105
km/h]). •
Keep the tires properly inflated and use
only the recommended size.
• Use the recommended engine oil.
• Perform all regularly scheduled
maintenance.
Avoid these actions; they reduce your fuel
economy:
• Sudden accelerations or hard
accelerations.
• Revving the engine before turning it off.
• Idle for periods longer than one minute.
• Warm up your vehicle on cold
mornings.
• Use the air conditioner or front
defroster.
• Use the speed control in hilly terrain.
• Rest your foot on the brake pedal while
driving.
• Drive a heavily loaded vehicle or tow a
trailer.
• Carry unnecessary weight
(approximately 1 mpg [0.4 km/L] is
lost for every 400 lb [180 kilogram] of
weight carried).
• Driving with the wheels out of
alignment.
Conditions
• Heavily loading a vehicle or towing a
trailer may reduce fuel economy at any
speed.
• Adding certain accessories to your
vehicle (for example bug deflectors,
rollbars, light bars, running boards, ski
racks or luggage racks) may reduce
fuel economy.
• To maximize the fuel economy, drive
with the tonneau cover installed (if
equipped).
• Using fuel blended with alcohol may
lower fuel economy.
298
Super Duty (TFE) Canada/United States of America, enUSA, Edition date: 201709, Second Printing Driving Hints