Page 129 of 660

Towing
% Grade, steering angle, gain and output display
Towing
Status
Trailer Name, Accumulated Miles, Trailer Reverse Guidance Status, Trailer
BLIS Status and Trailer Disconnected
Towing
Informa-
tion
Provides status of the brake, park and direction indicator light for the active
trailer.
Trailer
Light
Check
Follow onscreen directions to confirm or modify your settings.
Trailer Tire
Pressure
Trailer Sway Control
Trailer
Setup
Select Your Trailer
Select trailer
Follow onscreen
directions to
confirm or modify
your settings.
Rename Trailer
Change Trailer Settings
Reset Trailer
Distance
Change Blind Spot
Measurement
Add Blind Spot
Change Reverse
Guidance Sticker
Add Trailer Reverse
Guidance™
Change Brake Type
Change Brake Effort
Delete Trailer
Change Trailer
Setup Select Your Setting
Trailer Brake Type
Add Trailer
Trailer Brake EffortFollow onscreen
directions to
confirm or modify
your settings.
Trailer Setup
126
Super Duty (TFE) Canada/United States of America, enUSA, Edition date: 201709, Second Printing Information Displays
Page 130 of 660
Towing
Follow onscreen directions to confirm or
modify your settings.
Conventional
Connec-
tion Check-
list Fifth Wheel
Gooseneck Off Road
Off Road Status
Displays pitch, steering angle, roll, Elocker and 4X4. Settings
Auto Highbeam
Auto Regen
Blind Spot
Cross Traffic Alert
Driver Alert
Rear Park Aid
Trailer Blind Spot Select Your Setting
Alert Sensit-
ivity
Pre-Collision
Pre-Collision
- On
Select Your Setting
Cruise
Control
DTE Calcula-
tion
Gauge Selec-
tion
Select Your Setting
Mode
Lane
Keeping
System Sensitivity
Alert Intensity
127
Super Duty (TFE) Canada/United States of America, enUSA, Edition date: 201709, Second Printing Information Displays
Page 140 of 660

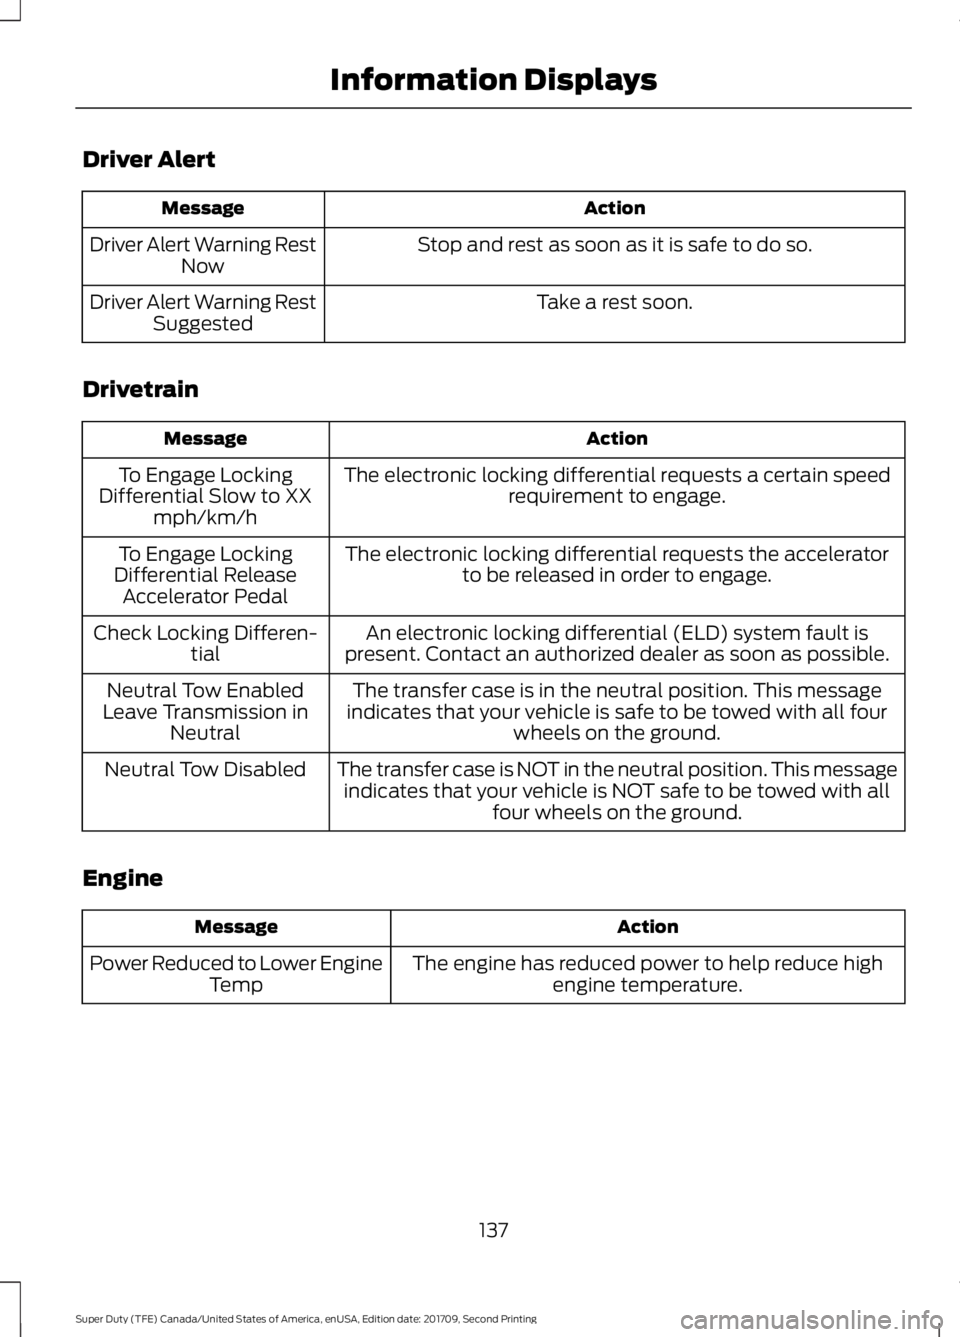
Driver Alert
Action
Message
Stop and rest as soon as it is safe to do so.
Driver Alert Warning Rest
Now
Take a rest soon.
Driver Alert Warning Rest
Suggested
Drivetrain Action
Message
The electronic locking differential requests a certain speedrequirement to engage.
To Engage Locking
Differential Slow to XX mph/km/h
The electronic locking differential requests the acceleratorto be released in order to engage.
To Engage Locking
Differential Release Accelerator Pedal
An electronic locking differential (ELD) system fault is
present. Contact an authorized dealer as soon as possible.
Check Locking Differen-
tial
The transfer case is in the neutral position. This message
indicates that your vehicle is safe to be towed with all four wheels on the ground.
Neutral Tow Enabled
Leave Transmission in Neutral
The transfer case is NOT in the neutral position. This messageindicates that your vehicle is NOT safe to be towed with all four wheels on the ground.
Neutral Tow Disabled
Engine Action
Message
The engine has reduced power to help reduce highengine temperature.
Power Reduced to Lower Engine
Temp
137
Super Duty (TFE) Canada/United States of America, enUSA, Edition date: 201709, Second Printing Information Displays
Page 146 of 660

Starting System
Action
Message
A reminder to apply the brake when starting your vehicle .
To START Press Brake
The starter has exceeded its cranking time in attempting tostart your vehicle.
Cranking Time Exceeded
The starter is attempting to start your vehicle.
Engine Start Pending
Please Wait
The system has cancelled the pending start.
Pending Start Cancelled
Tire Pressure Monitoring System Action
Message
One or more tires on your vehicle has low tire pressure. SeeTire Pressure Monitoring System (page 400).
Tire Pressure Low
The tire pressure monitoring system is malfunctioning. If thewarning stays on or continues to come on, contact an
authorized dealer. See
Tire Pressure Monitoring System (page 400).
Tire Pressure Monitor
Fault
A tire pressure sensor is malfunctioning or your spare tire is in
use. See Tire Pressure Monitoring System (page 400). Ifthe warning stays on or continues to come on, contact an authorized dealer as soon as possible.
Tire Pressure Sensor
Fault
Trailer Action
Message
The current gain setting for the trailer brake.
Trailer Brake Gain: {trailer gain
value:#0.0}
The current gain setting for the trailer brake when atrailer is not connected.
Trailer Brake Gain: {trailer gain
value:#0.0} No Trailer
Faults sensed in the Integrated Trailer Brake ControlModule followed by a single chime. See
Towing a
Trailer (page 272).
Trailer Brake Module Fault
A correct trailer connection is sensed during a givenignition cycle.
Trailer Connected
143
Super Duty (TFE) Canada/United States of America, enUSA, Edition date: 201709, Second Printing Information Displays
Page 147 of 660

Action
Message
A trailer connection becomes disconnected, either
intentionally or unintentionally, and has been sensed during a given ignition cycle.
Trailer Disconnected
The trailer sway control has detected trailer sway.
Trailer Sway Reduce Speed
There are certain faults in your vehicle wiring and trailer
wiring/brake system. See Towing a Trailer (page 272).
Trailer Wiring Fault
There is a fault with your trailer turn lamp. Check yourlamp.
Trailer Left Turn Lamps Fault
Check Lamps
There is a fault with your trailer turn lamp. Check yourlamp.
Trailer Right Turn Lamps Fault
Check Lamps
There is a fault with your trailer battery. See Towing
a Trailer (page 272).
Trailer Battery Not Charging See
Manual
There is a fault with your vehicle trailer lighting module.See
Towing a Trailer (page 272).
Trailer Lighting Module Fault
See Manual
One or more tires on your trailer is below the specifiedtire pressure.
Trailer Tire Low Specified:
A trailer tire pressure sensor is malfunctioning. If the
warning stays on or continues to come on, contact an authorized dealer as soon as possible.
Trailer Tire Pressure Sensor
Fault
The trailer tire pressure monitoring system is
malfunctioning. If the warning stays on or continues to come on, contact an authorized dealer.
Trailer Tire Pressure Monitor
Fault
The system cannot detect the trailer tire pressuremonitoring system.
Trailer Tire Pressure Monitor
Capability Not Detected
The trailer tire pressure monitoring system is not setup.See
General Information (page 113).
Trailer Tire Pressure Indication
Not Setup See Manual
144
Super Duty (TFE) Canada/United States of America, enUSA, Edition date: 201709, Second Printing Information Displays
Page 159 of 660

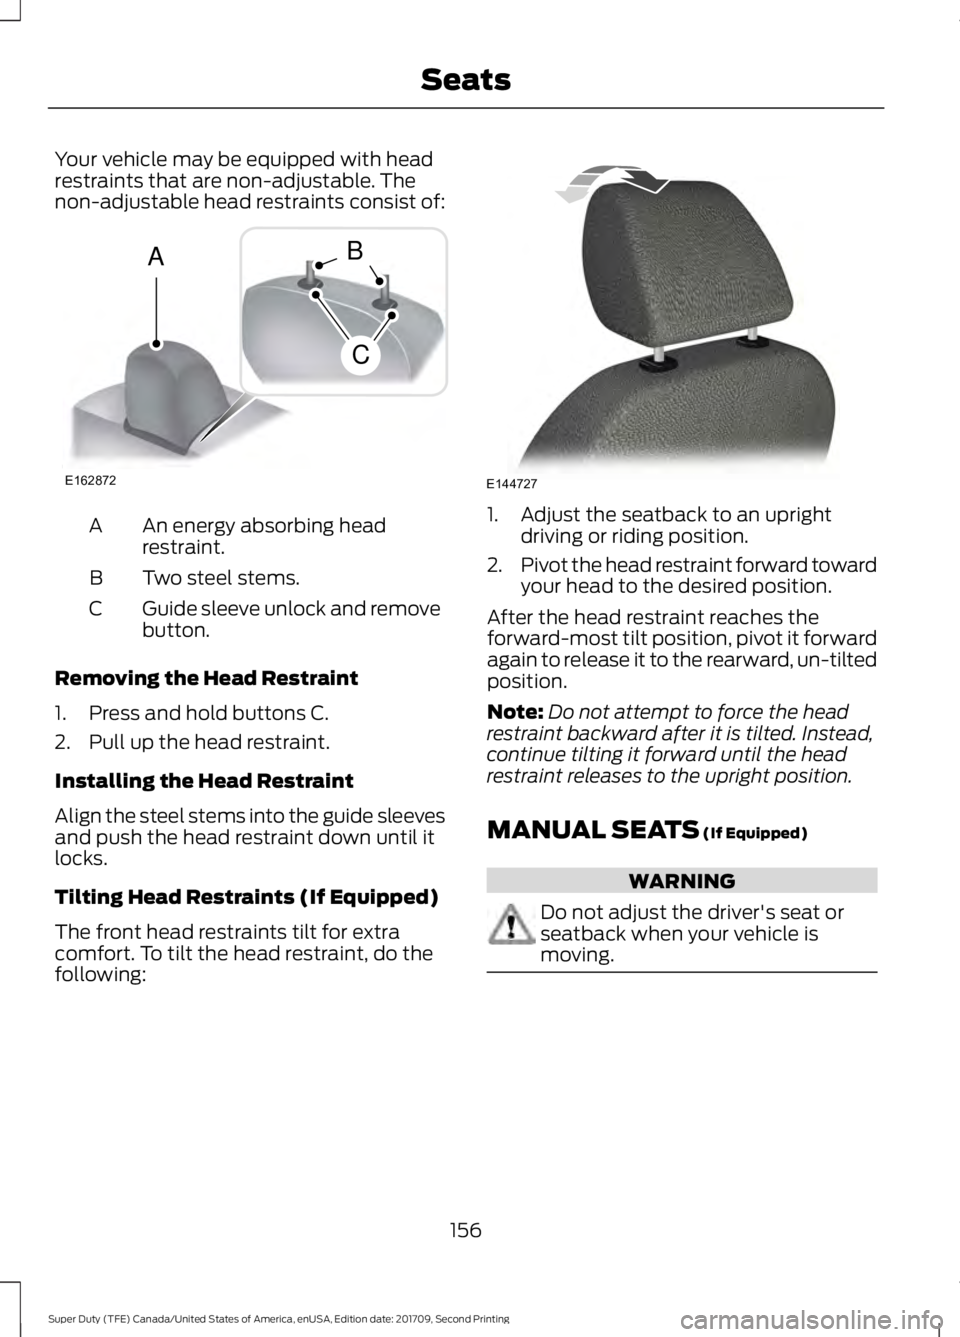
Your vehicle may be equipped with head
restraints that are non-adjustable. The
non-adjustable head restraints consist of:
An energy absorbing head
restraint.
A
Two steel stems.
B
Guide sleeve unlock and remove
button.
C
Removing the Head Restraint
1. Press and hold buttons C.
2. Pull up the head restraint.
Installing the Head Restraint
Align the steel stems into the guide sleeves
and push the head restraint down until it
locks.
Tilting Head Restraints (If Equipped)
The front head restraints tilt for extra
comfort. To tilt the head restraint, do the
following: 1. Adjust the seatback to an upright
driving or riding position.
2. Pivot the head restraint forward toward
your head to the desired position.
After the head restraint reaches the
forward-most tilt position, pivot it forward
again to release it to the rearward, un-tilted
position.
Note: Do not attempt to force the head
restraint backward after it is tilted. Instead,
continue tilting it forward until the head
restraint releases to the upright position.
MANUAL SEATS (If Equipped) WARNING
Do not adjust the driver's seat or
seatback when your vehicle is
moving.
156
Super Duty (TFE) Canada/United States of America, enUSA, Edition date: 201709, Second Printing SeatsE162872
A
C
B E144727
Page 175 of 660
CENTER CONSOLE (If Equipped)
Stow items in the cup holder carefully as
items may become loose during hard
braking, acceleration or crashes, including
hot drinks which may spill.
Available console features include: Storage compartment.
A
Front storage compartment with
USB ports.
B
Sliding cup holder.
C
Center storage compartment
with auxiliary power point.
D
Rear cup holders.
E
AC power point.
F
Heated rear seats.
G
Auxiliary power point.
H
USB charging ports.
I OVERHEAD CONSOLE (If Equipped)
Press near the rear edge of the door to
open it.
UNDER SEAT STORAGE
Rear Under Seat Storage
1. Lift rear seat to access under seat
storage bin.
172
Super Duty (TFE) Canada/United States of America, enUSA, Edition date: 201709, Second Printing Storage CompartmentsE250516 E224959 E229819
Page 187 of 660

Note:
The heater is most effective when
outdoor temperatures are below 0°F
(-18°C).
For cold climates that are below
0°F
(-18°C) needing a temporary battery
installation. Order the cold climate pack.
The heater acts as a starting aid by
warming the engine coolant. This allows
the climate control system to respond
quickly. The equipment includes a heater
element (installed in the engine block) and
a wire harness. You can connect the
system to a grounded 120-volt AC
electrical source. We recommend that you do the following
for a safe and correct operation:
•
Make sure your vehicle is parked in a
clean area, clear of combustibles.
• locate the block heater cord in the front
tow hook pocket.
• Use a 16-gauge outdoor extension cord
that is product certified by
Underwriter ’s Laboratory (UL) or
Canadian Standards Association
(CSA). This extension cord must be
suitable for use outdoors, in cold
temperatures, and be clearly marked
Suitable for Use with Outdoor
Appliances. Do not use an indoor
extension cord outdoors. This could
result in an electric shock or become a
fire hazard. •
Use as short an extension cord as
possible.
• Do not use multiple extension cords.
• Make sure that when in operation, the
extension cord plug and heater cord
plug connections are free and clear of
water. This could cause an electric
shock or fire.
• Make sure the heater, heater cord and
extension cord are firmly connected.
• Check for heat anywhere in the
electrical hookup once the system has
been operating for approximately 30
minutes.
• Make sure the system is unplugged and
properly stowed before starting and
driving your vehicle. Make sure the
protective cover seals the prongs of the
block heater cord plug when not in use.
• Make sure the heater system is
checked for proper operation before
winter.
Using the Engine Block Heater
Make sure the receptacle terminals are
clean and dry prior to use. Clean them with
a dry cloth if necessary.
The heater uses 0.4 to 1.0 kilowatt-hours
of energy per hour of use. The system does
not have a thermostat. It achieves
maximum temperature after
approximately three hours of operation.
Using the heater longer than three hours
does not improve system performance and
unnecessarily uses electricity.
184
Super Duty (TFE) Canada/United States of America, enUSA, Edition date: 201709, Second Printing Starting and Stopping the EngineE236180