2018 FORD F-150 flat tire
[x] Cancel search: flat tirePage 42 of 641
Seatbelt Locking Modes
WARNING: If your vehicle is
involved in a crash, have the seatbelts
and associated components inspected
as soon as possible. Failure to follow this
instruction could result in personal injury
or death.
All safety restraints in the vehicle are
combination lap and shoulder belts. The
driver seatbelt has the first type of locking
mode, and the front outboard passenger
and rear seat seatbelts have both types of
locking modes described as follows:
Vehicle Sensitive Mode
This is the normal retractor mode, which
allows free shoulder belt length
adjustment to your movements and
locking in response to vehicle movement.
For example, if the driver brakes suddenly,
turns a corner sharply, or the vehicle
receives an impact of about
5 mph
(8 km/h) or more, the combination
seatbelts lock to help reduce forward
movement of the driver and passengers.
In addition, the retractor is designed to lock
if you pull the webbing out too quickly. If
the seatbelt retractor locks, slowly lower
the height adjuster to allow the seatbelt
to retract. If the retractor does not unlock,
pull the seatbelt out slowly then feed a
small length of webbing back toward the
stowed position. For rear seatbelts, recline
the rear seat backrest or push the seat
backrest cushion away from the seatbelt.
Feed a small length of webbing back
toward the stowed position. Automatic Locking Mode
In this mode, the shoulder belt
automatically pre-locks. The belt still
retracts to remove any slack in the
shoulder belt. The automatic locking mode
is not available on the driver seatbelt.
When to Use the Automatic Locking
Mode
Use this mode any time you install a child
safety seat in a front outboard passenger
seating position in a Regular Cab,
SuperCab, SuperCrew or any rear seating
position of a SuperCab or SuperCrew. The
optional front seat center seatbelt has a
cinch mechanism. Properly restrain
children 12 years old and under in a rear
seat whenever possible. See
Child Safety
(page 18).
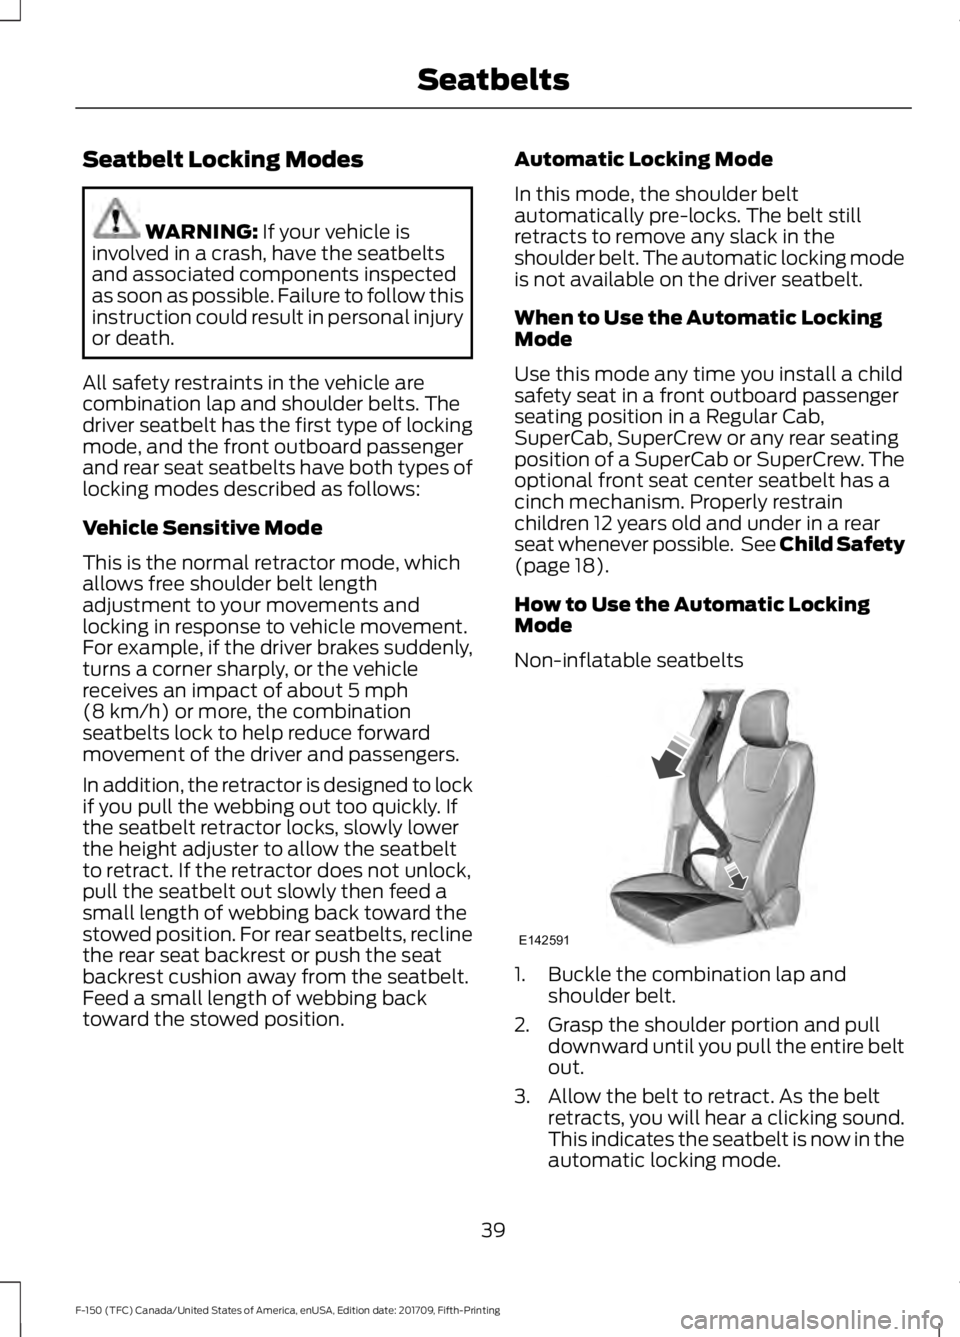
How to Use the Automatic Locking
Mode
Non-inflatable seatbelts 1. Buckle the combination lap and
shoulder belt.
2. Grasp the shoulder portion and pull downward until you pull the entire belt
out.
3. Allow the belt to retract. As the belt retracts, you will hear a clicking sound.
This indicates the seatbelt is now in the
automatic locking mode.
39
F-150 (TFC) Canada/United States of America, enUSA, Edition date: 201709, Fifth-Printing SeatbeltsE142591
Page 43 of 641

Rear Outboard Inflatable Seatbelts
Second Row Only
– If Equipped1. Buckle the combination lap and
shoulder belt.
2. Grasp the lap portion of the belt and pull upward until you pull the entire
belt out.
3. Allow the belt to retract. As the belt retracts, you will hear a clicking sound.
This indicates the seatbelt is now in the
automatic locking mode.
How to Disengage the Automatic
Locking Mode
Unbuckle the combination lap and
shoulder belt and allow it to retract
completely to disengage the automatic
locking mode and activate the vehicle
sensitive (emergency) locking mode.
Rear Inflatable Seatbelt (If Equipped) WARNING:
Do not attempt to
service, repair, or modify the
supplementary restraint system or
associated components. Failure to
follow this instruction could result in
personal injury or death. The rear inflatable seatbelts are in the
shoulder portion of the seatbelts of the
second-row outboard seating positions.
Note:
The rear inflatable seatbelts are
compatible with most infant and child
safety car seats and belt positioning booster
seats when properly installed. This is
because they are designed to fill with a
cooled gas at a lower pressure and at a
slower rate than traditional airbags. After
inflation, the shoulder portion of the
seatbelt remains cool to the touch.
The rear inflatable seatbelt consists of the
following:
• An inflatable bag in the shoulder
seatbelt webbing.
• Lap seatbelt webbing with automatic
locking mode.
• The same warning light, electronic
control and diagnostic unit as used for
the front seatbelts.
• Impact sensors in various parts of the
vehicle.
How does the rear inflatable seatbelt
system work? WARNING:
If a supplementary
restraint system component has
deployed, it will not function again. Have
the system and associated components
inspected as soon as possible. Failure to
follow this instruction could result in
personal injury or death.
The rear inflatable seatbelts function like
standard restraints in everyday usage.
40
F-150 (TFC) Canada/United States of America, enUSA, Edition date: 201709, Fifth-Printing SeatbeltsE146363
Page 196 of 641

3. Apply the parking brake.
4. Fully open the fuel filler door.
5. Check the fuel tank filler valve for any
debris that may be restricting its
movement.
6. Remove any debris from the fuel tank filler valve.
7. Fully insert a fuel pump nozzle or the fuel filler funnel provided with your
vehicle into the fuel filler pipe. See
Fuel Filler Funnel Location (page
189). This action should dislodge any
debris that may be preventing the fuel
tank filler valve from fully closing.
8. Remove the fuel pump nozzle or fuel filler funnel from the fuel filler pipe.
9. Fully close the fuel filler door.
Note: The message may not immediately
reset. If the message continues to appear
and a warning lamp illuminates, have your
vehicle checked as soon as possible.
FUEL CONSUMPTION
Advertised Capacity
The advertised capacity is the maximum
amount of fuel that you can add to the fuel
tank after running out of fuel. Included in
the advertised capacity is an empty
reserve. The empty reserve is an
unspecified amount of fuel that remains
in the fuel tank when the fuel gauge
indicates empty.
Note: The amount of fuel in the empty
reserve varies and should not be relied upon
to increase driving range.
Fuel Economy
Your vehicle calculates fuel economy
figures through the trip computer average
fuel function. See
General Information
(page 113). The first
1,000 mi (1,500 km) of driving is
the break-in period of the engine. A more
accurate measurement is obtained after
2,000 mi (3,000 km)
.
Impacting Fuel Economy
• Incorrect tire inflation pressures.
• Fully loading your vehicle.
• Carrying unnecessary weight.
• Adding certain accessories to your
vehicle such as bug deflectors, rollbars
or light bars, running boards and ski
racks.
• Using fuel blended with alcohol. See
Fuel Quality
(page 184).
• Fuel economy may decrease with lower
temperatures.
• Fuel economy may decrease when
driving short distances.
• You may get better fuel economy when
driving on flat terrain than when driving
on hilly terrain.
193
F-150 (TFC) Canada/United States of America, enUSA, Edition date: 201709, Fifth-Printing Fuel and Refueling
Page 238 of 641

If you are uncomfortable with the proximity
to any vehicle or object, you may choose
to override the system by grabbing the
steering wheel or pushing the active park
assist button.
The system may not operate correctly in
any of the following conditions:
•
You use a spare tire or a tire
significantly worn more than the other
tires.
• One or more tires are improperly
inflated.
• You try to park on a tight curve.
• Something passes between the front
bumper and the parking space. For
example, a pedestrian or cyclist.
• The edge of the neighboring parking
vehicle is high off the ground. For
example, a bus, tow truck or flatbed
truck.
• The weather conditions are poor. For
example, during heavy rain, snow or
fog.
Note: Keep the sensors, located on the
fascia, free from now, ice and large
accumulations of dirt. Covered sensors can
affect the systems accuracy. Do not clean
the sensors with sharp objects.
Note: The sensors may not detect objects
with surfaces that absorb ultrasonic waves
or cause ultrasonic interference. For
example, motorcycle exhaust, truck air
brakes or horns. Note:
Following a change in tire size, the
system must recalibrate and operation may
be impaired for a short time.
Do not use the system if:
• You have attached a bike rack, trailer
or other object near the sensors on the
front or rear of your vehicle.
• You have attached an overhanging
object to the roof. For example, a
surfboard.
• A foreign object damages or obstructs
the sensors.
• The correct tire size is not in use. For
example, when using a mini-spare tire.
Using Active Park Assist Press the button to turn the
system on or off.
When driving at a speed less than 22 mph
(35 km/h), the system automatically scans
both sides of your vehicle for an available
parking space. The system displays a
message and a corresponding graphic to
indicate it is searching for a parking space.
Use the direction indicator to select
searching either to the left hand side or
right hand side of your vehicle. If the
direction indicator is not used, the system
defaults to the passenger side of your
vehicle.
235
F-150 (TFC) Canada/United States of America, enUSA, Edition date: 201709, Fifth-Printing Parking AidsE146186
Page 241 of 641
The system does not offer a particular space
The parking space is farther than 5 ft (1.5 m) or closer than 16 in (40 cm) away.
Your vehicle is going faster than
22 mph (35 km/h).
You may have recently disconnected or replaced the battery. After a battery disconnect,
the vehicle must be driven on a straight road for a short period of time. The system does not position your vehicle where I want in the space
Your vehicle is rolling in the opposite direction of the transmission. For example, rolling
forward when the transmission is in reverse (R).
An irregular curb along the parking space prevents the system from aligning your vehicle
properly.
Vehicles or objects bordering the space may not be positioned correctly.
Your vehicle was pulled too far past the parking space. The system performs best when
you drive the same distance past the parking space.
The tires may not be installed or maintained correctly. For example, not inflated correctly,
improper size or of a different size.
A repair or alteration has changed detection capabilities.
A parked vehicle has a high attachment. For example, a salt sprayer, snowplow or moving
truck bed.
The parking space length or position of parked objects changed after your vehicle passed.
The temperature around your vehicle changes quickly. For example, when driving from
a heated garage into the cold, or after leaving a car wash.
REAR VIEW CAMERA (IF EQUIPPED) WARNING: The rear view camera
system is a reverse aid supplement
device that still requires the driver to use
it in conjunction with the interior and
exterior mirrors for maximum coverage. WARNING: Objects that are close
to either corner of the bumper or under
the bumper, might not be seen on the
screen due to the limited coverage of the
camera system. WARNING:
Reverse your vehicle
as slow as possible, higher speeds may
limit your reaction time to stop your
vehicle.
238
F-150 (TFC) Canada/United States of America, enUSA, Edition date: 201709, Fifth-Printing Parking Aids
Page 260 of 641
Why does the vehicle not come back toward the middle of the lane, as expected, in the
Aid or Aid + Alert mode?
High cross winds are present.
There is a large road crown.
Rough roads, grooves or shoulder drop-offs.
Heavy uneven loading of the vehicle or improper tire inflation pressure.
The tires have been changed, or the suspension has been modified.
BLIND SPOT INFORMATION
SYSTEM (IF EQUIPPED) WARNING:
Do not use the blind
spot information system as a
replacement for using the interior and
exterior mirrors or looking over your
shoulder before changing lanes. The
blind spot information system is not a
replacement for careful driving. WARNING:
The system may not
operate properly during severe weather
conditions, for example snow, ice, heavy
rain and spray. Always drive with due
care and attention. Failure to take care
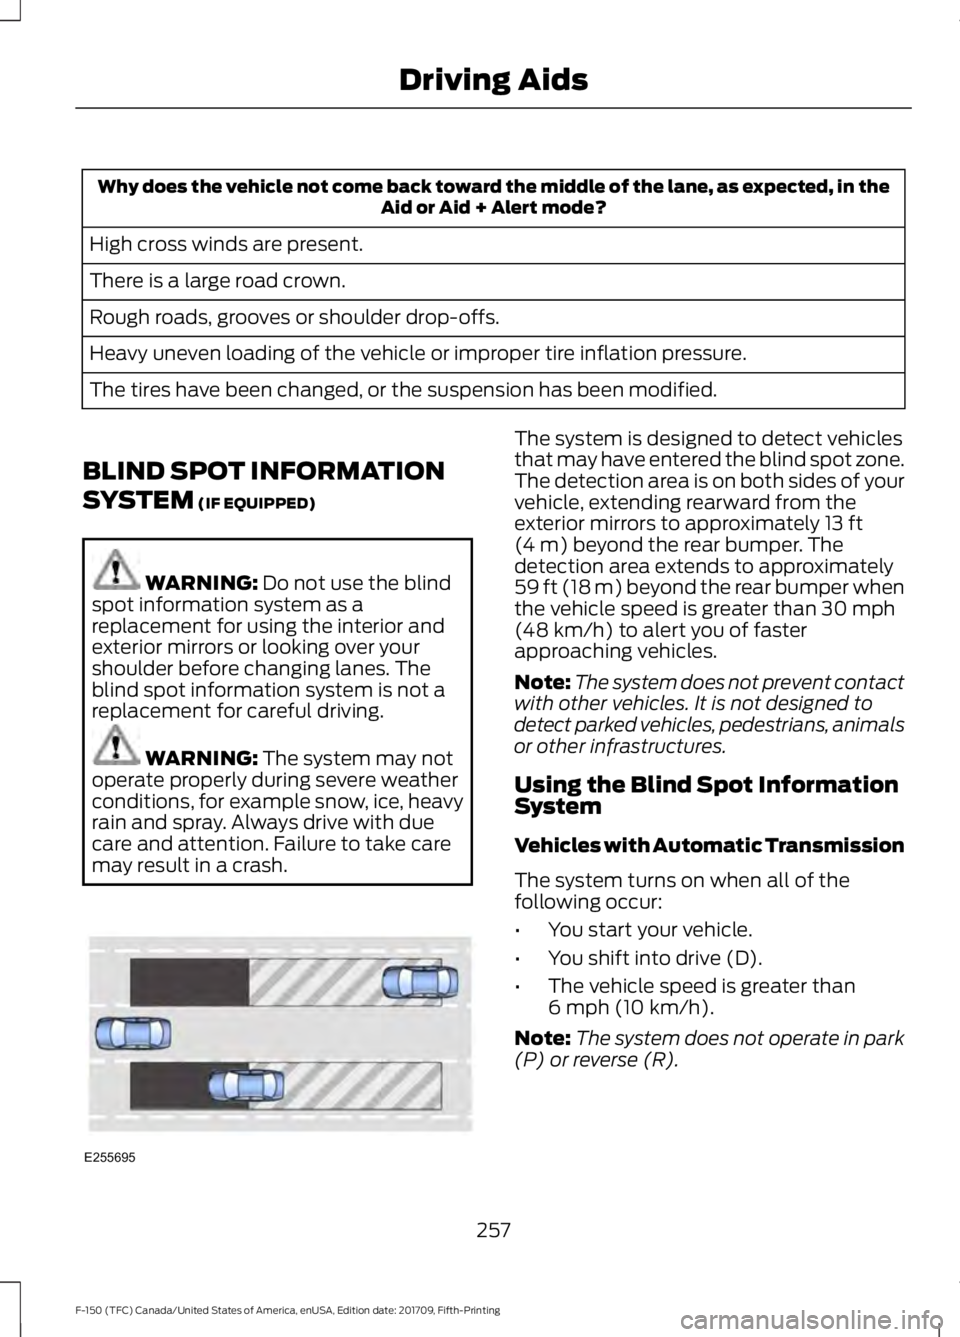
may result in a crash. The system is designed to detect vehicles
that may have entered the blind spot zone.
The detection area is on both sides of your
vehicle, extending rearward from the
exterior mirrors to approximately
13 ft
(4 m) beyond the rear bumper. The
detection area extends to approximately
59 ft (18 m)
beyond the rear bumper when
the vehicle speed is greater than 30 mph
(48 km/h) to alert you of faster
approaching vehicles.
Note: The system does not prevent contact
with other vehicles. It is not designed to
detect parked vehicles, pedestrians, animals
or other infrastructures.
Using the Blind Spot Information
System
Vehicles with Automatic Transmission
The system turns on when all of the
following occur:
• You start your vehicle.
• You shift into drive (D).
• The vehicle speed is greater than
6 mph (10 km/h)
.
Note: The system does not operate in park
(P) or reverse (R).
257
F-150 (TFC) Canada/United States of America, enUSA, Edition date: 201709, Fifth-Printing Driving AidsE255695
Page 287 of 641
Note:
The default option is low. This is
recommended for most trailers. If the
trailer's brakes require more initial voltage,
or if you prefer more aggressive braking then
select the other options as required.
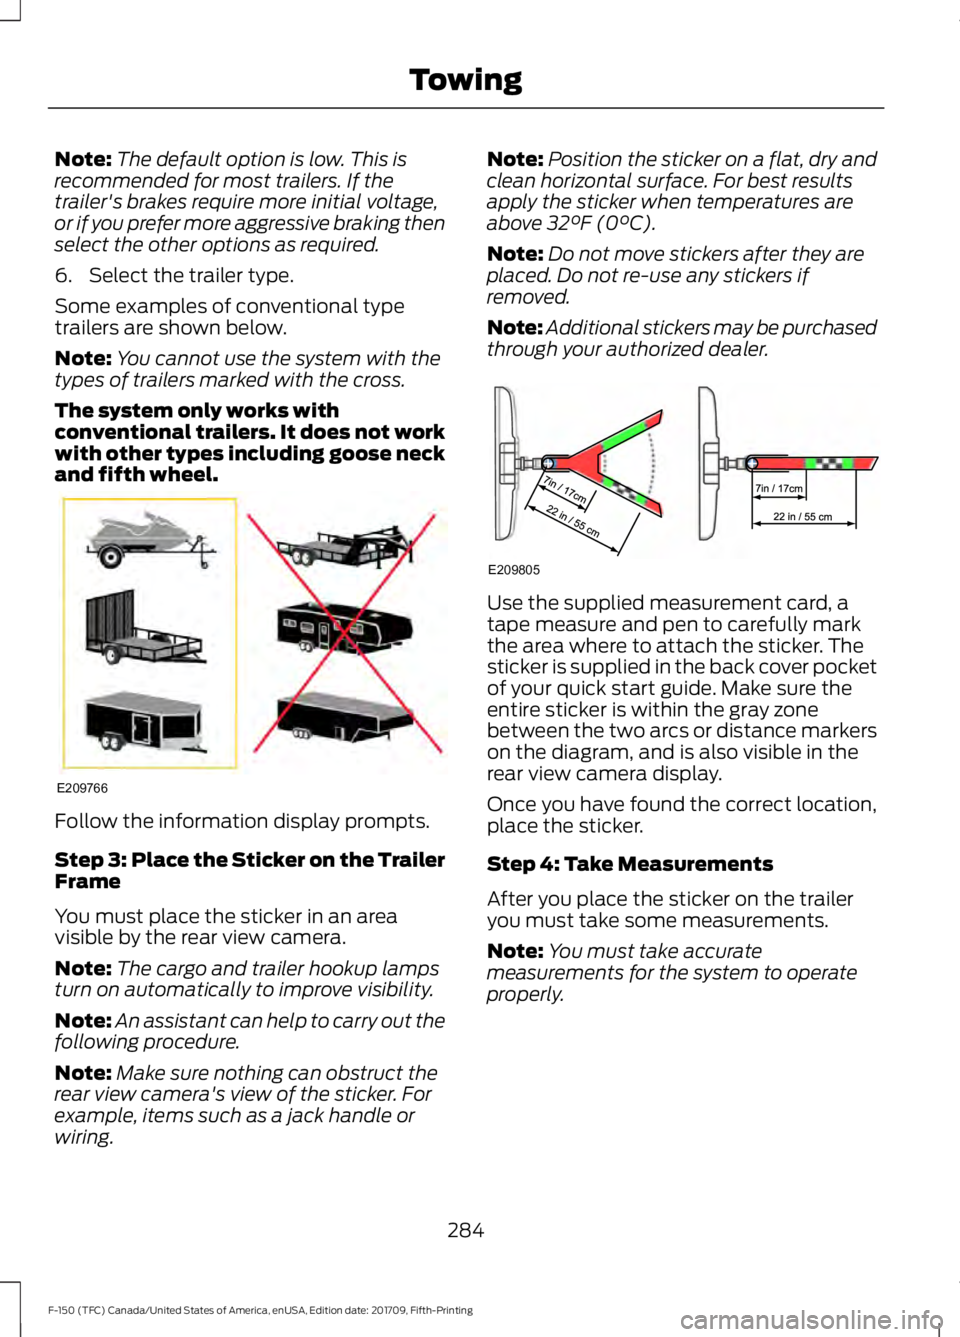
6. Select the trailer type.
Some examples of conventional type
trailers are shown below.
Note: You cannot use the system with the
types of trailers marked with the cross.
The system only works with
conventional trailers. It does not work
with other types including goose neck
and fifth wheel. Follow the information display prompts.
Step 3: Place the Sticker on the Trailer
Frame
You must place the sticker in an area
visible by the rear view camera.
Note:
The cargo and trailer hookup lamps
turn on automatically to improve visibility.
Note: An assistant can help to carry out the
following procedure.
Note: Make sure nothing can obstruct the
rear view camera's view of the sticker. For
example, items such as a jack handle or
wiring. Note:
Position the sticker on a flat, dry and
clean horizontal surface. For best results
apply the sticker when temperatures are
above 32°F (0°C).
Note: Do not move stickers after they are
placed. Do not re-use any stickers if
removed.
Note: Additional stickers may be purchased
through your authorized dealer. Use the supplied measurement card, a
tape measure and pen to carefully mark
the area where to attach the sticker. The
sticker is supplied in the back cover pocket
of your quick start guide. Make sure the
entire sticker is within the gray zone
between the two arcs or distance markers
on the diagram, and is also visible in the
rear view camera display.
Once you have found the correct location,
place the sticker.
Step 4: Take Measurements
After you place the sticker on the trailer
you must take some measurements.
Note:
You must take accurate
measurements for the system to operate
properly.
284
F-150 (TFC) Canada/United States of America, enUSA, Edition date: 201709, Fifth-Printing TowingE209766 E209805
Page 293 of 641
•
Remove any items that may be
blocking the view of the sticker.
Depending on your trailer configuration
and any equipment mounted to your
trailer, it is possible for the sticker to be
blocked from view of the camera as it
rotates on the hitch ball but not be
blocked during setup. Remove the
obstruction if possible. It may be
necessary to remove the sticker from
its current location if the obstruction
cannot be cleared. Place a new sticker
that is visible to the camera in all
positions of the trailer behind your
vehicle.
• Placing the sticker on a surface angled
away from the vehicle reduces
performance. Use a drawbar that
positions the trailer level to the ground
when attached to the vehicle. This
typically provides a level surface to
mount the sticker. Place the sticker on
a bracket or other object when no level
surface is available.
• Make sure the entire sticker is on a flat
surface that is completely visible to the
camera. Do not fold the sticker over an
edge on the trailer frame. This can
degrade performance.
• Shadows on the sticker may effect
tracking performance under some
lighting conditions. Moving the sticker
to another location within the allowed
placement area may improve
performance. Use the change sticker
option in the information display menu
if you move the sticker.
• You can change your sticker location
by going into the information display
menu, selecting trailer options,
selecting change trailer settings and
then selecting the change sticker
option. The previous sticker must be
removed. ONLY ONE STICKER
SHOULD BE PLACED ON THE
TRAILER FOR CORRECT SYSTEM
FUNCTION. •
The camera system uses the entered
measurements to help locate the
sticker. Inaccurate measurements
reduce the system ’s ability to locate
the sticker. Check the measurements
entered into the system are correct.
Refer to step 4 of setup for instructions
on measurements.
• You can change your measurement by
going into the information display
menu, selecting trailer options,
selecting change trailer setting and
then selecting the change sticker
option. Disregard the prompt to remove
this sticker and continue to the next
step if you only plan to update the
measurements for the current sticker
location.
System does not reverse straight:
• Factors such as the drawbar
connection to the hitch receiver, road
camber, road grade and compliance in
the trailer suspension can influence
how straight the system is able to
reverse your trailer when the knob is
not turned. You can compensate for
the trailer drifting to the right or left by
slowly turning the knob until the trailer
is following your desired path and then
holding the knob in that position. If you
would like to recalibrate the system for
straight backing, you can do so with the
following procedure.
• Go into the information display menu,
select trailer options, select change
trailer setting and then select the
change sticker option. Your saved
measurements display. Do not change
them but continue to confirm
measurements. Once you confirm the
measurements, the system then
prompts you to perform the calibration
procedure.
290
F-150 (TFC) Canada/United States of America, enUSA, Edition date: 201709, Fifth-Printing Towing