2018 FORD F-150 flat tire
[x] Cancel search: flat tirePage 403 of 641

Check each tire, including the
spare if applicable, monthly,
when cold and inflate to the
inflation pressure recommended by the
vehicle manufacturer on the vehicle
placard or tire inflation pressure label. If
your vehicle has tires of a different size
than the size indicated on the vehicle
placard or tire inflation pressure label, you
should determine the proper tire inflation
pressure for those tires.
As an added safety feature, your vehicle
has been equipped with a Tire Pressure
Monitoring System (TPMS) that
illuminates a low tire pressure telltale
when one or more of your tires is
significantly under-inflated. Accordingly,
when the low tire pressure telltale
illuminates, you should stop and check
your tires as soon as possible, and inflate
them to the proper pressure. Driving on a
significantly under-inflated tire causes the
tire to overheat and can lead to tire failure.
Under-inflation also reduces fuel efficiency
and tire tread life, and may affect the
vehicle ’s handling and stopping ability.
Please note that the TPMS is not a
substitute for proper tire maintenance, and
it is the driver ’s responsibility to maintain
correct tire pressure, even if under-inflation
has not reached the level to trigger
illumination of the TPMS low tire pressure
telltale.
Your vehicle has also been equipped with
a TPMS malfunction indicator to indicate
when the system is not operating properly.
The TPMS malfunction indicator is
combined with the low tire pressure
telltale. When the system detects a
malfunction, the telltale flashes for
approximately one minute and then
remains continuously illuminated. This
sequence continues upon subsequent
vehicle start-ups as long as the
malfunction exists. When the malfunction indicator is
illuminated, the system may not be able
to detect or signal low tire pressure as
intended. TPMS malfunctions may occur
for a variety of reasons, including the
installation of replacement or alternate
tires or wheels on the vehicle that prevent
the TPMS from functioning properly.
Always check the TPMS malfunction
telltale after replacing one or more tires or
wheels on your vehicle to ensure that the
replacement or alternate tires and wheels
allow the TPMS to continue to function
properly.
This device complies with part 15 of the
FCC Rules and with Licence exempt RSS
Standards of Industry Canada. Operation
is subject to the following two conditions:
•
This device may not cause harmful
interference.
• This device must accept any
interference received, including
interference that may cause undesired
operation. WARNING: Changes or
modifications not expressively approved
by the party responsible for compliance
could void the user's authority to operate
the equipment. The term "IC:" before the
radio certification number only signifies
that Industry Canada technical
specifications were met.
400
F-150 (TFC) Canada/United States of America, enUSA, Edition date: 201709, Fifth-Printing Wheels and Tires
Page 404 of 641

Changing Tires With a Tire
Pressure Monitoring System
Note:
Each road tire is equipped with a tire
pressure sensor located inside the wheel
and tire assembly cavity. The pressure
sensor is attached to the valve stem. The
pressure sensor is covered by the tire and is
not visible unless the tire is removed. Take
care when changing the tire to avoid
damaging the sensor.
You should always have your tires serviced
by an authorized dealer.
Periodically check the tire pressure, at least
monthly, using an accurate tire gauge. See
Inflating Your Tires in this chapter.
Understanding Your Tire Pressure
Monitoring System
The tire pressure monitoring system
measures pressure in your four road tires
and sends the tire pressure readings to
your vehicle. The low tire pressure warning light turns
on if the tire pressure is significantly low.
Once the light is illuminated, your tires are
under-inflated and need to be inflated to
the manufacturer
’s recommended tire
pressure. Even if the light turns on and a
short time later turns off, your tire pressure
still needs to be checked.
When Your Temporary Spare Tire is
Installed
When you replace one of your road tires
with the temporary spare, the system
continues to identify an issue to remind
you that the damaged road wheel and tire
assembly needs to be repaired and put
back on your vehicle.
To restore the full function of the tire
pressure monitoring system, have the
damaged road wheel and tire assembly
repaired and remounted on your vehicle.
When You Believe Your System is Not
Operating Properly
The main function of the tire pressure
monitoring system is to warn you when
your tires need air. It can also warn you in
the event the system is no longer capable
of functioning as intended. See the
following chart for information concerning
your tire pressure monitoring system:
401
F-150 (TFC) Canada/United States of America, enUSA, Edition date: 201709, Fifth-Printing Wheels and TiresE142549 E224333
Page 405 of 641

Customer Action Required
Possible Cause
Low Tire Pressure
Warning Light
Make sure tires are at the proper pres-
sure. See Inflating your tires in this
chapter. After inflating your tires to the
manufacturer’s recommended pressure
as shown on the Tire Label, on the edge
of driver door or the B-Pillar, drive your
vehicle for at least two minutes over
20 mph (32 km/h) before the light turns
off.
Tire(s) under-inflated
Solid warning light
Repair the damaged road wheel and tire
assembly and reinstall it on the vehicle
to restore system function. For a
description on how the system functions,
see When Your Temporary Spare Tire is
Installed, in this section.
Spare tire in use
If the tires are properly inflated and the
spare tire is not in use but the light
remains on, contact your authorized
dealer as soon as possible.
Tire pressure monitoring
system malfunction
On vehicles with different front and rear
tire pressures, the system must be
retrained following every tire rotation.
See Tire Care (page 384).
Tire rotation without
sensor training
Repair the damaged road wheel and tire
assembly and reinstall it on the vehicle
to restore system function. For a
description on how the system functions,
see When Your Temporary Spare Tire is
Installed, in this section.
Spare tire in use
Flashing warning
light
If the tires are properly inflated and the
spare tire is not in use but the light
remains on, contact your authorized
dealer as soon as possible.
Tire pressure monitoring
system malfunction
402
F-150 (TFC) Canada/United States of America, enUSA, Edition date: 201709, Fifth-Printing Wheels and Tires
Page 406 of 641
When Inflating Your Tires
WARNING: Do not use the tire
pressure displayed in the information
display as a tire pressure gauge. Failure
to follow this instruction could result in
personal injury or death.
When putting air into your tires, such as at
a gas station or in your garage, the tire
pressure monitoring system may not
immediately respond to the air added to
your tires.
It may take up to two minutes of driving
over 20 mph (32 km/h) for the light to turn
off after you have filled your tires to the
recommended inflation pressure.
How Temperature Affects Your Tire
Pressure
The tire pressure monitoring system
monitors tire pressure in each pneumatic
tire. When driving in a normal manner, a
typical passenger tire inflation pressure
may increase about
2 –4 psi (14– 28 kPa)
from a cold start situation. If the vehicle is
stationary overnight with the outside
temperature significantly lower than the
daytime temperature, the tire pressure may
decrease about 3 psi (21 kPa) for a drop of
30°F (17°C) in ambient temperature. This
lower pressure value may be detected by
the tire pressure monitoring system as
being significantly lower than the
recommended inflation pressure and
activate the system warning light for low
tire pressure. If the low tire pressure warning light is on,
visually check each tire to verify that no tire
is flat. If one or more tires are flat, repair as
necessary. Check the air pressure in the
road tires. If any tire is under-inflated,
carefully drive the vehicle to the nearest
location where air can be added to the
tires. Inflate all the tires to the
recommended inflation pressure.
Tire Pressure Monitoring System Reset
Procedure WARNING:
To determine the
required pressure(s) for your vehicle, see
the Safety Compliance Certification
Label (on the door hinge pillar,
door-latch post or the door edge that
meets the door-latch post, next to the
driver seat) or the Tire Label on the
B-Pillar or the edge of the driver door.
Note: You need to perform the tire pressure
monitoring system reset procedure after
each tire rotation on vehicles that require
different recommended tire pressures in the
front tires as compared to the rear tires.
Overview
To provide the vehicle's load carrying
capability, some vehicles require different
recommended tire pressures in the front
tires as compared to the rear tires. The tire
pressure monitoring system equipped on
these vehicles is designed to illuminate the
low tire pressure warning light at two
different pressures; one for the front tires
and one for the rear tires.
Since tires need to be rotated to provide
consistent performance and maximum tire
life, the tire pressure monitoring system
needs to know when the tires are rotated
to determine which set of tires are on the
front and which are on the rear. With this
information, the system can detect and
properly warn of low tire pressures.
403
F-150 (TFC) Canada/United States of America, enUSA, Edition date: 201709, Fifth-Printing Wheels and Tires
Page 408 of 641

11.
Set all four tires to the recommended
air pressure as indicated on the
Safety Compliance Certification
Label, affixed to either the door hinge
pillar, door-latch post, or the door
edge that meets the door-latch post,
next to the driver seating position or
Tire Label located on the B-Pillar or
the edge of the driver door.
CHANGING A ROAD WHEEL WARNING: If the tire pressure
monitor sensor becomes damaged it
may not function.
Note: The use of tire sealant may damage
your tire pressure monitoring system and
should only be used in roadside
emergencies.
Note: The tire pressure monitoring system
indicator light illuminates when the spare
tire is in use. To restore the full function of
the monitoring system, all road wheels
equipped with tire pressure monitoring
sensors must be mounted on this vehicle.
If you get a flat tire when driving, do not
apply the brake heavily. Instead, gradually
decrease your speed. Hold the steering
wheel firmly and slowly move to a safe
place on the side of the road.
Have a flat serviced by an authorized
dealer in order to prevent damage to the
system sensors.
See Tire Pressure
Monitoring System (page 399). Replace
the spare tire with a road tire as soon as
possible. During repairing or replacing of
the flat tire, have the authorized dealer
inspect the system sensor for damage. Dissimilar Spare Wheel and Tire
Assembly Information WARNING:
Failure to follow these
guidelines could result in an increased
risk of loss of vehicle control, injury or
death.
If you have a dissimilar spare wheel and
tire, then it is intended for temporary use
only. This means that if you need to use it,
you should replace it as soon as possible
with a road wheel and tire assembly that
is the same size and type as the road tires
and wheels that were originally provided
by Ford.
A dissimilar spare wheel and tire assembly
is defined as a spare wheel and tire
assembly that is different in brand, size or
appearance from the road tires and
wheels.
Full-size dissimilar spare
When driving with the full-size dissimilar
spare wheel and tire assembly, do not:
• Exceed
70 mph (113 km/h).
• Use more than one dissimilar spare
wheel and tire assembly at a time.
• Use snow chains on the end of the
vehicle with the dissimilar spare wheel
and tire assembly.
When driving with the full-size dissimilar
spare wheel and tire assembly, 4WD
functionality may be limited, especially
when driving in a mechanically locked 4WD
mode. You may experience the following:
• Additional noise from the transfer case
or other drive components.
• Difficulty shifting out of a mechanically
locked 4WD mode.
405
F-150 (TFC) Canada/United States of America, enUSA, Edition date: 201709, Fifth-Printing Wheels and Tires
Page 412 of 641
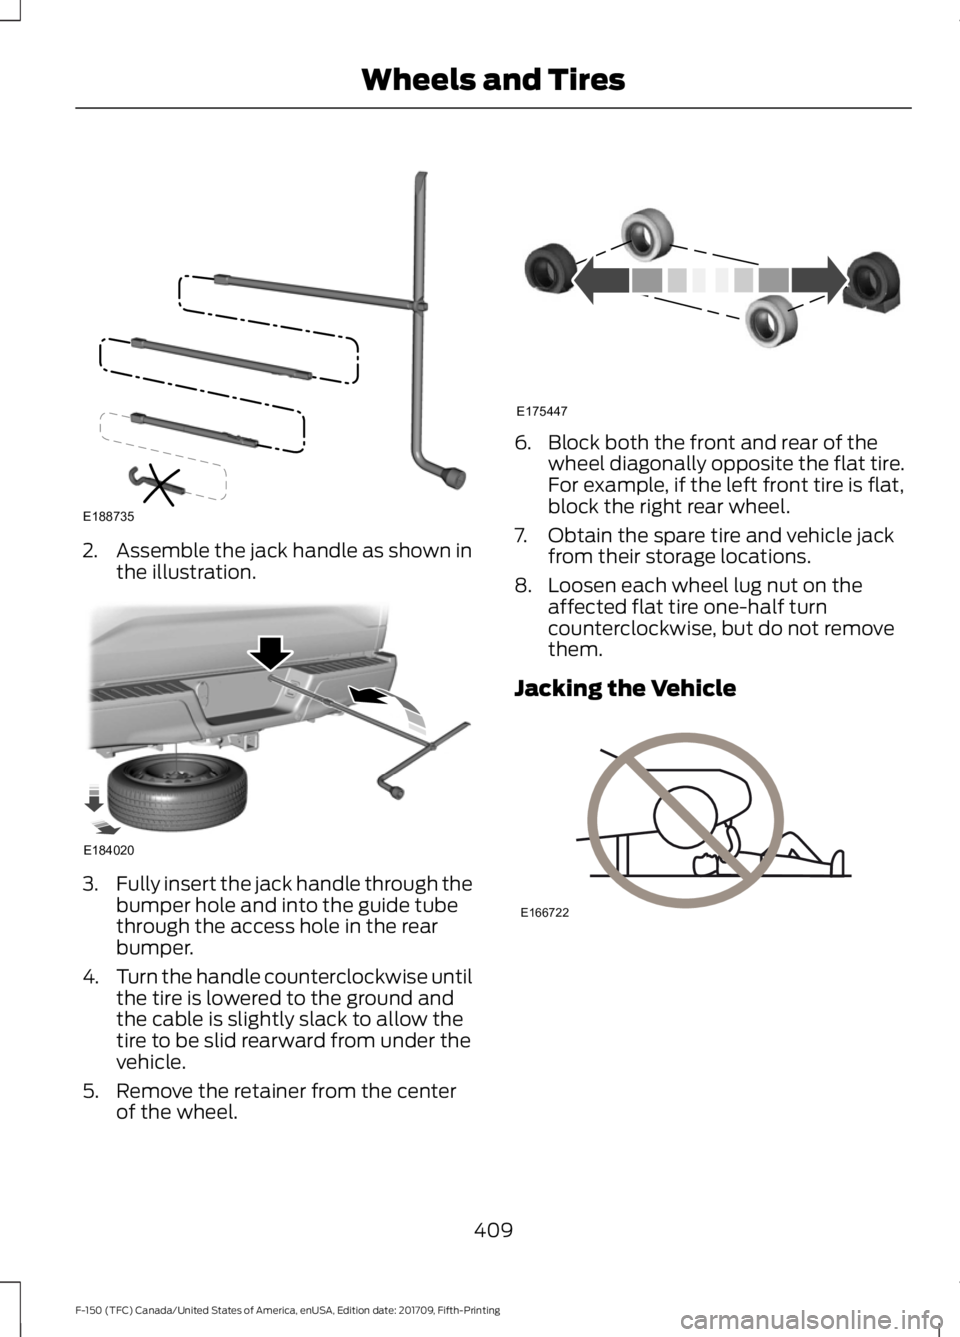
2. Assemble the jack handle as shown in
the illustration. 3.
Fully insert the jack handle through the
bumper hole and into the guide tube
through the access hole in the rear
bumper.
4. Turn the handle counterclockwise until
the tire is lowered to the ground and
the cable is slightly slack to allow the
tire to be slid rearward from under the
vehicle.
5. Remove the retainer from the center of the wheel. 6. Block both the front and rear of the
wheel diagonally opposite the flat tire.
For example, if the left front tire is flat,
block the right rear wheel.
7. Obtain the spare tire and vehicle jack from their storage locations.
8. Loosen each wheel lug nut on the affected flat tire one-half turn
counterclockwise, but do not remove
them.
Jacking the Vehicle 409
F-150 (TFC) Canada/United States of America, enUSA, Edition date: 201709, Fifth-Printing Wheels and TiresE188735 E184020 E175447 E166722
Page 413 of 641

Front Jacking Points
Note:
Use the frame rail as the front jacking
location point, not the control arm. The
frame rail is marked with an arrow. Rear Jacking Points
Note:
Jack at the specified locations to
avoid damage to the vehicle.
1. Place the vehicle jack at the jacking point next to the tire you are changing.
Turn the jack handle clockwise until
the wheel is completely off the ground.
2. Remove the lug nuts with the lug wrench.
3. Replace the flat tire with the spare tire,
making sure the valve stem is facing
outward. Reinstall the lug nuts until the
wheel is snug against the hub. Do not
fully tighten the lug nuts until the wheel
has been lowered.
4. Lower the wheel by turning the jack handle counterclockwise.
410
F-150 (TFC) Canada/United States of America, enUSA, Edition date: 201709, Fifth-Printing Wheels and TiresE183709 E272477
Page 414 of 641

5. Remove the vehicle jack and fully
tighten the lug nuts in the order shown.
See Technical Specifications (page
413).
6. Stow the flat tire. See the Stowing the Flat or Spare Tire.
7. Stow the vehicle jack and lug wrench. Make sure the jack is securely fastened
before you drive. See Stowing the
Vehicle Jack and Tool Bag.
8. Unblock the wheels. Stowing the Flat or Spare Tire
Note:
Failure to follow the spare tire
stowage instructions may result in failure of
the cable or loss of the spare tire.
1. Lay the tire on the ground with the valve stem facing up.
2. Slide the wheel partially under the vehicle and install the retainer through
the wheel center. Pull on the cable to
align the components at the end of the
cable.
3. Turn the jack handle clockwise until the tire is raised to its stowed position
underneath the vehicle. The effort to
turn the jack handle increases
significantly and the spare tire carrier
ratchets or slips when the tire is raised
to the maximum tightness. Tighten to the best of your ability, to the point
where the ratchet or slip occurs, if
possible. The spare tire carrier does not
allow you to overtighten. If the spare
tire carrier ratchets or slips with little
effort, contact your authorized dealer.
4. Check that the tire lies flat against the frame and is properly tightened. Try to
push or pull, then turn the tire to be
sure it does not move. Loosen and
retighten, if necessary. Failure to
properly stow the spare tire may result
in failure of the winch cable and loss
of the tire.
5. Repeat this tightness check procedure
when servicing the spare tire pressure,
every six months, as per your scheduled
maintenance information, or at any
time that the spare tire is disturbed
through service of other components.
6. If removed, install the spare tire lock into the bumper drive tube with the
spare tire lock key and jack handle.
Stowing the Vehicle Jack and Tool
Bag 1. Adjust the jack up or down by rotating
the lead screw located on the end of
the jack. The stowage markings should
line up with the bottom channel.
411
F-150 (TFC) Canada/United States of America, enUSA, Edition date: 201709, Fifth-Printing Wheels and TiresE166719
1
3
5 4
6
2 E184021