2018 FORD F-150 tow bar
[x] Cancel search: tow barPage 294 of 641
System consistently shows Pro Trailer
Backup Assist™ Stop now Maximum
trailer angle Press Knob to Exit
:
• The system uses your measurements
to determine sticker position and
establish system limits. Accurate
sticker placement and trailer
measurements provide the best
system performance. If you are
consistently receiving this warning, it is
likely there is an issue with sticker
placement or the entered
measurements. Make sure that the
sticker is placed correctly based on
step 3 and the measurements were
made correctly according to step 4.
The troubleshooting guide for trailer
measurements can also be reviewed
for help in making measurements.
• To change sticker location or change
trailer measurements, go into the
information display menu, select trailer
options, select change trailer setting
and then select the change sticker
option.
• If the sticker location needs to be
changed, the previous sticker must be
removed and a new sticker needs to
be placed on the trailer. ONLY ONE
STICKER SHOULD BE PLACED ON
THE TRAILER FOR PROPER
SYSTEM FUNCTION.
• Disregard the prompt to remove this
sticker and continue to the next step if
you only plan to update the
measurements for the current sticker
location. System consistently shows
Pro Trailer
Backup Assist™ Stop Now Take Control
of Steering Wheel
:
• The system displays this warning when
it can no longer steer the vehicle and
you must take over steering. There are
four reasons why this warning displays
and additional information regarding
the reason for the warning is available
on the center display.
• The steering wheel is touched while
under system control. Avoid touching
the wheel during system operation.
• The maximum speed for feature
operation is exceeded. System
performance is optimized at slower
speeds. Reverse slowly.
• The sticker was lost by the camera
system. Once your vehicle is stopped,
additional warnings indicate the sticker
was lost. Refer to sticker lost
troubleshooting tips.
• An internal condition for system
operation was not met which requires
your vehicle return to manual control
of the steering.
Note: The system is designed to be used
with the same trailer connection every time
the trailer is chosen from the selection
menu. When using a different drawbar or a
different pin hole on drawbars with more
than one, connecting the drawbar to your
vehicle affects the trailer measurements.
Take the measurements again and update
if required.
291
F-150 (TFC) Canada/United States of America, enUSA, Edition date: 201709, Fifth-Printing Towing
Page 307 of 641

Calculating the Maximum
Loaded Trailer Weight for Your
Vehicle
1. Start with the gross combined
weight rating for your vehicle
model and axle ratio. See the
previous charts.
2. Subtract all of the following
that apply to your vehicle:
• Vehicle curb weight.
• Hitch hardware weight, for
example a draw bar, ball, locks
or weight distributing hardware.
• Driver weight.
• Passenger(s) weight.
• Payload, cargo and luggage
weight.
• Aftermarket equipment weight.
This equals the maximum loaded
trailer weight for this combination.
Note: The trailer tongue load is
considered part of the payload for
your vehicle. Reduce the total
payload by the final trailer tongue
weight.
Note: Consult an authorized dealer
to determine the maximum trailer
weight allowed for your vehicle if
you are not sure.
ESSENTIAL TOWING CHECKS
Follow these guidelines for safe towing:
• Do not tow a trailer until you drive your
vehicle at least 1,000 mi (1,600 km).
• Consult your local motor vehicle laws
for towing a trailer. •
See the instructions included with
towing accessories for the proper
installation and adjustment
specifications.
• Service your vehicle more frequently if
you tow a trailer. See your scheduled
maintenance information.
See
Scheduled Maintenance (page 561).
• If you use a rental trailer, follow the
instructions the rental agency gives
you.
See
Load limits in the Load Carrying
chapter for load specification terms found
on the tire label and Safety Compliance
label and instructions on calculating your
vehicle's load. See Load Limit (page 272).
Remember to account for the trailer
tongue weight as part of your vehicle load
when calculating the total vehicle weight.
Trailer Towing Connector 304
F-150 (TFC) Canada/United States of America, enUSA, Edition date: 201709, Fifth-Printing TowingE193232
Page 308 of 641
When attaching the trailer wiring connector
to your vehicle, only use a proper fitting
connector that works with the vehicle and
trailer functions. Some seven-position
connectors may have the SAE J2863 logo,
which confirms that it is the proper wiring
connector and works correctly with your
vehicle.
Function
Color
Left turn signal and stop lamp
Yellow
Ground (-)
White
Electric brakes
Blue
Right turn signal and stop
lamp
Green
Battery (+) 1
Orange
Running lights
Brown
Reverse lights
Grey
1 Your vehicle must recognize the trailer
before the trailer can receive power.
Recognizing a Trailer
1. Attach the trailer and wiring connector
to your vehicle.
2. Switch on your vehicle.
3. Press the brake pedal for a few seconds.
A confirmation message appears in the
information display. See General
Information (page 113).
Hitches
Do not use a hitch that either clamps onto
the bumper or attaches to the axle. You
must distribute the load in your trailer so
that 10-15% of the total weight of the
trailer is on the tongue. Weight-distributing Hitches WARNING:
Do not adjust the
spring bars so that your vehicle's rear
bumper is higher than before attaching
the trailer. Doing so will defeat the
function of the weight-distributing hitch,
which may cause unpredictable
handling, and could result in serious
personal injury.
When hooking-up a trailer using a
weight-distributing hitch, always use the
following procedure:
1. Park the loaded vehicle, without the trailer, on a level surface.
2. Measure the height to the top of your vehicle's front wheel opening on the
fender. This is H1.
3. Attach the loaded trailer to your vehicle
without the weight-distributing bars
connected.
4. Measure the height to the top of your vehicle's front wheel opening on the
fender a second time. This is H2.
5. Install and adjust the tension in the weight-distributing bars so that the
height of your vehicle's front wheel
opening on the fender is approximately
a quarter the way down from H2,
toward H1.
6. Check that the trailer is level or slightly
nose down toward your vehicle. If not,
adjust the ball height accordingly and
repeat Steps 2-6.
Once the trailer is level or slightly nose
down toward the vehicle:
• Lock the bar tension adjuster in place.
• Check that the trailer tongue securely
attaches and locks onto the hitch.
• Install safety chains, lighting, and trailer
brake controls as required by law or the
trailer manufacturer.
305
F-150 (TFC) Canada/United States of America, enUSA, Edition date: 201709, Fifth-Printing Towing
Page 310 of 641
The controller user interface consists of
the following:
A: + and - (Gain adjustment buttons):
Pressing these buttons adjusts the
controller's power output to the trailer
brakes in 0.5 increments. You can increase
the gain setting to 10.0 (maximum trailer
braking) or decrease it to 0 (no trailer
braking). The gain setting displays in the
message center.
The controller shows gain setting, output
bar graph, and trailer connectivity status
in the information display. They appear in
the information display as follows:
• Trailer Brake Controller Gain (without
trailer connected): Shows the current
gain setting during a given ignition cycle
and when adjusting the gain. This also
displays if you use the manual control
lever or make gain adjustments with
no trailer connected.
• Trailer Brake Controller Gain Output:
Displays when you push your vehicle's
brake pedal, or upon use of the manual
control. Bar indicators illuminate in the
information display to indicate the
amount of power going to the trailer
brakes relative to the brake pedal or
manual control input. One bar indicates
the least amount of output; six bars
indicate maximum output.
• Trailer Connected: Displays when the
system senses a correct trailer wiring
connection (a trailer with electric trailer
brakes) during a given ignition cycle.
• Trailer Disconnected: Displays,
accompanied by a single audible time,
when the system senses a trailer
connection and then a disconnection,
either intentional or unintentional,
during a given ignition cycle. It also
displays if a truck or trailer-wiring fault
occurs causing the trailer to appear
disconnected. This message can also
display if you use the manual control lever without a trailer connected. After
disconnecting the trailer connector,
press the brake pedal for
approximately five seconds to allow
the system to detect and update the
trailer status.
B:
Manual control lever: Slide the control
lever to the left to turn on the trailer's
electric brakes independent of the tow
vehicle's. See the following Procedure for
adjusting gain section for instructions on
proper use of this feature. If you use the
manual control while the brake is also
applied, the greater of the two inputs
determines the power sent to the trailer
brakes.
• Stop lamps: Using the manual control
lever illuminates both the trailer brake
lamps and your vehicle brake lamps
except the center high-mount stop
lamp, if you make the proper electrical
connection to the trailer. Pressing your
vehicle brake pedal also illuminates
both trailer and vehicle brake lamps.
Procedure for Setting Trailer Brake
Controller Mode
Select the correct option using the
information display. Choose electric for
trailers with electromagnetic drum brakes
or EOH for trailers with electric over
hydraulic brake systems. See Information
Displays
(page 113).
Trailer Brake Effort Setting
The trailer brake controller allows the user
to customize how aggressively the trailer
brakes engage. The default value is "Low"
and is the recommended setting for most
trailers. If your trailer's brakes require more
initial voltage, or if you prefer more
aggressive trailer braking, then select either
the "Medium" or the "High" setting.
307
F-150 (TFC) Canada/United States of America, enUSA, Edition date: 201709, Fifth-Printing Towing
Page 317 of 641

BREAKING-IN
You need to break in new tires for
approximately 300 mi (480 km). During
this time, your vehicle may exhibit some
unusual driving characteristics.
Avoid driving too fast during the first
1,000 mi (1,600 km)
. Vary your speed
frequently and change up through the
gears early. Do not labor the engine.
Do not tow during the first
1,000 mi
(1,600 km).
ECONOMICAL DRIVING
Your fuel economy is affected by several
things, such as how you drive, the
conditions you drive under, and how you
maintain your vehicle.
You may improve your fuel economy by
keeping these things in mind:
• Accelerate and slow down in a smooth,
moderate fashion.
• Drive at steady speeds without
stopping.
• Anticipate stops; slowing down may
eliminate the need to stop.
• Combine errands and minimize
stop-and-go driving.
• Close the windows for high-speed
driving.
• Drive at reasonable speeds (traveling
at 55 mph [88 km/h] uses 15% less
fuel than traveling at 65 mph [105
km/h]).
• Keep the tires properly inflated and use
only the recommended size.
• Use the recommended engine oil.
• Perform all regularly scheduled
maintenance. Avoid these actions; they reduce your fuel
economy:
•
Sudden accelerations or hard
accelerations.
• Revving the engine before turning it off.
• Idle for periods longer than one minute.
• Warm up your vehicle on cold
mornings.
• Use the air conditioner or front
defroster.
• Use the speed control in hilly terrain.
• Rest your foot on the brake pedal while
driving.
• Drive a heavily loaded vehicle or tow a
trailer.
• Carry unnecessary weight
(approximately 1 mpg [0.4 km/L] is
lost for every 400 lb [180 kilogram] of
weight carried).
• Driving with the wheels out of
alignment.
Conditions
• Heavily loading a vehicle or towing a
trailer may reduce fuel economy at any
speed.
• Adding certain accessories to your
vehicle (for example bug deflectors,
rollbars, light bars, running boards, ski
racks or luggage racks) may reduce
fuel economy.
• To maximize the fuel economy, drive
with the tonneau cover installed (if
equipped).
• Using fuel blended with alcohol may
lower fuel economy.
• Fuel economy may decrease with lower
temperatures during the first
5–10 mi
(12 –16 km) of driving.
• Driving on flat terrain offers improved
fuel economy as compared to driving
on hilly terrain.
314
F-150 (TFC) Canada/United States of America, enUSA, Edition date: 201709, Fifth-Printing Driving Hints
Page 344 of 641
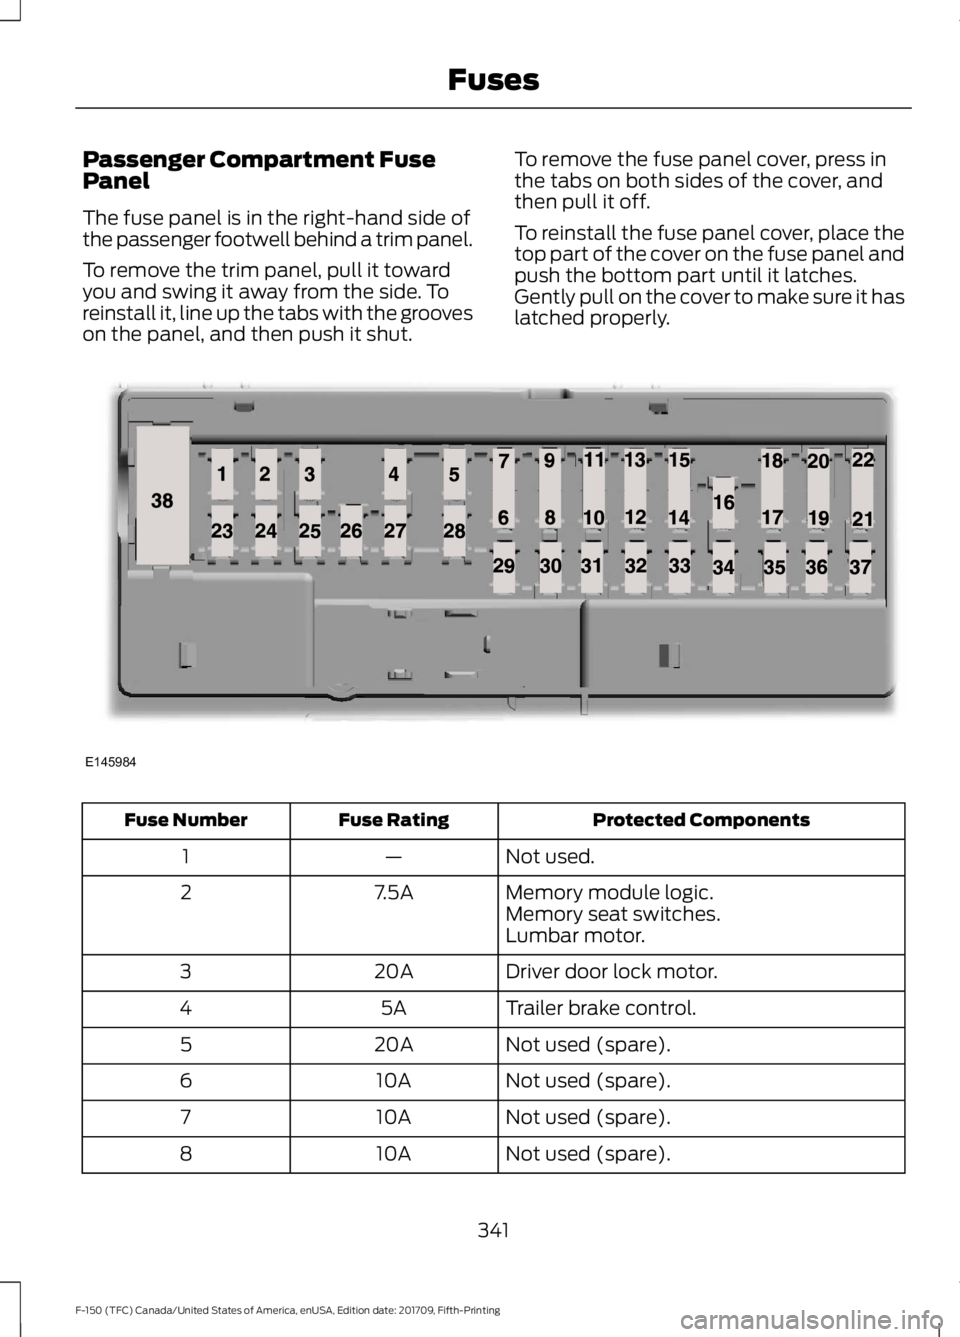
Passenger Compartment Fuse
Panel
The fuse panel is in the right-hand side of
the passenger footwell behind a trim panel.
To remove the trim panel, pull it toward
you and swing it away from the side. To
reinstall it, line up the tabs with the grooves
on the panel, and then push it shut.
To remove the fuse panel cover, press in
the tabs on both sides of the cover, and
then pull it off.
To reinstall the fuse panel cover, place the
top part of the cover on the fuse panel and
push the bottom part until it latches.
Gently pull on the cover to make sure it has
latched properly. Protected Components
Fuse Rating
Fuse Number
Not used.
—
1
Memory module logic.
7.5A
2
Memory seat switches.
Lumbar motor.
Driver door lock motor.
20A
3
Trailer brake control.
5A
4
Not used (spare).
20A
5
Not used (spare).
10A
6
Not used (spare).
10A
7
Not used (spare).
10A
8
341
F-150 (TFC) Canada/United States of America, enUSA, Edition date: 201709, Fifth-Printing FusesE145984
Page 559 of 641
For a complete listing of the accessories
that are available for your vehicle, please
contact your authorized dealer or visit the
online store web site:
Web Address (United States)
www.Accessories.Ford.com Web Address (Canada)
www.Accessories.Ford.ca
Ford Accessories are available for your
vehicle through an authorized Ford dealer.
Ford Motor Company will repair or replace
any properly authorized dealer-installed
Ford Original Accessory found to be
defective in factory-supplied materials or
workmanship during the warranty period,
as well as any component damaged by the
defective accessories.
Ford Motor Company will warrant your
Ford Original Accessory through the
warranty that provides the greatest
benefit:
• 24 months, unlimited mileage.
• The remainder of your new vehicle
limited warranty.
Contact an authorized dealer for details
and a copy of the warranty.
Exterior Style
• Bed rails.
• Chrome exhaust tips.
• Custom graphics*.
• Door sills*.
• Fender flares*.
• Fog lamps*.
• Hood deflector.
• Running boards.
• Side window deflectors*. •
Splash guards.
• Tailgate dampener.
• Tow hooks.
• Trailer tow mirrors.
• Trim kits.
Interior Style
• Ambient lighting.
• Floor mats.
• Premium floor liners.
Lifestyle
• Audio upgrade*.
• Bed divider.
• Bed extender.
• Bed lighting.
• Bedliners and bedmats.
• Bed ramps.
• Bed side step.
• Ford Telematics ™*.
• Hitch balls and towbars.
• Interior cargo organization and
management.
• In-vehicle safe*.
• Racks and carriers*.
• Rear-seat entertainment*.
• Smoker's package.
• Sportliner cargo liner*.
• Tablet cradle*
• Tonneau/Bed cover*.
• Trailer brake controller.
• Trailer hitches, wiring harnesses and
accessories.
• Truck bed camping tent*.
• Truck bed cargo organization and
management.
• Wireless charging*.
556
F-150 (TFC) Canada/United States of America, enUSA, Edition date: 201709, Fifth-Printing Accessories
Page 636 of 641

P
Parking Aids...................................................233
Principle of Operation...................................... 233
Passive Anti-Theft System.........................78 SecuriLock ™.......................................................... 78
PATS See: Passive Anti-Theft System..................... 78
Pedals................................................................88
Perchlorate.........................................................11
Personal Safety System ™
.........................46
How Does the Personal Safety System
Work?.................................................................. 46
Phone.................................................................511 During a Phone Call........................................... 515
Making Calls......................................................... 514
Pairing Your Cell Phone for the First Time..................................................................... 511
Phone Menu.......................................................... 512
Receiving Calls..................................................... 515
Smartphone Connectivity............................... 516
Text Messaging.................................................... 516
Post-Crash Alert System..........................325
Power Door Locks See: Locking and Unlocking............................. 68
Power Running Boards................................82
Power Seats
...................................................154
Adjusting the Lumbar Support...................... 155
Adjusting the Multi-Contour Front Seats With Active Motion ....................................... 155
Power Steering Fluid Check....................359
Power Windows
.............................................98
Accessory Delay................................................... 99
Bounce-Back......................................................... 98
One-Touch Up or Down.................................... 98
Window Lock......................................................... 99
Pre-Collision Assist.....................................265 Adjusting the Pre-Collision Assist
Settings............................................................. 267
Blocked Sensors................................................. 267
Distance Indication and Alert....................... 266
Using the Pre-Collision Assist System.............................................................. 265
Protecting the Environment........................15
Puncture See: Changing a Road Wheel....................... 405R
Rear Axle
..........................................................221
Rear Parking Aid...........................................233 Obstacle Distance Indicator.......................... 234
Rear Seat Armrest.........................................161
Rear Seats
.......................................................158
Folding Up the Rear Seat Cushion ..............158
Returning the Seat to the Seating
Position............................................................. 158
Rear View Camera.......................................238 Camera guidelines............................................ 240
Manual Zoom....................................................... 241
Obstacle Distance Indicator........................... 241
Rear Camera Delay............................................ 241
Using the Rear View Camera System........239
Rear View Camera See: Rear View Camera................................... 238
Recommended Towing Weights...........292 Calculating the Maximum Loaded Trailer
Weight for Your Vehicle.............................. 304
Refueling.........................................................190 Refueling System Overview........................... 190
Refueling System Warning.............................. 192
Refueling Your Vehicle....................................... 191
Remote Control
..............................................56
Car Finder............................................................... 60
Integrated Keyhead Transmitter.................... 56
Intelligent Access Key......................................... 57
Remote Start.......................................................... 61
Replacing the Battery......................................... 58
Sounding a Panic Alarm................................... 60
Remote Start
.................................................149
Automatic Settings........................................... 150
Removing the Tailgate
..................................74
Repairing Minor Paint Damage...............379
Replacement Parts Recommendation........................................12
Collision Repairs.................................................... 12
Scheduled Maintenance and Mechanical Repairs.................................................................. 12
Warranty on Replacement Parts..................... 12
Replacing a Lost Key or Remote Control.............................................................62
Reporting Safety Defects (Canada Only)..............................................................333
Reporting Safety Defects (U.S. Only)..............................................................333
633
F-150 (TFC) Canada/United States of America, enUSA, Edition date: 201709, Fifth-Printing Index