2018 FORD EXPEDITION rear view mirror
[x] Cancel search: rear view mirrorPage 103 of 571

Blind spot mirrors have an integrated
convex mirror built into the upper outboard
corner of the exterior mirrors. They can
assist you by increasing visibility along the
side of your vehicle. The blind spot mirror
is only on the driver exterior mirror.
Check the main mirror first before a lane
change, then check the blind spot mirror.
If no vehicles are present in the blind spot
mirror and the traffic in the adjacent lane
is at a safe distance, signal that you are
going to change lanes. Glance over your
shoulder to verify traffic is clear, and
carefully change lanes. The image of the approaching vehicle is
small and near the inboard edge of the
main mirror when it is at a distance. The
image becomes larger and begins to move
outboard across the main mirror as the
vehicle approaches (A). The image
transitions from the main mirror and begins
to appear in the blind spot mirror as the
vehicle approaches (B). The vehicle
transitions to your peripheral field of view
as it leaves the blind spot mirror (C).
INTERIOR MIRROR
WARNING: Do not adjust the
mirror when your vehicle is moving.
Note: Do not clean the housing or glass of
any mirror with harsh abrasives, fuel or other
petroleum or ammonia-based cleaning
products.
You can adjust the interior mirror to your
preference. Some mirrors also have a
second pivot point. This lets you move the
mirror head up or down and from side to
side.
Auto-Dimming Mirror
Note: Do not block the sensors on the front
and back of the mirror. Mirror performance
may be affected. A rear center passenger or
raised rear center head restraint may also
block light from reaching the sensor.
The mirror will dim automatically to reduce
glare when bright lights are detected from
behind your vehicle. It will automatically
return to normal reflection when you select
reverse gear to make sure you have a clear
view when backing up.
100
Expedition (TB8) Canada/United States of America, enUSA, Edition date: 201708, Third-Printing- Windows and MirrorsA
B
C
E138665
Page 104 of 571
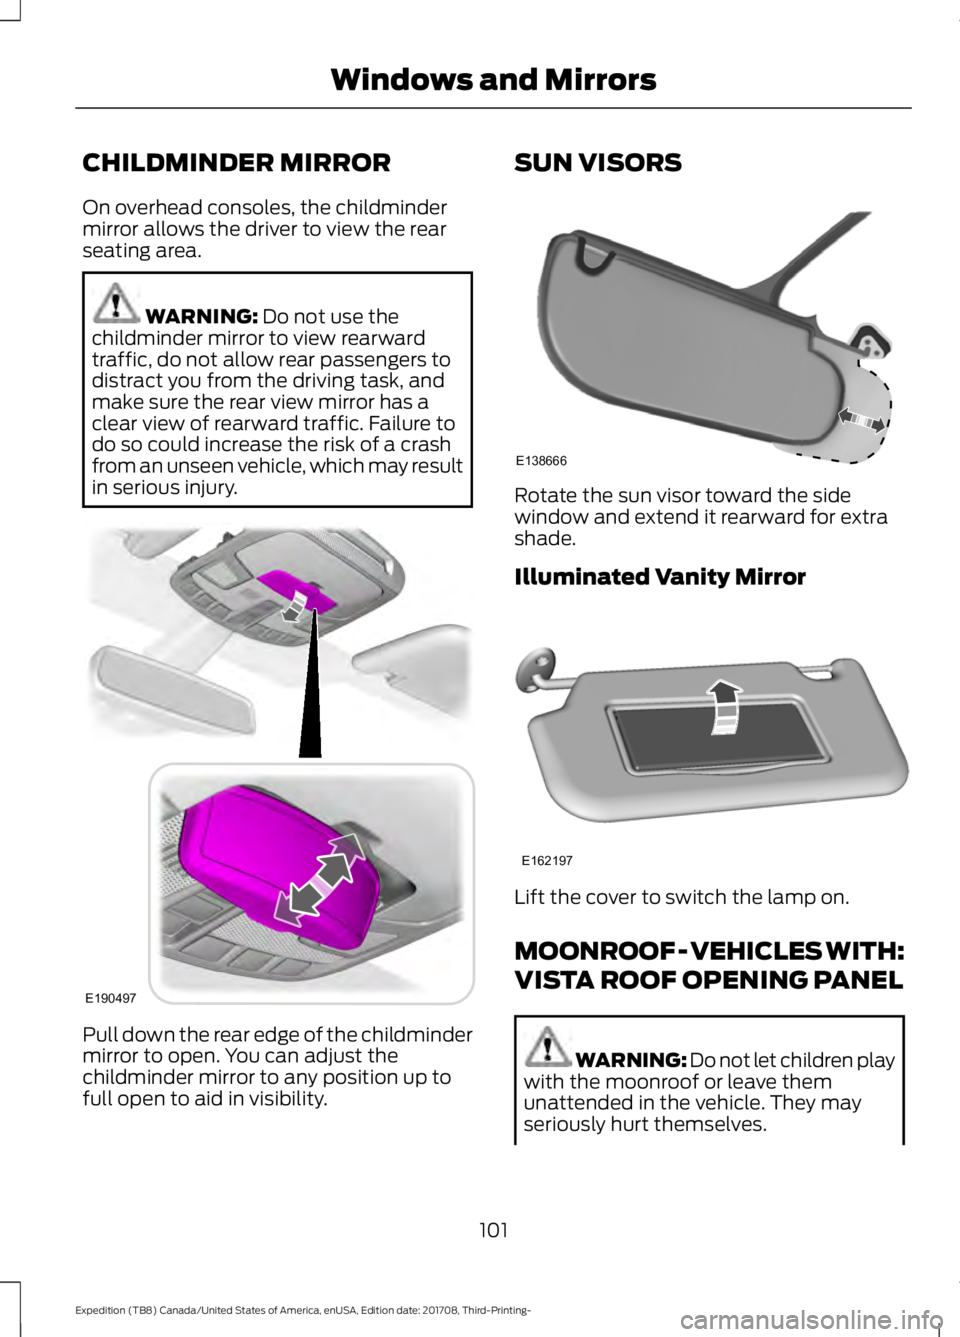
CHILDMINDER MIRROR
On overhead consoles, the childminder
mirror allows the driver to view the rear
seating area.
WARNING: Do not use the
childminder mirror to view rearward
traffic, do not allow rear passengers to
distract you from the driving task, and
make sure the rear view mirror has a
clear view of rearward traffic. Failure to
do so could increase the risk of a crash
from an unseen vehicle, which may result
in serious injury. Pull down the rear edge of the childminder
mirror to open. You can adjust the
childminder mirror to any position up to
full open to aid in visibility. SUN VISORS
Rotate the sun visor toward the side
window and extend it rearward for extra
shade.
Illuminated Vanity Mirror
Lift the cover to switch the lamp on.
MOONROOF - VEHICLES WITH:
VISTA ROOF OPENING PANEL
WARNING: Do not let children play
with the moonroof or leave them
unattended in the vehicle. They may
seriously hurt themselves.
101
Expedition (TB8) Canada/United States of America, enUSA, Edition date: 201708, Third-Printing- Windows and MirrorsE190497 E138666 E162197
Page 234 of 571
Possible Cause
Symptom
The vehicle speed is greater than 22 mph (35 km/h)
for parallel parking or greater than 19 mph (30 km/h)
for perpendicular parking.
You recently disconnected or replaced the battery. After
you reconnect the battery you must drive your vehicle
on a straight road for a short period of time.
Your vehicle is rolling in the opposite direction of the
current transmission position. For example, rolling
forward when in reverse (R).
The system does not correctly
position your vehicle in a
parking space.
An irregular curb along the parking space prevents the
system from correctly aligning your vehicle.
Vehicles or objects bordering the space may not be
correctly parked.
Your vehicle stopped too far past the parking space.
The tires may not be correctly installed or maintained.
For example, not inflated correctly, improper size, or of
different sizes.
A repair or alteration changes the detection capabilities.
A parked vehicle has a high attachment. For example,
a salt sprayer, snowplow or moving truck bed.
The parking space length or position of parked objects
changes after your vehicle passes the space.
The temperature around your vehicle quickly changes.
For example, driving from a heated garage into the cold,
or after leaving a car wash.
REAR VIEW CAMERA WARNING: The rear view camera
system is a reverse aid supplement
device that still requires the driver to use
it in conjunction with the interior and
exterior mirrors for maximum coverage. WARNING: Objects that are close
to either corner of the bumper or under
the bumper, might not be seen on the
screen due to the limited coverage of the
camera system. WARNING:
Reverse your vehicle
slowly. Failure to follow this instruction
could result in the loss of control of your
vehicle, personal injury or death.
231
Expedition (TB8) Canada/United States of America, enUSA, Edition date: 201708, Third-Printing- Parking Aids
Page 236 of 571
Camera System Settings
The rear view camera system settings can
be accessed through the display screen.
See General Information (page 111).
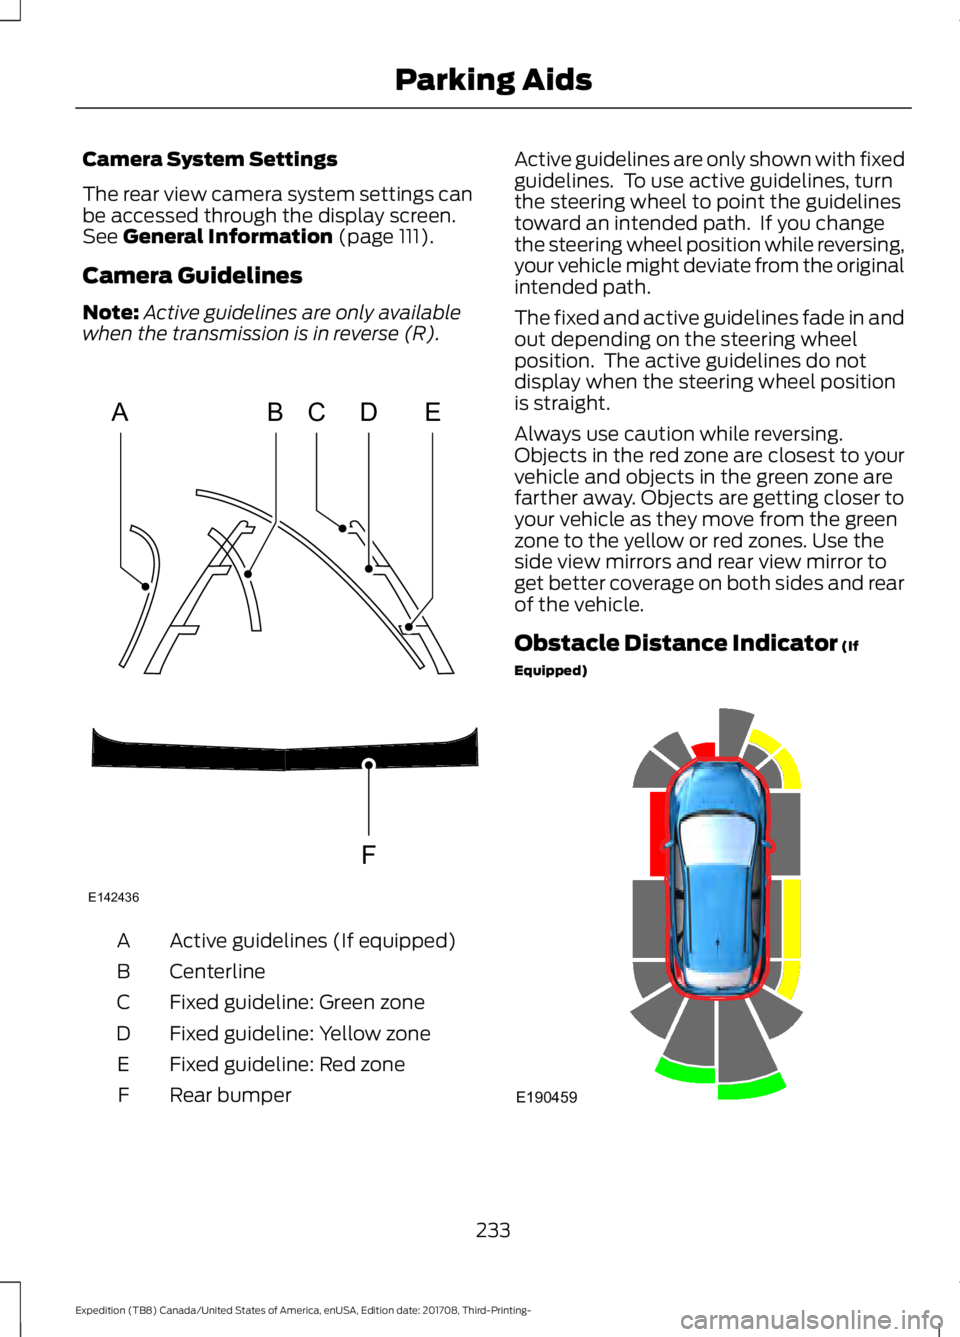
Camera Guidelines
Note: Active guidelines are only available
when the transmission is in reverse (R). Active guidelines (If equipped)
A
Centerline
B
Fixed guideline: Green zone
C
Fixed guideline: Yellow zone
D
Fixed guideline: Red zone
E
Rear bumper
F Active guidelines are only shown with fixed
guidelines. To use active guidelines, turn
the steering wheel to point the guidelines
toward an intended path. If you change
the steering wheel position while reversing,
your vehicle might deviate from the original
intended path.
The fixed and active guidelines fade in and
out depending on the steering wheel
position. The active guidelines do not
display when the steering wheel position
is straight.
Always use caution while reversing.
Objects in the red zone are closest to your
vehicle and objects in the green zone are
farther away. Objects are getting closer to
your vehicle as they move from the green
zone to the yellow or red zones. Use the
side view mirrors and rear view mirror to
get better coverage on both sides and rear
of the vehicle.
Obstacle Distance Indicator
(If
Equipped) 233
Expedition (TB8) Canada/United States of America, enUSA, Edition date: 201708, Third-Printing- Parking AidsABCD
F
E
E142436 E190459
Page 237 of 571

The system will provide an image of your
vehicle and the sensor zones. The zones
will highlight green, yellow and red when
the parking aid sensors detect an object in
the coverage area.
Manual Zoom
WARNING: When manual zoom
is on, the full area behind your vehicle
may not show. Be aware of your
surroundings when using the manual
zoom feature.
Note: Manual zoom is only available when
the transmission is in reverse (R).
Note: When you enable manual zoom, only
the centerline is shown.
Selectable settings for this feature are
Zoom in (+) and Zoom out (-). Press the
symbol in the camera screen to change the
view. The default setting is Zoom OFF.
This allows you to get a closer view of an
object behind your vehicle. The zoomed
image keeps the bumper in the image to
provide a reference. The zoom is only
active while the transmission is in reverse
(R).
Rear Camera Delay
Selectable settings for this feature are ON
and OFF.
The default setting for the rear camera
delay is OFF.
When shifting the transmission out of
reverse (R) and into any gear other than
park (P), the camera image remains in the
display until:
• Your vehicle speed reaches
approximately
6 mph (10 km/h).
• You shift your vehicle into park (P). 360 DEGREE CAMERA
(IF
EQUIPPED) WARNING:
The 360 degree
camera system still requires the driver
to use it in conjunction with looking out
of the windows, and checking the interior
and exterior mirrors for maximum
coverage. WARNING: Objects that are close
to either corner of the bumper or under
the bumper, might not be seen on the
screen due to the limited coverage of the
camera system. WARNING:
Use caution when
turning camera features on or off when
the transmission is not in park (P). Make
sure your vehicle is not moving.
Note: The 360 degree camera system turns
off when your vehicle is in motion at low
speed, except when in reverse (R).
The 360 degree camera system consists
of front, side and rear cameras. The
system:
• Allows you to see what is directly in
front or behind your vehicle.
• Provides cross traffic view in front and
behind your vehicle.
• Allows you to see a top-down view of
the area outside your vehicle, including
the blind spots.
• Provides visibility around your vehicle
to you in parking maneuvers such as:
•Centering in a parking space.
• Obstacles near vehicle.
• Parallel parking.
234
Expedition (TB8) Canada/United States of America, enUSA, Edition date: 201708, Third-Printing- Parking Aids
Page 238 of 571
Camera Views
The camera button is located on
the instrument panel and allows
you to toggle through different
camera views.
When in park (P), neutral (N) or drive (D),
only images from the front cameras are
displayed. Press the camera button to
display the front camera image on the
display screen.
When in reverse (R), only images from the
rear cameras are displayed. When you shift
into reverse (R), the rear view camera
image automatically shows on the display
screen.
Advanced Camera Views (If Equipped) Additional camera views may be
available for vehicles with
specific features. Press the small
camera icon shown on the top left corner
of the display screen to open the camera
view menu.
The following camera views can be
accessed in park (P), neutral (N) or drive
(D) when you press the camera button:
• Front 360 + Normal:
Contains the
normal front camera view next to a
360 degree camera view.
• Front Normal View:
Provides an
image of what is directly in front of your
vehicle.
• Front Split View:
Provides an
extended view of what is in front of
your vehicle. The following camera views can be
accessed when you shift into reverse (R):
•
Rear 360 + Normal:
Contains the
normal rear camera view next to a 360
degree camera view. Press the zoom
(+) button to quickly access Rear
Normal View from this screen.
• Rear Normal View: Provides an image
of what is directly behind your vehicle.
• Rear Split View:
Provides an
extended view of what is behind your
vehicle.
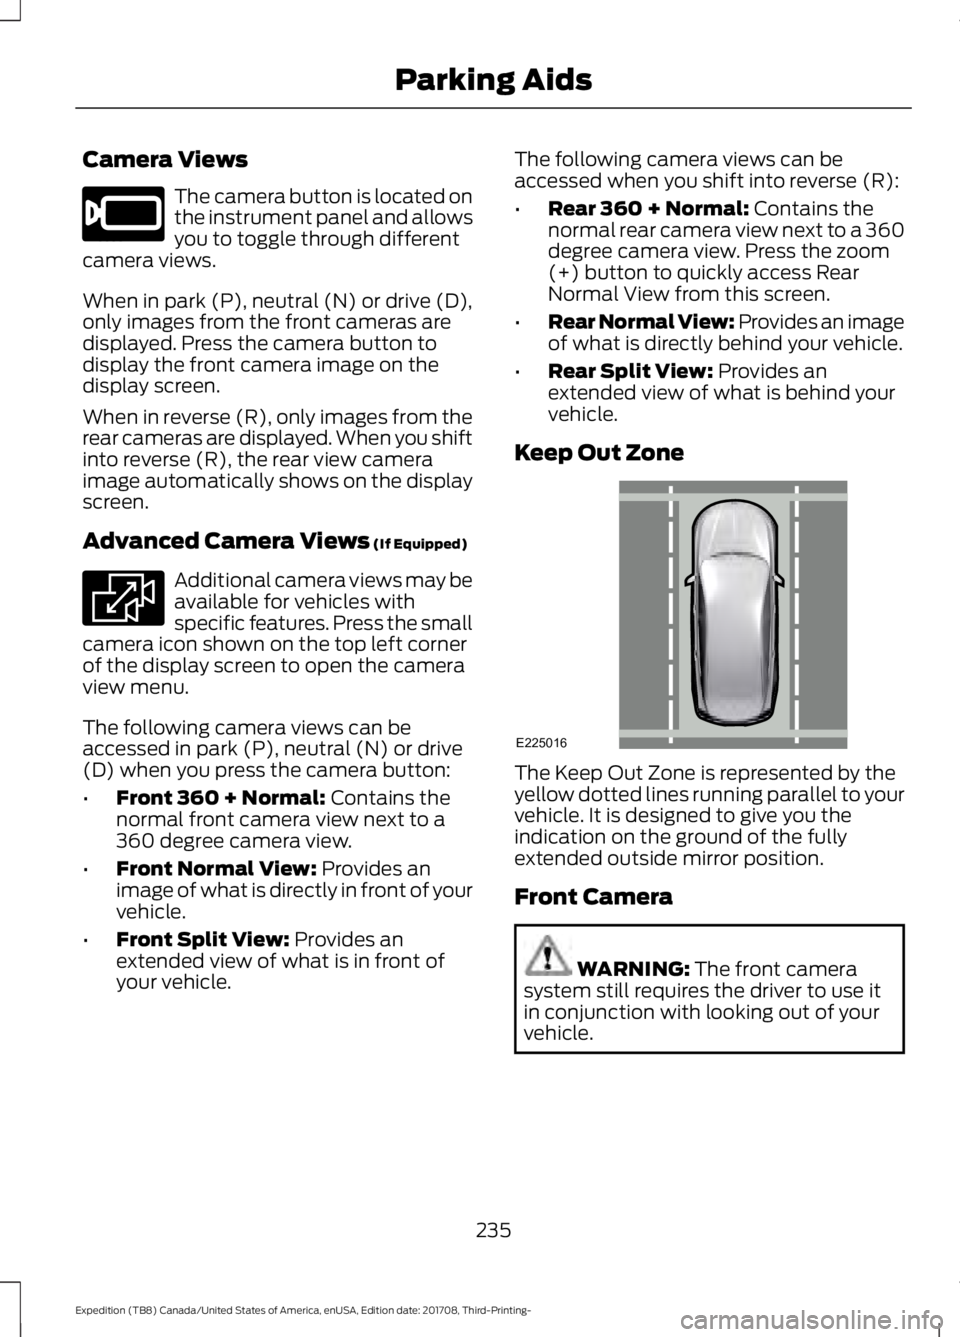
Keep Out Zone The Keep Out Zone is represented by the
yellow dotted lines running parallel to your
vehicle. It is designed to give you the
indication on the ground of the fully
extended outside mirror position.
Front Camera
WARNING:
The front camera
system still requires the driver to use it
in conjunction with looking out of your
vehicle.
235
Expedition (TB8) Canada/United States of America, enUSA, Edition date: 201708, Third-Printing- Parking AidsE205884 E233726 E225016
Page 319 of 571

Protected Component
Fuse Rating
Fuse Number
4x4 module.
10A 1
13
Heated backlite.
Heated mirror relay coil.
Heated wiper park relay coil.
Transmission isolation relay coil.
Transmission control module.
15A 1
14
Voltage quality module run/start power.
15A 1
15
Blindspot information system.
Head Up Display.
Image processing module B.
Front view camera.
Rear view camera.
Cruise control module.
Powertrain control module (PCM) run/
start feed.
10A 1
16
Antilock brake system run/ start feed.
10A 1
17
Electronic power assist steering run / start
feed.
10A 1
18
Not used.
—
19
Front blower.
40A 2
20
Passenger seat motors.
40A 2
21
Not used.
20A 1
22
Alternator A-line.
10A 1
23
Trailer brake control module.
30A 2
24
Body control module power 1.
50A 2
25
Electronic fan 3.
50A 2
26
Driver seat motors.
40A 2
27
Rear heated seats.
15A 1
28
Integrated wheel end solenoid.
10A 1
29
316
Expedition (TB8) Canada/United States of America, enUSA, Edition date: 201708, Third-Printing- Fuses
Page 565 of 571
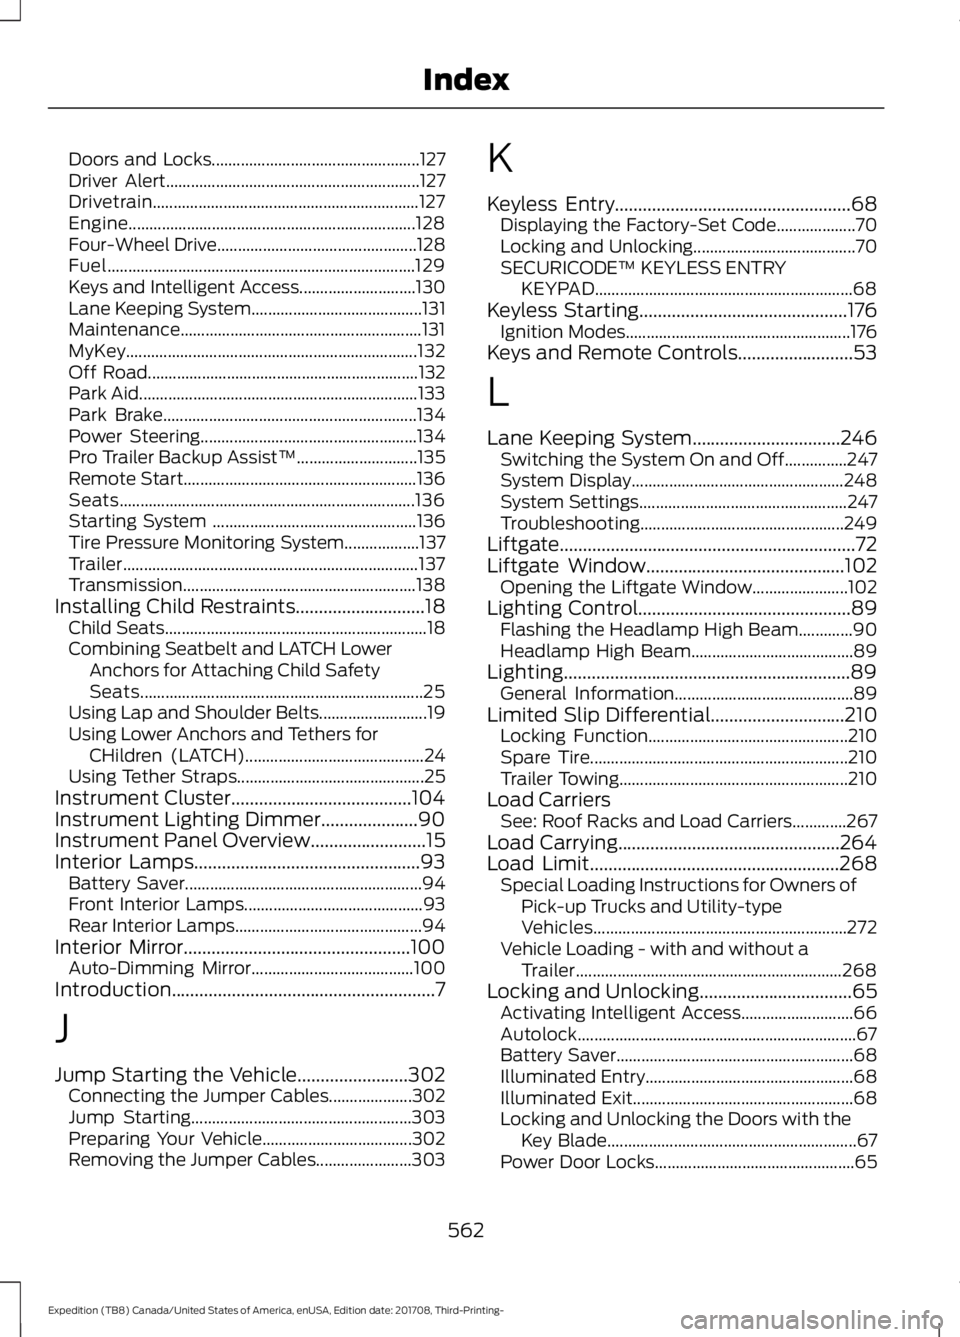
Doors and Locks..................................................
127
Driver Alert............................................................. 127
Drivetrain................................................................ 127
Engine..................................................................... 128
Four-Wheel Drive................................................ 128
Fuel........................................................................\
.. 129
Keys and Intelligent Access............................ 130
Lane Keeping System......................................... 131
Maintenance.......................................................... 131
MyKey...................................................................... 132
Off Road................................................................. 132
Park Aid................................................................... 133
Park Brake............................................................. 134
Power Steering.................................................... 134
Pro Trailer Backup Assist™............................. 135
Remote Start........................................................ 136
Seats....................................................................... 136
Starting System ................................................. 136
Tire Pressure Monitoring System.................. 137
Trailer....................................................................... 137
Transmission........................................................ 138
Installing Child Restraints............................18
Child Seats............................................................... 18
Combining Seatbelt and LATCH Lower Anchors for Attaching Child Safety
Seats.................................................................... 25
Using Lap and Shoulder Belts.......................... 19
Using Lower Anchors and Tethers for CHildren (LATCH)........................................... 24
Using Tether Straps............................................. 25
Instrument Cluster.......................................104
Instrument Lighting Dimmer.....................90
Instrument Panel Overview
.........................15
Interior Lamps.................................................93
Battery Saver......................................................... 94
Front Interior Lamps........................................... 93
Rear Interior Lamps............................................. 94
Interior Mirror
.................................................100
Auto-Dimming Mirror....................................... 100
Introduction.........................................................7
J
Jump Starting the Vehicle........................302 Connecting the Jumper Cables.................... 302
Jump Starting..................................................... 303
Preparing Your Vehicle.................................... 302
Removing the Jumper Cables....................... 303K
Keyless Entry
...................................................68
Displaying the Factory-Set Code................... 70
Locking and Unlocking....................................... 70
SECURICODE™ KEYLESS ENTRY KEYPAD.............................................................. 68
Keyless Starting.............................................176 Ignition Modes...................................................... 176
Keys and Remote Controls.........................53
L
Lane Keeping System
................................246
Switching the System On and Off...............247
System Display................................................... 248
System Settings.................................................. 247
Troubleshooting................................................. 249
Liftgate................................................................72
Liftgate Window...........................................102 Opening the Liftgate Window....................... 102
Lighting Control
..............................................89
Flashing the Headlamp High Beam.............90
Headlamp High Beam....................................... 89
Lighting..............................................................89 General Information........................................... 89
Limited Slip Differential
.............................210
Locking Function................................................ 210
Spare Tire.............................................................. 210
Trailer Towing....................................................... 210
Load Carriers See: Roof Racks and Load Carriers.............267
Load Carrying................................................264
Load Limit
......................................................268
Special Loading Instructions for Owners of
Pick-up Trucks and Utility-type
Vehicles............................................................. 272
Vehicle Loading - with and without a Trailer................................................................ 268
Locking and Unlocking.................................65 Activating Intelligent Access........................... 66
Autolock................................................................... 67
Battery Saver......................................................... 68
Illuminated Entry.................................................. 68
Illuminated Exit..................................................... 68
Locking and Unlocking the Doors with the Key Blade............................................................ 67
Power Door Locks................................................ 65
562
Expedition (TB8) Canada/United States of America, enUSA, Edition date: 201708, Third-Printing- Index