2018 FORD EXPEDITION Manual release
[x] Cancel search: Manual releasePage 77 of 571

If the liftgate starts to close after it has
fully opened, this indicates there may be
excessive weight on the liftgate or a
possible strut failure. A repetitive tone
sounds and the liftgate closes under
control. Remove any excessive weight
from the liftgate. If the liftgate continues
to close after opening, have the system
checked as soon as possible.
Opening and Closing the Liftgate
WARNING: Make sure all persons
are clear of the power liftgate area
before using the power liftgate control.
Note: Make sure the area behind your
vehicle is free from obstruction and that
there is enough room for you to operate the
liftgate. Objects too close to your vehicle,
for example a wall, garage door or another
vehicle may come into contact with the
moving liftgate. This could damage the
liftgate and its components.
Note: Be careful when opening or closing
the liftgate in a garage or other enclosed
area to avoid damaging the liftgate.
Note: Do not leave the liftgate open when
you are driving. This could damage the
liftgate and its components.
From the Instrument Panel With the transmission in park
(P), press the button on the
instrument panel.
Remote Control Press the button twice within a
few seconds. Outside Control
Opening the Liftgate
1. Unlock the liftgate with the remote
control or power door unlock control.
If an intelligent access key is within
3 ft
(1 m) of the liftgate, the liftgate unlocks
when you press the liftgate release
button. 2. Press the button inside the liftgate
handle.
Note: Allow the power system to open the
liftgate. Manually pushing or pulling the
liftgate may activate the system ’s obstacle
detection and stop the power operation or
reverse its direction, replicate a strut failure,
or damage mechanical components.
Closing the Liftgate WARNING:
Keep clear of the
liftgate when using the rear switch.
74
Expedition (TB8) Canada/United States of America, enUSA, Edition date: 201708, Third-Printing- Liftgate E138630 E252962
Page 78 of 571

Press and release the liftgate control
button.
Disabling the Liftgate Button
You can disable the liftgate button under
the Advanced Settings menu. See
General Information (page 111).
Opening the Liftgate Window
See
Liftgate Window (page 102).
Stopping the Liftgate Movement
Note: Do not apply sudden excessive force
to the liftgate while it is in motion. This
could damage the power liftgate and its
components.
You can stop the liftgate movement by
doing any of the following:
• Pressing the liftgate control button.
• Pressing the liftgate button on the
remote control twice.
• Pressing the liftgate button on the
instrument panel. Setting the Liftgate Open Height
1. Open the liftgate.
2.
Stop the liftgate movement by pressing
the control button on the liftgate when
it reaches the desired height.
Note: Once the liftgate has stopped
moving, you can also manually move it to
the desired height.
3. Press and hold the liftgate control button on the liftgate until a tone
sounds, indicating programming is
complete.
Note: You can only use the liftgate control
button to program the height.
Note: You cannot program the height if the
liftgate position is too low.
The new open liftgate height is recalled
when the power liftgate is opened. To
change the programmed height, repeat the
above procedure. Once you open the
power liftgate, you can manually move it
to a different height.
Note: The system recalls the new
programmed height, even if you disconnect
the battery.
When operating the power liftgate after
you have programmed a lower height than
fully open, you can fully open the liftgate
by manually pushing it upward to the
maximum open position.
Obstacle Detection
When Closing
The system stops when it detects an
obstacle. Three tones sound and the
system reverses to open. When you
remove the obstacle, you can power close
the liftgate.
75
Expedition (TB8) Canada/United States of America, enUSA, Edition date: 201708, Third-Printing- LiftgateE252965
Page 137 of 571

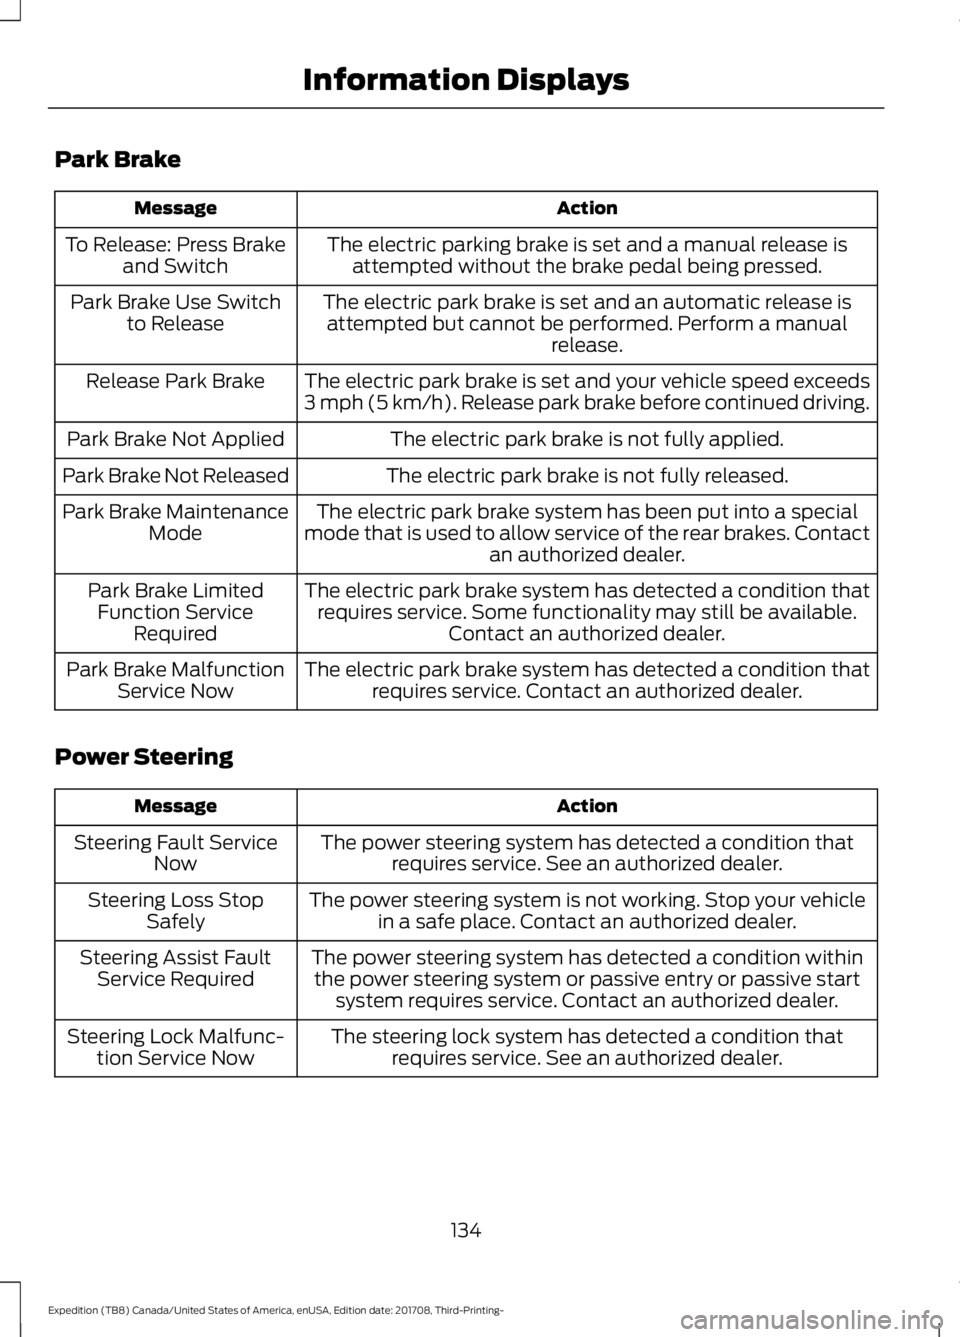
Park Brake
Action
Message
The electric parking brake is set and a manual release isattempted without the brake pedal being pressed.
To Release: Press Brake
and Switch
The electric park brake is set and an automatic release isattempted but cannot be performed. Perform a manual release.
Park Brake Use Switch
to Release
The electric park brake is set and your vehicle speed exceeds
3 mph (5 km/h). Release park brake before continued driving.
Release Park Brake
The electric park brake is not fully applied.
Park Brake Not Applied
The electric park brake is not fully released.
Park Brake Not Released
The electric park brake system has been put into a special
mode that is used to allow service of the rear brakes. Contact an authorized dealer.
Park Brake Maintenance
Mode
The electric park brake system has detected a condition thatrequires service. Some functionality may still be available. Contact an authorized dealer.
Park Brake Limited
Function Service Required
The electric park brake system has detected a condition thatrequires service. Contact an authorized dealer.
Park Brake Malfunction
Service Now
Power Steering Action
Message
The power steering system has detected a condition thatrequires service. See an authorized dealer.
Steering Fault Service
Now
The power steering system is not working. Stop your vehiclein a safe place. Contact an authorized dealer.
Steering Loss Stop
Safely
The power steering system has detected a condition withinthe power steering system or passive entry or passive start system requires service. Contact an authorized dealer.
Steering Assist Fault
Service Required
The steering lock system has detected a condition thatrequires service. See an authorized dealer.
Steering Lock Malfunc-
tion Service Now
134
Expedition (TB8) Canada/United States of America, enUSA, Edition date: 201708, Third-Printing- Information Displays
Page 153 of 571

WARNING: The head restraint is
a safety device. Whenever possible it
should be installed and properly
adjusted when the seat is occupied.
Failure to adjust the head restraint
properly could reduce its effectiveness
during certain impacts.
Note: Adjust the seatback to an upright
driving position before adjusting the head
restraint. Adjust the head restraint so that
the top of it is level with the top of your head
and as far forward as possible. Make sure
that you remain comfortable. If you are
extremely tall, adjust the head restraint to
its highest position.
Front Seat Manual Head
Restraints The head restraints consist of:
An energy absorbing foam and
structure.
A
Two steel stems.
B
Guide sleeve adjust and release
button.
C
Guide sleeve unlock and remove
button.
D Adjusting the Head Restraint
Raising the Head Restraint
Pull the head restraint up.
Lowering the Head Restraint
1. Press and hold button C.
2. Push the head restraint down.
Removing the Head Restraint
1. Pull the head restraint up until it
reaches its highest position.
2. Press and hold buttons C and D.
3. Pull the head restraint up.
Note: You cannot remove front seat head
restraints that have entertainment system
video screens.
Installing the Head Restraint
Align the steel stems into the guide sleeves
and push the head restraint down until it
locks.
Tilting Manual Head Restraints (If
Equipped)
The front seat head restraints tilt for extra
comfort. To tilt the head restraint, do the
following: 150
Expedition (TB8) Canada/United States of America, enUSA, Edition date: 201708, Third-Printing- SeatsE138642 E144727
Page 184 of 571

AUTO-START-STOP
The system helps reduce fuel consumption
by automatically stopping and restarting
the engine when your vehicle has stopped.
The engine restarts automatically when
you release the brake pedal.
In some situations, your vehicle may restart
automatically, for example:
•
To maintain interior comfort.
• To recharge the battery.
Note: Power assist steering turns off when
the engine is off.
Note: If your vehicle is flex fuel capable,
Auto-Start-Stop will be inhibited for a short
time after a refuel event while the system
is verifying the fuel type being used. WARNING: Always fully apply the
parking brake. Make sure you shift into
park (P) for vehicles with an automatic
transmission. Switch the ignition off and
remove the key whenever you leave your
vehicle. WARNING:
Before opening the
hood or performing any maintenance,
fully apply the parking brake, shift into
park (P) or neutral (N) and switch the
ignition off. WARNING:
Always switch the
ignition off before leaving the vehicle. If
the ignition is switched on an automatic
restart may occur at any time. WARNING:
The system may
require the engine to automatically
restart when the auto-start-stop
indicator illuminates green or flashes
amber. Failure to follow this instruction
could result in personal injury. The Auto-Start-Stop system status is
available at a glance within the information
display. See Information Displays (page
111
).
Enabling Auto-Start-Stop
The system automatically enables every
time you start your vehicle if:
• You do not press the Auto-Start-Stop
button (not illuminated).
• Your vehicle exceeds an initial speed
of
3 mph (5 km/h) after you have
initially started your vehicle.
• You have stopped your vehicle.
• Your foot is on the brake pedal.
• The driver door is closed.
• There is adequate brake vacuum.
• The interior compartment has cooled
or warmed to an acceptable level.
• The front windshield defroster is off.
• You have not turned the steering wheel
rapidly or you do not have it at a sharp
angle.
• The vehicle is not on a steep road
grade.
• The battery is within optimal operating
conditions (battery state of charge and
temperature in range).
• The engine coolant is at operating
temperature.
• Elevation is below about
11,000 ft
(3,350 m).
• Ambient temperature is moderate.
• The trailer is not connected.
• If you select Normal, Eco, Snow/Wet
or Grass/Gravel/Snow modes.
• You are not in 4H or 4L.
• You have not selected Manual shift
mode.
181
Expedition (TB8) Canada/United States of America, enUSA, Edition date: 201708, Third-Printing- Unique Driving Characteristics
Page 199 of 571

3.
When you are finished driving, come to
a complete stop.
4. Move the transmission selector to park
(P).
The instrument cluster displays the current
gear.
Park (P)
With the transmission in park (P), your
vehicle locks the transmission and
prevents the wheels from turning. Always
come to a complete stop before putting
your vehicle into and out of park (P).
On a console shifter, when the ignition is
turned off, your vehicle automatically shifts
into park (P). If the ignition is turned off
when the vehicle is moving, it first shifts
into neutral (N) until it comes to a
complete stop. Your vehicle then shifts
into park (P) automatically.
The electric parking brake may apply when
you shift to park (P) without the brake
pedal fully pressed. The electric parking
brake applies when you shift to park (P)
on large slopes. The electric parking brake
releases with the drive away release
function or manually as described in the
Releasing the Electric Parking Brake
section. See Electric Parking Brake
(page 212).
Automatic Return to Park - Console
Shifter
Note: This feature does not operate when
your vehicle is in Stay in Neutral mode or
neutral tow. Your vehicle has a feature that shifts into
park (P) when any of the following
conditions occur:
•
You turn the vehicle off.
• You open the driver door with your
seatbelt unlatched and the vehicle
stopped.
• You unlatch your seatbelt when the
driver door is open and the vehicle
stopped.
If you turn your vehicle off when moving,
your vehicle first shifts into neutral (N) until
it comes to a complete stop and then shift
into park (P) automatically.
Note: If you have waited an extended
period of time, 2-15 minutes before starting
your vehicle, unlatching your seatbelt can
cause this feature to turn on, even with the
driver door closed.
Note: This feature may not work properly
if the door ajar switch is malfunctioning. If
your door ajar indicator does not illuminate
when you open the driver door or the
indicator illuminates with the driver door
closed, see your authorized dealer.
Reverse (R)
With the selector in reverse (R), your
vehicle moves backward. Always come to
a complete stop before shifting into and
out of reverse (R).
Neutral (N)
With the selector in neutral (N), your
vehicle can be started and is free to roll.
Hold the brake pedal down when in this
position.
196
Expedition (TB8) Canada/United States of America, enUSA, Edition date: 201708, Third-Printing- Transmission
Page 201 of 571

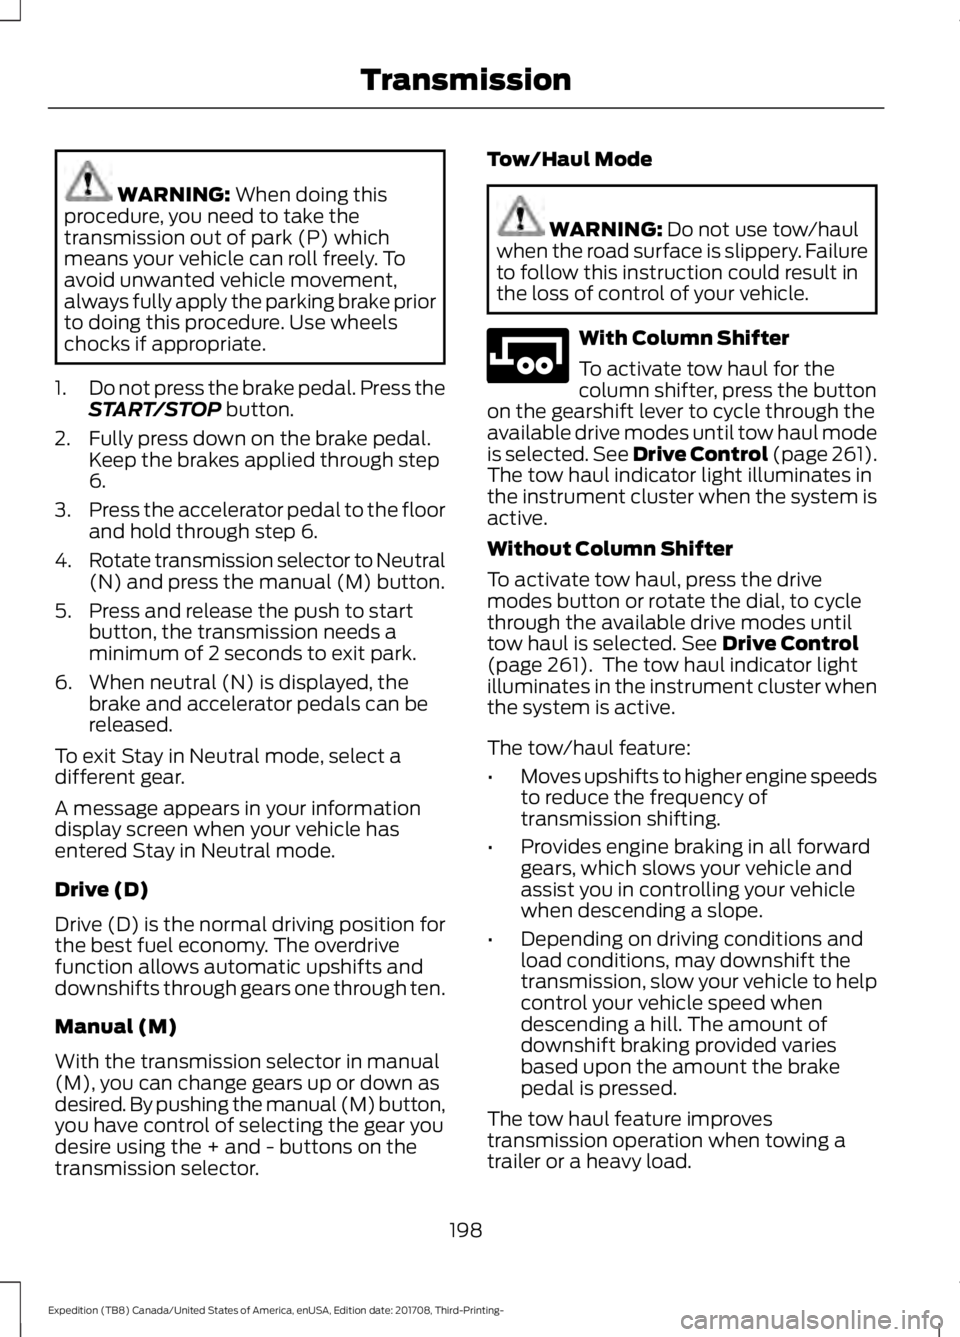
WARNING: When doing this
procedure, you need to take the
transmission out of park (P) which
means your vehicle can roll freely. To
avoid unwanted vehicle movement,
always fully apply the parking brake prior
to doing this procedure. Use wheels
chocks if appropriate.
1. Do not press the brake pedal. Press the
START/STOP
button.
2. Fully press down on the brake pedal. Keep the brakes applied through step
6.
3. Press the accelerator pedal to the floor
and hold through step 6.
4. Rotate transmission selector to Neutral
(N) and press the manual (M) button.
5. Press and release the push to start button, the transmission needs a
minimum of 2 seconds to exit park.
6. When neutral (N) is displayed, the brake and accelerator pedals can be
released.
To exit Stay in Neutral mode, select a
different gear.
A message appears in your information
display screen when your vehicle has
entered Stay in Neutral mode.
Drive (D)
Drive (D) is the normal driving position for
the best fuel economy. The overdrive
function allows automatic upshifts and
downshifts through gears one through ten.
Manual (M)
With the transmission selector in manual
(M), you can change gears up or down as
desired. By pushing the manual (M) button,
you have control of selecting the gear you
desire using the + and - buttons on the
transmission selector. Tow/Haul Mode WARNING:
Do not use tow/haul
when the road surface is slippery. Failure
to follow this instruction could result in
the loss of control of your vehicle. With Column Shifter
To activate tow haul for the
column shifter, press the button
on the gearshift lever to cycle through the
available drive modes until tow haul mode
is selected.
See Drive Control (page 261).
The tow haul indicator light illuminates in
the instrument cluster when the system is
active.
Without Column Shifter
To activate tow haul, press the drive
modes button or rotate the dial, to cycle
through the available drive modes until
tow haul is selected.
See Drive Control
(page 261). The tow haul indicator light
illuminates in the instrument cluster when
the system is active.
The tow/haul feature:
• Moves upshifts to higher engine speeds
to reduce the frequency of
transmission shifting.
• Provides engine braking in all forward
gears, which slows your vehicle and
assist you in controlling your vehicle
when descending a slope.
• Depending on driving conditions and
load conditions, may downshift the
transmission, slow your vehicle to help
control your vehicle speed when
descending a hill. The amount of
downshift braking provided varies
based upon the amount the brake
pedal is pressed.
The tow haul feature improves
transmission operation when towing a
trailer or a heavy load.
198
Expedition (TB8) Canada/United States of America, enUSA, Edition date: 201708, Third-Printing- TransmissionE246592
Page 203 of 571

transmission automatically shifts between
the available gears. Push the + button to
unlock gears and allow the transmission
to shift to higher gears. The transmission
shifts automatically within the gear range
you select.
Manual (M)
Pushing the manual (M) button on the
selector allows you to manually select the
gear you desire. Only the current gear is
displayed. Use the buttons on the
transmission selector to manually select
gears. Push the + button to upshift or the
– button to downshift. Once in Manual
mode, press (M) again to deactivate
manual control.
SelectShift does not automatically upshift,
even if the engine is approaching the RPM
limit. It must be shifted manually by
pushing the + button.
Brake-Shift Interlock
WARNING: When doing this
procedure, you need to take the
transmission out of park (P) which
means your vehicle can roll freely. To
avoid unwanted vehicle movement,
always fully apply the parking brake prior
to doing this procedure. Use wheels
chocks if appropriate. WARNING:
If the parking brake is
fully released, but the brake warning
lamp remains illuminated, the brakes
may not be working properly. Have your
vehicle checked as soon as possible.
Note: Do not drive your vehicle until you
verify that the brake lamps are working.
Note: See your authorized dealer as soon
as possible if this procedure is used.
Note: For some markets this feature is
disabled. Your vehicle is equipped with a brake-shift
interlock feature that prevents moving the
transmission from park (P) when the
ignition is in the on position and the brake
pedal is not pressed.
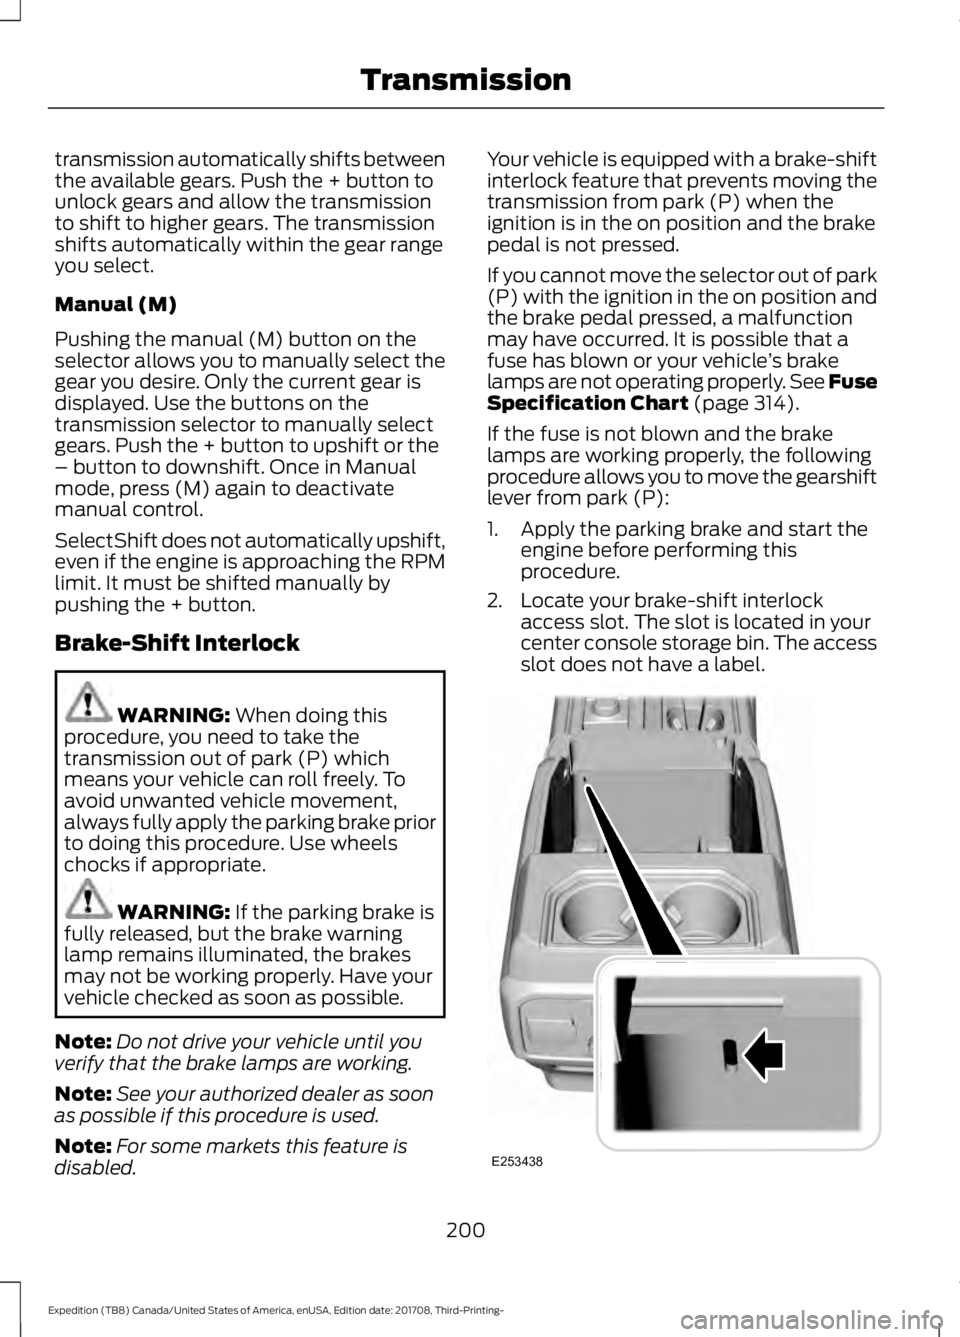
If you cannot move the selector out of park
(P) with the ignition in the on position and
the brake pedal pressed, a malfunction
may have occurred. It is possible that a
fuse has blown or your vehicle
’s brake
lamps are not operating properly. See Fuse
Specification Chart
(page 314).
If the fuse is not blown and the brake
lamps are working properly, the following
procedure allows you to move the gearshift
lever from park (P):
1. Apply the parking brake and start the engine before performing this
procedure.
2. Locate your brake-shift interlock access slot. The slot is located in your
center console storage bin. The access
slot does not have a label. 200
Expedition (TB8) Canada/United States of America, enUSA, Edition date: 201708, Third-Printing- TransmissionE253438