2018 FORD EXPEDITION manual transmission
[x] Cancel search: manual transmissionPage 200 of 571
Stay in Neutral Mode - Console Shifter
Stay in Neutral mode allows your vehicle
to stay in neutral when you exit your
vehicle. Extended usage of Stay in Neutral
mode may result in a battery voltage
reduction to a level where the vehicle may
no longer start. Your vehicle must be
stationary to enter this mode.
Note:
Stay in neutral mode is a temporary
vehicle state with the ignition off. Once in
this mode, sufficient battery voltage must
be maintained or your vehicle returns to
park. Do not tow your vehicle in this mode.
Note: Always put your vehicle in Stay in
Neutral mode if you want your vehicle to
stay in neutral when you exit or turn off your
vehicle. Refer to the Return to Park section
for more information.
Note: Do not use this feature for towing
your vehicle. WARNING: When doing this
procedure, you need to take the
transmission out of park (P) which
means your vehicle can roll freely. To
avoid unwanted vehicle movement,
always fully apply the parking brake prior
to doing this procedure. Use wheels
chocks if appropriate. To enter Stay in Neutral mode:
•
Move the transmission selector to
neutral (N).
• A message appears in your information
display screen prompting you to press
the manual (M) button.
• Press the manual (M) button again to
enter Stay in Neutral mode.
•This step can be completed as long
as the message prompts you to
remain in Neutral (N).
• A confirmation message appears
in the information display when
your vehicle has entered Stay in
Neutral mode.
To exit Stay in Neutral mode, apply the
brake and select a different gear. See
Putting your vehicle in or out of gear for
more information.
Stay in Neutral Mode - Console Shifter -
No Start
Use this feature to move your transmission
from the park position in the event of a no
start situation. If your vehicle has a dead
battery, an external power source is
required. Do not tow your vehicle in this
mode.
Note: This feature only functions if your
12-volt battery has power and the starter
can spin the engine. If vehicle battery
voltage is not sufficient, an external 12-volt
power source (for example, jumper cables,
battery charger or jump pack) may be
required for this feature to function.
Note: Once in this mode, sufficient battery
voltage must be maintained or your vehicle
returns to park.
197
Expedition (TB8) Canada/United States of America, enUSA, Edition date: 201708, Third-Printing- Transmission
Page 201 of 571
WARNING: When doing this
procedure, you need to take the
transmission out of park (P) which
means your vehicle can roll freely. To
avoid unwanted vehicle movement,
always fully apply the parking brake prior
to doing this procedure. Use wheels
chocks if appropriate.
1. Do not press the brake pedal. Press the
START/STOP
button.
2. Fully press down on the brake pedal. Keep the brakes applied through step
6.
3. Press the accelerator pedal to the floor
and hold through step 6.
4. Rotate transmission selector to Neutral
(N) and press the manual (M) button.
5. Press and release the push to start button, the transmission needs a
minimum of 2 seconds to exit park.
6. When neutral (N) is displayed, the brake and accelerator pedals can be
released.
To exit Stay in Neutral mode, select a
different gear.
A message appears in your information
display screen when your vehicle has
entered Stay in Neutral mode.
Drive (D)
Drive (D) is the normal driving position for
the best fuel economy. The overdrive
function allows automatic upshifts and
downshifts through gears one through ten.
Manual (M)
With the transmission selector in manual
(M), you can change gears up or down as
desired. By pushing the manual (M) button,
you have control of selecting the gear you
desire using the + and - buttons on the
transmission selector. Tow/Haul Mode WARNING:
Do not use tow/haul
when the road surface is slippery. Failure
to follow this instruction could result in
the loss of control of your vehicle. With Column Shifter
To activate tow haul for the
column shifter, press the button
on the gearshift lever to cycle through the
available drive modes until tow haul mode
is selected.
See Drive Control (page 261).
The tow haul indicator light illuminates in
the instrument cluster when the system is
active.
Without Column Shifter
To activate tow haul, press the drive
modes button or rotate the dial, to cycle
through the available drive modes until
tow haul is selected.
See Drive Control
(page 261). The tow haul indicator light
illuminates in the instrument cluster when
the system is active.
The tow/haul feature:
• Moves upshifts to higher engine speeds
to reduce the frequency of
transmission shifting.
• Provides engine braking in all forward
gears, which slows your vehicle and
assist you in controlling your vehicle
when descending a slope.
• Depending on driving conditions and
load conditions, may downshift the
transmission, slow your vehicle to help
control your vehicle speed when
descending a hill. The amount of
downshift braking provided varies
based upon the amount the brake
pedal is pressed.
The tow haul feature improves
transmission operation when towing a
trailer or a heavy load.
198
Expedition (TB8) Canada/United States of America, enUSA, Edition date: 201708, Third-Printing- TransmissionE246592
Page 203 of 571
transmission automatically shifts between
the available gears. Push the + button to
unlock gears and allow the transmission
to shift to higher gears. The transmission
shifts automatically within the gear range
you select.
Manual (M)
Pushing the manual (M) button on the
selector allows you to manually select the
gear you desire. Only the current gear is
displayed. Use the buttons on the
transmission selector to manually select
gears. Push the + button to upshift or the
– button to downshift. Once in Manual
mode, press (M) again to deactivate
manual control.
SelectShift does not automatically upshift,
even if the engine is approaching the RPM
limit. It must be shifted manually by
pushing the + button.
Brake-Shift Interlock
WARNING: When doing this
procedure, you need to take the
transmission out of park (P) which
means your vehicle can roll freely. To
avoid unwanted vehicle movement,
always fully apply the parking brake prior
to doing this procedure. Use wheels
chocks if appropriate. WARNING:
If the parking brake is
fully released, but the brake warning
lamp remains illuminated, the brakes
may not be working properly. Have your
vehicle checked as soon as possible.
Note: Do not drive your vehicle until you
verify that the brake lamps are working.
Note: See your authorized dealer as soon
as possible if this procedure is used.
Note: For some markets this feature is
disabled. Your vehicle is equipped with a brake-shift
interlock feature that prevents moving the
transmission from park (P) when the
ignition is in the on position and the brake
pedal is not pressed.
If you cannot move the selector out of park
(P) with the ignition in the on position and
the brake pedal pressed, a malfunction
may have occurred. It is possible that a
fuse has blown or your vehicle
’s brake
lamps are not operating properly. See Fuse
Specification Chart
(page 314).
If the fuse is not blown and the brake
lamps are working properly, the following
procedure allows you to move the gearshift
lever from park (P):
1. Apply the parking brake and start the engine before performing this
procedure.
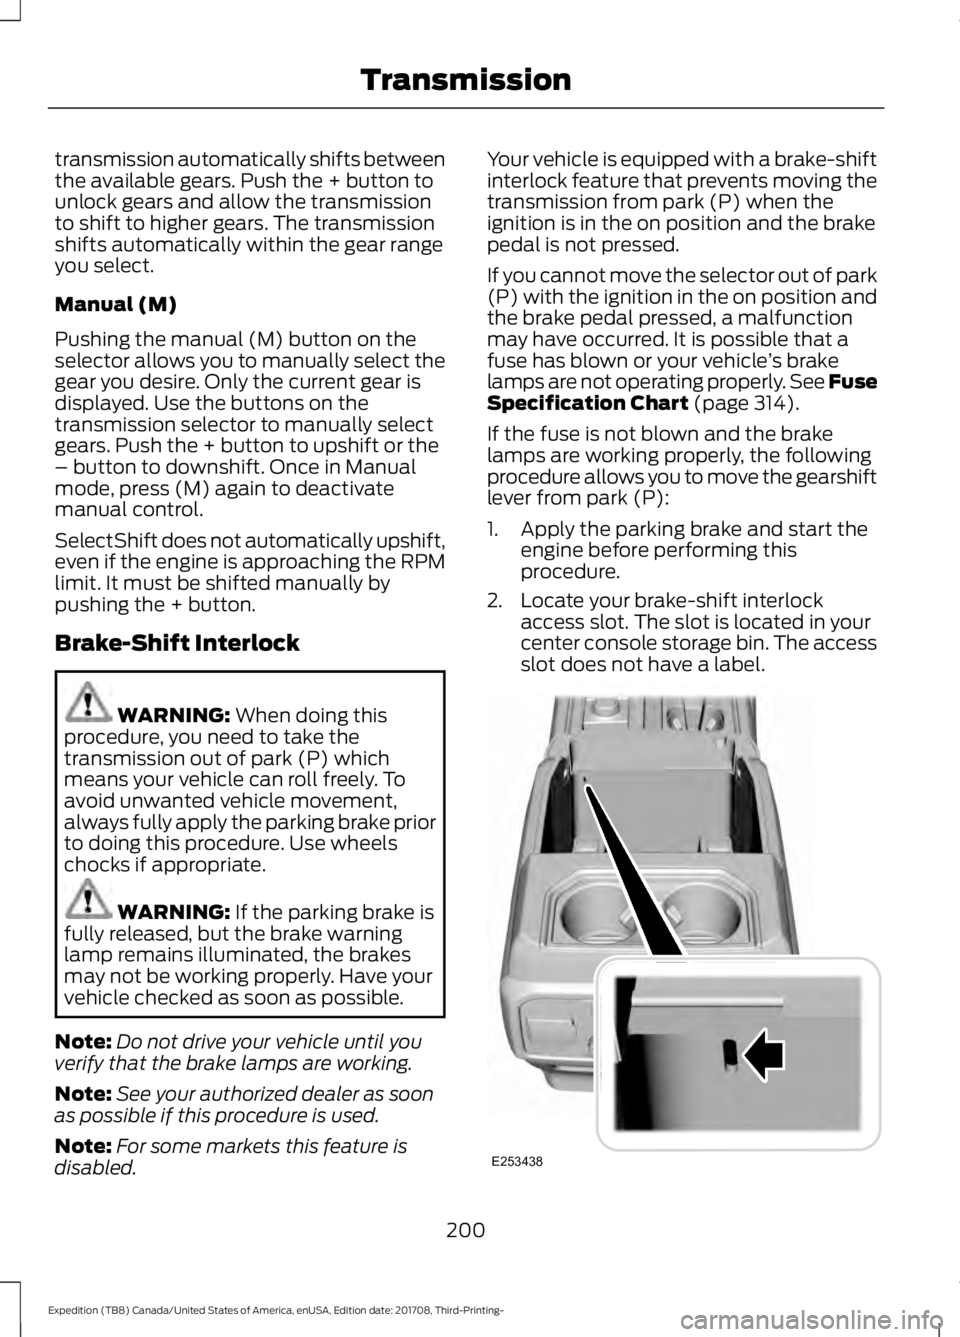
2. Locate your brake-shift interlock access slot. The slot is located in your
center console storage bin. The access
slot does not have a label. 200
Expedition (TB8) Canada/United States of America, enUSA, Edition date: 201708, Third-Printing- TransmissionE253438
Page 215 of 571
•
You take corners too fast.
• The road surface is poor.
Note: If the system activates, the brake
pedal may pulse and may travel further.
Maintain pressure on the brake pedal. You
may also hear a noise from the system. This
is normal.
ELECTRIC PARKING BRAKE WARNING: Always fully apply the
parking brake and make sure you shift
into park (P). Failure to follow this
instruction could result in personal injury
or death. WARNING:
If you drive extended
distances with the parking brake applied,
you could cause damage to the brake
system. WARNING:
The electric parking
brake does not operate if the vehicle
battery is running out of charge.
Your vehicle has an electric parking brake.
You operate it with a switch instead of a
lever. The switch is on the center console
or to the left-hand side of the steering
wheel, on the lower part of the instrument
panel.
Note: The electric parking brake makes
noises during operation. This is normal.
Applying the Electric Parking
Brake Pull the switch upward.
The red warning lamp flashes
during operation and illuminates
when the parking brake is
applied. Note:
It remains illuminated for a short
period of time after you switch the ignition
off.
If it continues to flash or does not
illuminate, the system has malfunctioned.
Have your vehicle checked as soon as
possible.
Note: You can apply the electric parking
brake when the ignition is off.
Note: The electric parking brake could
automatically apply when you shift into park
(P). See
Transmission (page 195).
Applying the Electric Parking Brake in
an Emergency
Note: Do not apply the electric parking
brake when your vehicle is moving, except
in an emergency. If you repeatedly use the
electric parking brake to slow or stop your
vehicle, you could cause damage to the
brake system.
You can use the electric parking brake to
slow or stop your vehicle in an emergency. Pull the switch upward and hold
it.
The red warning lamp
illuminates, a tone sounds and
the stoplamps turn on.
The electric parking brake continues to
slow your vehicle down unless you release
the switch.
Manually Releasing the Electric
Parking Brake
Switch the ignition on.
Press and hold the brake pedal.
212
Expedition (TB8) Canada/United States of America, enUSA, Edition date: 201708, Third-Printing- BrakesE267156 E270480 E267156 E270480
Page 216 of 571
Push the switch downward.
The red warning lamp turns off.
If it remains illuminated or flashes, the
system has malfunctioned. Have your
vehicle checked as soon as possible.
Pulling Away on a Hill When Towing a
Trailer
Press and hold the brake pedal.
Pull the switch upward and hold
it.
Shift into gear.
Press the accelerator pedal until engine
has developed sufficient torque to prevent
your vehicle from rolling down the hill. Release the switch and pull
away in a normal manner.
Automatically Releasing the
Electric Parking Brake
Close the driver door.
Shift into gear.
Press the accelerator pedal and pull away
in a normal manner. The red warning lamp turns off.
If it remains illuminated or flashes, the
electric parking brake has not released.
Manually release the parking brake. Releasing the Electric Parking
Brake if the Vehicle Battery is
Running Out of Charge
Connect a booster battery to the vehicle
battery to release the electric parking brake
if the vehicle battery is running out of
charge. See Jump Starting the Vehicle
(page 302).
HILL START ASSIST WARNING:
The system does not
replace the parking brake. When you
leave your vehicle, always apply the
parking brake and shift the transmission
into park (P) for automatic transmission
or first gear for manual transmission. WARNING:
You must remain in
your vehicle when the system turns on.
At all times, you are responsible for
controlling your vehicle, supervising the
system and intervening, if required.
Failure to take care may result in the loss
of control of your vehicle, serious
personal injury or death.
Note: If the engine is revved excessively, or
if a malfunction is detected, the system will
be deactivated.
The system makes it easier to pull away
when your vehicle is on a slope without the
need to use the parking brake.
When the system is active, your vehicle will
remain stationary on the slope for two to
three seconds after you release the brake
pedal. This allows you time to move your
foot from the brake to the accelerator
pedal. The brakes release automatically
213
Expedition (TB8) Canada/United States of America, enUSA, Edition date: 201708, Third-Printing- BrakesE267156 E270480 E267156 E267156 E270480
Page 217 of 571

when the engine has sufficient torque to
prevent your vehicle from rolling down the
grade. This is an advantage when pulling
away on a slope, for example from a car
park ramp, traffic lights or when reversing
uphill into a parking space.
The system will activate automatically on
any slope that will cause significant vehicle
rollback. For vehicles with a manual
transmission, you can switch this feature
off using the information display. See
Information Displays (page 111). The
system will remain on or off depending on
how it was last set.
Note: There is no warning lamp to indicate
the system is either on or off.
Note: If your vehicle is equipped with Auto
Hold, Hill Start Assist will not be available
while Auto Hold is active.
Using Hill Start Assist
1. Bring your vehicle to a complete standstill. Keep the brake pedal
pressed and select an uphill gear (for
example, drive (D) or first (1) when
facing uphill or reverse (R) when facing
downhill).
2. If the sensors detect that your vehicle is on a slope, the system will activate
automatically.
3. When you remove your foot from the brake pedal, your vehicle will remain
on the slope without rolling away for
about two or three seconds. This hold
time will automatically be extended if
you are in the process of driving off.
4. Drive off in the normal manner. The brakes will release automatically. Switching the System On and Off
You can switch this feature on or off if your
vehicle is equipped with a manual
transmission and an information display.
See
General Information (page 111). The
system remembers the last setting when
you start your vehicle.
If your vehicle is not equipped with a
manual transmission and an information
display, you cannot turn the system on or
off. When you switch the ignition on, the
system automatically turns on.
214
Expedition (TB8) Canada/United States of America, enUSA, Edition date: 201708, Third-Printing- Brakes
Page 226 of 571

Coverage area of up to 28 in (70 cm) from
the front bumper. The coverage area
decreases at the outer corners.
When your vehicle approaches an object,
a warning tone sounds. When your vehicle
moves closer to an object, the warning
tone repeat rate increases. The warning
tone sounds continuously when an object
is
12 in (30 cm) or less from the front
bumper.
You can switch the system off through the
information display menu or from the
pop-up message that appears once you
shift the transmission into reverse (R). See
General Information
(page 111). If your
vehicle has a parking aid button, you can
switch the system off by pressing the
button.
Obstacle Distance Indicator
(If
Equipped)
The system provides obstacle distance
indication through the information display.
The indicator displays:
• As the distance to the obstacle
decreases the indicator blocks
illuminate and move towards the
vehicle icon.
• If there is no obstacle detected, the
distance indicator blocks are grayed
out. If the transmission is in reverse (R), the
front sensing system provides audio
warnings when your vehicle is moving and
the detected obstacle is moving towards
your vehicle. Once the vehicle is stationary,
the audio warning will be stopped after 2
seconds. Visual indication is always
present in reverse (R).
If the transmission is in drive (D) or any
other forward gear (for example, low (L),
sport (S) or any forward gear in a manual
transmission), the front sensing system
provides audio and visual warnings when
your vehicle is moving below a speed of
5 mph (8 km/h) and an obstacle is located
inside the detection area. Once the vehicle
is stationary, the audio warning will be
stopped after 2 seconds and the visual
indication stops after 4 seconds. If the
obstacles detected are within
12 in
(30 cm), the visual indication remains on.
If the transmission is in neutral (N), the
system provides visual indication only
when your vehicle is moving at
5 mph
(8 km/h) or below and an obstacle is
located inside the detection area. Once
your vehicle is stationary, the visual
indication will stop after 4 seconds.
SIDE SENSING SYSTEM
(IF
EQUIPPED)
The side sensing system uses the front and
rear side sensors to detect and map
obstacles within the vehicle's driving path,
located near the sides of your vehicle. The
side sensors are active when the
transmission is in any position other than
park (P).
Note: Obstacles that enter the side
detection area without being detected and
mapped by the front or rear side sensors will
not be detected.
223
Expedition (TB8) Canada/United States of America, enUSA, Edition date: 201708, Third-Printing- Parking AidsE187330
Page 227 of 571
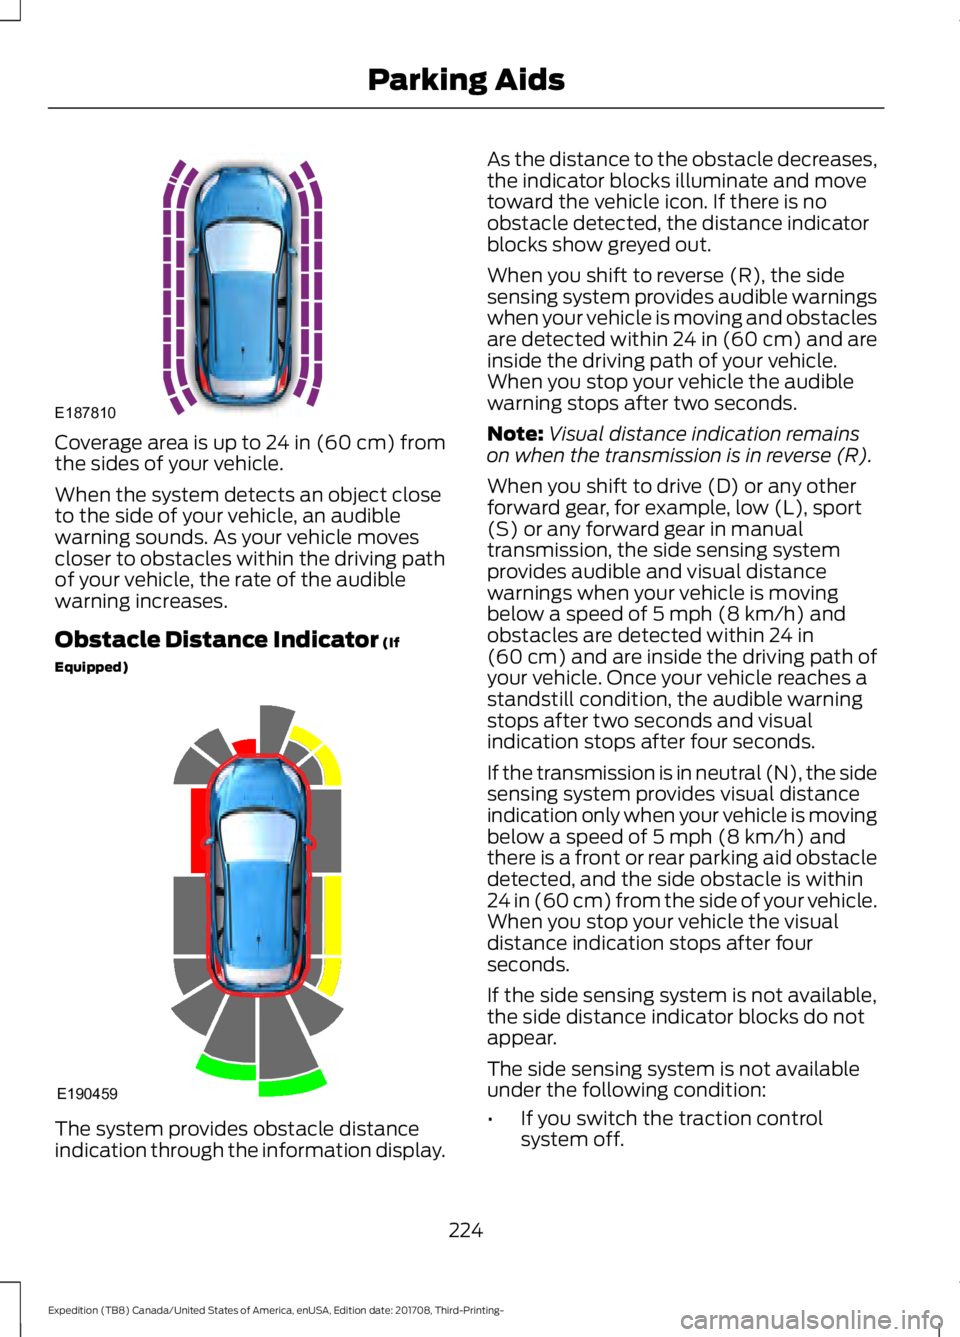
Coverage area is up to 24 in (60 cm) from
the sides of your vehicle.
When the system detects an object close
to the side of your vehicle, an audible
warning sounds. As your vehicle moves
closer to obstacles within the driving path
of your vehicle, the rate of the audible
warning increases.
Obstacle Distance Indicator (If
Equipped) The system provides obstacle distance
indication through the information display. As the distance to the obstacle decreases,
the indicator blocks illuminate and move
toward the vehicle icon. If there is no
obstacle detected, the distance indicator
blocks show greyed out.
When you shift to reverse (R), the side
sensing system provides audible warnings
when your vehicle is moving and obstacles
are detected within 24 in (60 cm) and are
inside the driving path of your vehicle.
When you stop your vehicle the audible
warning stops after two seconds.
Note:
Visual distance indication remains
on when the transmission is in reverse (R).
When you shift to drive (D) or any other
forward gear, for example, low (L), sport
(S) or any forward gear in manual
transmission, the side sensing system
provides audible and visual distance
warnings when your vehicle is moving
below a speed of
5 mph (8 km/h) and
obstacles are detected within 24 in
(60 cm) and are inside the driving path of
your vehicle. Once your vehicle reaches a
standstill condition, the audible warning
stops after two seconds and visual
indication stops after four seconds.
If the transmission is in neutral (N), the side
sensing system provides visual distance
indication only when your vehicle is moving
below a speed of
5 mph (8 km/h) and
there is a front or rear parking aid obstacle
detected, and the side obstacle is within
24 in (60 cm) from the side of your vehicle.
When you stop your vehicle the visual
distance indication stops after four
seconds.
If the side sensing system is not available,
the side distance indicator blocks do not
appear.
The side sensing system is not available
under the following condition:
• If you switch the traction control
system off.
224
Expedition (TB8) Canada/United States of America, enUSA, Edition date: 201708, Third-Printing- Parking AidsE187810 E190459