2018 FORD E-450 light
[x] Cancel search: lightPage 191 of 323

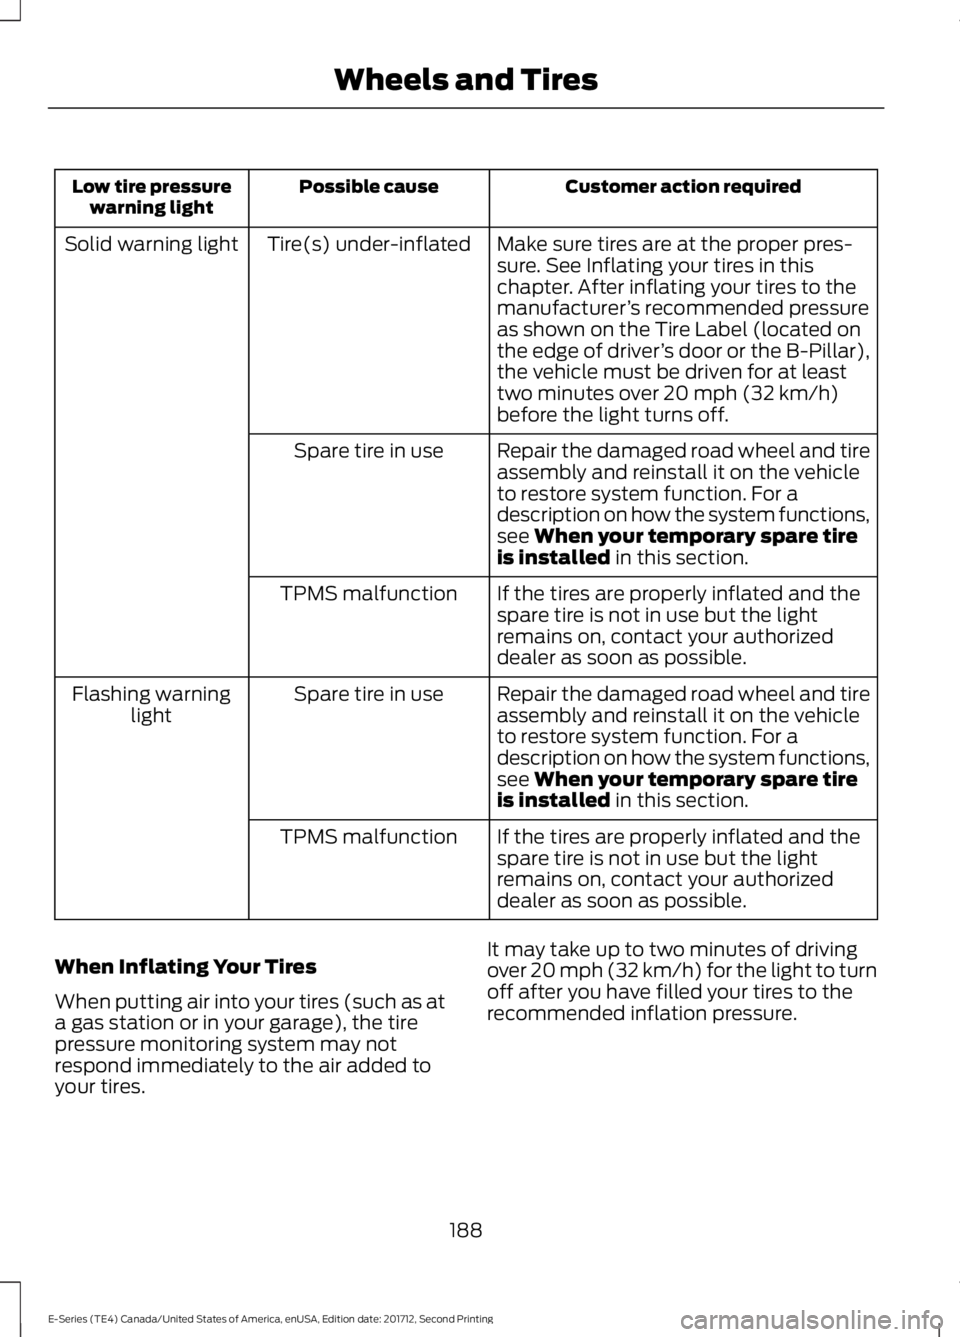
Customer action required
Possible cause
Low tire pressure
warning light
Make sure tires are at the proper pres-
sure. See Inflating your tires in this
chapter. After inflating your tires to the
manufacturer’s recommended pressure
as shown on the Tire Label (located on
the edge of driver ’s door or the B-Pillar),
the vehicle must be driven for at least
two minutes over 20 mph (32 km/h)
before the light turns off.
Tire(s) under-inflated
Solid warning light
Repair the damaged road wheel and tire
assembly and reinstall it on the vehicle
to restore system function. For a
description on how the system functions,
see
When your temporary spare tire
is installed in this section.
Spare tire in use
If the tires are properly inflated and the
spare tire is not in use but the light
remains on, contact your authorized
dealer as soon as possible.
TPMS malfunction
Repair the damaged road wheel and tire
assembly and reinstall it on the vehicle
to restore system function. For a
description on how the system functions,
see
When your temporary spare tire
is installed in this section.
Spare tire in use
Flashing warning
light
If the tires are properly inflated and the
spare tire is not in use but the light
remains on, contact your authorized
dealer as soon as possible.
TPMS malfunction
When Inflating Your Tires
When putting air into your tires (such as at
a gas station or in your garage), the tire
pressure monitoring system may not
respond immediately to the air added to
your tires. It may take up to two minutes of driving
over 20 mph (32 km/h) for the light to turn
off after you have filled your tires to the
recommended inflation pressure.
188
E-Series (TE4) Canada/United States of America, enUSA, Edition date: 201712, Second Printing Wheels and Tires
Page 192 of 323

How Temperature Affects Your Tire
Pressure
The tire pressure monitoring system
monitors tire pressure in each pneumatic
tire. While driving in a normal manner, a
typical passenger tire inflation pressure
may increase about 2
–4 psi (14– 28 kPa)
from a cold start situation. If the vehicle is
stationary overnight with the outside
temperature significantly lower than the
daytime temperature, the tire pressure may
decrease about 3 psi (21 kPa) for a drop of
30°F (17°C) in ambient temperature. This
lower pressure value may be detected by
the tire pressure monitoring system as
being significantly lower than the
recommended inflation pressure and
activate the system warning light for low
tire pressure. If the low tire pressure
warning light is on, visually check each tire
to verify that no tire is flat. If one or more
tires are flat, repair as necessary. Check
the air pressure in the road tires. If any tire
is under-inflated, carefully drive the vehicle
to the nearest location where air can be
added to the tires. Inflate all the tires to
the recommended inflation pressure.
CHANGING A ROAD WHEEL WARNING
To determine the required
pressure(s) for your vehicle, see the
Safety Compliance Certification
Label (on the door hinge pillar, door-latch
post or the door edge that meets the
door-latch post, next to the driver seat) or
the Tire Label on the B-Pillar or the edge
of the driver door. Note:
You should only use tire sealants in
roadside emergencies as they may cause
damage to the tire pressure monitoring
system sensor. Note:
The tire pressure monitoring system
indicator light will illuminate when the spare
tire is in use. To restore the full function of
the monitoring system, all road wheels
equipped with tire pressure monitoring
sensors must be mounted on the vehicle.
Note: Do not use wheels or lug nuts
different than the original equipment, as this
may damage the wheel or mounting system.
If you get a flat tire while driving, do not
apply the brake heavily. Instead, gradually
decrease your speed. Hold the steering
wheel firmly and slowly move to a safe
place on the side of the road.
Have a flat serviced by an authorized
dealer in order to prevent damage to the
tire pressure monitoring system sensors.
See
Tire Pressure Monitoring System
(page 186). Replace the spare tire with a
road tire as soon as possible. During
repairing or replacing of the flat tire, have
the authorized dealer inspect the tire
pressure monitoring system sensor for
damage.
Dissimilar Spare Wheel and Tire
Assembly Information WARNING
Failure to follow these guidelines
could result in an increased risk of
loss of vehicle control, injury or death.
If you have a dissimilar spare wheel and
tire, then it is intended for temporary use
only. This means that if you need to use it,
you should replace it as soon as possible
with a road wheel and tire assembly that
is the same size and type as the road tires
and wheels that were originally provided
by Ford. If the dissimilar spare tire or wheel
is damaged, it should be replaced rather
than repaired.
189
E-Series (TE4) Canada/United States of America, enUSA, Edition date: 201712, Second Printing Wheels and Tires
Page 212 of 323

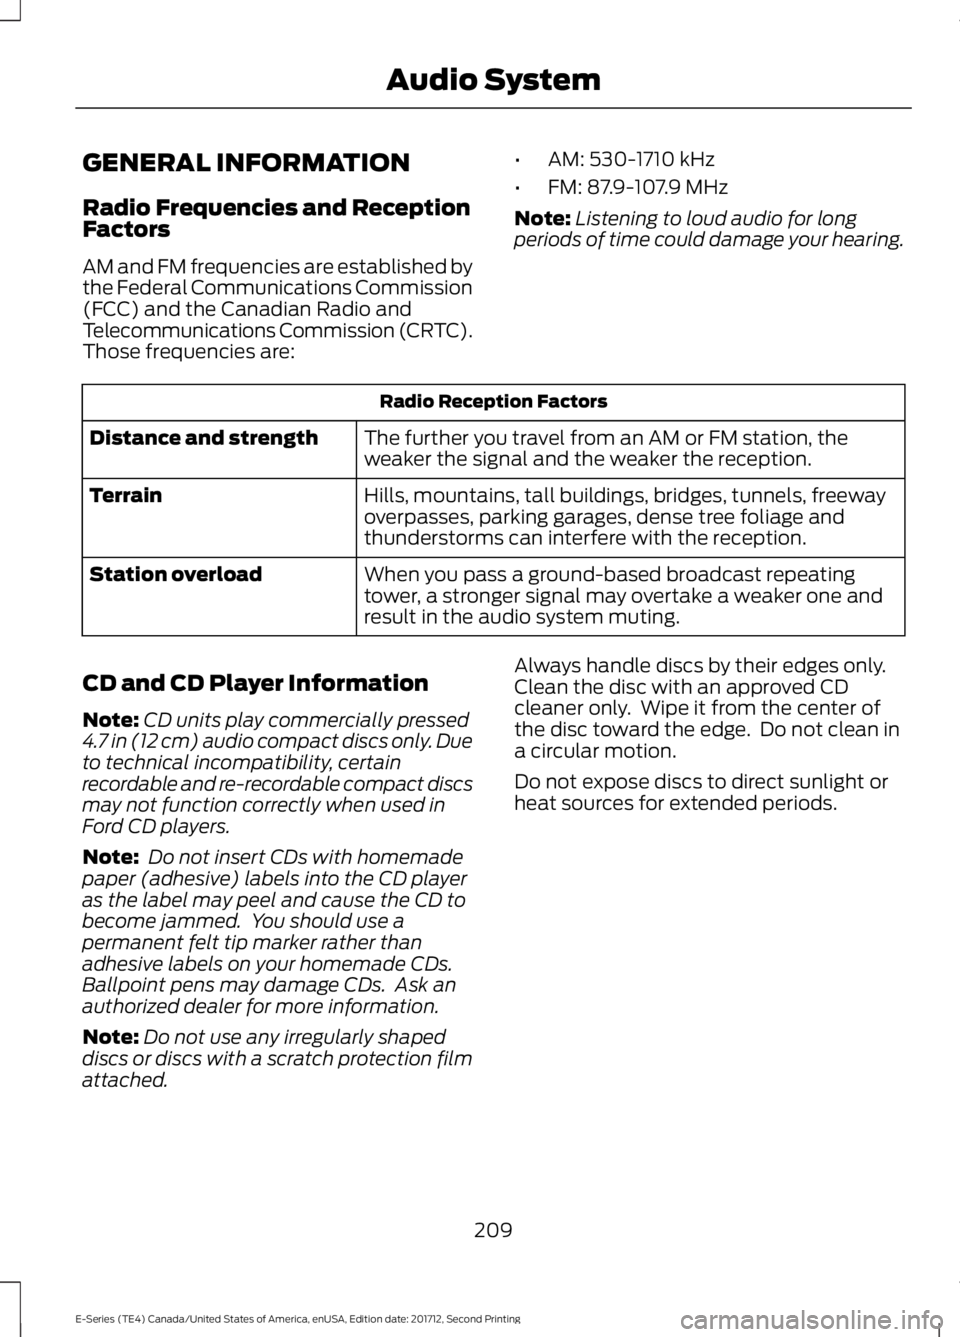
GENERAL INFORMATION
Radio Frequencies and Reception
Factors
AM and FM frequencies are established by
the Federal Communications Commission
(FCC) and the Canadian Radio and
Telecommunications Commission (CRTC).
Those frequencies are:
•
AM: 530-1710 kHz
• FM: 87.9-107.9 MHz
Note: Listening to loud audio for long
periods of time could damage your hearing. Radio Reception Factors
The further you travel from an AM or FM station, the
weaker the signal and the weaker the reception.
Distance and strength
Hills, mountains, tall buildings, bridges, tunnels, freeway
overpasses, parking garages, dense tree foliage and
thunderstorms can interfere with the reception.
Terrain
When you pass a ground-based broadcast repeating
tower, a stronger signal may overtake a weaker one and
result in the audio system muting.
Station overload
CD and CD Player Information
Note: CD units play commercially pressed
4.7 in (12 cm) audio compact discs only. Due
to technical incompatibility, certain
recordable and re-recordable compact discs
may not function correctly when used in
Ford CD players.
Note: Do not insert CDs with homemade
paper (adhesive) labels into the CD player
as the label may peel and cause the CD to
become jammed. You should use a
permanent felt tip marker rather than
adhesive labels on your homemade CDs.
Ballpoint pens may damage CDs. Ask an
authorized dealer for more information.
Note: Do not use any irregularly shaped
discs or discs with a scratch protection film
attached. Always handle discs by their edges only.
Clean the disc with an approved CD
cleaner only. Wipe it from the center of
the disc toward the edge. Do not clean in
a circular motion.
Do not expose discs to direct sunlight or
heat sources for extended periods.
209
E-Series (TE4) Canada/United States of America, enUSA, Edition date: 201712, Second Printing Audio System
Page 217 of 323

When HD Radio is on and you tune to a
station broadcasting HD Radio technology,
you may notice the HD Radio logo on your
screen. When this logo is available, you
may also see Title and Artist fields
on-screen.
The multicast indicator appears in FM
mode (only) if the current station is
broadcasting multiple digital broadcasts.
The highlighted numbers signify available
digital channels where new or different
content is available. HD1 signifies the main
programming status and is available in
analog and digital broadcasts. Other
multicast stations (HD2 through HD7) are
only available digitally.
When HD Radio broadcasts are active, you
can access the following functions:
•
Scan allows you to hear a brief
sampling of all available stations. This
feature still works when HD Radio
reception is on, although it does not
scan for HD2-HD7 channels. You may
see the HD logo appear if the station
has a digital broadcast.
• Memory presets
allow you to save an
active channel as a memory preset.
Touch and hold a memory preset slot
until the sound returns. There is a brief
mute while the radio saves the station.
Sound returns when finished. When
switching to an HD2 or HD3 memory
preset, the sound mutes before the
digital audio plays, because the system
has to reacquire the digital signal.
Note: As with any saved radio station, you
cannot access a station you save if your
vehicle is outside the station ’s reception
area.
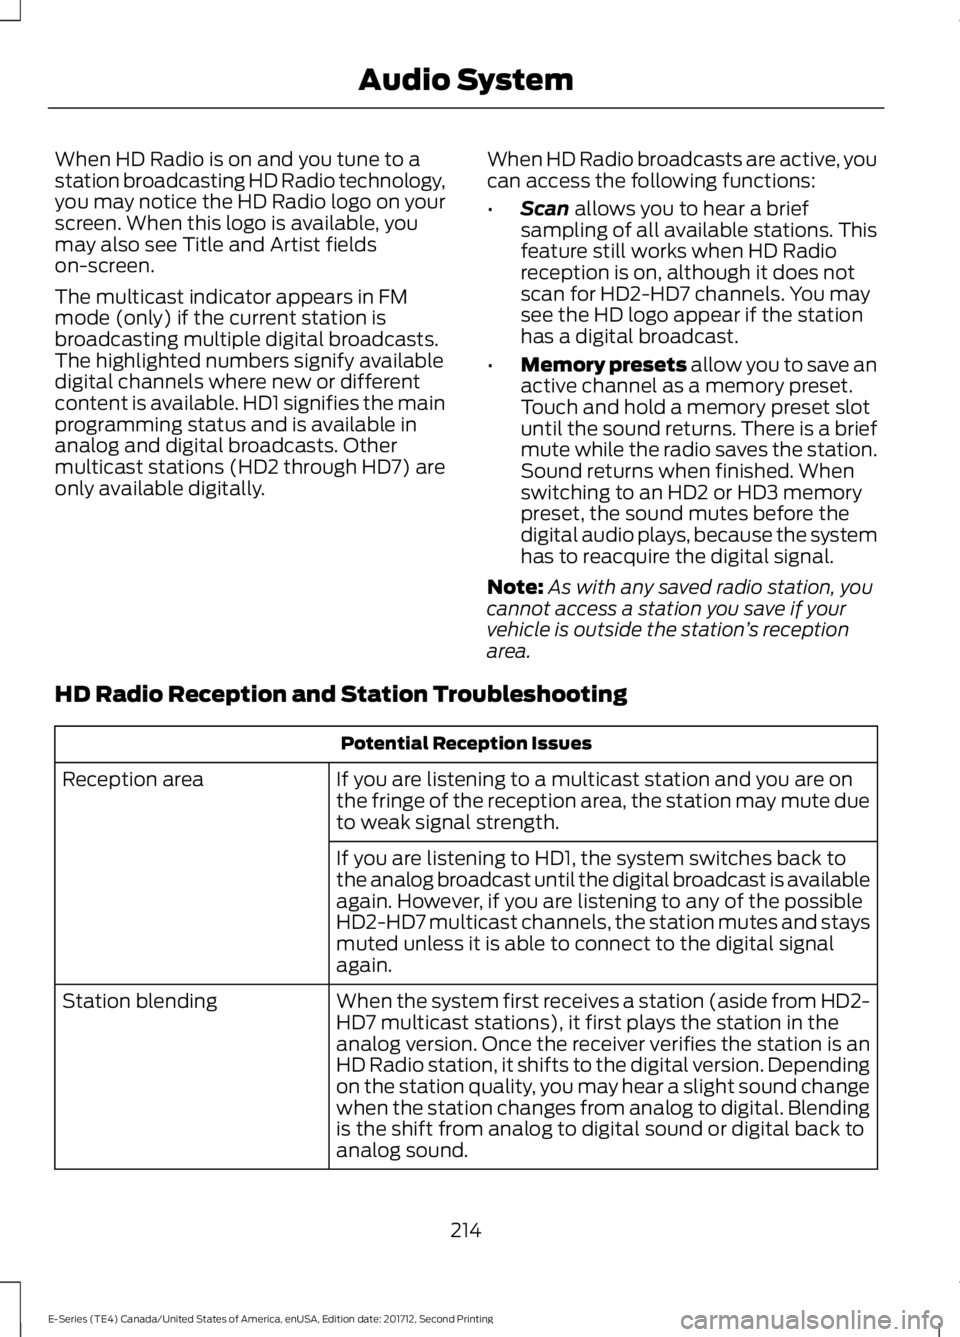
HD Radio Reception and Station Troubleshooting Potential Reception Issues
If you are listening to a multicast station and you are on
the fringe of the reception area, the station may mute due
to weak signal strength.
Reception area
If you are listening to HD1, the system switches back to
the analog broadcast until the digital broadcast is available
again. However, if you are listening to any of the possible
HD2-HD7 multicast channels, the station mutes and stays
muted unless it is able to connect to the digital signal
again.
When the system first receives a station (aside from HD2-
HD7 multicast stations), it first plays the station in the
analog version. Once the receiver verifies the station is an
HD Radio station, it shifts to the digital version. Depending
on the station quality, you may hear a slight sound change
when the station changes from analog to digital. Blending
is the shift from analog to digital sound or digital back to
analog sound.
Station blending
214
E-Series (TE4) Canada/United States of America, enUSA, Edition date: 201712, Second Printing Audio System
Page 274 of 323

Ford Motor Company has recommended
maintenance intervals for various parts
and component systems based upon
engineering testing. Ford Motor Company
relies upon this testing to determine the
most appropriate mileage for replacement
of oils and fluids to protect your vehicle at
the lowest overall cost to you and
recommends against maintenance
schedules that deviate from the scheduled
maintenance information.
We strongly recommend the use of only
genuine Ford, Motorcraft or
Ford-authorized re-manufactured
replacement parts engineered for your
vehicle.
Additives and Chemicals
This owner's manual and the Ford
Workshop Manual list the recommended
additives and chemicals for your vehicle.
We do not recommend using chemicals or
additives not approved by us as part of
your vehicle
’s normal maintenance. Please
consult your warranty information. Oils, Fluids and Flushing
In many cases, fluid discoloration is a
normal operating characteristic and, by
itself, does not necessarily indicate a
concern or that the fluid needs to be
changed. However, a qualified expert, such
as the factory-trained technicians at your
dealership, should inspect discolored fluids
that also show signs of overheating or
foreign material contamination
immediately.
Make sure to change your vehicle
’s oils and
fluids at the specified intervals or in
conjunction with a repair. Flushing is a
viable way to change fluid for many vehicle
sub-systems during scheduled
maintenance. It is critical that systems are
flushed only with new fluid that is the same
as that required to fill and operate the
system or using a Ford-approved flushing
chemical.
Owner Checks and Services
Make sure you perform the following basic
maintenance checks and inspections every
month or at six-month intervals. Check every month
Engine oil level.
Function of all interior and exterior lights.
Tires (including spare) for wear and proper pressure. Windshield washer fluid level. Check every six months
Battery connections. Clean if necessary.
Body and door drain holes for obstructions. Clean if necessary. Cooling system fluid level and coolant strength.
Door weatherstrips for wear. Lubricate if necessary.
271
E-Series (TE4) Canada/United States of America, enUSA, Edition date: 201712, Second Printing Scheduled Maintenance
Page 319 of 323

Vehicle Stationary for Extended Periods
During Extreme High Ambient
Temperatures................................................... 66
Hints on Driving With Anti-Lock Brakes.............................................................90
Hood Lock See: Opening and Closing the Hood...........139
I
Ignition Switch.................................................73
In California (U.S. Only)..............................123
Information Displays
.....................................56
General Information............................................ 56
Information Messages
..................................61
Brake System.......................................................... 61
Fuel........................................................................\
..... 61
Maintenance........................................................... 61
Tire........................................................................\
..... 62
Traction Control.................................................... 62
Trailer........................................................................\
63
Transmission.......................................................... 63
Installing Child Restraints
............................16
Child Seats............................................................... 16
Using Lap and Shoulder Belts.......................... 17
Using Tether Straps.............................................. 19
Instrument Cluster
..........................................51
Instrument Lighting Dimmer.....................48
Instrument Panel Overview........................14
Interior Mirror
...................................................50
Automatic Dimming Mirror.............................. 50
Manual Dimming Mirror..................................... 50
Introduction........................................................5
J
Jump Starting the Vehicle..........................119 Connecting the Jumper Cables...................... 119
Jump Starting....................................................... 120
Preparing Your Vehicle....................................... 119
Removing the Jumper Cables........................ 120
K
Keys and Remote Controls.........................37 L
Lighting Control
...............................................47
Headlamp Flasher............................................... 48
High Beams............................................................. 47
Lighting...............................................................47 General Information............................................ 47
Limited Slip Differential..............................89
Load Carrying
...................................................97
Load Limit.........................................................97 Special Loading Instructions for Owners of
Pick-up Trucks and Utility-type
Vehicles.............................................................. 101
Vehicle Loading - with and without a Trailer.................................................................... 97
Locking and Unlocking
................................40
Autolock Feature................................................... 41
Autounlock Feature.............................................. 41
Enabling or Disabling Autolock and Autounlock......................................................... 41
Illuminated Entry................................................... 41
Power Door Locks................................................ 40
Remote Control.................................................... 40
Lug Nuts See: Changing a Road Wheel........................ 189
M
Maintenance..................................................139 General Information.......................................... 139
Manual Climate Control..............................64 Heater Only System............................................ 64
Manual Climate Control.................................... 65
Manual Seats..................................................69 Manual Lumbar ................................................... 69
Moving the Seat Backward and Forward.............................................................. 69
Recline Adjustment............................................ 69
Message Center See: Information Displays................................. 56
Mirrors See: Windows and Mirrors................................ 49
Mobile Communications Equipment
.......12
Motorcraft Parts - 6.2L...............................195
Motorcraft Parts - 6.8L..............................196
316
E-Series (TE4) Canada/United States of America, enUSA, Edition date: 201712, Second Printing Index
Page 322 of 323

U
Under Hood Overview................................139
USB Port..........................................................218
Using Cruise Control.....................................95 Switching Cruise Control Off........................... 95
Switching Cruise Control On............................ 95
Using Snow Chains......................................185
Using SYNC™ With Your Media Player............................................................246
Accessing Your Play Menu............................... 251
Connecting Your Digital Media Player to the USB Port.......................................................... 246
Media Menu Features...................................... 249
Media Voice Commands................................ 248
System Settings................................................. 253
What's Playing?................................................. 248
Using SYNC™ With Your Phone............224 Accessing Features Through the Phone
Menu.................................................................. 228
Accessing Your Phone Settings.................... 233
Making a Call........................................................ 227
Pairing Subsequent Cell Phones.................225
Pairing Your Cell Phone for the First Time ........................................................................\
......224
Phone Options during an Active Call..........227
Phone Voice Commands................................ 225
Receiving Calls.................................................... 227
System Settings................................................. 234
Text Messaging.................................................... 231
Using Traction Control
.................................92
Switching the System Off ................................ 92
System Indicator Lights and Messages............................................................ 92
Using Voice Recognition.............................221 Initiating a Voice Session................................. 221
System Interaction and Feedback..............222
Utilizing the Mediation/Arbitration Program (Canada Only)
.........................125
V
Vehicle Care
....................................................159
General Information.......................................... 159
Vehicle Certification Label........................198
Vehicle Identification Number.................197
Vehicle Storage
.............................................164
Battery.................................................................... 164Body........................................................................\
164
Brakes..................................................................... 165
Cooling system.................................................... 164
Engine..................................................................... 164
Fuel system.......................................................... 164
General................................................................... 164
Miscellaneous...................................................... 165
Removing Vehicle From Storage.................. 165
Tires........................................................................\
. 165
Ventilation See: Climate Control.......................................... 64
VIN See: Vehicle Identification Number.............197
Voice Control
...................................................45
W
Warning Lamps and Indicators
.................52
Airbag Warning Lamp......................................... 53
Anti-Lock Brake System Warning Lamp.................................................................... 53
Anti-Theft System............................................... 53
Battery...................................................................... 53
Brake System Warning Lamp.......................... 53
Check Fuel Cap..................................................... 53
Cruise Control Indicator..................................... 53
Direction Indicator................................................ 53
Engine Coolant Temperature Warning Lamp.................................................................... 53
Engine Oil................................................................ 54
Fasten Seatbelt Warning Lamp...................... 54
Headlamp High Beam Indicator..................... 54
Low Fuel Level Warning Lamp........................ 54
Low Tire Pressure Warning Lamp.................. 54
Powertrain Malfunction/Electronic Throttle Control................................................................. 54
Service Engine Soon........................................... 54
Tow Haul Indicator............................................... 55
Traction Control System................................... 54
Traction Control System Off............................ 55
Washer Fluid Check.....................................150
Washers See: Cleaning the Exterior............................... 159
See: Wipers and Washers................................. 46
Waxing...............................................................161
Wheel Nuts See: Changing a Road Wheel........................ 189
319
E-Series (TE4) Canada/United States of America, enUSA, Edition date: 201712, Second Printing Index