2018 FIAT FULLBACK fuel
[x] Cancel search: fuelPage 98 of 316

NOTE If fuel is added with the ignition
switch or the operation mode is ON,
the fuel gauge may incorrectly indicate
the fuel level.
NOTE The fuel lid mark (A) indicates
that the fuel tank filler door is located on
the left side of the vehicle.
Fuel remaining warning display
If the remaining fuel level is
approximately 10 litres or less (one
segment displayed) when the ignition
switch is turned to the “ON” position or
the operation mode is changed to ON,
the last segment of the fuel gauge
flashes. If the remaining fuel level is
reduced further, the last segment of the
fuel gauge goes out and
flash.
49)
NOTE On inclines or curves, the
display may be incorrect due to the
movement of fuel in the tank.Service reminder
Displays the approximate time until the
next periodic inspection that Fiat
recommends.“---” is displayed when
the inspection time has arrived.
The spanner mark indicates the
periodic inspection.
NOTE Depending on the vehicle
specifications, the displayed time until
the next periodic inspection may differ
from that of FCA Italy SpA
recommends. In addition, the display
settings for the next periodic inspection
time can be modified. To modify the
display settings, have it adjusted at a
Fiat Dealership. For more details,
contact a Fiat Dealership.
* — Distance
** — Months
1. Displays the time until the next
periodic inspection.NOTE The distance is shown in units of
100 km (100 miles). The time is shown
in units of months.
2. This informs you that a periodic
inspection is due. Please consult a Fiat
Dealership.
3. After your vehicle is inspected at a
Fiat Dealership, it displays the time until
the next periodic inspection.
To reset
The “---” display can be reset while the
ignition switch or the operation mode is
in OFF.
1. When you lightly press the multi
information display switch a few times,
the information display switches to the
service reminder display.
2. Press and hold the multi information
display switch for about 2 seconds or
more to make the spanner mark start
flashing. (If there is no operation for
about 10 seconds with flashing, the
190AHA101312191AHA101325192AHA101338
96
KNOWING THE INSTRUMENT PANEL
Page 99 of 316

display will revert to its original
indication.)
3. Lightly press the multi information
display switch while the icon is flashing
to change the display from “---” to
“cLEAr”. After this, the time until the
next periodic inspection will be
displayed.
50)
“---” display cannot be reset when the
ignition switch or the operation mode is
in ON.
When “---” is displayed, after a certain
distance and a certain period of time,
the display is reset and the time until
the next periodic inspection is
displayed.
If you accidentally reset the display,
consult a Fiat Dealership.Changing the function settings
The “Average fuel consumption reset
mode”, “Fuel consumption unit” and
“Temperature unit” setting can be
modified as desired, when the ignition
switch or the operation mode is ON.
117)
118)
Changing the reset mode for
average fuel consumption
The mode conditions for the average
fuel consumption display can be
switched between “Auto reset” and
“Manual reset”.
1. When you lightly press the multi
information display switch a few times,
the information display switches to the
driving range display. Refer to
“Information display”.
2. Each time you press the multi
information display switch for
2 seconds or more on driving range
display, you can switch reset mode for
average fuel consumption (A: Auto reset
mode, B: Manual reset mode).A — Auto Reset Mode
B — Manual Reset Mode
Manual reset mode
When the average fuel consumption
is being displayed, if you hold down the
multi information display switch, the
average fuel consumption displayed at
that time is reset.
When the following operation is
performed, the mode setting is
automatically switched from manual to
auto. Except for vehicles equipped with
the keyless operation system: turn the
ignition switch from the “ACC” or
“LOCK” position to the “ON” position.
For vehicles equipped with the keyless
operation system: change the operation
mode from ACC or OFF to ON.
Switching to auto occurs automatically.
If switching to manual mode is done,
however, the data from the last reset is
displayed.
193AHA101341
194AHA101354
97
Page 100 of 316

Auto reset modeWhen the average fuel consumption
is being displayed, if you hold down the
multi information display switch, the
average fuel consumption displayed at
that time are reset.
When the engine switch or the
operation mode is in the following
conditions, the average fuel
consumption display is automatically
reset. Except for vehicles equipped with
the keyless operation system: the
ignition switch is in the “ACC” or
“LOCK” position for about 4 hours or
longer. For vehicles equipped with the
keyless operation system: the operation
mode is in ACC or OFF for about
4 hours or longer.
IMPORTANT The average fuel
consumption display can be reset
separately for the auto reset mode and
for the manual reset mode.
IMPORTANT The memory of the
manual reset mode or auto reset mode
for the average fuel consumption
display is erased if the battery is
disconnected.
The initial (default) setting is “Auto reset
mode”.Changing the fuel consumption
display unit
The display unit for fuel consumption
can be switched. The distance and
amount units are also switched to
match the selected fuel consumption
unit.When you lightly press the multi
information display switch a few times,
the information display switches to the
average fuel consumption display. Refer
to “Information display”.
Press and hold the multi information
display switch for about 5 seconds or
more until buzzer sound is heard twice.
Press and hold the multi information
display switch to switch in sequence
from “km/L” > “L/100 km” > “mpg” >
“km/L”.The display units for the driving range,
the average fuel consumption are
switched, but the units for the indicating
needle (speedometer), the odometer,
the tripmeter and the service reminder
will remain unchanged.
The memory of the unit setting is
erased if the battery is disconnected,
and it returns automatically to factory
setting.
The distance units is also switched in
the following combinations to match the
selected fuel consumption unit.Fuel
consumptionDistance (driving
range)
km/L km
L/100 km km
mpg mile (s)
Changing the temperature unit
The display unit for outside temperature
can be switched.
1. When you lightly press the multi
information display switch a few times,
the information display switches to the
outside temperature display. Refer to
“Information display”.
2. Each time you press the multi
information display switch for
2 seconds or more on outside
temperature display, you can switch
from °C to °F or from °F to °C unit of
outside temperature display.
195AHA101367
98
KNOWING THE INSTRUMENT PANEL
Page 101 of 316

The temperature value on air
conditioner panel is switched in
conjunction with outside temperature
display unit of the multi information
display. However, “°C” or “°F” are not
shown to temperature display of an air
conditioner.
WARNING
115)There is a danger the road might be
icy, even when this symbol is not flashing,
so please take care when driving.
116)If the engine is overheating, “
” will
blink. In this case, the bar graph is on the
red zone. Immediately park the vehicle in a
safe place and take the required measures.
Refer to “Engine overheating”.
117)The driver should not operate the
display while the vehicle is in motion.
118)When operating the system, stop the
vehicle in a safe area.
IMPORTANT
49)Do not drive with an extremely low fuel
level, running out of fuel could cause
damage to the fuel system.
50)The customer is responsible for making
sure that periodic inspection and
maintenance are performed. Inspections
and maintenance must be performed to
prevent accidents and malfunctions.
99
Page 102 of 316

INDICATOR AND WARNING LAMPS
1. Front fog lamp indicator lamp* 2. Turn-signal indicator lamps/Hazard warning indicator lamps 3. High-beam indicator lamp
4. Start&Stop indicator lamp* 5. Lane departure warning (LDW) standby indicator lamp (green)* — Lane departure warning
(LDW) lamp (amber)* 6. Position lamp indicator lamp* 7. Lane departure warning (LDW) system ON indicator lamp* 8. Rear
fog lamp indicator lamp 9. Cruise control indicator lamp* 10. Diesel particulate filter (DPF) warning lamp* 11. Diesel preheat
indicator lamp 12. Charge warning lamp 13. Check engine warning lamp 14. Fuel filter indicator lamp 15. A/T (automatic
transmission) fluid temperature warning lamp (vehicles with A/T) 16. Oil pressure warning lamp 17. Start&Stop OFF indicator
lamp* 18. Washer fluid level warning lamp* 19. Multi information display 20. For details, refer to “Warning activation” (if so
equipped) 21. For details, refer to “Warning activation” (if so equipped) 22. Door-ajar warning lamp 23. Seat belt
reminder/warning lamp 24. Anti-lock brake system (ABS) warning lamp 25. Electronic Stability Control (ESC) indicator lamp
26. Electronic Stability Control (ESC) OFF indicator lamp 27. Supplemental restraint system (SRS) warning lamp 28. Brake
warning lamp 29. Rear Differential Lock indicator lamp* 30. 2WD/4WD operation indicator lamp* 31. Low-range indicator
lamp* 32. 2WD/4WD operation indicator lamp* 33. Low-range indicator lamp*
* — if so equipped
196AH1100948
100
KNOWING THE INSTRUMENT PANEL
Page 104 of 316
Indicator lamps What it means
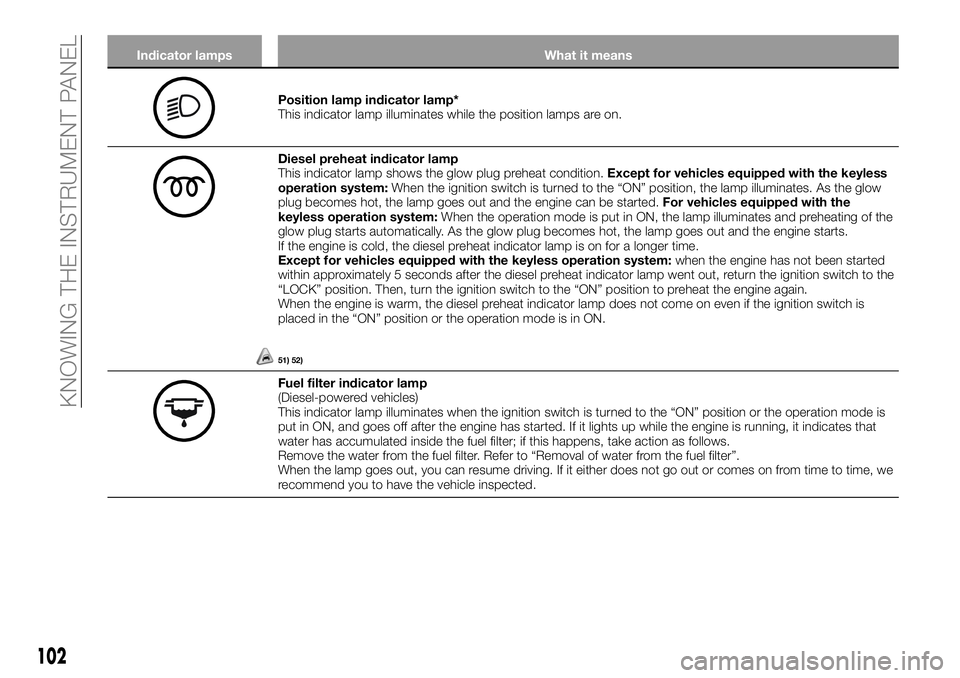
Position lamp indicator lamp*
This indicator lamp illuminates while the position lamps are on.
Diesel preheat indicator lamp
This indicator lamp shows the glow plug preheat condition.Except for vehicles equipped with the keyless
operation system:When the ignition switch is turned to the “ON” position, the lamp illuminates. As the glow
plug becomes hot, the lamp goes out and the engine can be started.For vehicles equipped with the
keyless operation system:When the operation mode is put in ON, the lamp illuminates and preheating of the
glow plug starts automatically. As the glow plug becomes hot, the lamp goes out and the engine starts.
If the engine is cold, the diesel preheat indicator lamp is on for a longer time.
Except for vehicles equipped with the keyless operation system:when the engine has not been started
within approximately 5 seconds after the diesel preheat indicator lamp went out, return the ignition switch to the
“LOCK” position. Then, turn the ignition switch to the “ON” position to preheat the engine again.
When the engine is warm, the diesel preheat indicator lamp does not come on even if the ignition switch is
placed in the “ON” position or the operation mode is in ON.
51) 52)
Fuel filter indicator lamp
(Diesel-powered vehicles)
This indicator lamp illuminates when the ignition switch is turned to the “ON” position or the operation mode is
put in ON, and goes off after the engine has started. If it lights up while the engine is running, it indicates that
water has accumulated inside the fuel filter; if this happens, take action as follows.
Remove the water from the fuel filter. Refer to “Removal of water from the fuel filter”.
When the lamp goes out, you can resume driving. If it either does not go out or comes on from time to time, we
recommend you to have the vehicle inspected.
102
KNOWING THE INSTRUMENT PANEL
Page 109 of 316
WARNING
119)In the following situations, brake
performance may be compromised or the
vehicle may become unstable if brakes are
applied suddenly; consequently, avoid
driving at high speeds or applying the
brakes suddenly. Furthermore, immediately
the vehicle should be brought to a stop in a
safe location and we recommend you to
have it checked. 1 – The brake warning
lamp does not illuminate when the parking
brake is applied or does not turn off when
the parking brake is released.2–The
brake warning lamp and the ABS warning
lamp illuminate at the same time. For
details, refer to “ABS warning lamp”. 3 –
The brake warning lamp remains
illuminated while driving.
120)The vehicle should be brought to a
halt in the following manner when brake
performance has deteriorated. 1 – Depress
the brake pedal harder than usual. Even if
the brake pedal moves down to the very
end of its possible stroke, keep it pressed
down hard. 2 – Should the brakes fail, use
engine braking to reduce your speed and
carefully pull the parking brake lever.
Depress the brake pedal to operate the
stop lamp to alert the vehicles behind you.
IMPORTANT
51)This warning lightwill flash after
starting or during prolonged cranking to
indicate a fault with the glow plug heating
system. If the engine starts, the vehicle can
be used as normal, but a Fiat Dealership
must be contacted as soon as possible.
52)If the diesel preheat indicator lamp
comes on after the engine is started, the
engine speed may not rise above the idling
speed because of fuel freezing. In this case,
keep the engine idling for about
10 minutes, then turn off the ignition switch
or put in OFF the operation mode, and
immediately turn it on or put in ON again to
confirm that the diesel preheat indicator
lamp is off.
53)When this indicator lamp blinks,
electronic stability control function or active
traction control function is operating, which
means that the road is slippery or that your
vehicle’s wheels are beginning to slip. If this
happens, drive slower with less accelerator
input.54)If an abnormal condition occurs in the
system while driving, the
indicator lamp
will illuminate. In these cases, follow these
procedures:1–Ifthetemperature in the
braking system continues to increase due
to continuous brake control on a slippery
road surface, the
indicator lamp will
blink, and operation of the active traction
control function will be suspended to
protect the brake system. (The engine
control of the active traction control
function and normal brake operation will
not be affected). Park your vehicle in a safe
place. When the temperature in the braking
system has come down, the
indicator
lamp will go off and the electronic stability
control function and active traction control
function will start operating again.2–Ifthe
indicator lamp does not go out even
through the above procedure is followed,
there could be a problem in the system.
Stop the engine and start the engine again
and check whether the
indicator lamp
goes out. If the indicator lamp goes out,
there is no abnormal condition.3–Ifthe
indicator lamp illuminates even after
your vehicle is driven a short distance after
re-starting the engine, we recommend you
to have your vehicle checked as soon as
possible.
55)Prolonged driving with this lamp on
may cause further damage to the emission
control system. It could also affect fuel
economy and drivability.
56)If the lamp does not illuminate when the
ignition switch is turned to the “ON”
position or the operation mode is put in
ON, we recommend you to have the
system checked.
107
Page 148 of 316

ECONOMICAL
DRIVING
For economical driving, there are some
technical requirements that have to be
met. The prerequisite for low fuel
consumption is a properly adjusted
engine. In order to achieve longer life of
the vehicle and the most economical
operation, we recommend you to have
the vehicle checked at regular intervals
in accordance with the service
standards.
Fuel economy and generation of
exhaust gas and noise are highly
influenced by personal driving habits as
well as the particular operating
conditions. The following points should
be observed in order to minimize wear
of brakes, tyres and engine as well as
to reduce environmental pollution.
Accelerating and decelerating
Drive according to traffic conditions,
and avoid sudden starts, sudden
acceleration, and sudden braking, as
they will increase fuel consumption.
Shifting
Shift only at an appropriate speed and
engine speed. Always use the highest
shift position possible.
The transfer shift lever or the drive
modeselector should be set to “2H”
when driving 4WD vehicles on normal
roads and express ways to obtain best
possible fuel economy.City traffic
Frequent starting and stopping
increases the average fuel
consumption. Use roads with smooth
traffic flow whenever possible. When
driving on congested roads, avoid use
of a low shift position at high engine
speeds.
Idling
The vehicle consumes fuel even during
idling. Avoid extended idling whenever
possible.
Speed
At higher the vehicle speed, more fuel is
consumed. Avoid driving at full speed.
Even a slight release of the accelerator
pedal will save a significant amount of
fuel.
Tyre inflation pressure
Check the tyre inflation pressures at
regular intervals. Low tyre inflation
pressure increases road resistance and
fuel consumption. In addition, low tyre
pressures adversely affect tyre wear
and driving stability.
Cargo loads
Do not drive with unnecessary articles
in the luggage compartment. Especially
during city driving where frequent
starting and stopping is necessary, the
increased weight of the vehicle will
greatly affect fuel consumption. Also
avoid driving with unnecessary luggage
or carriers, etc., on the roof; theincreased air resistance will increase
fuel consumption.
Cold engine starting
Starting of a cold engine consumes
more fuel. Unnecessary fuel
consumption is also caused by keeping
a hot engine running. After the engine is
started, commence driving as soon as
possible.
Cooler or air conditioning
The use of the air conditioner will
increase the fuel consumption.
146
STARTING AND DRIVING