2018 FIAT 500L radio
[x] Cancel search: radioPage 170 of 268

74)Incorrect installation of electric and
electronic devices may cause severe
damage to your car. After purchasing your
vehicle, if you wish to install any
accessories (e.g. anti-theft, radio phone,
etc.), go to a Fiat Dealership, which will
suggest the most suitable devices and
advise you whether a higher capacity
battery needs to be installed.
WARNING
3)Used engine oil and oil filters contain
substances which are harmful to the
environment. To change the oil and filters,
we advise you to contact a Fiat Dealership.
4)Used transmission oil contains
substances that may be dangerous for the
environment. It is advisable to contact a
Fiat Dealership to have the oil changed.
5)Batteries contain substances which are
very harmful for the environment. For
battery replacement, contact a Fiat
Dealership.
BATTERY
RECHARGING
162) 163)
IMPORTANT After turning the ignition
key to STOP and having closed the
driver side door, wait at least 1 minute
before disconnecting the electrical
supply from the battery. When
reconnecting the electrical supply to the
battery, make sure that the ignition
device is in the STOP position and the
driver side door is closed.
IMPORTANT Charging should be slow
at a low ampere rating for
approximately 24 hours. Charging for a
longer time may damage the battery.IMPORTANT Make sure that the cables
of the electrical system are correctly
reconnected to the battery: the positive
cable (+) to the positive terminal and
the negative cable (-) to the negative
terminal. The battery terminals are
marked with the positive (+) and
negative (–) symbols, and are shown on
the battery cover. The battery terminals
must also be corrosion-free and firmly
secured to the terminals. If a "quick-
type" battery charger is used with the
battery fitted on the vehicle, before
connecting it disconnect both cables of
the battery itself. Do not use a
"quick-type" battery charger to provide
the starting voltage.
IMPORTANT The battery recharging
procedure is given as information only.
You are advised to contact a Fiat
Dealership to have this operation
carried out.
VERSIONS WITHOUT
Start&Stop SYSTEM
(for versions/markets, where provided)
To recharge, proceed as follows:
disconnect the terminal from the
negative battery pole;
connect the charger cables to the
battery terminals, observing the polarity;
turn on the battery charger;
168
SERVICING AND CARE
Page 221 of 268

TIPS, CONTROLS
AND GENERAL
INFORMATION
ROAD SAFETY
169) 170)
Learn how to use the various system
functions before setting off.
Read the instructions for the system
carefully before setting off.
RECEPTION CONDITIONS
Reception conditions change
constantly while driving. Reception may
be interfered with by the presence of
mountains, buildings or bridges,
especially when you are far away from
the broadcaster.
IMPORTANT The volume may be
increased when receiving traffic
information and news.
CARE AND MAINTENANCE
85) 86)
Observe the following precautions to
ensure the system is fully operational:
the display lens should not come
into contact with pointed or rigid
objects which could damage its
surface; use a soft, dry anti-static cloth
to clean and do not press.
never use alcohol, petrols and
derivatives to clean the display lens.
Prevent any liquid from entering the
system: this could damage it beyond
repair.
MULTIMEDIA DEVICES
IMPORTANT Some multimedia player
may not be compatible with the
Uconnect™ system.
Only use devices (e.g. USB flash drives)
from safe sources on the car. Devices
from unknown sources could contain
software infected by viruses which,
if installed on the car, could increase the
vulnerability of the car's electric/
electronic systems to hacking.
ANTITHEFT PROTECTION
The system is equipped with an
anti-theft protection system based on
the exchange of information with the
electronic control unit (Body Computer)
on the vehicle.
This guarantees maximum safety and
prevents the secret code from being
entered after the power supply has
been disconnected.If the check has a positive outcome, the
system will start to operate, whereas if
the comparison codes are not the
same or if the electronic control unit
(Body Computer) is replaced, the
system will ask the user to enter the
secret code according to the procedure
described in the paragraph below.
Entering the secret code
When the system is switched on, if the
code is requested, the display will
show "Please enter Anti-Theft Code"
followed by the screen showing a
keypad to enter the secret code.
The secret code has four numbers from
0 to 9: to insert the code numbers,
rotate the BROWSE/ENTER dial and
press to confirm.
After entering the fourth number the
system will start functioning.
If an incorrect code is entered, the
system displays "Incorrect Code" to
notify the user of the need to enter the
correct code.
After the 3 available attempts to enter
the code, the system displays
"Incorrect Code. Radio locked. Wait for
30 minutes". After the text has
disappeared it is possible to start the
code entering procedure again.
219
Page 222 of 268

Vehicle radio passport
This document certifies ownership of
the system. The vehicle radio passport
shows the system model, serial number
and secret code.
In case of loss of the car radio
passport, contact the Fiat Dealership,
taking an ID document and the car
ownership documents.
IMPORTANT Keep the vehicle radio
passport in a safe place so that you
can give the information to the relevant
authorities if the system is stolen.
IMPORTANT NOTES
In the event of a fault, the system must
only be checked and repaired by a
Fiat Dealership.
If the temperature is particularly low, the
display may take a while to reach
optimum brightness.
If the car is stopped for a while and the
external temperature is very high, the
system may go into “thermal
protection” mode, suspending
operation until the radio temperature
returns to acceptable levels.Look at the screen only and when it is
necessary and safe. If you need to look
at the screen for a long time, pull over
to a safe place so as not to be
distracted while driving.
Immediately stop using the system in
the event of a fault. Otherwise the
system might be damaged. Contact a
Fiat Dealership as soon as possible
to have the system repaired.
WARNING
169)Follow the safety rules here below:
otherwise serious injuries may occur to the
occupants or the system may be
damaged.
170)If the volume is too loud this can be
dangerous. Adjust the volume so that
you can still hear background noises (e.g.
horns, ambulances, police vehicles, etc.).
WARNING
85)Only clean the front panel and the
display with a soft, clean, dry, anti-static
cloth. Cleaning and polishing products
may damage the surface. Do not use
alcohol or similar products to clean the
control panel or the display.
86)Do not use the display as a base for
supports with suction pads or adhesives
for external navigators or smartphones
or similar devices.
220
MULTIMEDIA
Page 224 of 268

FRONT PANEL CONTROL SUMMARY TABLE
Button Functions Mode
Power on/off Short button press
Volume adjustment Left/right rotation of knob
Volume activation/deactivation (Mute/Pause) Short button press
Display on/off Short button press
Access car settings menu Short button press
Exit the selection/return to previous screen Short button press
BROWSE ENTERScrolling the list or tuning to a radio station Left/right rotation of knob
Confirmation of the option displayed Short button press
APPSAccess to additional features (e.g. Time display,
outside temperature, Media, Radio, eco:drive
data function,UConnect™LIVE services, if
any)Short button press
PHONEPhone data display Short button press
TRIPAccess to the TRIP menu Short button press
MEDIASource selection: USB/iPod, AUX or
Blu-
etooth®Short button press
RADIOAccess to the Radio mode Short button press
222
MULTIMEDIA
Page 227 of 268

CONTROLS BEHIND THE STEERING WHEEL
Button A Interaction
Button A (steering wheel left
side)
Upper button
Brief button press: search for next radio station or selection of USB/iPod next track.
Long button press: scan of higher frequencies until released/fast forward of USB/iPod track.
Central buttonWith each press it scrolls through sources AM, FM, DAB, USB/iPod, AUX. Only the available sources will be
selected.
Lower button
Brief button press: search for previous radio station or selection of USB/iPod previous track.
Long button press: scan of lower frequencies until released/fast forward of USB/iPod track.
Button B (steering wheel
right side)
Upper buttonIncreasing volume
Brief button press: single volume increase
Long button press: fast volume increase
Central button Activation/deactivation of Mute / Pause function
Lower buttonDecreasing volume
Brief button press: single volume decrease
Long button press: fast volume decrease
225
Page 228 of 268

SYSTEM ON / OFF
The system is switched on/off by
pressing the
(ON/OFF) button/knob.
Turn the button/knob clockwise to
increase the radio volume or
anticlockwise to decrease it.
USB/iPod/AUX SUPPORT
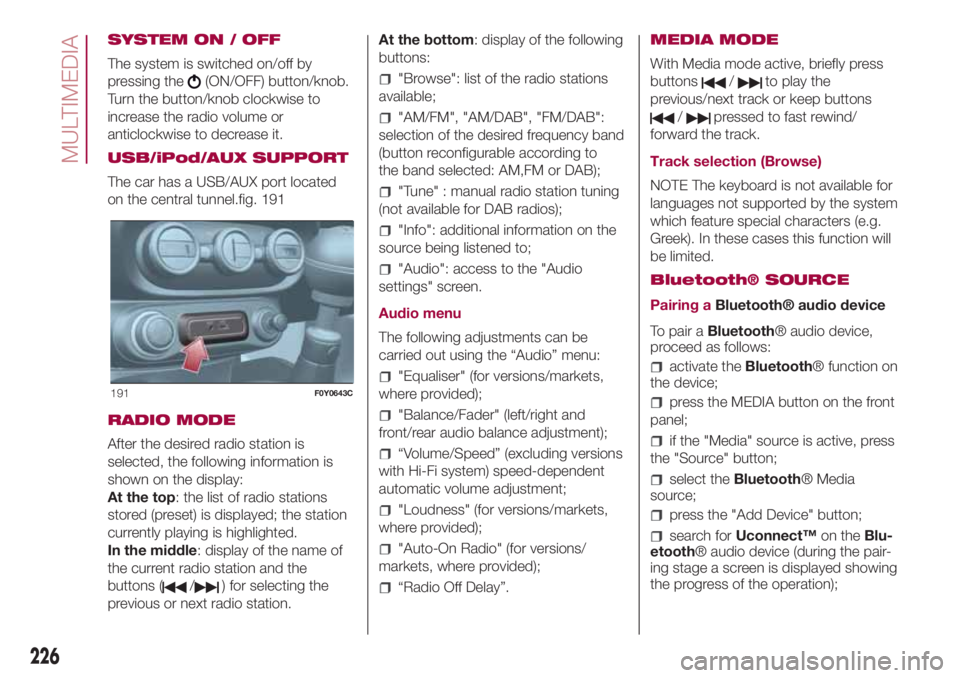
The car has a USB/AUX port located
on the central tunnel.fig. 191
RADIO MODE
After the desired radio station is
selected, the following information is
shown on the display:
At the top: the list of radio stations
stored (preset) is displayed; the station
currently playing is highlighted.
In the middle: display of the name of
the current radio station and the
buttons (
/) for selecting the
previous or next radio station.At the bottom: display of the following
buttons:
"Browse": list of the radio stations
available;
"AM/FM", "AM/DAB", "FM/DAB":
selection of the desired frequency band
(button reconfigurable according to
the band selected: AM,FM or DAB);
"Tune" : manual radio station tuning
(not available for DAB radios);
"Info": additional information on the
source being listened to;
"Audio": access to the "Audio
settings" screen.
Audio menu
The following adjustments can be
carried out using the “Audio” menu:
"Equaliser" (for versions/markets,
where provided);
"Balance/Fader" (left/right and
front/rear audio balance adjustment);
“Volume/Speed” (excluding versions
with Hi-Fi system) speed-dependent
automatic volume adjustment;
"Loudness" (for versions/markets,
where provided);
"Auto-On Radio" (for versions/
markets, where provided);
“Radio Off Delay”.MEDIA MODE
With Media mode active, briefly press
buttons
/to play the
previous/next track or keep buttons
/pressed to fast rewind/
forward the track.
Track selection (Browse)
NOTE The keyboard is not available for
languages not supported by the system
which feature special characters (e.g.
Greek). In these cases this function will
be limited.
Bluetooth® SOURCE
Pairing aBluetooth® audio device
To pair aBluetooth® audio device,
proceed as follows:
activate theBluetooth® function on
the device;
press the MEDIA button on the front
panel;
if the "Media" source is active, press
the "Source" button;
select theBluetooth® Media
source;
press the "Add Device" button;
search forUconnect™on theBlu-
etooth® audio device (during the pair-
ing stage a screen is displayed showing
the progress of the operation);
191F0Y0643C
226
MULTIMEDIA
Page 229 of 268

when requested by the audio
device, enter the PIN code shown on
the system display or confirm on the
device the PIN displayed;
if the pairing procedure is completed
successfully, a screen is displayed.
Answer "Yes" to the question to pair the
Bluetooth® audio device as favourite
(the device will have priority over all
other devices to be paired subse-
quently). Selecting "No" will mean the
priority will be determined by the order
in which they were connected. The last
device connected will have the highest
priority;
an audio device can also be paired
by pressing the PHONE button on
the front panel and by selecting
"Settings" or, from the "Settings" menu,
selecting "Phone/Bluetooth".
IMPORTANT If theBluetooth® con-
nection between mobile phone and
system is lost, consult the mobile
phone handbook.
PHONE MODE
Phone mode activation:
Press the PHONE button on the front
panel to activate the Phone mode.
Use the buttons on the display to:
dial the phone number (using the
graphic keypad on the display);
display and call the contacts in the
mobile phone phonebook;
display and call contacts from the
registers of previous calls;
pair up to 10 phones/audio devices
to make access and connection easier
and quicker;
transfer calls from the system to the
mobile phone and vice versa and
deactivate the microphone audio for
private conversations.
The mobile phone audio is transmitted
through the car’s audio system; the
system automatically mutes the
Uconnect™system audio when the
Phone function is used.
NOTE To consult the list of mobile
phones and supported functions, visit
the www.driveuconnect.eu website
Pairing a mobile phone
Proceed as follows:
activate theBluetooth® function on
the mobile phone;
press the PHONE button on the
front panel;
if no phone is paired with the system
yet, the display shows a dedicated
screen;
select “Yes” to start the pairing
procedure, then search for the
Uconnect™device on the mobile
phone (if "No" is selected, the Phone
main screen is displayed);
when prompted by the mobile
phone, use its keypad to enter the PIN
code shown on the system display
or confirm on the mobile phone the PIN
displayed;
from the “Phone” screen you can
always pair a mobile phone by pressing
the “Settings” button: press the “Add
Device” button and proceed as
described above.
During the pairing stage a screen is
displayed showing the progress of the
operation. When the pairing procedure
is completed successfully, a screen is
displayed: answer “Yes” to the question
to pair the mobile phone as favourite
(the mobile phone will have priority over
all other mobile phones to be paired
subsequently). If no other devices are
paired, the system will consider the first
associated device as favourite.
NOTE After updating the phone
software, for proper operation, it is
recommended to remove the phone
from the list of devices linked to the
radio, delete the previous system
pairing also from the list ofBluetooth®
devices on the phone and make a new
pairing.
227
Page 231 of 268

Browsing text messages
(for versions/markets, where provided)
Using the steering wheel commands,
you can view and manage the last
10 SMS messages received on the
instrument panel display. To use this
function the mobile phone must
support the SMS exchange function
throughBluetooth®.
Select “Phone” on the instrument panel
Setup menu and then select “SMS
reader” using the
/steering
wheel controls. The "SMS reader"
submenu allows the last 10 SMS
messages to be displayed.
Uconnect™ LIVE
SERVICES
(where provided)
Press the APPS button to access the
menu where all the application
functions of the system are present,
such as: time display,eco:Drive™
function data, Trip Computer, Outdoor
temperature, Settings,Uconnect™
LIVEapplications.
If there is aUconnect™ LIVEicon, the
system is set up for the connected
services and allows the applications to
be used directly from the radio menu,
for a more efficient and advanced
use of the car.The application functions are present
according to the vehicle configuration
and to the market.
To use theUconnect™ LIVEservices,
you need to:
to downloadUconnect™LIVEApp
from "App Store" or "Google play" on
your compatible smartphone, making
sure that the data connection is
enabled;
register, through theUconnect™
LIVE Appon the
www.driveuconnect.eu or www.fiat.it
website
start theUconnect™LIVEapp on
your smart phone and enter your
credentials.
For more information relating to the
services available on the market,
consult the www.driveuconnect.eu site.
First access to the car
After starting theUconnect™ LIVE
App and entering your credentials,
to access theUconnect™LIVEApp
services in the car you needBlu-
etooth® pairing between your smart
phone and theUnconnect ™system
as described in the "Registering your
cell phone" section. The list of sup-
ported mobile phones is available on
www.driveuconnect.euAfter pairing, press theUconnect™
LIVEbutton on the display to access
the connected services.
When the activation process is
completed, the display shows a
dedicated message. In the case of
services that require a personal profile,
you can connect your own account
through theUconnect™ LIVEApp or
in the reserved area on the
www.driveuconnect.eu site.
User not connected
If the device is not paired to aBlu-
etooth® telephone, if theUconnect™
LIVEbutton is pressed, the system
menu has its icons disabled, except for
eco:Drive™.
For further details on theeco:Drive™
function refer to the dedicated
paragraph.
Uconnect™ LIVE services setup
using the dedicated menu
Using theUconnect™system menu
dedicated toUconnect ™LIVE
services the “Settings” section can be
accessed by pressing the
icon. In
this section you can check the system
options and change them according
to your preferences.
229