Page 445 of 568
, B, and C,
representing the tire’s resistance to the generation of
heat and its ability to dissipate heat, when tested under
controlled")
Temperature Grades
The Temperature grades are A (the highest), B, and C,
representing the tire’s resistance to the generation of
heat and its ability to dissipate heat, when tested under
controlled conditions on a specified indoor laboratory
test wheel.
Sustained high temperature can cause the material of
the tire to degenerate and reduce tire life, and excessive
temperature can lead to sudden tire failure. The grade C
corresponds to a level of performance, which all pas-
senger vehicle tires must meet under the Federal Motor
Vehicle Safety Standard No. 109. Grades B and A
represent higher levels of performance on the laboratory
test wheel, than the minimum required by law.
WARNING!
The temperature grade for this tire is established for
a tire that is properly inflated and not overloaded.
Excessive speed, under-inflation, or excessive load-
ing, either separately or in combination, can cause
heat buildup and possible tire failure.STORING THE VEHICLE
If the vehicle should remain stationary for more than a
month, observe the following precautions:
•
Park your vehicle in a covered, dry and possibly airy
location the windows open slightly.
• Check that the Electric Park Brake is not engaged.
• Disconnect the negative (-) terminal from the battery
post and be sure that the battery is fully charged. During
storage check battery charge quarterly.
• If you do not disconnect the battery from the electrical
system, be sure to check the battery charge every 30
days. Also, it is recommended that you use storage
mode. For more information refer to “Instrument Clus-
ter Display Menu Items” in “Getting To Know Your
Instrument Panel”.
• Clean and protect the painted parts by applying protec-
tive waxes.
• Clean and protect polished metal parts by applying
protective waxes.
• Apply talcum powder to the front and rear wiper blades
and leave raised from the glass.
8
SERVICING AND MAINTENANCE 443
Page 446 of 568

•Cover the vehicle with an appropriate cover taking care
not to damage the painted surface by dragging across
dirty surfaces. Do not use plastic sheeting which will not
allow the evaporation of moisture present on the surface
of the vehicle.
• Inflate the tires at a pressure of +7.25 psi (+0.5 bar)
higher than recommended on the tire placard and check
it periodically.
• Do not drain the engine cooling system.
•
Whenever you leave the vehicle is stationary for two weeks
or more, run idle the engine for approximately five minutes,
with the air conditioning system on and high fan speed.
This will ensure a proper lubrication of the system, thus
minimizing the possibility of damage to the compressor
when the vehicle is put back into operation.
CAUTION!
Before removal of the positive and negative terminals
to the battery, wait at least a minute with ignition
switch in the OFF position and close the driver ’s door.
When reconnecting the positive and negative terminals
to the battery be sure the ignition switch is in the OFF
position and the driver ’s door is closed.
Battery Storage Mode
With the ignition in the ON position, engine not running,
navigate to the battery gauge page on the instrument cluster
display, then press and hold the OK button. The vehicle will be
put into battery storage mode, which will greatly increase the
amount of time the vehicle can sit and restart without needing
to disconnect the battery. Going into battery storage mode will
increase the amount of time between starts to about 60 days.
NOTE: The key fob buttons will not work while the
vehicle is in battery storage mode, pulling the door handle
will wake the vehicle and allow it to recognize the key fob
to unlock the door.
BODYWORK
Protection From Atmospheric Agents
Vehicle body care requirements vary according to geographic
locations and usage. Chemicals that make roads passable in
snow and ice and those that are sprayed on trees and road
surfaces during other seasons are highly corrosive to the metal
in your vehicle. Outside parking, which exposes your vehicle
to airborne contaminants, road surfaces on which the vehicle
is operated, extreme hot or cold weather and other extreme
conditions will have an adverse effect on paint, metal trim,
and underbody protection.
444 SERVICING AND MAINTENANCE
Page 467 of 568

Customer Programmable Features — Uconnect
4C/4C NAV Settings
Press the “Apps” button, then press the “Settings”
button on the touchscreen to display the menu setting
screen. In this mode the Uconnect system allows you to
access programmable features that may be equipped
such as Display, Units, Voice, Clock, Safety & Driving
Assistance, Lights, Doors & Locks, Auto-On Comfort,
Engine Off Options, Audio, Phone/Bluetooth, SiriusXM
Setup, Restore Settings, Clear Personal Data, and Sys-
tem Information.
NOTE: Depending on the vehicles options, feature settings
may vary.
When making a selection, press the button on the touch-
screen to enter the desired mode. Once in the desired mode, press and release the preferred setting “option” until
a check-mark appears next to the setting, showing that
setting has been selected. Once the setting is complete,
either press the “Back” Arrow button on the touchscreen to
return to the previous menu, or press the “X” button on the
touchscreen to close out of the settings screen. Pressing the
“Up” or “Down” Arrow button on the right side of the
screen will allow you to toggle up or down through the
available settings.
Display
After pressing the “Display” button on the touchscreen, the
following settings will be available:
Setting Name
Selectable Options
Display Mode ManualAuto
Display Brightness With Headlights ON +-
NOTE:
To make changes to the �Display Brightness with Headlights ON� setting, the headlights must be on and the interior
dimmer switch must not be in the �party�or�parade� positions.
10
MULTIMEDIA 465
Page 468 of 568
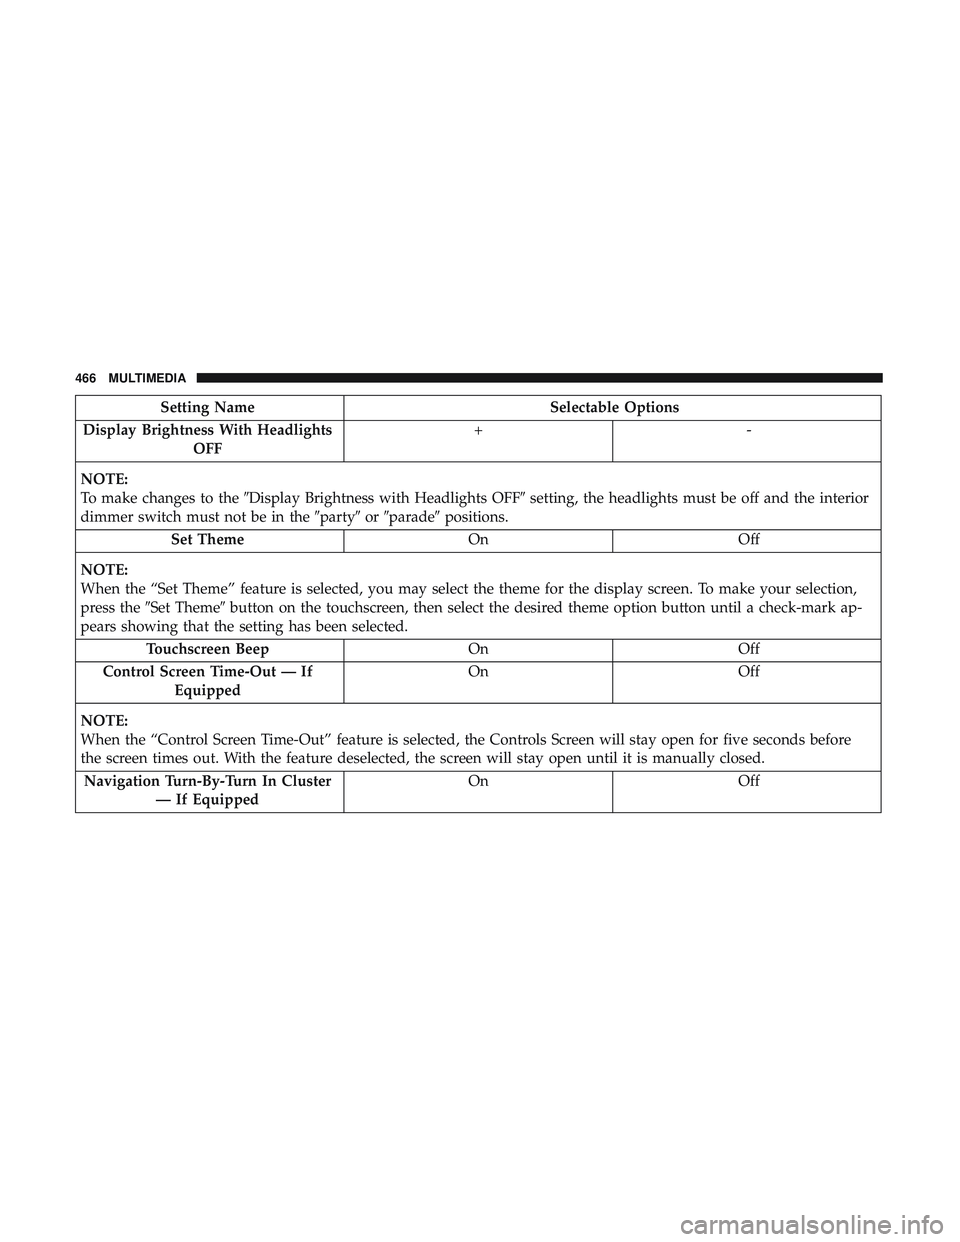
Setting NameSelectable Options
Display Brightness With Headlights OFF +-
NOTE:
To make changes to the �Display Brightness with Headlights OFF� setting, the headlights must be off and the interior
dimmer switch must not be in the �party�or�parade� positions.
Set Theme OnOff
NOTE:
When the “Set Theme” feature is selected, you may select the theme for the display screen. To make your selection,
press the �Set Theme� button on the touchscreen, then select the desired theme option button until a check-mark ap-
pears showing that the setting has been selected.
Touchscreen Beep OnOff
Control Screen Time-Out — If Equipped On
Off
NOTE:
When the “Control Screen Time-Out” feature is selected, the Controls Screen will stay open for five seconds before
the screen times out. With the feature deselected, the screen will stay open until it is manually closed. Navigation Turn-By-Turn In Cluster — If Equipped On
Off
466 MULTIMEDIA
Page 469 of 568
Setting NameSelectable Options
NOTE:
When the “Navigation Turn-By-Turn In Cluster” feature is selected, the turn-by-turn directions will appear in the in-
strument cluster display as the vehicle approaches a designated turn within a programmed route. Phone Pop-ups Displayed in Cluster OnOff
Units
After pressing the “Units” button on the touchscreen, you
may select each unit of measure independently displayed
in the instrument cluster display, and navigation system (if
equipped). The following selectable units of measure are
listed below:
Setting Name Selectable Options
Units USMetric Custom
NOTE:
The “Custom” option allows you to set the “Speed” (MPH, or km/h), “Distance” (mi, or km), “Fuel Consumption”
[MPG (US), MPG (UK), L/100 km, or km/L], “Pressure” (psi, kPa, or bar), “Temperature” (°C, or °F) units of measure
independently, “Power” [ HP (US), HP (UK) or kW] and “Torque” (lb-ft or Nm.)
10
MULTIMEDIA 467
Page 471 of 568
Setting NameSelectable Options
Time Format 12hrs24hrs
AM PM
Show Time in Status Bar — If Equipped OnOff
Camera
After pressing the “Camera” button on the touchscreen, the
following settings will be available:
Setting Name Selectable Options
Parkview Backup Camera Delay OnOff
NOTE:
When the “ParkView Backup Camera Delay” feature is enabled, it will allow the ParkView Backup Camera display to
remain on while in drive for up to 10 seconds, or 8 mph (12 km/h). Active Parkview Backup Camera Guidelines On
Off
10
MULTIMEDIA 469
Page 473 of 568

Setting NameSelectable Options
NOTE:
The “Forward Collision Warning Sensitivity” setting determines at what relative distance the vehicle directly in front
of you needs to be at, before the system warns you of a possible collision with the vehicle directly in front of you,
based on the option is selected. “Far” gives you the most amount of reaction time, whereas “Near” gives you the
least amount of reaction time, based on the distance between the two vehicles. ParkSense — If Equipped Sound Only Sound & Display
NOTE:
The “ParkSense” system setting scans for objects behind the vehicle when the transmission gear selector is in RE-
VERSE and the vehicle speed is less than 7 mph (11 km/h), when enabled. It provides an alert (audible and/or vi-
sual) to indicate the proximity to other objects. The system can be enabled with “Sound Only,” or “Sound & Display.” Rear ParkSense Chime Volume Low
Medium High
Front ParkSense Chime Volume Low
Medium High
Rear ParkSense Braking Assist — If Equipped On
Off
NOTE:
When the “Rear ParkSense Braking Assist” feature is selected, the park assist system detects objects located behind
the vehicle and utilize autonomous braking to stop the vehicle.
10
MULTIMEDIA 471
Page 481 of 568
Audio
After pressing the “Audio” button on the touchscreen, the
following settings will be available:
Setting NameSelectable Options
Balance/Fade Speaker Icon
NOTE:
When in this display you may adjust the “Balance/Fade” of the audio by pressing and dragging the “Speaker Icon”
toward any location in the box. Equalizer BassMid Treble
NOTE:
When in this display you may adjust the “Bass”, “Mid” and “Treble” settings. Adjust the settings with the “+” and
“–” setting buttons on the touchscreen or by selecting any point on the scale between the “+” and “–” buttons on the
touchscreen. Bass/Mid/Treble also allow you to simply slide your finger up or down to change the setting as well as
press directly on the desired setting. Speed Adjusted Vol- ume Off
12 3
Surround Sound — If Equipped On
Off
10
MULTIMEDIA 479