Page 370 of 592

2. The LED light located between the ASSIST and SOSbuttons on the Rearview Mirror will turn green once a
connection to a SOS operator has been made.
3.
Once a connection between the vehicle and a SOS operator
is made, the SOS Call system may transmit the following
important vehicle information to a SOS operator:
• Indication that the occupant placed a SOS Call.
• The vehicle brand.
• The last known GPS coordinates of the vehicle.
4. You should be able to speak with the SOS operator through the vehicle audio system to determine if addi-
tional help is needed.
WARNING!
ALWAYS obey traffic laws and pay attention to the
road. ALWAYS drive safely with your hands on the
steering wheel. You have full responsibility and as-
sume all risks related to the use of the features and
applications in this vehicle. Only use the features and
applications when it is safe to do so. Failure to do so
may result in an accident involving serious injury or
death. NOTE:
•Your vehicle may be transmitting data as authorized
by the subscriber.
• Once a connection is made between the vehicle’s SOS
Call system and the SOS operator, the SOS operator
may be able to open a voice connection with the
vehicle to determine if additional help is needed. Once
the SOS operator opens a voice connection with the
vehicle’s SOS Call system, the operator should be able
to speak with you or other vehicle occupants and hear
sounds occurring in the vehicle. The vehicle’s SOS Call
system will attempt to remain connected with the SOS
operator until the SOS operator terminates the connec-
tion.
5. The SOS operator may attempt to contact appropriate emergency responders and provide them with impor-
tant vehicle information and GPS coordinates.
WARNING!
•If anyone in the vehicle could be in danger (e.g., fire
or smoke is visible, dangerous road conditions or
location), do not wait for voice contact from an
(Continued)
368 IN CASE OF EMERGENCY
Page 371 of 592

WARNING!(Continued)
Emergency Services Agent. All occupants should exit
the vehicle immediately and move to a safe location.
•
Never place anything on or near the vehicle’s operable
network and GPS antennas. You could prevent oper-
able network and GPS signal reception, which can
prevent your vehicle from placing an emergency call.
An operable network and GPS signal reception is
required for the SOS Call system to function properly.
• The SOS Call system is embedded into the vehicle’s
electrical system. Do not add aftermarket electrical
equipment to the vehicle’s electrical system. This
may prevent your vehicle from sending a signal to
initiate an emergency call. To avoid interference that
can cause the SOS Call system to fail, never add
aftermarket equipment (e.g., two-way mobile radio,
CB radio, data recorder, etc.) to your vehicle’s electri-
cal system or modify the antennas on your vehicle. IF
YOUR VEHICLE LOSES BATTERY POWER FOR
ANY REASON (INCLUDING DURING OR AFTER
AN ACCIDENT), THE UCONNECT FEATURES,
APPS AND SERVICES, AMONG OTHERS, WILL
NOT OPERATE.
(Continued)
WARNING! (Continued)
•Modifications to any part of the SOS Call system
could cause the air bag system to fail when you need
it. You could be injured if the air bag system is not
there to help protect you.
SOS Call System Limitations
Vehicles sold in Mexico DO NOThave SOS Call system
capabilities.
SOS or other emergency line operators in Mexico may not
answer or respond to SOS system calls.
If the SOS Call system detects a malfunction, any of the
following may occur at the time the malfunction is de-
tected, and at the beginning of each ignition cycle:
• The Rearview Mirror light located between the ASSIST
and SOS buttons will continuously be illuminated red.
• The Device Screen will display the following message
“Vehicle device requires service. Please contact your
dealer.”
• An In-Vehicle Audio message will state “Vehicle device
requires service. Please contact your dealer.”
7
IN CASE OF EMERGENCY 369
Page 383 of 592
CavityCartridge Fuse Micro Fuse Description
F69 –15 Amp Blue Spotlight Feed — If Equipped
F70 –20 Amp Yellow Fuel Pump Motor
F71 –30 Amp Green Audio Amplifier
F72 –10 Amp Red PCM — If Equipped
F73 –15 Amp Blue HID Headlamp RH — If Equipped
F75 –10 Amp Red Dual Batt Control — If Equipped
F76 –10 Amp Red Anti-lock Brakes/Electronic Stability Control
F77 –10 Amp Red Drivetrain Control Module/Front Axle Dis-
connect Module
F78 –10 Amp Red
Engine Control Module/Electric Power Steering
F80 –10 Amp Red Universal Garage Door Opener/Anti-
Intrusion Module
F81 –20 Amp Yellow Trailer Tow Right Turn/Stop Lights
F82 –10 Amp Red Steering Column Control Module/Cruise
Control/DTV
F83 –10 Amp Red Fuel Door
F84 –15 Amp Blue Switch Bank/Instrument Cluster
F85 –10 Amp Red Airbag Module
F86 –10 Amp Red Airbag Module
F87 –10 Amp Red Air Suspension — If Equipped
7
IN CASE OF EMERGENCY 381
Page 485 of 592

MULTIMEDIA
CONTENTS
�UCONNECT SYSTEMS ...................485
� DRAG & DROP MENU BAR ................485
� CYBERSECURITY .......................486
� UCONNECT SETTINGS ...................487
▫ Customer Programmable Features — Uconnect 4
Settings ............................. .488
▫ Customer Programmable Features — Uconnect
4C/4C NAV Settings ....................506
� STEERING WHEEL AUDIO CONTROLS — IF
EQUIPPED ............................527
▫ Radio Operation ........................528
▫ Media Mode ..........................528
� IPOD/USB/MP3 CONTROL — IF EQUIPPED . . .528
▫ Connecting The iPod Or External USB Device . . .529
▫ Using This Feature ..................... .529▫
Second Row USB Charging Port ............530
� UCONNECT REAR SEAT ENTERTAINMENT (RSE)
SYSTEM — IF EQUIPPED .................530
▫ Getting Started ........................531
▫ Dual Video Screen ..................... .532
▫ Blu-ray Disc Player ..................... .533
▫ Play Video Games ..................... .535
▫ Play A DVD/Blu-ray Disc Using The Touchscreen
Radio ...............................536
▫ Important Notes For Dual Video Screen System .538
▫ Blu-ray Disc Player Remote Control — If
Equipped ............................538
▫ Headphones Operation ...................540
▫ Controls ............................ .541
▫ Replacing The Headphone Batteries ..........541
10
Page 490 of 592

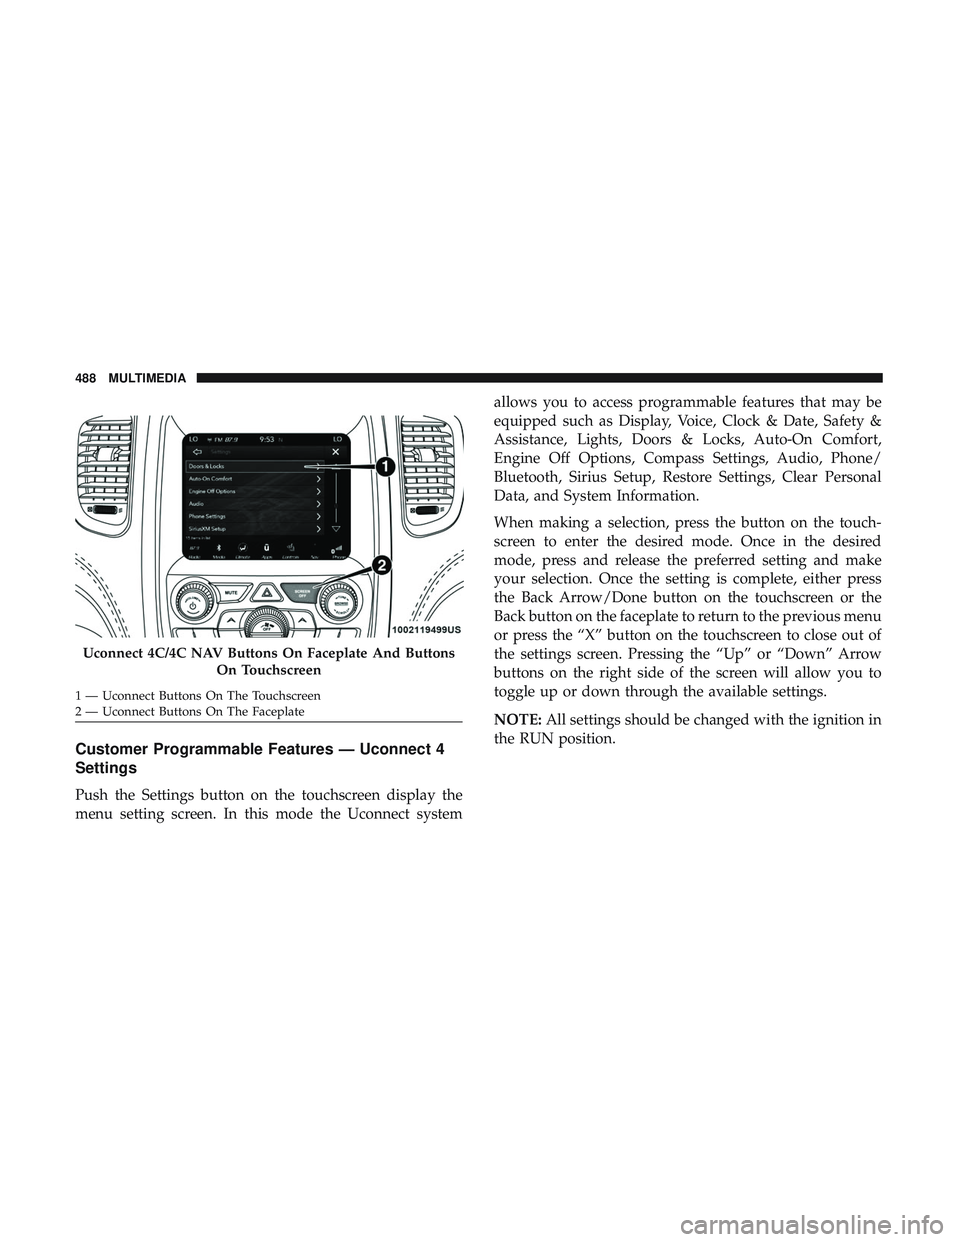
Customer Programmable Features — Uconnect 4
Settings
Push the Settings button on the touchscreen display the
menu setting screen. In this mode the Uconnect systemallows you to access programmable features that may be
equipped such as Display, Voice, Clock & Date, Safety &
Assistance, Lights, Doors & Locks, Auto-On Comfort,
Engine Off Options, Compass Settings, Audio, Phone/
Bluetooth, Sirius Setup, Restore Settings, Clear Personal
Data, and System Information.
When making a selection, press the button on the touch-
screen to enter the desired mode. Once in the desired
mode, press and release the preferred setting and make
your selection. Once the setting is complete, either press
the Back Arrow/Done button on the touchscreen or the
Back button on the faceplate to return to the previous menu
or press the “X” button on the touchscreen to close out of
the settings screen. Pressing the “Up” or “Down” Arrow
buttons on the right side of the screen will allow you to
toggle up or down through the available settings.
NOTE:
All settings should be changed with the ignition in
the RUN position.
Uconnect 4C/4C NAV Buttons On Faceplate And Buttons
On Touchscreen
1 — Uconnect Buttons On The Touchscreen
2 — Uconnect Buttons On The Faceplate 488 MULTIMEDIA
Page 504 of 592
Audio
After pressing the “Audio” button on the touchscreen, the
following settings will be available:
Setting NameSelectable Options
Equalizer BassMidTreble
NOTE:
When in this display you may adjust the “Bass”, “Mid” and “Treble” settings. Adjust the settings with the “+” and
“–” setting buttons on the touchscreen or by selecting any point on the scale between the “+” and “–” buttons on the
touchscreen. Bass/Mid/Treble also allow you to simply slide your finger up or down to change the setting as well as
press directly on the desired setting. Balance/Fade Up Arrow
Button Down Ar-
row Button Left Arrow
Button Right Ar-
row Button Center “C”
Button
NOTE:
When in this display you may adjust the “Balance/Fade” of the audio by using the “Arrow” button on the touch-
screen to adjust the sound level from the front and rear or right and left side speakers. Press the “Center ‘C’ Button”
on the touchscreen to reset the balance and fade to the factory setting.
502 MULTIMEDIA
Page 505 of 592
Setting NameSelectable Options
Speed Adjusted Volume Off123
Surround Sound — If Equipped OnOff
Loudness — If Equipped Ye sN o
NOTE:
This feature improves sound quality at lower volumes when enabled. AUX Volume Offset — If Equipped OnOff
NOTE:
This feature provides the ability to tune the audio level for portable devices connected through the AUX input.
Phone/Bluetooth
After pressing the “Phone/Bluetooth” button on the touch-
screen, the following settings will be available:
Setting Name Selectable Options
Paired Phones List of Paired Phones
NOTE:
The “Paired Phones” feature shows which phones are paired to the Phone/Bluetooth system. For further information,
refer to the Uconnect Owner ’s Manual Supplement.10
MULTIMEDIA 503
Page 508 of 592

System Information
After pressing the “System Information” button on the
touchscreen, the following settings will be available:
Setting NameSelectable Options
Software License System Software Information Screen
NOTE:
When the “System Information” feature is selected, a “System Software Information” screen will appear, displaying
the system software version.
Customer Programmable Features — Uconnect
4C/4C NAV Settings
Press the “Apps” button, then press the “Settings”
button on the touchscreen to display the menu setting
screen. In this mode the Uconnect system allows you to
access programmable features that may be equipped
such as Display, Units, Voice, Clock, Safety & Driving
Assistance, Lights, Doors & Locks, Auto-On Comfort,
Engine Off Options, Audio, Phone/Bluetooth, SiriusXM
Setup, Restore Settings, Clear Personal Data, and Sys-
tem Information.
NOTE: Depending on the vehicles options, feature settings
may vary. When making a selection, press the button on the touch-
screen to enter the desired mode. Once in the desired
mode, press and release the preferred setting “option” until
a check-mark appears next to the setting, showing that
setting has been selected. Once the setting is complete,
either press the “Back” Arrow button on the touchscreen to
return to the previous menu, or press the “X” button on the
touchscreen to close out of the settings screen. Pressing the
“Up” or “Down” Arrow button on the right side of the
screen will allow you to toggle up or down through the
available settings.
506 MULTIMEDIA