Page 431 of 592
NOTE:The rear wiper arm cannot be fully raised off the
glass unless the wiper arm pivot cap is unsnapped first.
Attempting to fully raise the rear wiper arm without
unsnapping the wiper arm pivot cap may damage the
vehicle.
2. Lift the rear wiper arm fully off the glass. 3. To remove the wiper blade from the wiper arm, grasp
the bottom end of the wiper blade nearest to wiper arm
with your right hand. With your left hand hold the
wiper arm as you pull the wiper blade away from the
wiper arm past its stop far enough to unsnap the wiper
blade pivot pin from the receptacle on the end of the
wiper arm.
Wiper Pivot Cap In Unlocked Position
1 — Wiper Arm Pivot Cap
2—WiperArm
Wiper Blade In Folded Out Position
1 — Wiper Arm Pivot Cap
2—WiperArm
3 — Wiper Blade
8
SERVICING AND MAINTENANCE 429
Page 490 of 592

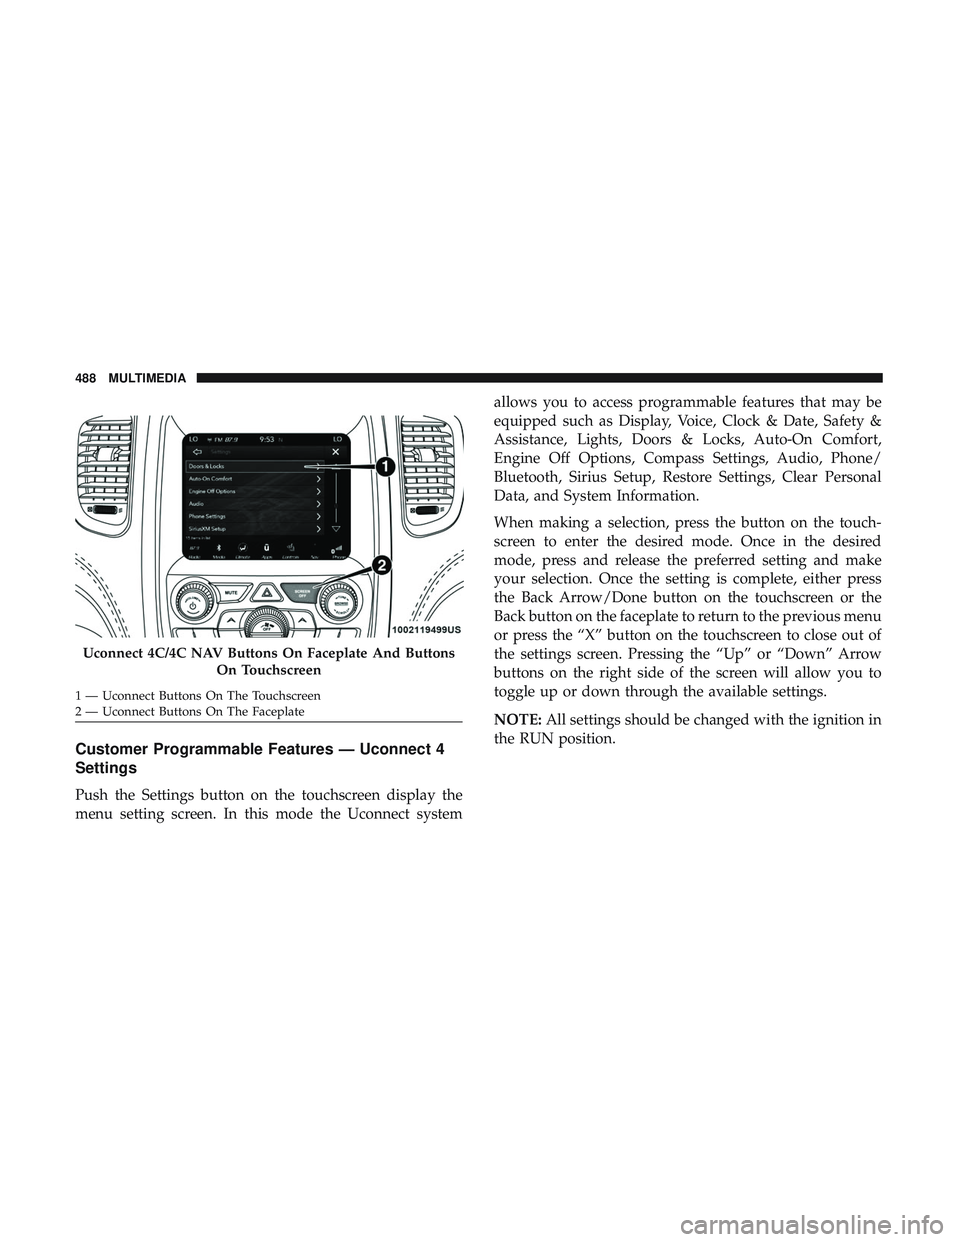
Customer Programmable Features — Uconnect 4
Settings
Push the Settings button on the touchscreen display the
menu setting screen. In this mode the Uconnect systemallows you to access programmable features that may be
equipped such as Display, Voice, Clock & Date, Safety &
Assistance, Lights, Doors & Locks, Auto-On Comfort,
Engine Off Options, Compass Settings, Audio, Phone/
Bluetooth, Sirius Setup, Restore Settings, Clear Personal
Data, and System Information.
When making a selection, press the button on the touch-
screen to enter the desired mode. Once in the desired
mode, press and release the preferred setting and make
your selection. Once the setting is complete, either press
the Back Arrow/Done button on the touchscreen or the
Back button on the faceplate to return to the previous menu
or press the “X” button on the touchscreen to close out of
the settings screen. Pressing the “Up” or “Down” Arrow
buttons on the right side of the screen will allow you to
toggle up or down through the available settings.
NOTE:
All settings should be changed with the ignition in
the RUN position.
Uconnect 4C/4C NAV Buttons On Faceplate And Buttons
On Touchscreen
1 — Uconnect Buttons On The Touchscreen
2 — Uconnect Buttons On The Faceplate 488 MULTIMEDIA
Page 493 of 592
Voice
After pressing the “Voice” button on the touchscreen, the
following settings will be available:
Setting NameSelectable Options
Voice Response Length Brief Detailed
Show Command List AlwaysWith Help Never
Clock & Date
After pressing the “Clock & Date” button on the touch-
screen, the following settings will be available:
Setting Name Selectable Options
Set Time and Format 12 hr24 hr AMPM
NOTE:
Within the “Set Time and Format” setting, press the corresponding arrow buttons on the touchscreen to adjust to the
correct time. Set Date Month DayYear
NOTE:
Within the “Set Date” setting, press the corresponding arrow buttons on the touchscreen to adjust to the current date.
10
MULTIMEDIA 491
Page 499 of 592
Setting NameSelectable Options
Headlights With Wipers — If Equipped On
Off
Headlight Illumination On Ap- proach 0 sec
30 sec
60 sec 90 sec
NOTE:
When this feature is selected, it allows the adjustment of the amount of time the headlights remain on after the doors
are unlocked with the key fob. Auto High Beam — If Equipped OnOff
NOTE:
When the “Auto High Beams” is selected, the high beam headlights will activate/deactivate automatically under cer-
tain conditions. Daytime Running Lights — If Equipped Ye s
N o
Flash Lights With Lock OnOff
10
MULTIMEDIA 497
Page 500 of 592
Doors & Locks
After pressing the “Doors & Locks” button on the touch-
screen, the following settings will be available:
Setting NameSelectable Options
Auto Door Locks On Off
NOTE:
The “Auto Door Locks” feature locks all doors automatically when the vehicle reaches a speed of 12 mph (20 km/h). Auto Unlock On Exit On Off
NOTE:
When the “Auto Unlock On Exit” feature is selected, all doors unlock when the vehicle is stopped and the transmis-
sion is in the PARK or NEUTRAL position and the driver’s door is opened. Flash Lights With Lock On Off
Horn With Lock Off1st Press 2nd Press
Horn With Remote Start — If Equipped On
Off
Passive Entry On Off
Remote Door Unlock/Door Unlock Driver
All
498 MULTIMEDIA
Page 501 of 592

Setting NameSelectable Options
NOTE:
When “Driver” is selected, only the driver’s door will unlock on the first push of the key fob unlock button, you
must push the key fob unlock button twice to unlock the passenger’s doors. When “All” is selected, all of the doors
unlock on the first press of the key fob unlock button. If “All” is programmed, all doors unlock no matter which Pas-
sive Entry equipped door handle is grasped. If “Driver” is programmed, only the driver ’s door unlocks when the
driver ’s door is grasped. Touching the handle more than once only results in the driver ’s door opening once. If the
driver door is opened, the interior door lock/unlock switch can be used to unlock all doors (or use key fob). Memory Linked To FOB — If Equipped On
Off
NOTE:
The “Memory Linked To FOB” feature provides automatic recall of all settings stored to a memory location (driver ’s
seat, exterior mirrors, steering column position and radio station pre-sets) to enhance driver mobility when entering
and exiting the vehicle. Power Liftgate Alert — If Equipped On
Off
NOTE:
The “Power Liftgate Alert” feature plays an alert when the power liftgate is raising or lowering.
10
MULTIMEDIA 499
Page 508 of 592

System Information
After pressing the “System Information” button on the
touchscreen, the following settings will be available:
Setting NameSelectable Options
Software License System Software Information Screen
NOTE:
When the “System Information” feature is selected, a “System Software Information” screen will appear, displaying
the system software version.
Customer Programmable Features — Uconnect
4C/4C NAV Settings
Press the “Apps” button, then press the “Settings”
button on the touchscreen to display the menu setting
screen. In this mode the Uconnect system allows you to
access programmable features that may be equipped
such as Display, Units, Voice, Clock, Safety & Driving
Assistance, Lights, Doors & Locks, Auto-On Comfort,
Engine Off Options, Audio, Phone/Bluetooth, SiriusXM
Setup, Restore Settings, Clear Personal Data, and Sys-
tem Information.
NOTE: Depending on the vehicles options, feature settings
may vary. When making a selection, press the button on the touch-
screen to enter the desired mode. Once in the desired
mode, press and release the preferred setting “option” until
a check-mark appears next to the setting, showing that
setting has been selected. Once the setting is complete,
either press the “Back” Arrow button on the touchscreen to
return to the previous menu, or press the “X” button on the
touchscreen to close out of the settings screen. Pressing the
“Up” or “Down” Arrow button on the right side of the
screen will allow you to toggle up or down through the
available settings.
506 MULTIMEDIA
Page 512 of 592
Voice
After pressing the “Voice” button on the touchscreen, the
following settings will be available:
Setting NameSelectable Options
Voice Response Length Brief Detailed
Show Command List AlwaysWith Help Never
Clock
After pressing the “Clock” button on the touchscreen, the
following settings will be available:
Setting Name Selectable Options
Sync Time With GPS OnOff
Set Time Hours +-
NOTE:
The “Set Time Hours” feature allows you to adjust the hours. The “Sync time with GPS” button on the touchscreen
must be unchecked. Set Time Minutes +-
510 MULTIMEDIA