2018 DODGE CHARGER SRT oil
[x] Cancel search: oilPage 206 of 490

WARNING!(Continued)
closed and the climate control BLOWER switch is set
at high speed. DO NOT use the recirculation mode.
• If it is necessary to sit in a parked vehicle with the
engine running, adjust your heating or cooling con-
trols to force outside air into the vehicle. Set the
blower at high speed.
The best protection against carbon monoxide entry into the
vehicle body is a properly maintained engine exhaust
system.
Whenever a change is noticed in the sound of the exhaust
system, when exhaust fumes can be detected inside the
vehicle, or when the underside or rear of the vehicle is
damaged, have a competent mechanic inspect the complete
exhaust system and adjacent body areas for broken, dam-
aged, deteriorated, or mispositioned parts. Open seams or
loose connections could permit exhaust fumes to seep into
the passenger compartment. In addition, inspect the ex-
haust system each time the vehicle is raised for lubrication
or oil change. Replace as required.
Safety Checks You Should Make Inside The Vehicle
Seat Belts
Inspect the seat belt system periodically, checking for cuts,
frays, and loose parts. Damaged parts must be replaced
immediately. Do not disassemble or modify the system.
Front seat belt assemblies must be replaced after a collision.
Rear seat belt assemblies must be replaced after a collision
if they have been damaged (i.e., bent retractor, torn web-
bing, etc.). If there is any question regarding seat belt or
retractor condition, replace the seat belt.
Air Bag Warning Light
The Air Bag warning lightwill turn on for four to
eight seconds as a bulb check when the ignition switch
is first turned to ON/RUN. If the light is either not on
during starting, stays on, or turns on while driving,
have the system inspected at your authorized dealer as
soon as possible. After the bulb check, this light will
illuminate with a single chime when a fault with the Air
Bag System has been detected. It will stay on until the
fault is removed. If the light comes on intermittently or
remains on while driving, have your authorized dealer
service the vehicle immediately.
204 SAFETY
Page 209 of 490

Door Latches
Check for proper closing, latching, and locking.
Fluid Leaks
Check area under the vehicle after overnight parking for
fuel, coolant, oil, or other fluid leaks. Also, if gasoline
fumes are detected or if fuel, or brake fluid leaks are
suspected. The cause should be located and corrected
immediately.
WARNING!
To prevent SERIOUS INJURY or DEATH when using
“Track-Use” parts and equipment:
•NEVER use any “Track-Use” equipment on public
roads. FCA US LLC does not authorize the use of
“Track-Use” equipment on public roads.
• The intended use of “Track-Use” parts is for race
vehicles on race tracks. To help ensure the safety of
the race driver, engineers should supervise the instal-
lation of “Track-Use” parts.
• FCA US LLC does not authorize the installation or
use of any part noted as “Track-Use” on any new
vehicle prior to its first retail sale.
WARNING!
To prevent SERIOUS INJURY or DEATH:
•ALWAYS remove any “Track-Use” equipment before
driving on public roads.
• ALWAYS properly use your three-point seat belts
when driving on public roads.
• In a collision, you and your passengers can suffer
much greater injuries if you are not properly buckled
up. You can strike the interior of your vehicle or
other passengers, or you can be thrown out of the
vehicle.
5
SAFETY 207
Page 218 of 490

ENGINE BREAK-IN RECOMMENDATIONS
The following tips will be helpful in obtaining optimum
performance and maximum durability for your new SRT
vehicle.
Despite modern technology and World Class manufactur-
ing methods, the moving parts of the vehicle must still
wear in with each other. This wearing in occurs mainly
during the first 500 miles (805 km) and continues through
the first oil change interval.
It is recommended for the operator to observe the follow-
ing driving behaviors during the new vehicle break-in
period:
0 to 100 miles (0 to 161 km):
•Do not allow the engine to operate at idle for an
extended period of time.
• Depress the accelerator pedal slowly and not more than
halfway to avoid rapid acceleration.
• Avoid aggressive braking.
• Drive with the engine speed less than 3,500 RPM.
• Maintain vehicle speed below 55 mph (88 km/h) and
observe local speed limits. 100 to 300 miles (161 to 483 km):
•
Depress the accelerator pedal slowly and not more than
halfway to avoid rapid acceleration in lower gears (1st to
3rd gears).
• Avoid aggressive braking.
• Drive with the engine speed less than 5,000 RPM.
• Maintain vehicle speed below 70 mph (112 km/h) and
observe local speed limits.
300 to 500 miles (483 to 805 km):
• Exercise the full engine rpm range, shifting manually at
higher rpms when possible.
• Do not perform sustained operation with the accelerator
pedal at wide open throttle.
• Maintain vehicle speed below 85 mph (136 km/h) and
observe local speed limits.
For the first 1500 miles (2414 km):
• Do not participate in track events, sport driving schools,
or similar activities during the first 1500 miles (2414 km).
216 STARTING AND OPERATING
Page 219 of 490
NOTE:Check engine oil with every refueling and add if
necessary. Oil and fuel consumption may be higher
through the first oil change interval. Running the engine
with an oil level below the add mark can cause severe
engine damage.
PARKING BRAKE
Before leaving the vehicle, make sure that the parking
brake is fully applied and place the gear selector in the
PARK position.
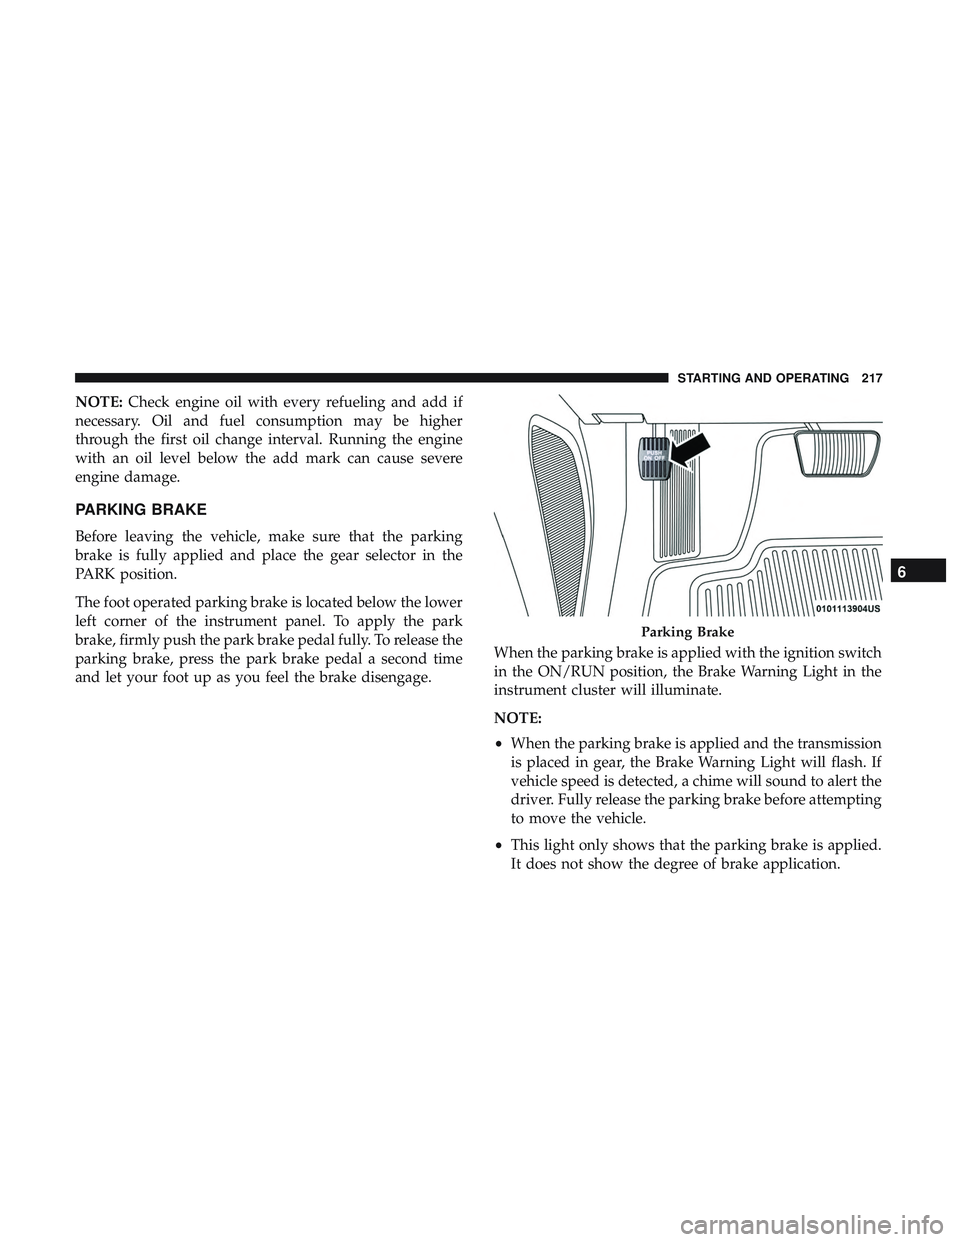
The foot operated parking brake is located below the lower
left corner of the instrument panel. To apply the park
brake, firmly push the park brake pedal fully. To release the
parking brake, press the park brake pedal a second time
and let your foot up as you feel the brake disengage. When the parking brake is applied with the ignition switch
in the ON/RUN position, the Brake Warning Light in the
instrument cluster will illuminate.
NOTE:
•
When the parking brake is applied and the transmission
is placed in gear, the Brake Warning Light will flash. If
vehicle speed is detected, a chime will sound to alert the
driver. Fully release the parking brake before attempting
to move the vehicle.
• This light only shows that the parking brake is applied.
It does not show the degree of brake application.
Parking Brake
6
STARTING AND OPERATING 217
Page 236 of 490
Power Steering Fluid Check
Checking the power steering fluid level at a defined service
interval is not required. The fluid should be checked at
every oil change if a leak is suspected, abnormal noises are
apparent, and/or the system is not functioning as antici-
pated. Coordinate inspection efforts through an authorized
dealer.
WARNING!
Fluid level should be checked on a level surface and
with the engine off to prevent injury from moving
parts and to ensure accurate fluid level reading. Do not
overfill. Use only manufacturer’s recommended power
steering fluid.
CAUTION!
Do not use chemical flushes in your power steering
system as the chemicals can damage your power steer-
ing components. Such damage is not covered by the
New Vehicle Limited Warranty.If necessary, add fluid to restore to the proper indicated
level. With a clean cloth, wipe any spilled fluid from all
surfaces. Refer to “Fluids And Lubricants” in “Technical
Specifications” for further information.
ELECTRIC POWER STEERING — IF EQUIPPED
The electric power steering system will give you good
vehicle response and increased ease of maneuverability in
tight spaces. The system will vary its assist to provide light
efforts while parking and good feel while driving. If the
electric steering system experiences a fault that prevents it
from providing assist, you will still have the ability to steer
the vehicle manually.
Alternate electric power steering efforts can be selected
through the Uconnect System. Refer to “Drive Modes” in
this section for further information.
234 STARTING AND OPERATING
Page 280 of 490
CAUTION!(Continued)
•Driving through standing water may cause damage
to your vehicle’s drivetrain components. Always in-
spect your vehicle’s fluids (i.e., engine oil, transmis-
sion, axle, etc.) for signs of contamination (i.e., fluid
that is milky or foamy in appearance) after driving
through standing water. Do not continue to operate
the vehicle if any fluid appears contaminated, as this
may result in further damage. Such damage is not
covered by the New Vehicle Limited Warranty.
• Getting water inside your vehicle’s engine can cause
it to lock up and stall out, and cause serious internal
damage to the engine. Such damage is not covered by
the New Vehicle Limited Warranty.
278 STARTING AND OPERATING
Page 289 of 490

Replacing Exterior Bulbs
Front Low/High Beam Headlamp And Park/Turn
Lamp — Models With Halogen Headlamps
1. Open the hood.
NOTE:Removal of the air cleaner filter housing may be
necessary prior to replacing bulbs in the headlamp assem-
bly on the driver side of the vehicle.
2. Remove the large dust cap from the headlamp housing by turning it counterclockwise.
3. Turn the bulb counterclockwise, and remove.
CAUTION!
Do not touch the new bulb with your fingers. Oil
contamination will severely shorten bulb life. If the
bulb comes in contact with any oily surface, clean the
bulb with rubbing alcohol.
4. Disconnect the bulb from the socket assembly and install the replacement bulb.
5. Reinstall the bulb and socket assembly into the head- lamp assembly, and then turn it clockwise. 6. Reinstall the dust cap.
Front Low/High Beam Headlamp And Park/Turn
Lamp — Models With High Intensity Discharge
Headlamps (HID)
The headlamps are a type of high voltage discharge tube.
High voltage can remain in the circuit even with the
headlamp switch off and the key removed.
Because of this,
you should not attempt to service a headlamp bulb
yourself. If a headlamp bulb fails, take your vehicle to an
authorized dealer for service.
WARNING!
A transient high voltage occurs at the bulb sockets of
HID headlamps when the headlamp switch is turned
ON. It may cause serious electrical shock or electrocu-
tion if not serviced properly. See your authorized
dealer for service.
NOTE: On vehicles equipped with HID headlamps, when
the headlamps are turned on, there is a blue hue to the
lights. This diminishes and becomes more white after
approximately 10 seconds, as the system charges.
7
IN CASE OF EMERGENCY 287
Page 307 of 490
This will allow the Tire Service Kit Hoses (6) and (7) to
reach the valve stem and keep the Tire Service Kit flat on
the ground. This will provide the best positioning of the
kit when injecting the sealant into the deflated tire and
running the air pump. Move the vehicle as necessary to
place the valve stem in this position before proceeding.
3. Place the transmission in PARK (auto transmission) or in Gear (manual transmission) and place the ignition in the
OFF position.
4. Apply the parking brake.
(B) Setting Up To Use Tire Service Kit:
1. Push in the Mode Select Knob (5) and turn to the Sealant Mode position.
2. Uncoil the Sealant Hose (6) and then remove the cap from the fitting at the end of the hose.
3. Place the Tire Service Kit flat on the ground next to the deflated tire.
4. Remove the cap from the valve stem and then screw the fitting at the end of the Sealant Hose (6) onto the valve
stem. 5. Uncoil the Power Plug (8) and insert the plug into the
vehicle’s 12 Volt power outlet.
NOTE: Do not remove foreign objects (e.g., screws or
nails) from the tire.
(C) Injecting Tire Service Kit Sealant Into The
Deflated Tire:
• Always start the engine before turning ON the Tire
Service Kit.
NOTE: Manual transmission vehicles must have the park-
ing brake engaged and the gear selector in NEUTRAL.
• After pushing the Power Button (4), the sealant (white
fluid) will flow from the Sealant Bottle (1) through the
Sealant Hose (6) and into the tire.
NOTE: Sealant may leak out through the puncture in the
tire.
If the sealant (white fluid) does not flow within0–10
seconds through the Sealant Hose (6):
1. Push the Power Button (4) to turn Off the Tire Service Kit. Disconnect the Sealant Hose (6) from the valve stem.
Make sure the valve stem is free of debris. Reconnect the
Sealant Hose (6) to the valve stem. Check that the Mode
7
IN CASE OF EMERGENCY 305