2018 DODGE CHARGER parking brake
[x] Cancel search: parking brakePage 327 of 553
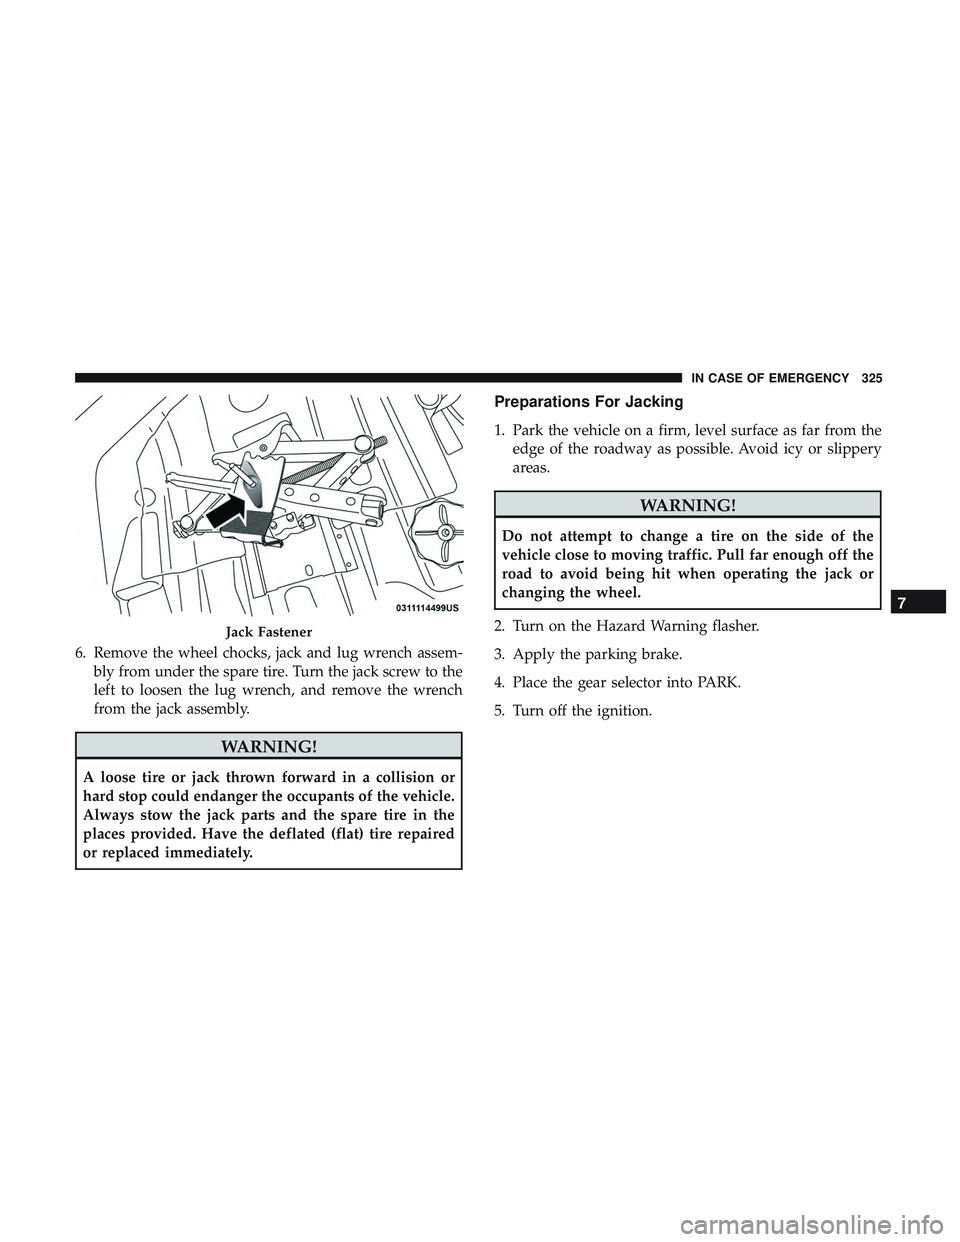
6. Remove the wheel chocks, jack and lug wrench assem-bly from under the spare tire. Turn the jack screw to the
left to loosen the lug wrench, and remove the wrench
from the jack assembly.
WARNING!
A loose tire or jack thrown forward in a collision or
hard stop could endanger the occupants of the vehicle.
Always stow the jack parts and the spare tire in the
places provided. Have the deflated (flat) tire repaired
or replaced immediately.
Preparations For Jacking
1. Park the vehicle on a firm, level surface as far from theedge of the roadway as possible. Avoid icy or slippery
areas.
WARNING!
Do not attempt to change a tire on the side of the
vehicle close to moving traffic. Pull far enough off the
road to avoid being hit when operating the jack or
changing the wheel.
2. Turn on the Hazard Warning flasher.
3. Apply the parking brake.
4. Place the gear selector into PARK.
5. Turn off the ignition.
Jack Fastener
7
IN CASE OF EMERGENCY 325
Page 328 of 553
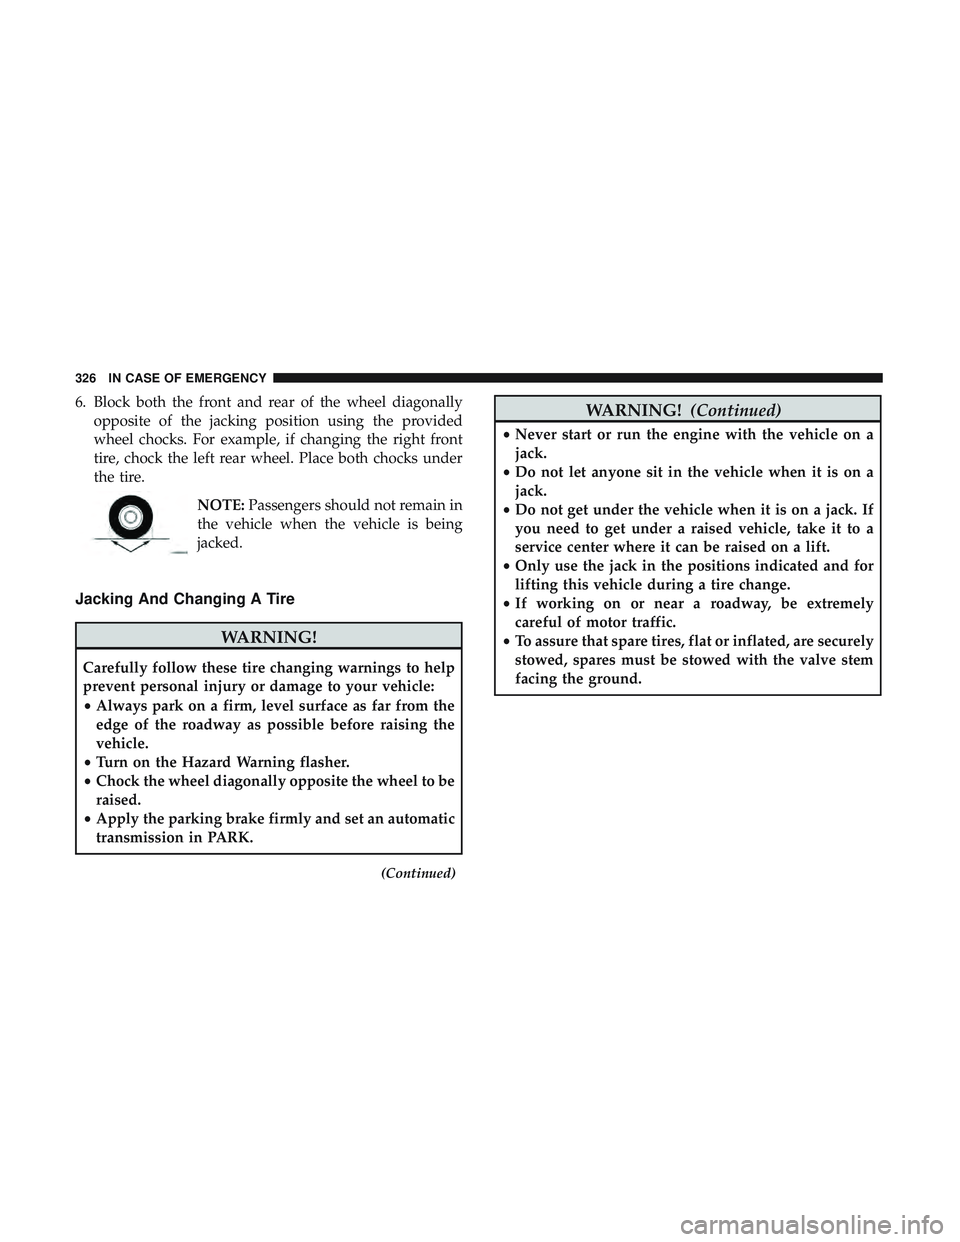
6. Block both the front and rear of the wheel diagonallyopposite of the jacking position using the provided
wheel chocks. For example, if changing the right front
tire, chock the left rear wheel. Place both chocks under
the tire.
NOTE:Passengers should not remain in
the vehicle when the vehicle is being
jacked.
Jacking And Changing A Tire
WARNING!
Carefully follow these tire changing warnings to help
prevent personal injury or damage to your vehicle:
• Always park on a firm, level surface as far from the
edge of the roadway as possible before raising the
vehicle.
• Turn on the Hazard Warning flasher.
• Chock the wheel diagonally opposite the wheel to be
raised.
• Apply the parking brake firmly and set an automatic
transmission in PARK.
(Continued)
WARNING! (Continued)
•Never start or run the engine with the vehicle on a
jack.
• Do not let anyone sit in the vehicle when it is on a
jack.
• Do not get under the vehicle when it is on a jack. If
you need to get under a raised vehicle, take it to a
service center where it can be raised on a lift.
• Only use the jack in the positions indicated and for
lifting this vehicle during a tire change.
• If working on or near a roadway, be extremely
careful of motor traffic.
• To assure that spare tires, flat or inflated, are securely
stowed, spares must be stowed with the valve stem
facing the ground.
326 IN CASE OF EMERGENCY
Page 336 of 553
WARNING!(Continued)
in injuries that are serious or fatal to you, your
passengers, and others around you.
• Take care not to allow the contents of Tire Service Kit
to come in contact with hair, eyes, or clothing. Tire
Service Kit sealant is harmful if inhaled, swallowed,
or absorbed through the skin. It causes skin, eye, and
respiratory irritation. Flush immediately with plenty
of water if there is any contact with eyes or skin.
Change clothing as soon as possible, if there is any
contact with clothing.
• Tire Service Kit Sealant solution contains latex. In
case of an allergic reaction or rash, consult a physi-
cian immediately. Keep Tire Service Kit out of reach
of children. If swallowed, rinse mouth immediately
with plenty of water and drink plenty of water. Do
not induce vomiting! Consult a physician immedi-
ately.
Sealing A Tire With Tire Service Kit
(A) Whenever You Stop To Use Tire Service Kit:
1. Pull over to a safe location and turn on the vehicle’s
Hazard Warning flashers. 2. Verify that the valve stem (on the wheel with the
deflated tire) is in a position that is near to the ground.
This will allow the Tire Service Kit Hoses (6) and (7) to
reach the valve stem and keep the Tire Service Kit flat on
the ground. This will provide the best positioning of the
kit when injecting the sealant into the deflated tire and
running the air pump. Move the vehicle as necessary to
place the valve stem in this position before proceeding.
3. Place the transmission in PARK (auto transmission) or in Gear (manual transmission) and place the ignition in the
OFF position.
4. Apply the parking brake.
(B) Setting Up To Use Tire Service Kit:
1. Push in the Mode Select Knob (5) and turn to the Sealant Mode position.
2. Uncoil the Sealant Hose (6) and then remove the cap from the fitting at the end of the hose.
3. Place the Tire Service Kit flat on the ground next to the deflated tire.
4. Remove the cap from the valve stem and then screw the fitting at the end of the Sealant Hose (6) onto the valve
stem.
334 IN CASE OF EMERGENCY
Page 342 of 553
WARNING!
•Take care to avoid the radiator cooling fan whenever
the hood is raised. It can start anytime the ignition
switch is ON. You can be injured by moving fan
blades.
• Remove any metal jewelry such as rings, watch
bands and bracelets that could make an inadvertent
electrical contact. You could be seriously injured.
• Batteries contain sulfuric acid that can burn your
skin or eyes and generate hydrogen gas which is
flammable and explosive. Keep open flames or
sparks away from the battery.
1. Apply the parking brake, shift the automatic transmis- sion into PARK and place the ignition in the OFF
position.
2. Turn off the heater, radio, and all unnecessary electrical accessories.
3. If using another vehicle to jump start the battery, park the vehicle within the jumper cable’s reach, apply the
parking brake and make sure the ignition is OFF.
WARNING!
Do not allow vehicles to touch each other as this could
establish a ground connection and personal injury
could result.
Jump Starting Procedure
WARNING!
Failure to follow this jump starting procedure could
result in personal injury or property damage due to
battery explosion.
CAUTION!
Failure to follow these procedures could result in
damage to the charging system of the booster vehicle
or the discharged vehicle.
340 IN CASE OF EMERGENCY
Page 345 of 553
CAUTION!
Driving with a hot cooling system could damage your
vehicle. If the temperature gauge reads HOT (H), pull
over and stop the vehicle. Idle the vehicle with the air
conditioner turned off until the pointer drops back
into the normal range. If the pointer remains on HOT
(H), and you hear continuous chimes, turn the engine
off immediately and call for service.
MANUAL PARK RELEASE — 8 SPEED
TRANSMISSION
WARNING!
Always secure your vehicle by fully applying the parking
brake before activating the Manual Park Release. In
addition, you should be seated in the driver’s seat with
your foot firmly on the brake pedal when activating the
Manual Park Release. Activating the Manual Park Release
will allow your vehicle to roll away if it is not secured by
the parking brake, or by proper connection to a tow
vehicle. Activating the Manual Park Release on an unse-
cured vehicle could lead to serious injury or death for
those in or around the vehicle.
In order to move the vehicle in cases where the transmis-
sion will not shift out of PARK (such as a dead battery), a
Manual Park Release is available.
Follow these steps to use the Manual Park Release:
1. Firmly apply the parking brake.
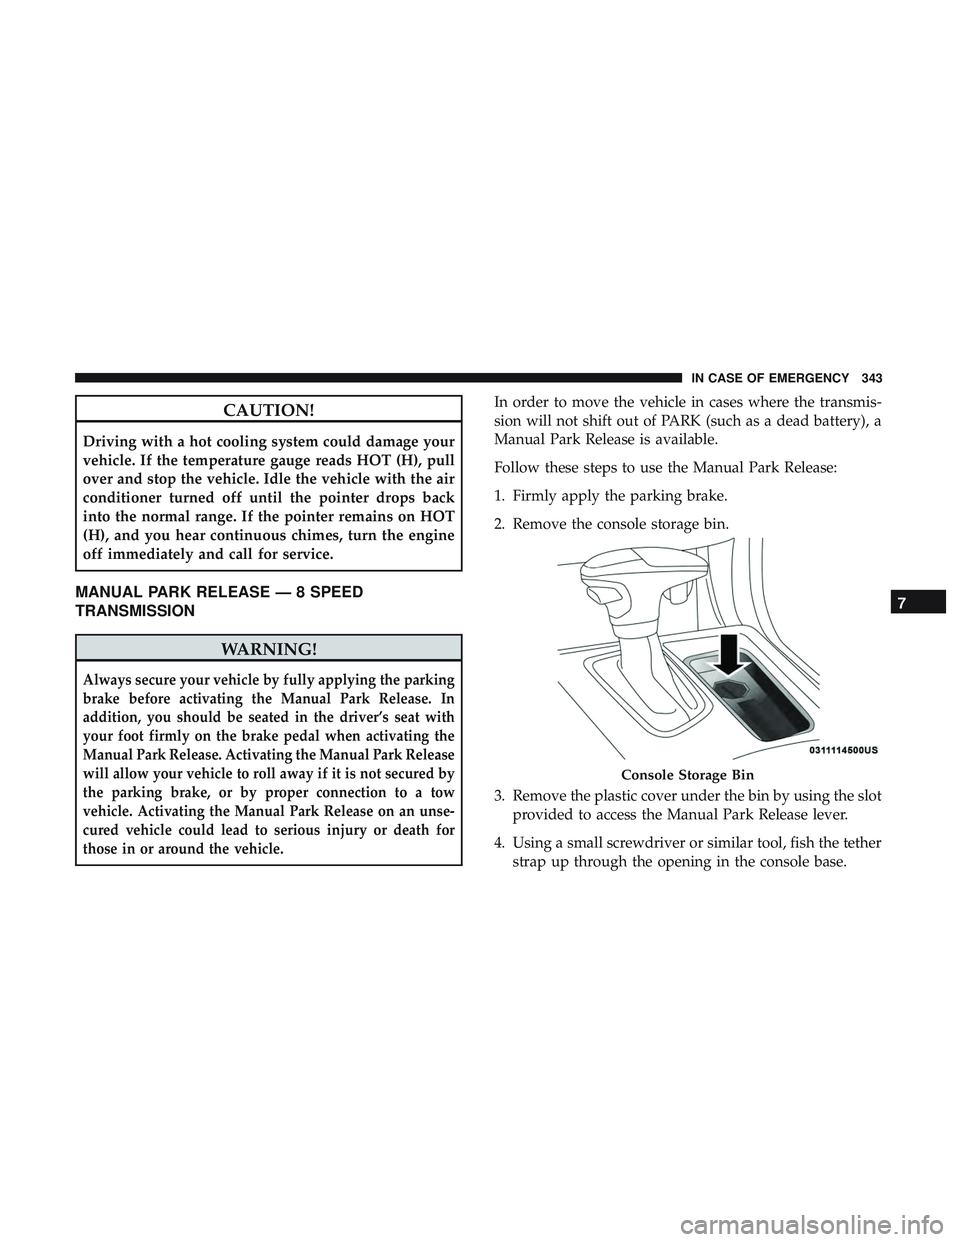
2. Remove the console storage bin.
3. Remove the plastic cover under the bin by using the slotprovided to access the Manual Park Release lever.
4. Using a small screwdriver or similar tool, fish the tether strap up through the opening in the console base.
Console Storage Bin
7
IN CASE OF EMERGENCY 343
Page 346 of 553
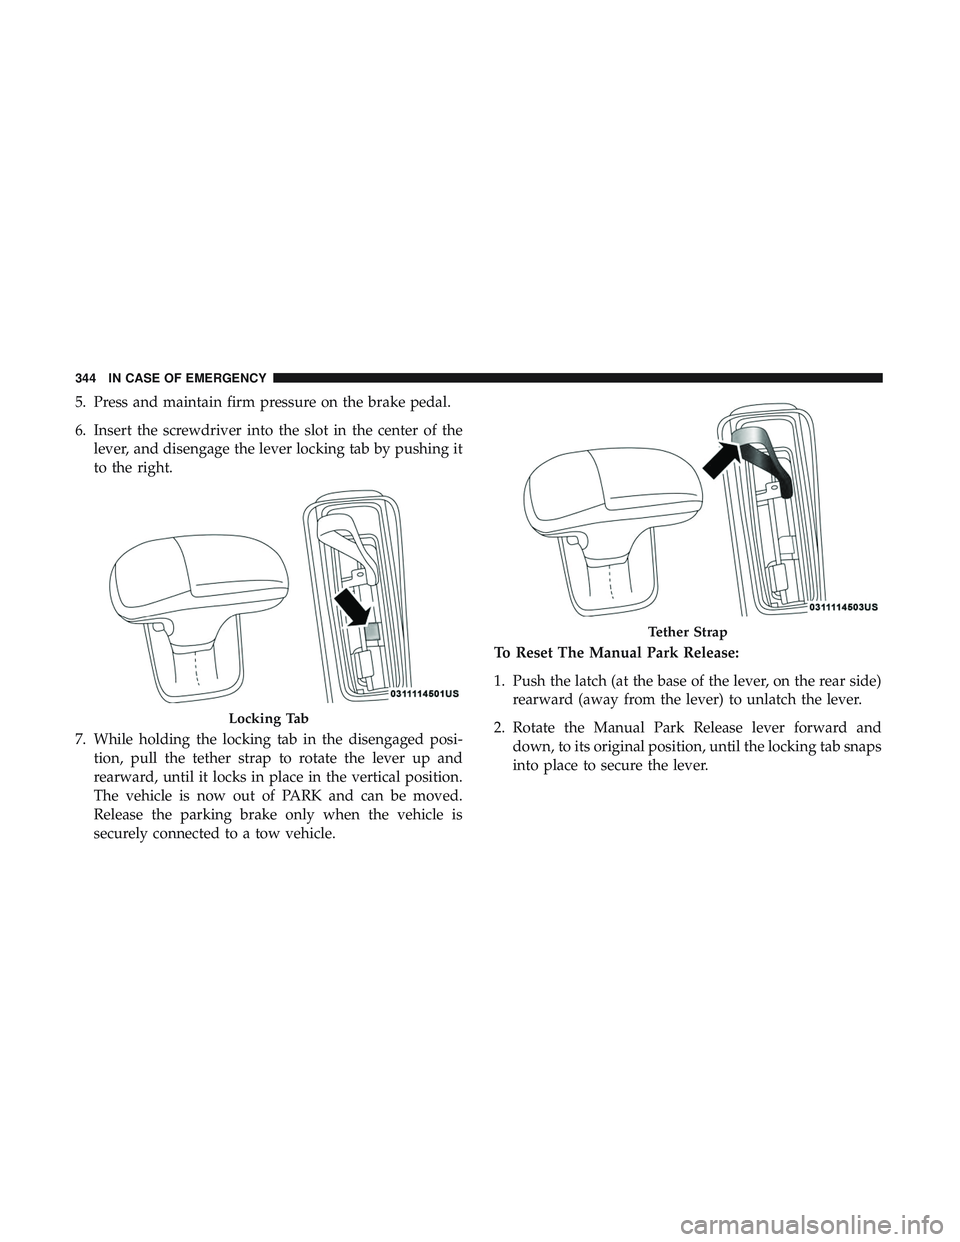
5. Press and maintain firm pressure on the brake pedal.
6. Insert the screwdriver into the slot in the center of thelever, and disengage the lever locking tab by pushing it
to the right.
7. While holding the locking tab in the disengaged posi- tion, pull the tether strap to rotate the lever up and
rearward, until it locks in place in the vertical position.
The vehicle is now out of PARK and can be moved.
Release the parking brake only when the vehicle is
securely connected to a tow vehicle. To Reset The Manual Park Release:
1. Push the latch (at the base of the lever, on the rear side)
rearward (away from the lever) to unlatch the lever.
2. Rotate the Manual Park Release lever forward and down, to its original position, until the locking tab snaps
into place to secure the lever.
Locking Tab
Tether Strap
344 IN CASE OF EMERGENCY
Page 362 of 553
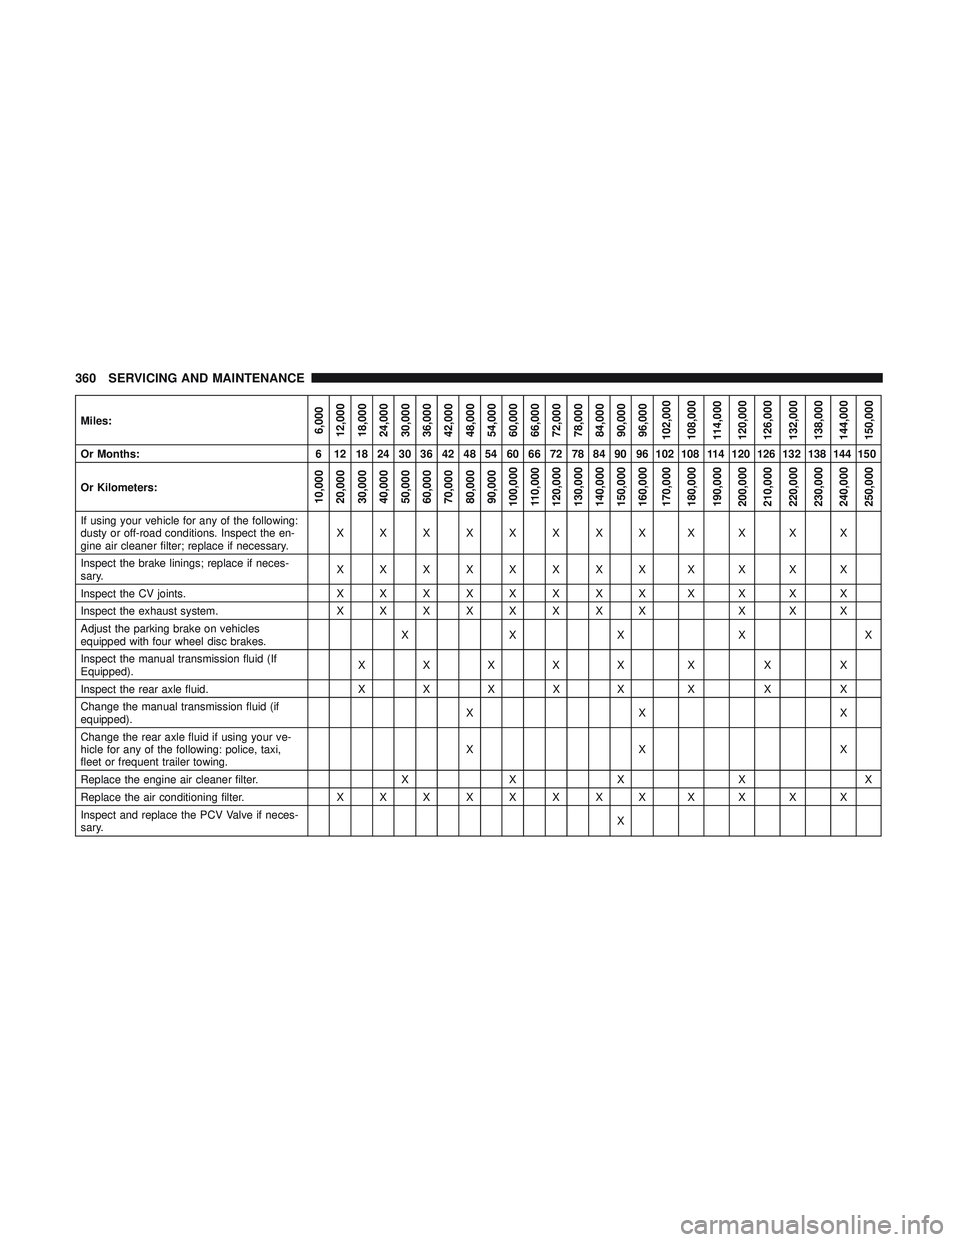
Miles:6,000
12,000
18,000
24,000
30,000
36,000
42,000
48,000
54,000
60,000
66,000
72,000
78,000
84,000
90,000
96,000
102,000
108,000
114,000
120,000
126,000
132,000
138,000
144,000
150,000
Or Months: 6 12 18 24 30 36 42 48 54 60 66 72 78 84 90 96 102 108 114 120 126 132 138 144 150
Or Kilometers:
10,000
20,000
30,000
40,000
50,000
60,000
70,000
80,000
90,000
100,000
110,000
120,000
130,000
140,000
150,000
160,000
170,000
180,000
190,000
200,000
210,000
220,000
230,000
240,000
250,000
If using your vehicle for any of the following:
dusty or off-road conditions. Inspect the en-
gine air cleaner filter; replace if necessary. XXXXXXXXXXXX
Inspect the brake linings; replace if neces-
sary. XXXXXXXXXXXX
Inspect the CV joints. X X X X X X X X XXXX
Inspect the exhaust system. X X X X X X X X X X X
Adjust the parking brake on vehicles
equipped with four wheel disc brakes. XXX X X
Inspect the manual transmission fluid (If
Equipped). XXXXXXXX
Inspect the rear axle fluid. XXX XX X XX
Change the manual transmission fluid (if
equipped). XX X
Change the rear axle fluid if using your ve-
hicle for any of the following: police, taxi,
fleet or frequent trailer towing. XX X
Replace the engine air cleaner filter. XX X X X
Replace the air conditioning filter. X X X X X X X X XXXX
Inspect and replace the PCV Valve if neces-
sary. X
360 SERVICING AND MAINTENANCE
Page 412 of 553
CAUTION!(Continued)
Only car wash soap, Mopar Wheel Cleaner or equiva-
lent is recommended.
NOTE: If you intend parking or storing your vehicle for an
extended period after cleaning the wheels with wheel
cleaner, drive your vehicle and apply the brakes to remove
the water droplets from the brake components. This activ-
ity will remove the red rust on the brake rotors and prevent
vehicle vibration when braking.
Dark Vapor Chrome, Black Satin Chrome, or Low Gloss
Clear Coat Wheels
CAUTION!
If your vehicle is equipped with these specialty
wheels, DO NOT USE wheel cleaners, abrasives, or
polishing compounds. They will permanently damage
this finish and such damage is not covered by the New
Vehicle Limited Warranty. HAND WASH ONLY US-
ING MILD SOAP AND WATER WITH A SOFT
CLOTH. Used on a regular basis; this is all that is
required to maintain this finish.
Tire Chains (Traction Devices)
Use of traction devices require sufficient tire-to-body clear-
ance. Follow these recommendations to guard against
damage.
• Traction device must be of proper size for the tire, as
recommended by the traction device manufacturer.
• Install on Rear Tires Only.
• Due to limited clearance, the following traction devices
are recommended:
• Rear Wheel Drive (RWD) Models
• On P215/65R17, P225/60R18 and 235/55R18 tires use a
Peerless Chain Super Z6 low profile traction device or
equivalent is recommended.
• All Wheel Drive (AWD) Models
• Original equipment P235/55R19, 235/55R19 tire with a
S Class traction device or equivalent.
WARNING!
Using tires of different size and type (M+S, Snow)
between front and rear axles can cause unpredictable
handling. You could lose control and have a collision.
410 SERVICING AND MAINTENANCE