2018 DODGE CHARGER check engine
[x] Cancel search: check enginePage 373 of 553
Engine Oil Filter
The engine oil filter should be replaced with a new filter at
every engine oil change.
Engine Oil Filter Selection
This manufacturer’s engines have a full-flow type dispos-
able oil filter. Use a filter of this type for replacement. The
quality of replacement filters varies considerably. Only
high quality filters should be used to assure most efficient
service. Mopar engine oil filters are high quality oil filters
and are recommended.
Engine Air Cleaner Filter
Refer to the “Maintenance Plan” in this section for the
proper maintenance intervals.
NOTE:Be sure to follow the “Severe Duty Conditions”
maintenance interval if applicable.
WARNING!
The air induction system (air cleaner, hoses, etc.) can
provide a measure of protection in the case of engine
backfire. Do not remove the air induction system (air
(Continued)
WARNING! (Continued)
cleaner, hoses, etc.) unless such removal is necessary
for repair or maintenance. Make sure that no one is
near the engine compartment before starting the ve-
hicle with the air induction system (air cleaner, hoses,
etc.) removed. Failure to do so can result in serious
personal injury.
Engine Air Cleaner Filter Selection
The quality of replacement engine air cleaner filters varies
considerably. Only high quality filters should be used to
assure most efficient service. Mopar engine air cleaner
filters are a high quality filter and are recommended.
Air Conditioner Maintenance
For best possible performance, your air conditioner should
be checked and serviced by an authorized dealer at the
start of each warm season. This service should include
cleaning of the condenser fins and a performance test.
Drive belt tension should also be checked at this time.
8
SERVICING AND MAINTENANCE 371
Page 383 of 553
Coolant Checks
Check engine coolant (antifreeze) protection every 12
months (before the onset of freezing weather, where appli-
cable). If the engine coolant (antifreeze) is dirty, the system
should be drained, flushed, and refilled with fresh OAT
coolant (conforming to MS.90032) by an authorized dealer.
Check the front of the radiator for any accumulation of
bugs, leaves, etc. If dirty, clean by gently spraying water
from a garden hose vertically down the face of the con-
denser.
Check the coolant recovery bottle tubing for brittle rubber,
cracking, tears, cuts, and tightness of the connection at the
bottle and radiator. Inspect the entire system for leaks. DO
NOT REMOVE THE COOLANT PRESSURE CAP WHEN
THE COOLING SYSTEM IS HOT.
Cooling System — Drain, Flush And Refill
NOTE:Some vehicles require special tools to add coolant
properly. Failure to fill these systems properly could lead to
severe internal engine damage. If any coolant is needed to
be added to the system please contact an authorized dealer.
If the engine coolant (antifreeze) is dirty or contains visible
sediment, have an authorized dealer clean and flush with
OAT coolant (antifreeze) (conforming to MS.90032).
Refer to the “Maintenance Plan” in this section for the
proper maintenance intervals.
Selection Of Coolant
Refer to “Fluids And Lubricants” in “Technical Specifica-
tions” for further information.
8
SERVICING AND MAINTENANCE 381
Page 386 of 553
Disposal Of Used Coolant
Used ethylene glycol-based coolant (antifreeze) is a regu-
lated substance requiring proper disposal. Check with your
local authorities to determine the disposal rules for your
community. To prevent ingestion by animals or children,
do not store ethylene glycol-based coolant in open contain-
ers or allow it to remain in puddles on the ground. If
ingested by a child or pet, seek emergency assistance
immediately. Clean up any ground spills immediately.
Coolant Level
The coolant bottle provides a quick visual method for
determining that the coolant level is adequate. With the
engine OFF and cold, the level of the engine coolant
(antifreeze) in the bottle should be between the ranges
indicated on the bottle.
The radiator normally remains completely full, so there is
no need to remove the radiator/coolant pressure cap
unless checking for engine coolant (antifreeze) freeze point
or replacing coolant. Advise your service attendant of this.
As long as the engine operating temperature is satisfactory,
the coolant bottle need only be checked once a month.
When additional engine coolant (antifreeze) is needed to
maintain the proper level, only OAT coolant that meets therequirements of FCA Material Standard MS.90032 should
be added to the coolant bottle. Do not overfill.
Points To Remember
NOTE:
When the vehicle is stopped after a few miles/
kilometers of operation, you may observe vapor coming
from the front of the engine compartment. This is normally
a result of moisture from rain, snow, or high humidity
accumulating on the radiator and being vaporized when
the thermostat opens, allowing hot engine coolant (anti-
freeze) to enter the radiator.
If an examination of your engine compartment shows no
evidence of radiator or hose leaks, the vehicle may be
safely driven. The vapor will soon dissipate.
• Do not overfill the coolant expansion bottle.
• Check the coolant freeze point in the radiator and in the
coolant expansion bottle. If engine coolant (antifreeze)
needs to be added, the contents of the coolant expansion
bottle must also be protected against freezing.
• If frequent engine coolant (antifreeze) additions are
required, the cooling system should be pressure tested
for leaks.
384 SERVICING AND MAINTENANCE
Page 387 of 553
•Maintain engine coolant (antifreeze) concentration at a
minimum of 50% OAT coolant (conforming to
MS.90032) and distilled water for proper corrosion pro-
tection of your engine which contains aluminum com-
ponents.
• Make sure that the coolant expansion bottle overflow
hoses are not kinked or obstructed.
• Keep the front of the radiator clean. If your vehicle is
equipped with air conditioning, keep the front of the
condenser clean.
• Do not change the thermostat for Summer or Winter
operation. If replacement is ever necessary, install ONLY
the correct type thermostat. Other designs may result in
unsatisfactory engine coolant (antifreeze) performance,
poor gas mileage, and increased emissions.
Brake System
In order to assure brake system performance, all brake
system components should be inspected periodically. Refer
to the “Maintenance Plan” in this section for the proper
maintenance intervals.
WARNING!
Riding the brakes can lead to brake failure and possi-
bly a collision. Driving with your foot resting or riding
on the brake pedal can result in abnormally high brake
temperatures, excessive lining wear, and possible
brake damage. You would not have your full braking
capacity in an emergency.
Fluid Level Check — Brake Master Cylinder
Check the fluid level in the master cylinder immediately if
the brake system warning light indicates system failure.
Check the fluid level in the master cylinder when perform-
ing underhood services.
Clean the top of the master cylinder area before removing
the cap. Add fluid to bring the level up to the top of the
“FULL” mark on the side of the master cylinder reservoir.
Overfilling of fluid is not recommended because it may
cause leaking in the system.
8
SERVICING AND MAINTENANCE 385
Page 388 of 553

Add enough fluid to bring the level up to the requirements
described on the brake fluid reservoir. With disc brakes,
fluid level can be expected to fall as the brake pads wear.
However, low fluid level may be caused by a leak and a
checkup may be needed.
Use only brake fluid that has been recommended by the
manufacturer, and has been kept in a tightly closed con-
tainer to avoid contamination from foreign matter or
moisture.
Refer to “Fluids And Lubricants” in “Technical Specifica-
tions” for further information.
WARNING!
•Use only manufacturer’s recommended brake fluid.
Refer to “Fluids And Lubricants” in “Technical
Specifications” for further information. Using the
wrong type of brake fluid can severely damage your
brake system and/or impair its performance. The
proper type of brake fluid for your vehicle is also
identified on the original factory installed hydraulic
master cylinder reservoir.
(Continued)
WARNING! (Continued)
•To avoid contamination from foreign matter or mois-
ture, use only new brake fluid or fluid that has been
in a tightly closed container. Keep the master cylin-
der reservoir cap secured at all times. Brake fluid in
a open container absorbs moisture from the air
resulting in a lower boiling point. This may cause it
to boil unexpectedly during hard or prolonged brak-
ing, resulting in sudden brake failure. This could
result in a collision.
• Overfilling the brake fluid reservoir can result in
spilling brake fluid on hot engine parts, causing the
brake fluid to catch fire. Brake fluid can also damage
painted and vinyl surfaces, care should be taken to
avoid its contact with these surfaces.
• Do not allow petroleum based fluid to contaminate
the brake fluid. Brake seal components could be
damaged, causing partial or complete brake failure.
This could result in a collision.
386 SERVICING AND MAINTENANCE
Page 389 of 553

Automatic Transmission
Selection Of Lubricant
It is important to use the proper transmission fluid to
ensure optimum transmission performance and life. Use
only the manufacturer’s specified transmission fluid. Refer
to “Fluids And Lubricants” in “Technical Specifications”
for fluid specifications. It is important to maintain the
transmission fluid at the correct level using the recom-
mended fluid.
NOTE:No chemical flushes should be used in any trans-
mission; only the approved lubricant should be used.
CAUTION!
Using a transmission fluid other than the manufactur-
er ’s recommended fluid may cause deterioration in
transmission shift quality and/or torque converter
shudder. Refer to “Fluids And Lubricants” in “Techni-
cal Specifications” for fluid specifications.
Special Additives
The manufacturer strongly recommends against using any
special additives in the transmission. Automatic Transmis-
sion Fluid (ATF) is an engineered product and its perfor-
mance may be impaired by supplemental additives. There-
fore, do not add any fluid additives to the transmission.
Avoid using transmission sealers as they may adversely
affect seals.
CAUTION!
Do not use chemical flushes in your transmission as
the chemicals can damage your transmission compo-
nents. Such damage is not covered by the New Vehicle
Limited Warranty.
Fluid Level Check
The fluid level is preset at the factory and does not require
adjustment under normal operating conditions. Routine
fluid level checks are not required; therefore the transmis-
sion has no dipstick. An authorized dealer can check your
transmission fluid level using special service tools. If you
notice fluid leakage or transmission malfunction, visit an
authorized dealer immediately to have the transmission
8
SERVICING AND MAINTENANCE 387
Page 465 of 553
System Information
After pressing the “System Information” button on the
touchscreen, the following settings will be available:
Setting NameSelectable Options
Software License System Software Information Screen
NOTE:
When the “Software License” feature is selected, a “System Software Information” screen will appear, displaying the
system software version. You can also update your maps with a USB device. Please see your authorized dealer for
further information.
Customer Programmable Features — Uconnect
4C/4C NAV Settings
Press the “Apps” button (If Equipped), and then
press the “Settings” button on the touchscreen to dis-
play the menu setting screen. In this mode, the
Uconnect system allows you to access programmable
features that may be equipped such as Language, Dis-
play, Units, Voice, Clock, Safety & Driving Assistance,
Lights, Doors & Locks, Auto-On Comfort, Engine Off
Options, Audio, Phone, SiriusXM Setup, Restore Set-
tings, Clear Personal Data and System Information.
NOTE: Depending on the vehicles options, feature settings
may vary. When making a selection, press the button on the touch-
screen to enter the desired mode. Once in the desired
mode, press and release the preferred setting “option” until
a check-mark appears next to the setting, showing that
setting has been selected. Once the setting is complete,
either press the back arrow button on the touchscreen to
return to the previous menu, or press the “X” button on the
touchscreen to close out of the settings screen. Pressing the
up or down arrow button on the right side of the screen
will allow you to toggle up or down through the available
settings.
10
MULTIMEDIA 463
Page 499 of 553
familiarity with the race track. Use of this feature in low
traction (cold, wet, gravel, etc.) conditions may results in
excess wheel slip outside this systems control resulting in
an aborted launch.
NOTE:
•Launch control should not be used on public roads.
Always check track conditions and the surrounding
area.
• Launch Control is not available for the first 500 miles of
the vehicle’s life.
• Launch Control should only be used when the engine
and transmission are at operating temperature.
• Launch Control is intended to be used on dry, paved
road surfaces only. Use on slippery or loose surfaces
may cause damage to vehicle components and is not
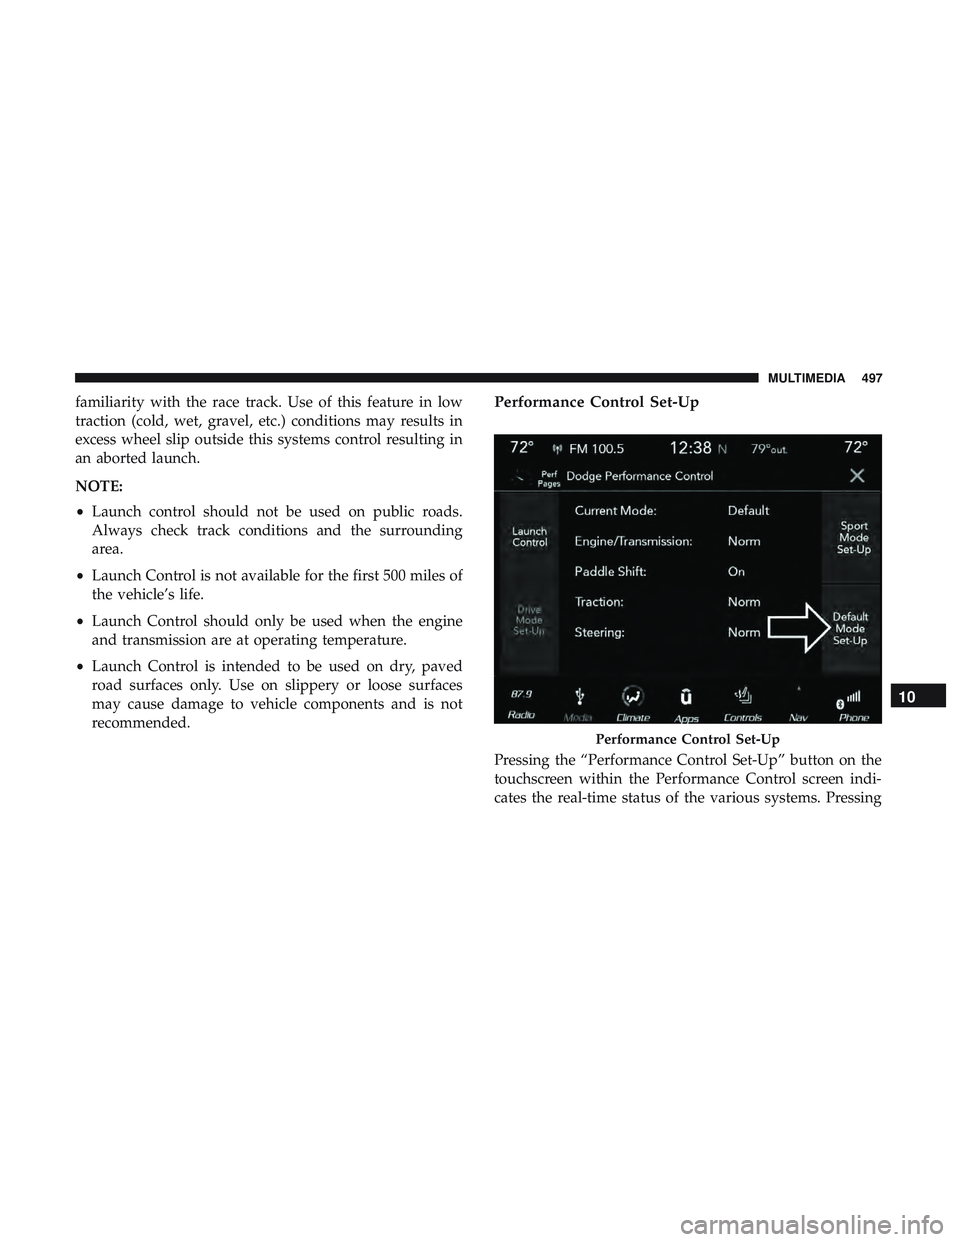
recommended.Performance Control Set-Up
Pressing the “Performance Control Set-Up” button on the
touchscreen within the Performance Control screen indi-
cates the real-time status of the various systems. Pressing
Performance Control Set-Up
10
MULTIMEDIA 497