2018 DODGE CHARGER change wheel
[x] Cancel search: change wheelPage 328 of 553
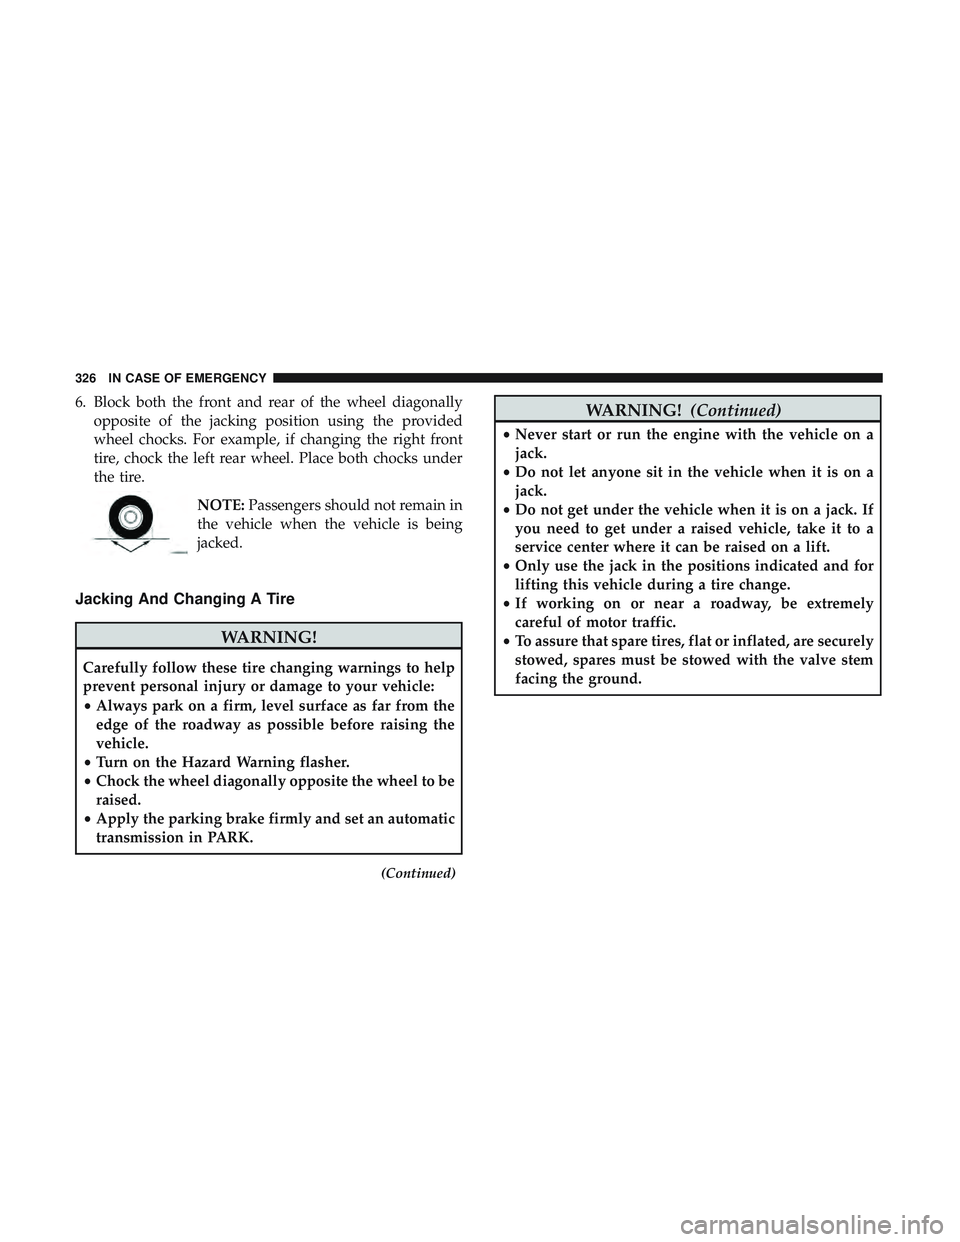
6. Block both the front and rear of the wheel diagonallyopposite of the jacking position using the provided
wheel chocks. For example, if changing the right front
tire, chock the left rear wheel. Place both chocks under
the tire.
NOTE:Passengers should not remain in
the vehicle when the vehicle is being
jacked.
Jacking And Changing A Tire
WARNING!
Carefully follow these tire changing warnings to help
prevent personal injury or damage to your vehicle:
• Always park on a firm, level surface as far from the
edge of the roadway as possible before raising the
vehicle.
• Turn on the Hazard Warning flasher.
• Chock the wheel diagonally opposite the wheel to be
raised.
• Apply the parking brake firmly and set an automatic
transmission in PARK.
(Continued)
WARNING! (Continued)
•Never start or run the engine with the vehicle on a
jack.
• Do not let anyone sit in the vehicle when it is on a
jack.
• Do not get under the vehicle when it is on a jack. If
you need to get under a raised vehicle, take it to a
service center where it can be raised on a lift.
• Only use the jack in the positions indicated and for
lifting this vehicle during a tire change.
• If working on or near a roadway, be extremely
careful of motor traffic.
• To assure that spare tires, flat or inflated, are securely
stowed, spares must be stowed with the valve stem
facing the ground.
326 IN CASE OF EMERGENCY
Page 336 of 553
WARNING!(Continued)
in injuries that are serious or fatal to you, your
passengers, and others around you.
• Take care not to allow the contents of Tire Service Kit
to come in contact with hair, eyes, or clothing. Tire
Service Kit sealant is harmful if inhaled, swallowed,
or absorbed through the skin. It causes skin, eye, and
respiratory irritation. Flush immediately with plenty
of water if there is any contact with eyes or skin.
Change clothing as soon as possible, if there is any
contact with clothing.
• Tire Service Kit Sealant solution contains latex. In
case of an allergic reaction or rash, consult a physi-
cian immediately. Keep Tire Service Kit out of reach
of children. If swallowed, rinse mouth immediately
with plenty of water and drink plenty of water. Do
not induce vomiting! Consult a physician immedi-
ately.
Sealing A Tire With Tire Service Kit
(A) Whenever You Stop To Use Tire Service Kit:
1. Pull over to a safe location and turn on the vehicle’s
Hazard Warning flashers. 2. Verify that the valve stem (on the wheel with the
deflated tire) is in a position that is near to the ground.
This will allow the Tire Service Kit Hoses (6) and (7) to
reach the valve stem and keep the Tire Service Kit flat on
the ground. This will provide the best positioning of the
kit when injecting the sealant into the deflated tire and
running the air pump. Move the vehicle as necessary to
place the valve stem in this position before proceeding.
3. Place the transmission in PARK (auto transmission) or in Gear (manual transmission) and place the ignition in the
OFF position.
4. Apply the parking brake.
(B) Setting Up To Use Tire Service Kit:
1. Push in the Mode Select Knob (5) and turn to the Sealant Mode position.
2. Uncoil the Sealant Hose (6) and then remove the cap from the fitting at the end of the hose.
3. Place the Tire Service Kit flat on the ground next to the deflated tire.
4. Remove the cap from the valve stem and then screw the fitting at the end of the Sealant Hose (6) onto the valve
stem.
334 IN CASE OF EMERGENCY
Page 358 of 553
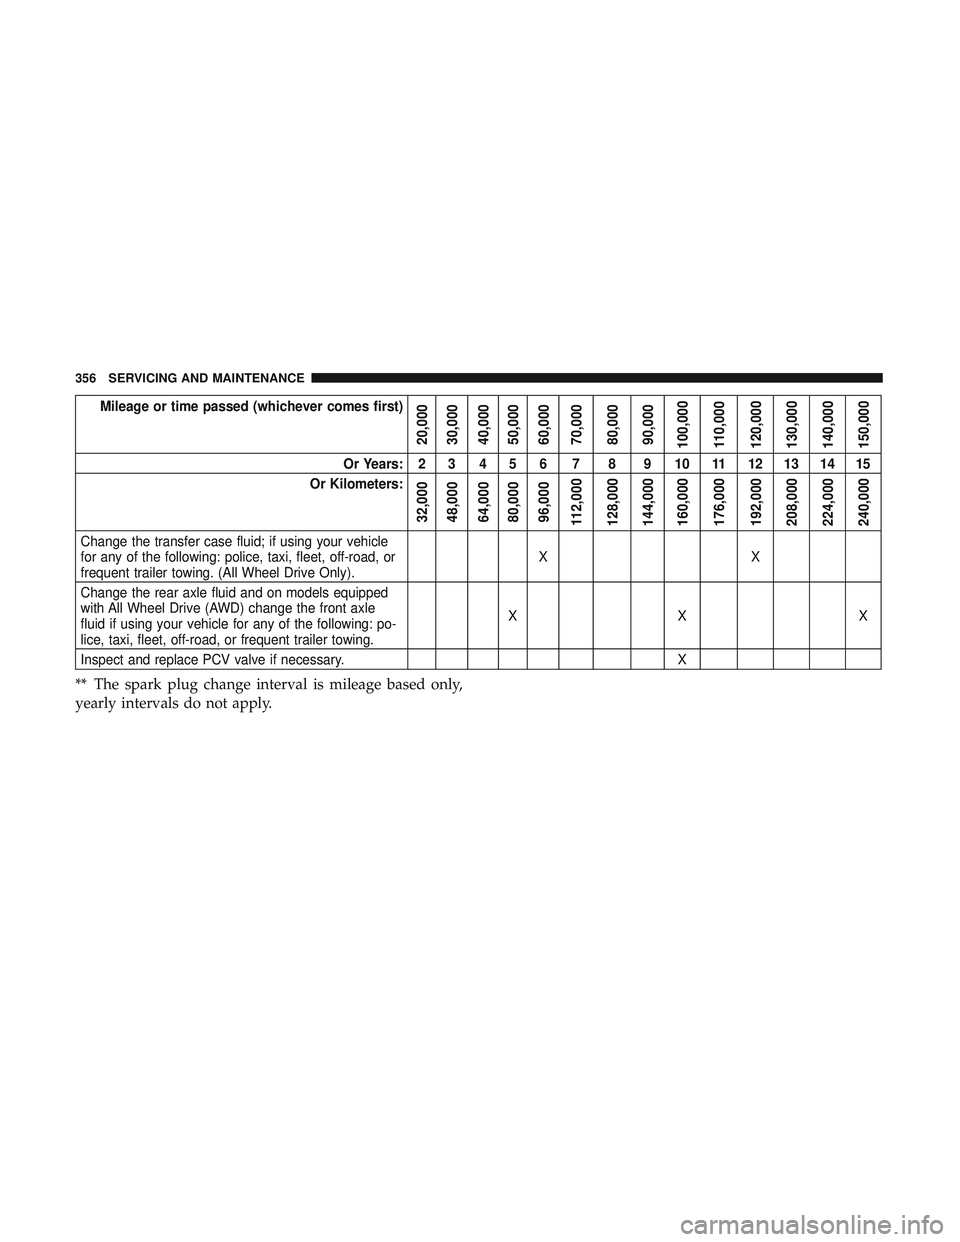
Mileage or time passed (whichever comes first)
20,000
30,000
40,000
50,000
60,000
70,000
80,000
90,000
100,000
110,000
120,000
130,000
140,000
150,000
Or Years: 2 3 4 5 6 7 8 9 10 11 12 13 14 15
Or Kilometers:
32,000
48,000
64,000
80,000
96,000
112,000
128,000
144,000
160,000
176,000
192,000
208,000
224,000
240,000
Change the transfer case fluid; if using your vehicle
for any of the following: police, taxi, fleet, off-road, or
frequent trailer towing. (All Wheel Drive Only). XX
Change the rear axle fluid and on models equipped
with All Wheel Drive (AWD) change the front axle
fluid if using your vehicle for any of the following: po-
lice, taxi, fleet, off-road, or frequent trailer towing. XX X
Inspect and replace PCV valve if necessary. X
** The spark plug change interval is mileage based only,
yearly intervals do not apply.
356 SERVICING AND MAINTENANCE
Page 362 of 553
Miles:6,000
12,000
18,000
24,000
30,000
36,000
42,000
48,000
54,000
60,000
66,000
72,000
78,000
84,000
90,000
96,000
102,000
108,000
114,000
120,000
126,000
132,000
138,000
144,000
150,000
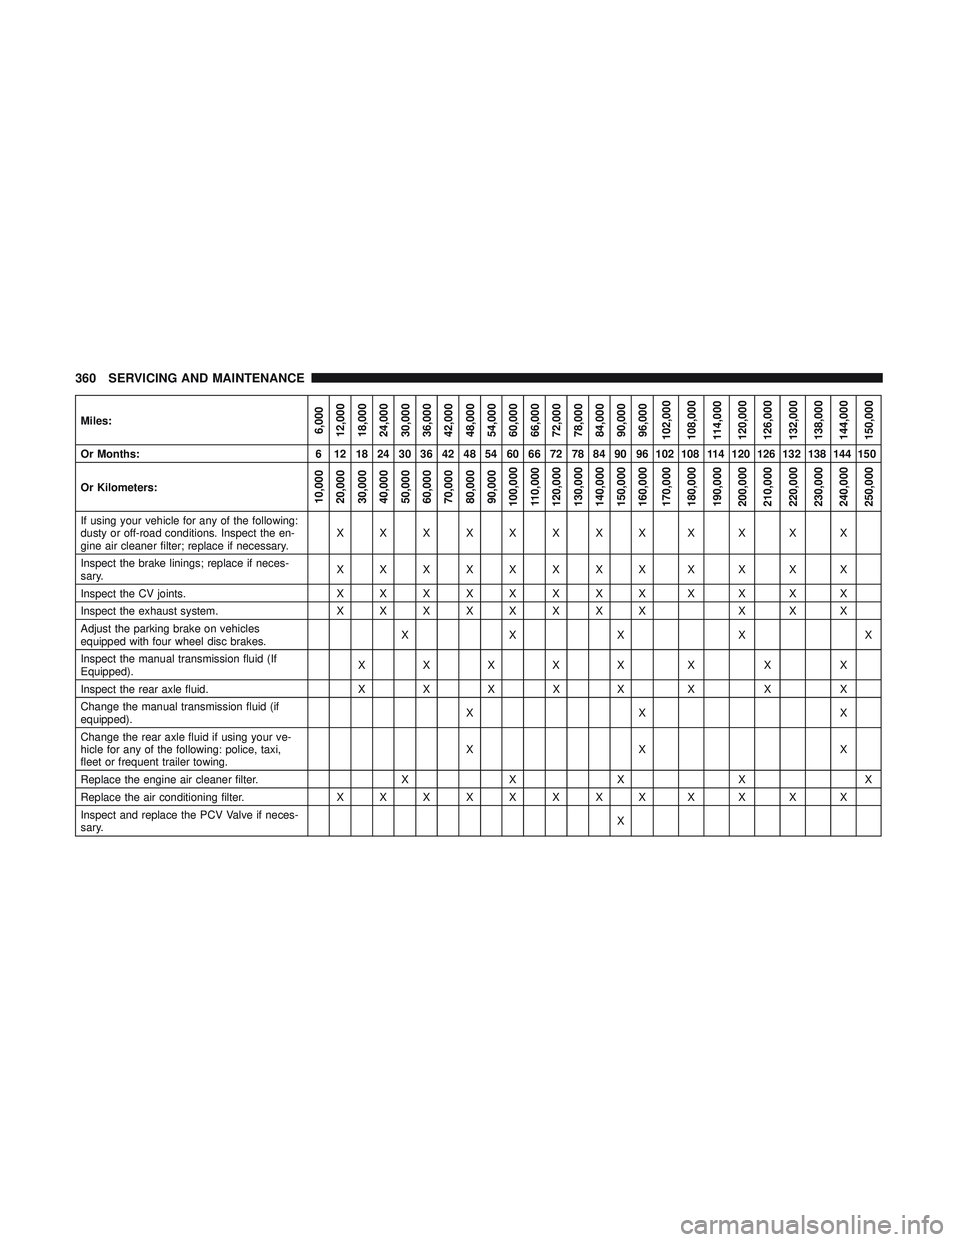
Or Months: 6 12 18 24 30 36 42 48 54 60 66 72 78 84 90 96 102 108 114 120 126 132 138 144 150
Or Kilometers:
10,000
20,000
30,000
40,000
50,000
60,000
70,000
80,000
90,000
100,000
110,000
120,000
130,000
140,000
150,000
160,000
170,000
180,000
190,000
200,000
210,000
220,000
230,000
240,000
250,000
If using your vehicle for any of the following:
dusty or off-road conditions. Inspect the en-
gine air cleaner filter; replace if necessary. XXXXXXXXXXXX
Inspect the brake linings; replace if neces-
sary. XXXXXXXXXXXX
Inspect the CV joints. X X X X X X X X XXXX
Inspect the exhaust system. X X X X X X X X X X X
Adjust the parking brake on vehicles
equipped with four wheel disc brakes. XXX X X
Inspect the manual transmission fluid (If
Equipped). XXXXXXXX
Inspect the rear axle fluid. XXX XX X XX
Change the manual transmission fluid (if
equipped). XX X
Change the rear axle fluid if using your ve-
hicle for any of the following: police, taxi,
fleet or frequent trailer towing. XX X
Replace the engine air cleaner filter. XX X X X
Replace the air conditioning filter. X X X X X X X X XXXX
Inspect and replace the PCV Valve if neces-
sary. X
360 SERVICING AND MAINTENANCE
Page 390 of 553

fluid level checked. Operating the vehicle with an im-
proper fluid level can cause severe transmission damage.
CAUTION!
If a transmission fluid leak occurs, visit an authorized
dealer immediately. Severe transmission damage may
occur. An authorized dealer has the proper tools to
adjust the fluid level accurately.
Fluid And Filter Changes — Eight-Speed
Transmission
Under normal operating conditions, the fluid installed at
the factory will provide satisfactory lubrication for the life
of the vehicle.
Routine fluid and filter changes are not required. However,
change the fluid and filter if the fluid becomes contami-
nated (with water, etc.), or if the transmission is disas-
sembled for any reason.
All Wheel Drive (AWD) — If Equipped
The all wheel drive system consists of a transfer case and
front differential. The exterior surface of these components
should be inspected for evidence of fluid leaks. Confirmed
leaks should be repaired as soon as possible.The transfer case fluid fill/inspection plug is located in the
middle of the rear housing. To inspect the transfer case
fluid level, remove the fill/inspection plug. The fluid level
should be even with the bottom of the hole. Use this plug
to add fluid as required.
The front differential fill plug is located on the outer cover
near the halfshaft attachment. To inspect the differential
fluid level, remove the fill plug. The fluid level should be
even with or slightly below the bottom of the hole.
Fluid Changes
Refer to “Scheduled Servicing” in “Servicing And Mainte-
nance” for the proper maintenance intervals.
Rear Axle
For normal service, periodic fluid level checks are not
required. When the vehicle is serviced for other reasons the
exterior surfaces of the axle assembly should be inspected.
If gear oil leakage is suspected inspect the fluid level. Refer
to “Fluids And Lubricants” in “Technical Specifications”
for further information.
RAISING THE VEHICLE
In the case where it is necessary to raise the vehicle, go to
an authorized dealer or service station.
388 SERVICING AND MAINTENANCE
Page 406 of 553
Keep dismounted tires in a cool, dry place with as little
exposure to light as possible. Protect tires from contact with
oil, grease, and gasoline.
Replacement Tires
The tires on your new vehicle provide a balance of many
characteristics. They should be inspected regularly for
wear and correct cold tire inflation pressures. The manu-
facturer strongly recommends that you use tires equivalent
to the originals in size, quality and performance when
replacement is needed. Refer to the paragraph on “Tread
Wear Indicators” in this section. Refer to the Tire and
Loading Information placard or the Vehicle Certification
Label for the size designation of your tire. The Load Index
and Speed Symbol for your tire will be found on the
original equipment tire sidewall.
See the Tire Sizing Chart example found in the “Tire Safety
Information” section of this manual for more information
relating to the Load Index and Speed Symbol of a tire.
It is recommended to replace the two front tires or two rear
tires as a pair. Replacing just one tire can seriously affect
your vehicle’s handling. If you ever replace a wheel, make
sure that the wheel’s specifications match those of the
original wheels.It is recommended you contact an authorized tire dealer or
original equipment dealer with any questions you may
have on tire specifications or capability. Failure to use
equivalent replacement tires may adversely affect the
safety, handling, and ride of your vehicle.
WARNING!
•
Do not use a tire, wheel size, load rating, or speed
rating other than that specified for your vehicle.
Some combinations of unapproved tires and wheels
may change suspension dimensions and perfor-
mance characteristics, resulting in changes to steer-
ing, handling, and braking of your vehicle. This can
cause unpredictable handling and stress to steering
and suspension components. You could lose control
and have a collision resulting in serious injury or
death. Use only the tire and wheel sizes with load
ratings approved for your vehicle.
• Never use a tire with a smaller load index or capacity,
other than what was originally equipped on your
vehicle. Using a tire with a smaller load index could
result in tire overloading and failure. You could lose
control and have a collision.
(Continued)
404 SERVICING AND MAINTENANCE
Page 501 of 553
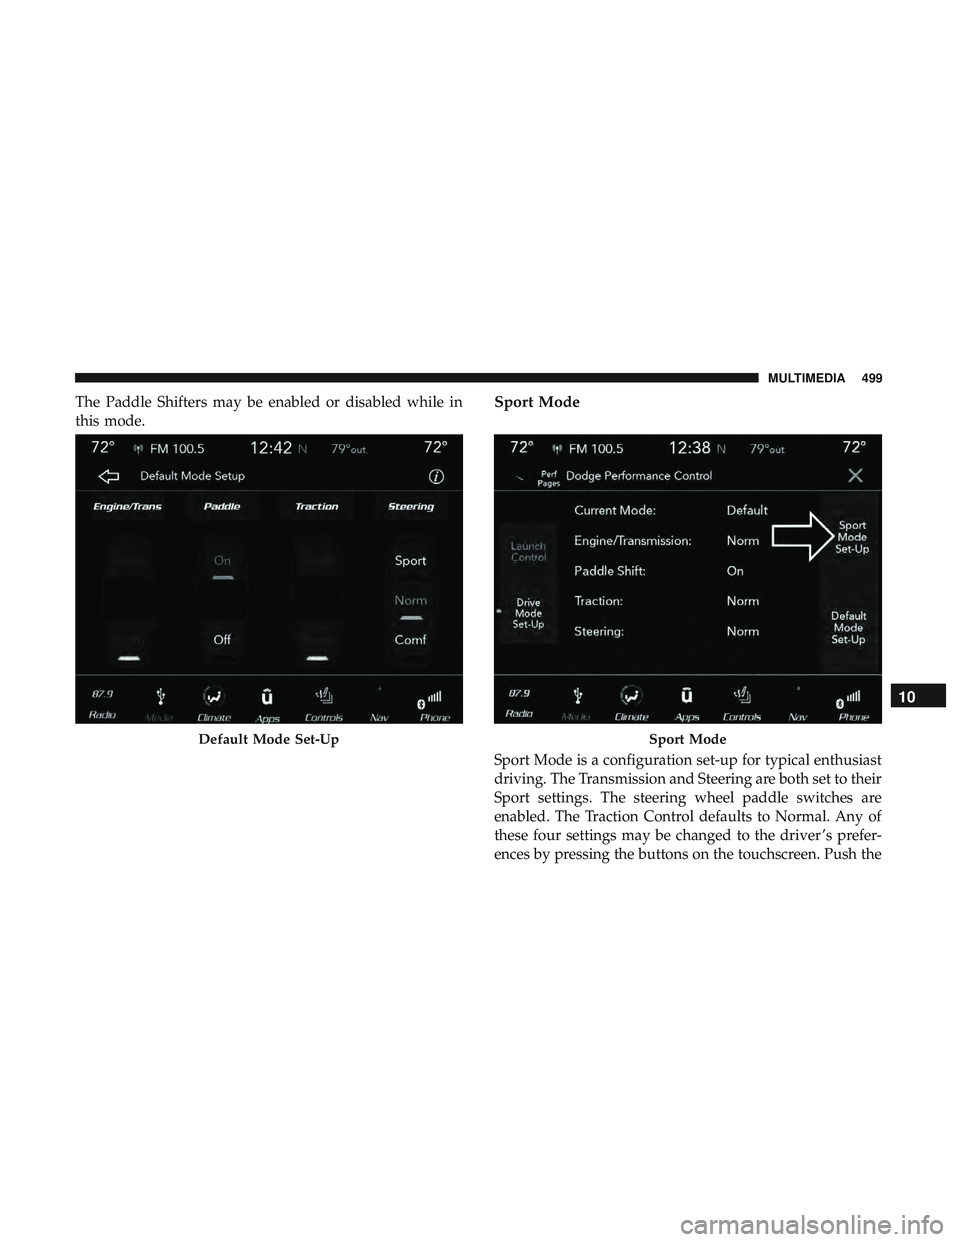
The Paddle Shifters may be enabled or disabled while in
this mode.Sport Mode
Sport Mode is a configuration set-up for typical enthusiast
driving. The Transmission and Steering are both set to their
Sport settings. The steering wheel paddle switches are
enabled. The Traction Control defaults to Normal. Any of
these four settings may be changed to the driver ’s prefer-
ences by pressing the buttons on the touchscreen. Push the
Default Mode Set-UpSport Mode
10
MULTIMEDIA 499