2018 DODGE CHARGER reset
[x] Cancel search: resetPage 197 of 553
Your vehicle may also be designed to perform any of these
other functions in response to the Enhanced Accident
Response System:
•Turn off the Fuel Filter Heater, Turn off the HVAC
Blower Motor, Close the HVAC Circulation Door
• Cut off battery power to the:
• Engine
• Electric Motor (if equipped)
• Electric power steering
• Brake booster
• Electric park brake
• Automatic transmission gear selector
• Horn
• Front wiper
• Headlamp washer pump NOTE:
After an accident, remember to cycle the ignition
to the STOP (OFF/LOCK) position and remove the key
from the ignition switch to avoid draining the battery.
Carefully check the vehicle for fuel leaks in the engine
compartment and on the ground near the engine compart-
ment and fuel tank before resetting the system and starting
the engine. If there are no fuel leaks or damage to the
vehicle electrical devices (e.g. headlights) after an accident,
reset the system by following the procedure described
below. If you have any doubt, contact an authorized dealer.
Enhanced Accident Response System Reset
Procedure
In order to reset the Enhanced Accident Response System
functions after an event, the ignition switch must be
changed from ignition START or ON/RUN to ignition OFF.
Carefully check the vehicle for fuel leaks in the engine
compartment and on the ground near the engine compart-
ment and fuel tank before resetting the system and starting
the engine.
5
SAFETY 195
Page 240 of 553
Transmission Limp Home Mode
Transmission function is monitored electronically for ab-
normal conditions. If a condition is detected that could
result in transmission damage, Transmission Limp Home
Mode is activated. In this mode, the transmission may
operate only in certain gears, or may not shift at all. Vehicle
performance may be severely degraded and the engine
may stall. In some situations, the transmission may not
re-engage if the engine is turned off and restarted. The
Malfunction Indicator Light (MIL) may be illuminated. A
message in the instrument cluster will inform the driver of
the more serious conditions, and indicate what actions may
be necessary.
In the event of a momentary problem, the transmission can
be reset to regain all forward gears by performing the
following steps:
NOTE:In cases where the instrument cluster message
indicates the transmission may not re-engage after engine
shutdown, perform this procedure only in a desired loca-
tion (preferably, at an authorized dealer).
1. Stop the vehicle.
2. Shift the transmission into PARK, if possible. If not, shift the transmission to NEUTRAL. 3. Push and hold the ignition switch until the engine turns
OFF.
4. Wait approximately 30 seconds.
5. Restart the engine.
6. Shift into the desired gear range. If the problem is no longer detected, the transmission will return to normal
operation.
NOTE: Even if the transmission can be reset, we recom-
mend that you visit an authorized dealer at your earliest
possible convenience. An authorized dealer has diagnostic
equipment to assess the condition of your transmission.
If the transmission cannot be reset, authorized dealer
service is required.
AutoStick
AutoStick is a driver-interactive transmission feature pro-
viding manual shift control, giving you more control of the
vehicle. AutoStick allows you to maximize engine braking,
eliminate undesirable upshifts and downshifts, and im-
prove overall vehicle performance.
This system can also provide you with more control during
passing, city driving, cold slippery conditions, mountain
driving, trailer towing, and many other situations.
238 STARTING AND OPERATING
Page 245 of 553
If the Steering icon is displayed and the “POWER STEER-
ING SYSTEM OVER TEMP” message is displayed on the
instrument cluster screen, they indicate that extreme steer-
ing maneuvers may have occurred which caused an over
temperature condition in the power steering system. Once
driving conditions are safe, pull over and let the vehicle
idle for a few moments until the icon and message turn off.
SPEED CONTROL — IF EQUIPPED
When engaged, the Speed Control takes over accelerator
operations at speeds greater than 25 mph (40 km/h).
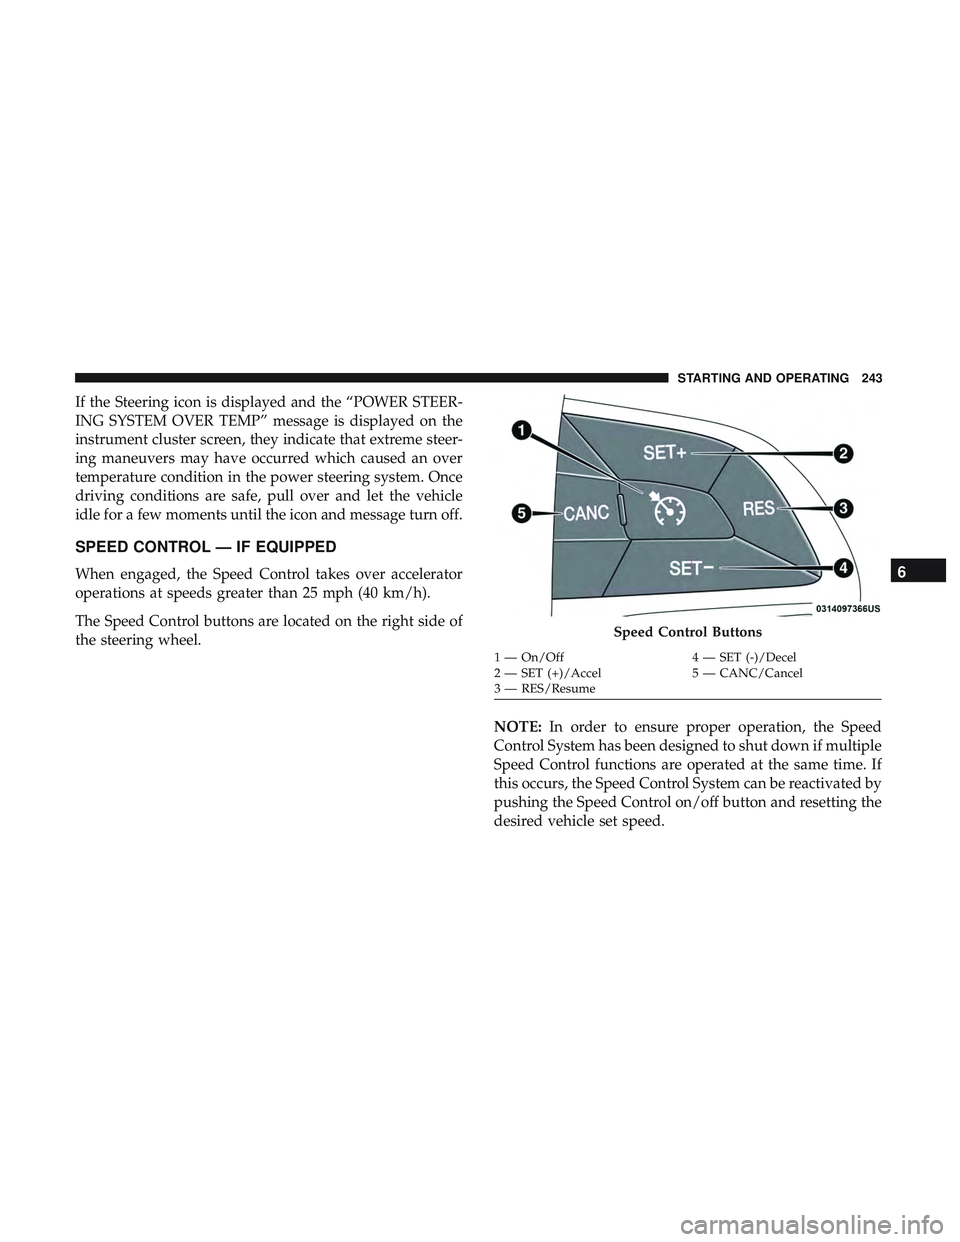
The Speed Control buttons are located on the right side of
the steering wheel.NOTE:In order to ensure proper operation, the Speed
Control System has been designed to shut down if multiple
Speed Control functions are operated at the same time. If
this occurs, the Speed Control System can be reactivated by
pushing the Speed Control on/off button and resetting the
desired vehicle set speed.
Speed Control Buttons
1 — On/Off 4 — SET (-)/Decel
2 — SET (+)/Accel 5 — CANC/Cancel
3 — RES/Resume
6
STARTING AND OPERATING 243
Page 248 of 553

WARNING!
Speed Control can be dangerous where the system
cannot maintain a constant speed. Your vehicle could
go too fast for the conditions, and you could lose
control and have an accident. Do not use Speed Control
in heavy traffic or on roads that are winding, icy,
snow-covered or slippery.
To Resume Speed
To resume a previously set speed, push the RES button and
release. Resume can be used at any speed above 20 mph
(32 km/h).
To Deactivate
A soft tap on the brake pedal, pushing the CANC button,
or normal brake pressure while slowing the vehicle will
deactivate the Speed Control without erasing the set speed
from memory.
Pushing the on/off button or turning the ignition switch
OFF erases the set speed from memory.
ADAPTIVE CRUISE CONTROL (ACC) — IF
EQUIPPED
Adaptive Cruise Control (ACC) increases the driving con-
venience provided by cruise control while traveling on
highways and major roadways. However, it is not a safety
system and not designed to prevent collisions.Speed
Control function performs differently. Please refer to the
proper section within this chapter.
ACC will allow you to keep cruise control engaged in light
to moderate traffic conditions without the constant need to
reset your cruise control. ACC utilizes a radar sensor and a
forward facing camera designed to detect a vehicle directly
ahead of you.
NOTE:
• If the sensor does not detect a vehicle ahead of you, ACC
will maintain a fixed set speed.
• If the ACC sensor detects a vehicle ahead, ACC will
apply limited braking or accelerate (not to exceed the
original set speed) automatically to maintain a preset
following distance, while matching the speed of the
vehicle ahead.
246 STARTING AND OPERATING
Page 249 of 553
The Cruise Control system has two control modes:
•Adaptive Cruise Control mode for maintaining an ap-
propriate distance between vehicles.
• Normal (Fixed Speed) Cruise Control mode for cruising
at a constant preset speed. For additional information,
refer to “Normal (Fixed Speed) Cruise Control Mode” in
this section.
NOTE: Normal (Fixed Speed) Cruise Control will not react
to preceding vehicles. Always be aware of the mode
selected.
You can change the mode by using the Cruise Control
buttons. The two control modes function differently. Al-
ways confirm which mode is selected.
WARNING!
• Adaptive Cruise Control (ACC) is a convenience
system. It is not a substitute for active driving
involvement. It is always the driver ’s responsibility
to be attentive of road, traffic, and weather condi-
tions, vehicle speed, distance to the vehicle ahead;
and, most importantly, brake operation to ensure safe
(Continued)
WARNING! (Continued)
operation of the vehicle under all road conditions.
Your complete attention is always required while
driving to maintain safe control of your vehicle.
Failure to follow these warnings can result in a
collision and death or serious personal injury.
• The ACC system:
• Does not react to pedestrians, oncoming vehicles,
and stationary objects (e.g., a stopped vehicle in a
traffic jam or a disabled vehicle).
• Cannot take street, traffic, and weather conditions
into account, and may be limited upon adverse
sight distance conditions.
• Does not always fully recognize complex driving
conditions, which can result in wrong or missing
distance warnings.
• Will bring the vehicle to a complete stop while
following a target vehicle and hold the vehicle for
2 seconds in the stop position. If the target vehicle
does not start moving within two seconds the ACC
system will display a message that the system will
release the brakes and that the brakes must be
(Continued)
6
STARTING AND OPERATING 247
Page 346 of 553
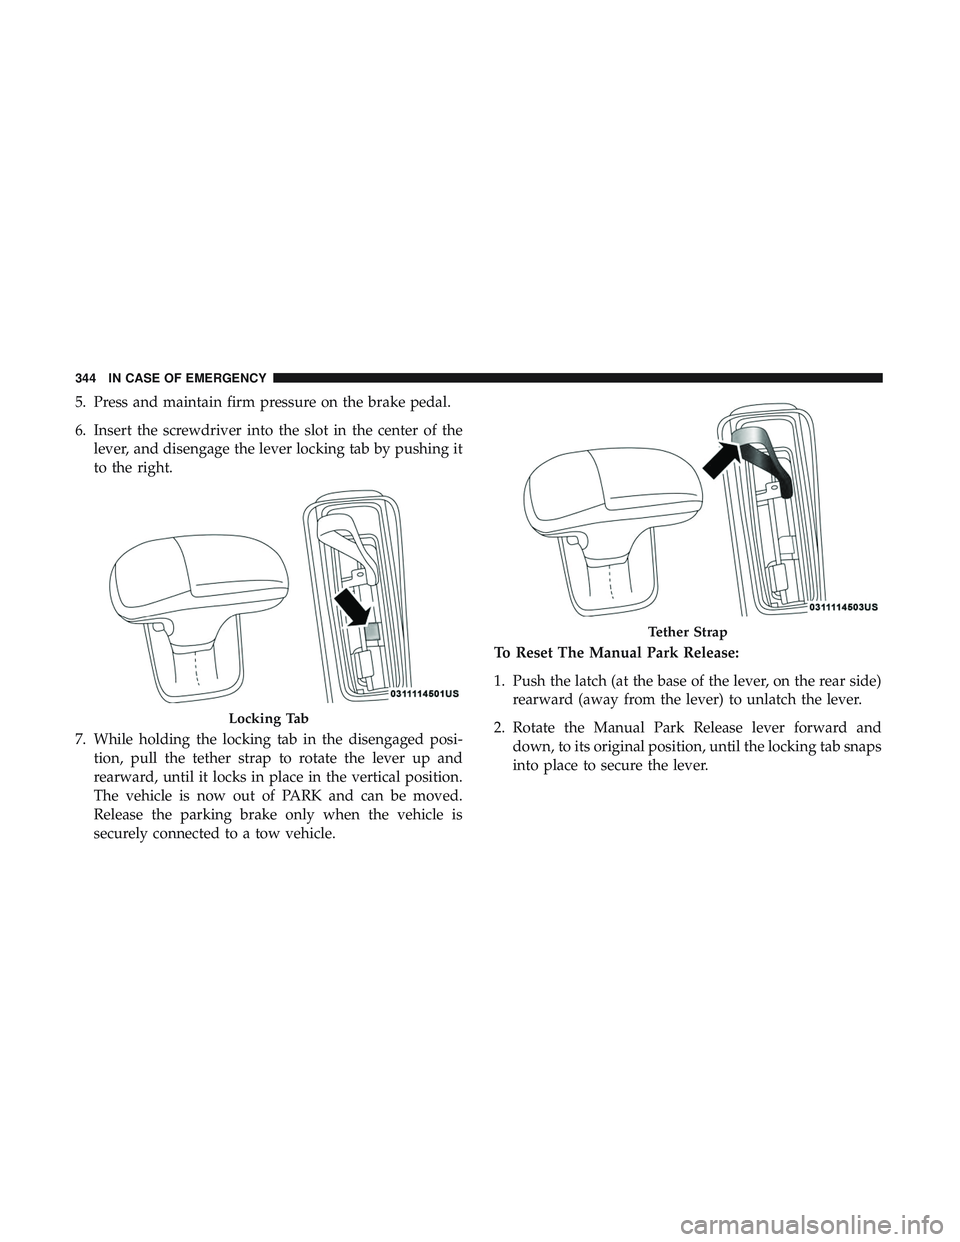
5. Press and maintain firm pressure on the brake pedal.
6. Insert the screwdriver into the slot in the center of thelever, and disengage the lever locking tab by pushing it
to the right.
7. While holding the locking tab in the disengaged posi- tion, pull the tether strap to rotate the lever up and
rearward, until it locks in place in the vertical position.
The vehicle is now out of PARK and can be moved.
Release the parking brake only when the vehicle is
securely connected to a tow vehicle. To Reset The Manual Park Release:
1. Push the latch (at the base of the lever, on the rear side)
rearward (away from the lever) to unlatch the lever.
2. Rotate the Manual Park Release lever forward and down, to its original position, until the locking tab snaps
into place to secure the lever.
Locking Tab
Tether Strap
344 IN CASE OF EMERGENCY
Page 355 of 553
SCHEDULED SERVICING
3.6L And 5.7L Engines
Your vehicle is equipped with an automatic oil change
indicator system. The oil change indicator system will
remind you that it is time to take your vehicle in for
scheduled maintenance.
Based on engine operation conditions, the oil change
indicator message will illuminate. This means that service
is required for your vehicle. Operating conditions such as
frequent short-trips, trailer tow, extremely hot or cold
ambient temperatures, and E85 fuel usage will influence
when the “Change Oil” or “Oil Change Required” message
is displayed. Severe Operating Conditions can cause the
change oil message to illuminate as early as 3,500 miles
(5,600 km) since last reset. Have your vehicle serviced as
soon as possible, within the next 500 miles (800 km).
The “Oil Change Required” message will be displayed in
the instrument cluster and a single chime will sound,
indicating that an oil change is necessary.Your authorized dealer will reset the oil change indicator
message after completing the scheduled oil change. If a
scheduled oil change is performed by someone other than
your authorized dealer, the message can be reset by
referring to “Instrument Cluster Display” in “Getting To
Know Your Instrument Panel” for further information.
NOTE:
Under no circumstances should oil change inter-
vals exceed 10,000 miles (16,000 km), twelve months or 350
hours of engine run time, whichever comes first. The 350
hours of engine run or idle time is generally only a concern
for fleet customers.
Severe Duty All Models
Change Engine Oil at 4,000 miles (6,500 km) or 350 hours of
engine run time if the vehicle is operated in a dusty and
off-road environment, or is operated predominantly at idle
or only very low engine RPM’s. This type of vehicle use is
considered Severe Duty.
8
SERVICING AND MAINTENANCE 353
Page 360 of 553

NOTE:
•The oil change indicator message will not monitor the
time since the last oil change. Change your vehicle’s oil
if it has been six months since your last oil change, even
if the oil change indicator message is NOT illuminated.
• Change your engine oil more often if you drive your
vehicle off-road/track usage for an extended period of
time.
• Under no circumstances should oil change intervals
exceed 6,000 miles (10,000 km) or six months, whichever
comes first.
An authorized dealer will reset the oil change indicator
message after completing the scheduled oil change. If a
scheduled oil change is performed by someone other than
an authorized dealer, the message can be reset by referring
to the steps described under “Instrument Cluster Display”
in “Getting To Know Your Instrument Panel” for further
information. At Each Stop For Fuel
•
Check the engine oil level. Refer to “Engine Compart-
ment” in this chapter for further information.
• Check the windshield washer solvent and add if re-
quired.
Once A Month
• Check tire pressure and look for unusual wear or
damage.
• Inspect the battery, and clean and tighten the terminals
as required.
• Check the fluid levels of the coolant reservoir, brake
master cylinder, and add as needed.
• Check all lights and other electrical items for correct
operation.
358 SERVICING AND MAINTENANCE