2018 DODGE CHARGER light
[x] Cancel search: lightPage 296 of 553
Towing Tips
Before setting out on a trip, practice turning, stopping, and
backing up the trailer in an area located away from heavy
traffic.
Automatic Transmission
Select the DRIVE range when towing. The transmission
controls include a drive strategy to avoid frequent shifting
when towing. However, if frequent shifting does occur
while in DRIVE, you can use the AutoStick shift control to
manually select a lower gear.
NOTE:Using a lower gear while operating the vehicle
under heavy loading conditions will improve performance
and extend transmission life by reducing excessive shifting
and heat buildup. This action will also provide better
engine braking.
Speed Control — If Equipped
• Do not use on hilly terrain or with heavy loads.
• When using the speed control, if you experience speed
drops greater than 10 mph (16 km/h), disengage until
you can get back to cruising speed.
• Use speed control in flat terrain and with light loads to
maximize fuel efficiency.
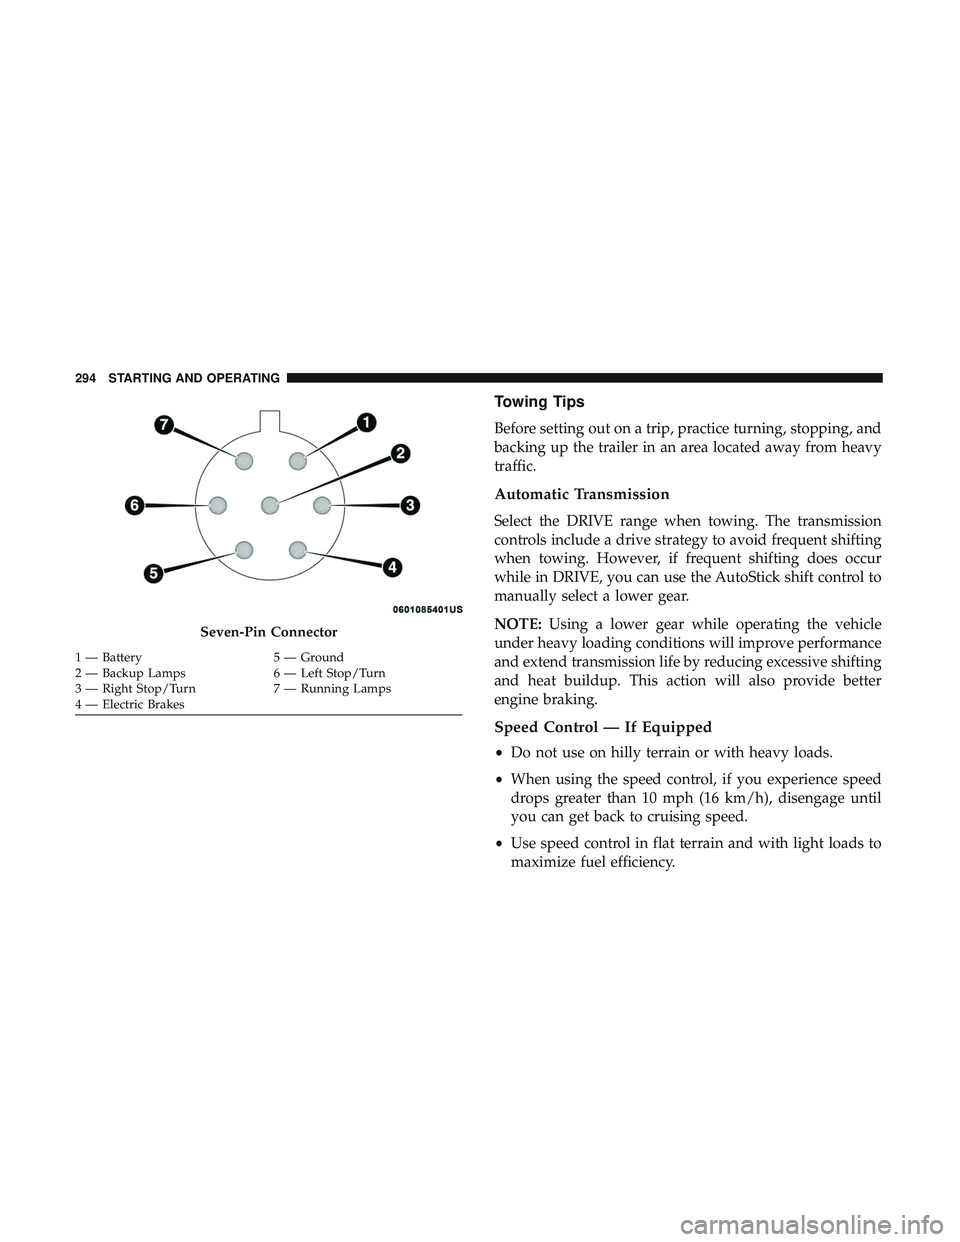
Seven-Pin Connector
1 — Battery 5 — Ground
2 — Backup Lamps 6 — Left Stop/Turn
3 — Right Stop/Turn 7 — Running Lamps
4 — Electric Brakes 294 STARTING AND OPERATING
Page 299 of 553
WARNING!(Continued)
result in injuries that are serious or fatal to you, your
passengers, and others around you.
Shallow Standing Water
Although your vehicle is capable of driving through shal-
low standing water, consider the following Cautions and
Warnings before doing so.
WARNING!
•Driving through standing water limits your vehicle’s
traction capabilities. Do not exceed 5 mph (8 km/h)
when driving through standing water.
• Driving through standing water limits your vehicle’s
braking capabilities, which increases stopping dis-
tances. Therefore, after driving through standing
water, drive slowly and lightly press on the brake
pedal several times to dry the brakes.
• Failure to follow these warnings may result in inju-
ries that are serious or fatal to you, your passengers,
and others around you.
CAUTION!
•Always check the depth of the standing water before
driving through it. Never drive through standing
water that is deeper than the bottom of the tire rims
mounted on the vehicle.
• Determine the condition of the road or the path that
is under water and if there are any obstacles in the
way before driving through the standing water.
• Do not exceed 5 mph (8 km/h) when driving through
standing water. This will minimize wave effects.
• Driving through standing water may cause damage
to your vehicle’s drivetrain components. Always in-
spect your vehicle’s fluids (i.e., engine oil, transmis-
sion, axle, etc.) for signs of contamination (i.e., fluid
that is milky or foamy in appearance) after driving
through standing water. Do not continue to operate
the vehicle if any fluid appears contaminated, as this
may result in further damage. Such damage is not
covered by the New Vehicle Limited Warranty.
• Getting water inside your vehicle’s engine can cause
it to lock up and stall out, and cause serious internal
damage to the engine. Such damage is not covered by
the New Vehicle Limited Warranty.
6
STARTING AND OPERATING 297
Page 304 of 553
WARNING!(Continued)
SiriusXM Guardian features and applications in this
vehicle. Only use Uconnect features and SiriusXM
Guardian services when it is safe to do so. Failure to do
so may result in an accident involving serious injury or
death.
NOTE:
• Your vehicle may be transmitting data as authorized by
the subscriber.
• The SOS and ASSIST buttons will only function if you
are connected to an operable LTE (voice/data) or 4G
(data) network. Other Uconnect services will only be
operable if your SiriusXM Guardian service is active and
you are connected to an operable LTE (voice/data) or 4G
(data) network.
ASSIST Call
The ASSIST Button is used to automatically connect you to
any one of the following support centers:
• Roadside Assistance – If you get a flat tire, or need a tow,
just push the ASSIST button and you’ll be connected to someone who can help. Roadside Assistance will know
what vehicle you’re driving and its location. Additional
fees may apply for roadside Assistance.
• SiriusXM Guardian Customer Care – In-vehicle support
for SiriusXM Guardian.
• Vehicle Customer Care – Total support for all other
vehicle issues.
SOS Call
1. Push the SOS Call button on the Rearview Mirror.
NOTE: In case the SOS Call button is pushed in error, there
will be a ten second delay before the SOS Call system
initiates a call to a SOS operator. To cancel the SOS Call
connection, push the SOS call button on the Rearview
Mirror or press the cancellation button on the Device
Screen. Termination of the SOS Call will turn off the green
LED light on the Rearview Mirror.
2. The LED light located between the ASSIST and SOS buttons on the Rearview Mirror will turn green once a
connection to a SOS operator has been made.
302 IN CASE OF EMERGENCY
Page 306 of 553
WARNING!
•If anyone in the vehicle could be in danger (e.g., fire
or smoke is visible, dangerous road conditions or
location), do not wait for voice contact from an
Emergency Services Agent. All occupants should exit
the vehicle immediately and move to a safe location.
• Never place anything on or near the vehicle’s oper-
able network and GPS antennas. You could prevent
operable network and GPS signal reception, which
can prevent your vehicle from placing an emergency
call. An operable network and GPS signal reception
is required for the SOS Call system to function
properly.
• The SOS Call system is embedded into the vehicle’s
electrical system. Do not add aftermarket electrical
equipment to the vehicle’s electrical system. This
may prevent your vehicle from sending a signal to
initiate an emergency call. To avoid interference that
can cause the SOS Call system to fail, never add
aftermarket equipment (e.g., two-way mobile radio,
CB radio, data recorder, etc.) to your vehicle’s electri-
cal system or modify the antennas on your vehicle. IF
YOUR VEHICLE LOSES BATTERY POWER FOR
(Continued)
WARNING! (Continued)
ANY REASON (INCLUDING DURING OR AFTER
AN ACCIDENT), THE UCONNECT FEATURES,
APPS AND SERVICES, AMONG OTHERS, WILL
NOT OPERATE.
• Modifications to any part of the SOS Call system
could cause the air bag system to fail when you need
it. You could be injured if the air bag system is not
there to help protect you.
SOS Call System Limitations
Vehicles sold in Mexico DO NOThave SOS Call system
capabilities.
SOS or other emergency line operators in Mexico may not
answer or respond to SOS system calls.
If the SOS Call system detects a malfunction, any of the
following may occur at the time the malfunction is de-
tected, and at the beginning of each ignition cycle:
• The Rearview Mirror light located between the ASSIST
and SOS buttons will continuously be illuminated red.
304 IN CASE OF EMERGENCY
Page 307 of 553
•The Device Screen will display the following message
“Vehicle device requires service. Please contact your
dealer.”
• An In-Vehicle Audio message will state “Vehicle device
requires service. Please contact your dealer.”
WARNING!
•Ignoring the Rearview Mirror light could mean you
will not have SOS Call services. If the Rearview
Mirror light is illuminated, have an authorized
dealer service the SOS Call system immediately.
• The Occupant Restraint Control module turns on the
air bag Warning Light on the instrument panel if a
malfunction in any part of the system is detected. If
the Air Bag Warning Light is illuminated, have an
authorized dealer service the Occupant Restraint
Control system immediately.
Even if the SOS Call system is fully functional, factors
beyond FCA US LLC’s control may prevent or stop the SOS
Call system operation. These include, but are not limited
to, the following factors:
• Delayed accessories mode is active.
• The ignition is in the OFF position. •
The vehicle’s electrical systems are not intact.
• The SOS Call system software and/or hardware are
damaged during a crash.
• The vehicle battery loses power or becomes discon-
nected during a vehicle crash.
• LTE (voice/data) or 4G (data) network and/or Global
Positioning Satellite signals are unavailable or ob-
structed.
• Equipment malfunction at the SOS operator facility.
• Operator error by the SOS operator.
• LTE (voice/data) or 4G (data) network congestion.
• Weather.
• Buildings, structures, geographic terrain, or tunnels.
WARNING!
ALWAYS obey traffic laws and pay attention to the
road. ALWAYS drive safely with your hands on the
steering wheel. You have full responsibility and as-
sume all risks related to the use of the Uconnect and
SiriusXM Guardian features and applications in this
(Continued)
7
IN CASE OF EMERGENCY 305
Page 309 of 553
BULB REPLACEMENT
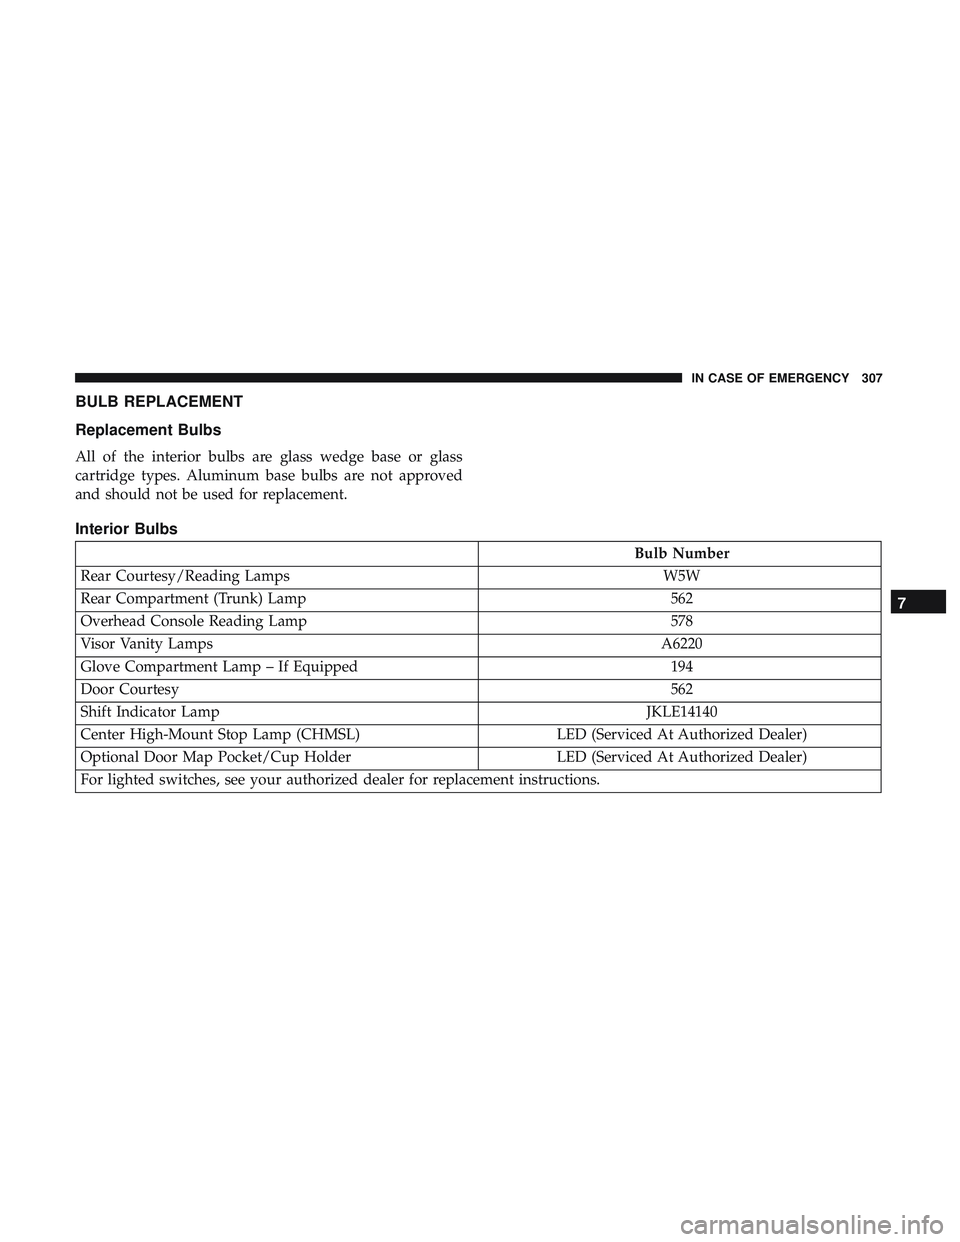
Replacement Bulbs
All of the interior bulbs are glass wedge base or glass
cartridge types. Aluminum base bulbs are not approved
and should not be used for replacement.
Interior Bulbs
Bulb Number
Rear Courtesy/Reading Lamps W5W
Rear Compartment (Trunk) Lamp 562
Overhead Console Reading Lamp 578
Visor Vanity Lamps A6220
Glove Compartment Lamp – If Equipped 194
Door Courtesy 562
Shift Indicator Lamp JKLE14140
Center High-Mount Stop Lamp (CHMSL) LED (Serviced At Authorized Dealer)
Optional Door Map Pocket/Cup Holder LED (Serviced At Authorized Dealer)
For lighted switches, see your authorized dealer for replacement instructions.
7
IN CASE OF EMERGENCY 307
Page 311 of 553
Replacing Exterior Bulbs
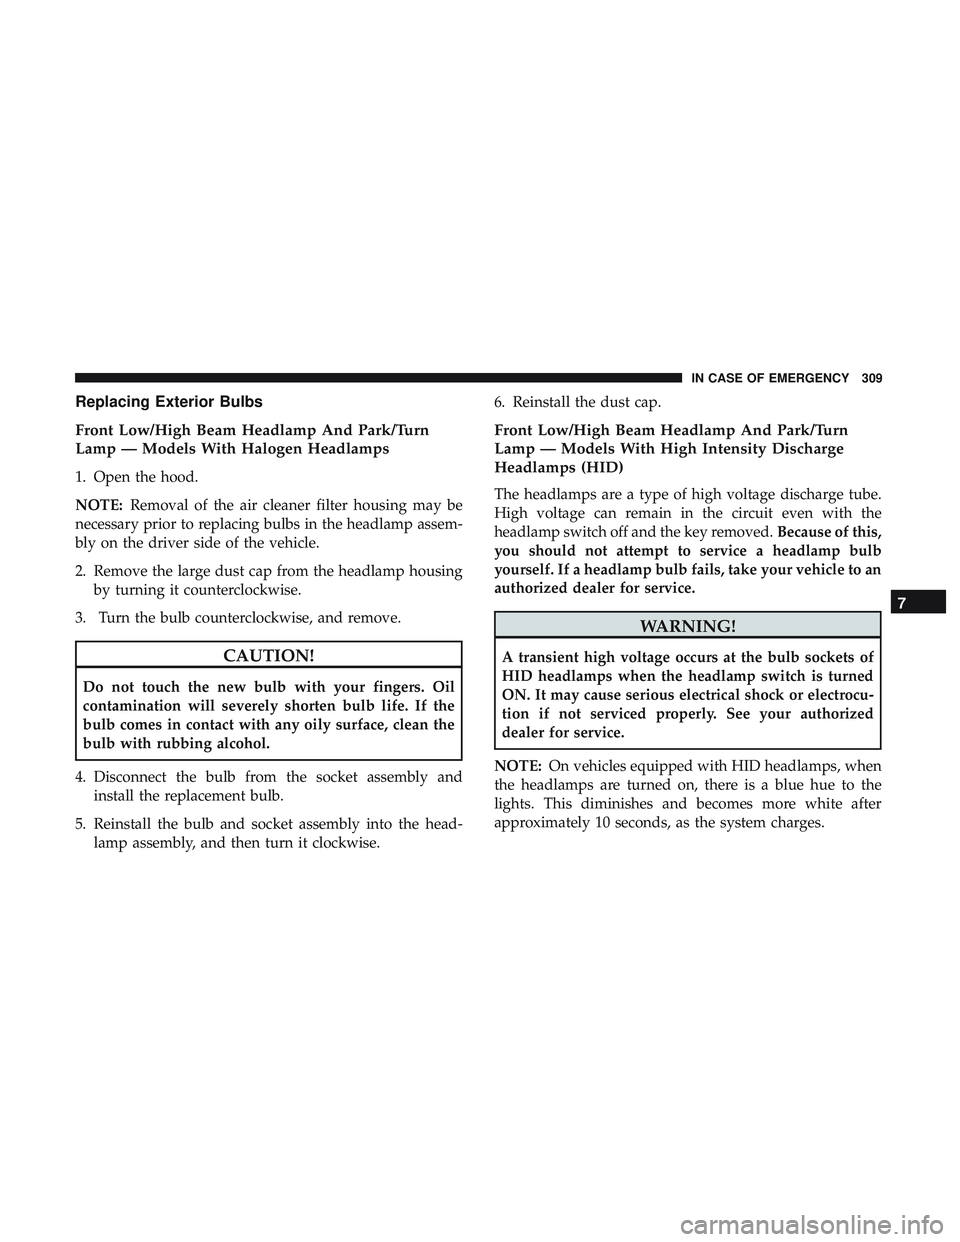
Front Low/High Beam Headlamp And Park/Turn
Lamp — Models With Halogen Headlamps
1. Open the hood.
NOTE:Removal of the air cleaner filter housing may be
necessary prior to replacing bulbs in the headlamp assem-
bly on the driver side of the vehicle.
2. Remove the large dust cap from the headlamp housing by turning it counterclockwise.
3. Turn the bulb counterclockwise, and remove.
CAUTION!
Do not touch the new bulb with your fingers. Oil
contamination will severely shorten bulb life. If the
bulb comes in contact with any oily surface, clean the
bulb with rubbing alcohol.
4. Disconnect the bulb from the socket assembly and install the replacement bulb.
5. Reinstall the bulb and socket assembly into the head- lamp assembly, and then turn it clockwise. 6. Reinstall the dust cap.
Front Low/High Beam Headlamp And Park/Turn
Lamp — Models With High Intensity Discharge
Headlamps (HID)
The headlamps are a type of high voltage discharge tube.
High voltage can remain in the circuit even with the
headlamp switch off and the key removed.
Because of this,
you should not attempt to service a headlamp bulb
yourself. If a headlamp bulb fails, take your vehicle to an
authorized dealer for service.
WARNING!
A transient high voltage occurs at the bulb sockets of
HID headlamps when the headlamp switch is turned
ON. It may cause serious electrical shock or electrocu-
tion if not serviced properly. See your authorized
dealer for service.
NOTE: On vehicles equipped with HID headlamps, when
the headlamps are turned on, there is a blue hue to the
lights. This diminishes and becomes more white after
approximately 10 seconds, as the system charges.
7
IN CASE OF EMERGENCY 309
Page 320 of 553
CAUTION!(Continued)
result in a dangerous electrical system overload. If a
properly rated fuse continues to blow, it indicates a
problem in the circuit that must be corrected.
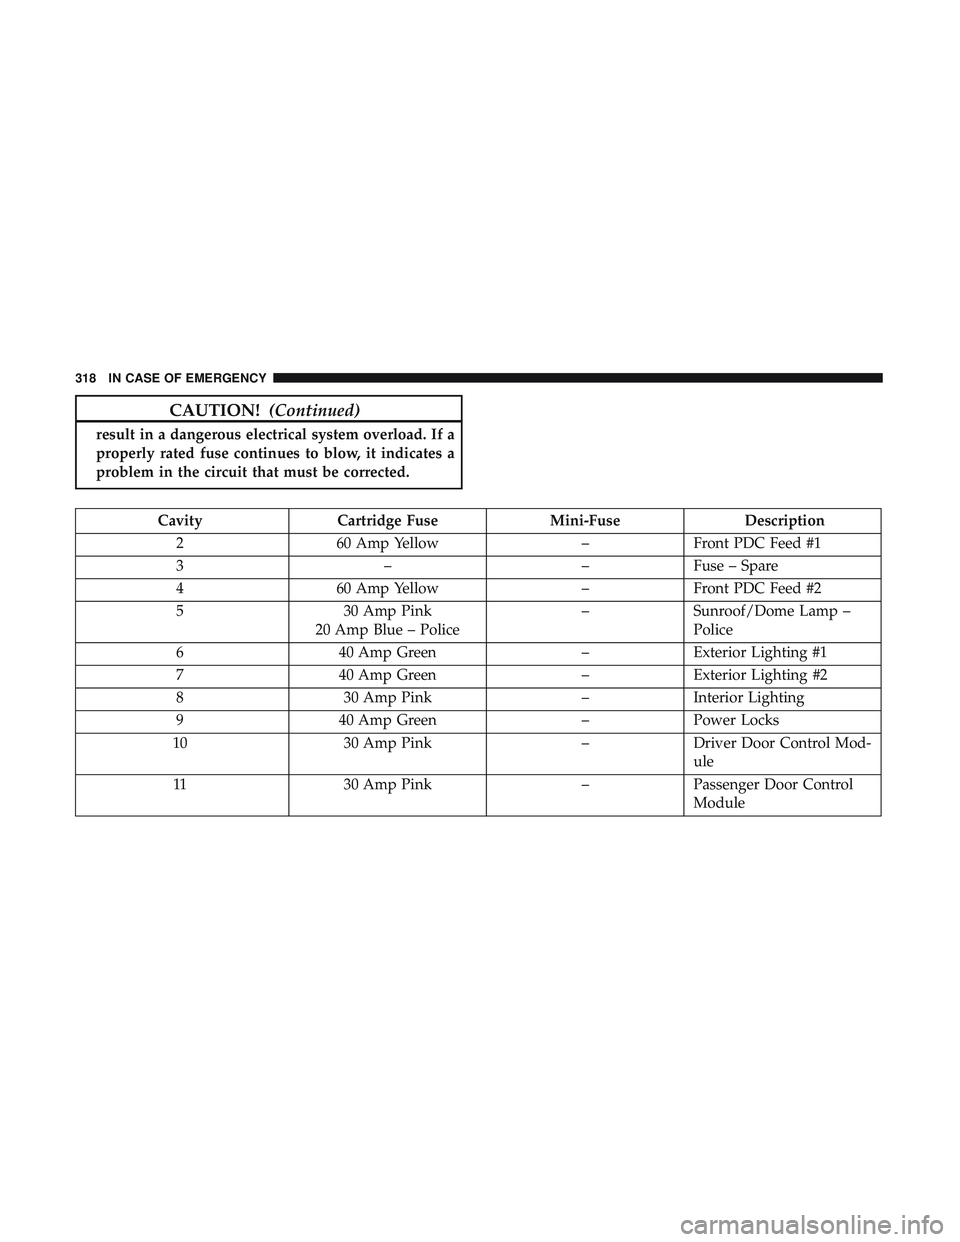
Cavity Cartridge Fuse Mini-FuseDescription
2 60 Amp Yellow –Front PDC Feed #1
3 ––Fuse – Spare
4 60 Amp Yellow –Front PDC Feed #2
5 30 Amp Pink
20 Amp Blue – Police –
Sunroof/Dome Lamp –
Police
6 40 Amp Green –Exterior Lighting #1
7 40 Amp Green –Exterior Lighting #2
8 30 Amp Pink –Interior Lighting
9 40 Amp Green –Power Locks
10 30 Amp Pink –Driver Door Control Mod-
ule
11 30 Amp Pink –Passenger Door Control
Module
318 IN CASE OF EMERGENCY