Page 25 of 244

23
Dashboard instruments01
The time counter is reset each time the ignition is
switched on.
Clock
It is deployed automatically when the ignition is
switched on and folds back automatically when
the ignition is switched off.
The hands mechanism is synchronised with the
time displayed on the touch screen.
Do not fold the clock back manually - it
may break!
12-inch touch screen
This system gives access to the following
elements:
– Time and e xterior temperature.
– Hea ting/air conditioning system controls and
reminders of settings.
–
Settings for driving aid functions, c
omfort and
safety functions, audio equipment and digital
instrument panel.
–
Settings o
f functions specific to rechargeable
hybrid vehicles.
–
Displa
y of visual manoeuvring aid functions.
–
In
teractive handbook.
–
Video t
utorials (e.g. screen management,
driving aids, voice recognition).
–
Audio equipmen
t and telephone controls with
display of associated information.
–
Connect
ed services and display of associated
information.
–
Na
vigation system controls and display
of associated information (depending on
equipment).
–
V
oice recognition (depending on equipment).
For safety reasons, always stop the
vehicle before performing operations that
require sustained attention.
Some functions are not accessible while
driving.
Recommendations
This screen is of the capacitive type.
– Do no t use pointed objects on the touch screen.
–
Do no
t touch the touch screen with wet hands.
–
U
se a soft, clean cloth to clean the touch
screen.
Main controls
Access to one of the home pages
Return to the first home page
Direct access to the Climate application
Direct access to the Shortcuts for driving
aids
► Swipe down from the upper edge of the touch
screen to access a list of quick settings (e.g.
Brightness, Diagnostics).
► Depending on the pages displayed on the
screen, with or without the context menu, scroll
the text by swiping with your finger, as with a
smartphone.
Show/Hide context menu
Return to the previous page
► To change the status of a function, press the
description for the corresponding line (change
confirmed by the slider moving to the right/left:
function activated/deactivated).
Access additional information on the
function
Access to function parameters
Adding/Removing shortcuts
Short press, ignition off: system on/off.
Short press, ignition on: mute/restore
sound.
Page 26 of 244
.
Volume adjustment.
Applications
Press this button to access the
applications wall")
24
Dashboard instruments01
Long press, ignition on: start standby mode (mute
sound, screens and clock display off).
Volume adjustment.
Applications
Press this button to access the
applications wall.
From any page, press the touch screen
with three fingers to display the
applications wall.
To obtain information about the other
applications not listed here, refer to the sections
describing the audio and telematic systems.
ADAS
Activation/Deactivation and configuration
of the driving aid functions.
Climate
Settings for temperature, air flow, etc.
For more information on Dual-zone automatic air
conditioning, refer to the corresponding section.
Seats
Activation/Deactivation and configuration
of the seat comfort functions (heating, ventilation
and massages).
For more information on the Heated and/or
ventilated seats or on the Multi-point massages,
refer to the corresponding section.
Settings
Main settings for the audio system, touch
screen and digital instrument panel. Activation/Deactivation and configuration of
the exterior lighting, vehicle access and safety
functions.
Energy
Access to the rechargeable hybrid system
features (energy flow, consumption statistics,
deferred charging, e
- SAVE function).
Energy application
Energy Flow
The page shows the operation of the rechargeable
hybrid system in real time.
1.Active driving mode
2. Petrol engine
3. Electric motor(s)
4. Traction battery charge level
The energy flows have a specific colour for each
type of driving:
–
Blue
: 100% electrical energy.
–
Whit
e: energy from the petrol engine.
–
G
reen: energy recovery.
Statistics
This page shows electrical energy and fuel
consumption statistics.
1. Average electrical consumption for the current
trip (kWh/100 km) and historical values:
–
Blue graph
: energy consumed directly from the
traction battery.
–
G
reen graph: energy regenerated during
deceleration and braking phases used to recharge
the traction battery.
2. Average fuel consumption for the current trip
(l/100 km) and historical values (orange graph).
Charging
This page allows you to programme deferred
charging.
For more information on Charging the traction
battery (Rechargeable hybrid), refer to the
corresponding section.
e-SAVE
The e-SAVE function makes it possible to
re serve all or part of the electrical energy of the
traction battery to be used later during a journey
Page 27 of 244
.
► Activate the function by pressing ON, then
select the electric range to be reserved")
25
Dashboard instruments01
(e.g. passing through an urban area or an area
reserved for electric vehicles).
► Activate the function by pressing ON, then
select the electric range to be reserved (6 miles
(10 km), 12 miles (20 km) or the full range MAX).
Activation of the function is confirmed by
the lighting of this indicator lamp on the
instrument panel and the indication of the energy
reserve in miles or kms.
► To use the energy reserve, choose the Electric
driving mode in the mode selector.
If the requested range exceeds the
available range (not recommended), the
internal combustion engine starts to recharge
the traction battery up to the requested
threshold. This leads to excessive fuel
consumption.
Remotely operable
additional functions
(Rechargeable hybrid)
(Depending on country of sale)
The following functions are
available from the MyDS App
application, which is accessible
from a smartphone:
– Managing the traction ba ttery charging
(deferred charging).
–
Managing the t
emperature pre-conditioning.
–
Vie
wing the state of charge and range of the
vehicle.
Installation procedure
► Download the MyDS App application from the
appropriate online store for your smartphone.
► Create an account.
► Enter the vehicle identification number
(available on the vehicle registration certificate).
For more information on Identification markings,
refer to the corresponding section.
Network coverage
In order to be able to use the various
remotely operable features, ensure that your
vehicle is located in an area covered by the
mobile network.
A lack of network coverage may prevent
communication with the vehicle (for example,
if it is in an underground car park). In such
cases, the application will display a message
indicating that the connection with the vehicle
could not be established.
Page 28 of 244
:")
26Access02
Electronic key with remote
control function and
built-in key
Remote control function
The remote control can be used to perform
the following remote functions (depending on
version):
–
U
nlocking/Locking/Deadlocking the vehicle.
–
U
nlocking - Opening the boot.
–
Folding/U
nfolding the door mirrors.
–
Activ
ating/Deactivating the alarm.
–
Loc
ating the vehicle.
–
O
pening/Closing the windows.
–
C
losing the sunroof.
–
Activ
ating the vehicle’s electronic immobiliser.
Built-in key
Depending on version, using the remote control
built-in key, you can perform the following
operations:
–
Activ
ation/Deactivation of the manual child
lock.
– Activation/Deactivation of the front passenger
airbag.
–
Back
-up Unlocking/Locking of the doors.
► To eject the key or put it back in place, pull and
hold the button.
Once the built-in key is ejected, always
keep it with you to be able to carry out the
corresponding back-up procedures.
Unlocking the vehicle
Selective unlocking (driver’s door, boot) is
configured in the Settings > Vehicle touch
screen application.
Complete unlocking
► If the selective unlocking is deactivated, press
the unlocking button.
Selective unlocking
Driver's door
► Press the unlocking button.
The driver's door and the fuel filler flap are
unlocked (Petrol or Diesel).
The driver's door is unlocked (Rechargeable
hybrid).
► Press it again to unlock the other doors and
the boot.
The charging nozzle can be unplugged on the
second press.
Complete or selective unlocking, and alarm
deactivation (depending on version), is confirmed
by the flashing of the direction indicators.
Depending on version, the door mirrors unfold.
Opening the windows
Depending on version, holding the
unlocking button pressed for more than 3
seconds opens the windows.
The windows stop when the button is released.
Selective unlocking and opening of the
tailgate
By default, selective unlocking of the tailgate
is deactivated and its motorised operation is
activated.
► Press and hold this button to unlock
the boot and, depending on version, trigger
the motorised opening of the tailgate.
When selective unlocking of the tailgate is
activated, the doors and the fuel filler flap remain
locked.
Page 29 of 244

27Access02
If selective unlocking of the tailgate is
deactivated, pressing the button unlocks the
whole vehicle.
If motorised operation of the tailgate is
deactivated, pressing the button partially
opens the tailgate.
To lock the vehicle, it is necessary to close the
tailgate again.
Locking the vehicle
Normal locking
► Press the locking button.
The locking, and the activation of the alarm
depending on version, is confirmed by the lighting
of the direction indicators.
Depending on version, the door mirrors fold.
An access (door or boot) that is not
properly closed prevents locking of the
vehicle. However, if the vehicle is fitted with an
alarm, it will be activated after 45 seconds.
If the vehicle is unlocked but the doors or boot
are not subsequently opened, the vehicle will
automatically lock itself again after about
30 seconds. If the vehicle is fitted with an
alarm, it will be reactivated automatically.
Deadlocking
Deadlocking renders the interior door
controls inoperative. It also disables the
central locking button.
The horn remains operational.
Never leave anyone inside the vehicle when it
is deadlocked.
► Press the locking button again within 5
seconds to deadlock the vehicle (confirmed by the
temporary lighting of the direction indicators).
Closing the windows and sunroof
An audible signal sounds before the start of
movement.
Maintaining pressure on the locking
button for more than 3 seconds allows the
windows and, depending on version, the sunroof
to be closed to the desired position.
This operation also closes the sunroof blind.
Ensure that no person or object could
prevent the correct closing of the
windows and sunroof.
If, on versions with alarm, you want to leave
the windows and/or sunroof partially open, you
must first deactivate the interior volumetric
alarm protection.
For more information on the Alarm, refer to the
corresponding section.
"DS LIGHT VEIL"
The additional daytime running lamps
and sidelamps illuminate in a scrolling pattern
upon locking and unlocking the vehicle.
Locating the vehicle
This function helps you to spot your vehicle from a
distance, with the vehicle locked:
–
The direction indic
ators flash for approximately
10 seconds.
–
The door mirror spo
tlamps come on.
–
The c
ourtesy lamps come on.
► Press this button.
Advice
Remote control
The remote control is a sensitive, high-
frequency device; avoid handling it in your
pocket, due to the risk of unintentionally
unlocking the vehicle.
Avoid pressing the remote control buttons
while out of range of the vehicle, due to
the risk of rendering the remote control
inoperative. It would then be necessary to
reset it.
Anti-theft protection
Do not modify the electronic vehicle
immobiliser, as this might result in
malfunctions.
Page 30 of 244

28Access02
Locking the vehicle
Driving with the doors locked could make
it more difficult for the emergency services
to enter the passenger compartment in an
emergency.
As a safety precaution, take the electronic key
with you when leaving the vehicle, even for a
short time.
Purchasing a second-hand vehicle
Have the key codes memorised by
a dealer, to ensure that the keys in your
possession are the only ones able to start the
vehicle.
Keyless Entry and Start
This system allows the unlocking, locking
and starting of the vehicle, while carrying the
electronic key on your person in the recognition
zone A.
Unlocking the vehicle
Selective unlocking (driver’s door, boot) is
configured in the Settings > Vehicle touch
screen application.
Complete unlocking
► Pass your hand behind the handle of one of the
four doors or press the tailgate opening control.
If the motorised tailgate opening control is
activated, this action triggers its automatic
opening.
Opening the windows
Depending on version, keeping your hand behind
the door handle or maintaining the press on the
tailgate opening control allows the windows to be
opened to the desired position.
Selective unlocking
Driver's door
► Pass your hand behind the driver’s door
handle.
The driver's door and the fuel filler flap are
unlocked (Petrol or Diesel).
The driver's door is unlocked (Rechargeable
hybrid).
► To unlock the vehicle completely, pass your
hand behind the handle of one of the passenger
doors with the electronic key close to the
passenger door, or press the tailgate opening
control with the electronic key close to the rear of
the vehicle.
Complete or selective unlocking, and deactivation
of the alarm depending on version, is confirmed
by the flashing of the direction indicators.
Depending on version, the door mirrors unfold.
Selective unlocking of the tailgate
► Press the tailgate opening control to unlock
just the boot.
The doors remain locked.
If selective unlocking of the tailgate is
deactivated, pressing this control also
unlocks the doors.
Page 31 of 244
 or the locking control on the
tailgate.
It is not possible to lock the vehicle if o")
29Access02
Locking the vehicle
Normal locking
► Press the handle on one of the four doors
(at the markings) or the locking control on the
tailgate.
It is not possible to lock the vehicle if one of the
electronic keys is left inside the vehicle.
Closing the windows and sunroof
Maintaining pressure on the door handle or
the tailgate control allows the windows and,
depending on version, the sunroof to be closed to
the desired position.
This operation also closes the sunroof blind.
Make sure that no item or person could
prevent the correct closing of the
windows and sunroof.
Pay particular attention to children when
operating windows.
The locking, and the activation of the alarm
depending on version, is confirmed by the
temporary lighting of the direction indicators.
Depending on version, the door mirrors fold.
For safety and theft protection reasons,
never leave the electronic key in the
vehicle, even when you are close to it.
Deadlocking
Deadlocking renders the interior door
controls inoperative. It also disables the
central locking button.
The horn remains operational.
Never leave anyone inside the vehicle when it
is deadlocked.
► Press the handle on one of the four doors
(at the markings) or the locking control on the
tailgate to lock the vehicle.
► Press it again within 5 seconds to deadlock
the vehicle (confirmed by the temporary lighting
of the direction indicators).
"DS LIGHT VEIL"
The additional daytime running lamps
and sidelamps illuminate in a scrolling pattern
upon locking and unlocking the vehicle.
If one of the doors or the boot is still open
or if the electronic key for the Keyless
Entry and Start
s
ystem has been left inside the
vehicle, central locking will not take place.
If the vehicle is unlocked but the doors or
tailgate are not subsequently opened, the
vehicle will automatically lock itself again
after about 30 seconds. If fitted to the vehicle,
the alarm is automatically reactivated (if
previously activated).
Automatic folding/unfolding of the door
mirrors is configured in the Settings >
Vehicle touch screen application.
As a safety measure, never leave the
vehicle, even for a short time, without
taking the Keyless Entry and Start system’s
electronic key with you.
Be aware of the risk of theft of the vehicle if
the key is present in one of the defined areas
while the vehicle is unlocked.
To preserve the battery charge in the
electronic key and the vehicle's battery,
the "hands-free" functions are set to
Page 32 of 244

30Access02
hibernation mode after 21 days without use. To
restore these functions, press one of the
remote control buttons or start the engine with
the electronic key in the reader.
For more information on starting with the
Keyless Entry and Start system, refer to the
corresponding section.
Electrical interference
The electronic key may not work if it
is close to an electronic device (e.g. mobile
telephone (switched on or on standby), laptop
computer, strong magnetic fields). If this
occurs, move the electronic key away from the
electronic device.
Central locking
Manual
► Press this button to lock/unlock the vehicle
(doors and boot) from inside the passenger
compartment.
The indicator lamp comes on to confirm the
central locking of the vehicle.
Central locking does not take place if any
of the doors are open.
When locking/deadlocking from the
outside
When the vehicle is locked or deadlocked from
the outside, the indicator lamp flashes and the
button is deactivated.
► After normal locking, pull one of the interior
door controls to unlock the vehicle.
► After deadlocking, you must use the remote
control, the "Keyless Entry and Start" system
or the built-in key to unlock the vehicle.
Automatic (anti-intrusion
security)
The doors and boot lock automatically while
driving (speed above 6 mph (10 km/h)).
To deactivate/reactivate this function (activated
by default):
► Press the button until an audible signal is
triggered and a confirmation message appears.
Transporting long or voluminous objects
Press the central locking control to drive
with the boot open and the doors locked.
Otherwise, every time the speed of the vehicle
exceeds 6 mph (10 km/h), the sound of the
locks rebounding will be heard and an alert will
be displayed.
Back-up procedures
Lost keys, remote control,
electronic key
Go to a dealer with the vehicle’s registration
certificate and your personal identification
documents.
The dealer will be able to retrieve the key code
and the transponder code, enabling a new key to
be ordered.
Complete unlocking/locking of
the vehicle with the key
Use this procedure in the following situations:
– R emote control battery discharged.
–
R
emote control malfunction.
–
V
ehicle battery discharged.
–
V
ehicle in an area subject to strong
electromagnetic interference.
In the first case, change the remote control
battery.
In the second case, reinitialise the remote control.
Refer to the corresponding sections.
 1
1 2
2 3
3 4
4 5
5 6
6 7
7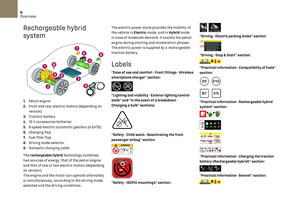 8
8 9
9 10
10 11
11 12
12 13
13 14
14 15
15 16
16 17
17 18
18 19
19 20
20 21
21 22
22 23
23 24
24 25
25 26
26 27
27 28
28 29
29 30
30 31
31 32
32 33
33 34
34 35
35 36
36 37
37 38
38 39
39 40
40 41
41 42
42 43
43 44
44 45
45 46
46 47
47 48
48 49
49 50
50 51
51 52
52 53
53 54
54 55
55 56
56 57
57 58
58 59
59 60
60 61
61 62
62 63
63 64
64 65
65 66
66 67
67 68
68 69
69 70
70 71
71 72
72 73
73 74
74 75
75 76
76 77
77 78
78 79
79 80
80 81
81 82
82 83
83 84
84 85
85 86
86 87
87 88
88 89
89 90
90 91
91 92
92 93
93 94
94 95
95 96
96 97
97 98
98 99
99 100
100 101
101 102
102 103
103 104
104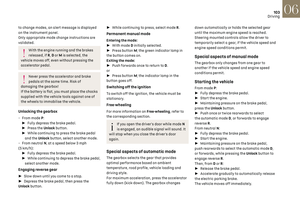 105
105 106
106 107
107 108
108 109
109 110
110 111
111 112
112 113
113 114
114 115
115 116
116 117
117 118
118 119
119 120
120 121
121 122
122 123
123 124
124 125
125 126
126 127
127 128
128 129
129 130
130 131
131 132
132 133
133 134
134 135
135 136
136 137
137 138
138 139
139 140
140 141
141 142
142 143
143 144
144 145
145 146
146 147
147 148
148 149
149 150
150 151
151 152
152 153
153 154
154 155
155 156
156 157
157 158
158 159
159 160
160 161
161 162
162 163
163 164
164 165
165 166
166 167
167 168
168 169
169 170
170 171
171 172
172 173
173 174
174 175
175 176
176 177
177 178
178 179
179 180
180 181
181 182
182 183
183 184
184 185
185 186
186 187
187 188
188 189
189 190
190 191
191 192
192 193
193 194
194 195
195 196
196 197
197 198
198 199
199 200
200 201
201 202
202 203
203 204
204 205
205 206
206 207
207 208
208 209
209 210
210 211
211 212
212 213
213 214
214 215
215 216
216 217
217 218
218 219
219 220
220 221
221 222
222 223
223 224
224 225
225 226
226 227
227 228
228 229
229 230
230 231
231 232
232 233
233 234
234 235
235 236
236 237
237 238
238 239
239 240
240 241
241 242
242 243
243