Page 176 of 248

174
Changing a bulb
The headlamps have polycarbonate
lenses with a
protective coating:
F
d
o not clean them using a dr y or
abrasive cloth, nor with a
detergent
or solvent product,
F
u
se a sponge and soapy water or a pH
neutral product,
F
w
hen using a high pressure washer
on persistent marks, do not keep the
lance directed towards the lamps or
their edges for too long, so as not to
damage their protective coating and
seals.
Changing a
bulb must only be done with
the ignition off and after the headlamp has
been switched off for several minutes –
Risk of serious burns!
F
D
o not touch the bulb directly with your
fingers, use a
lint-free cloth.
It is essential only to use anti-ultraviolet
(UV) type bulbs, so as not to damage the
headlamp.
Always replace a
failed bulb with a new
bulb with the same type and specification.
Front lamps
Halogen headlamps
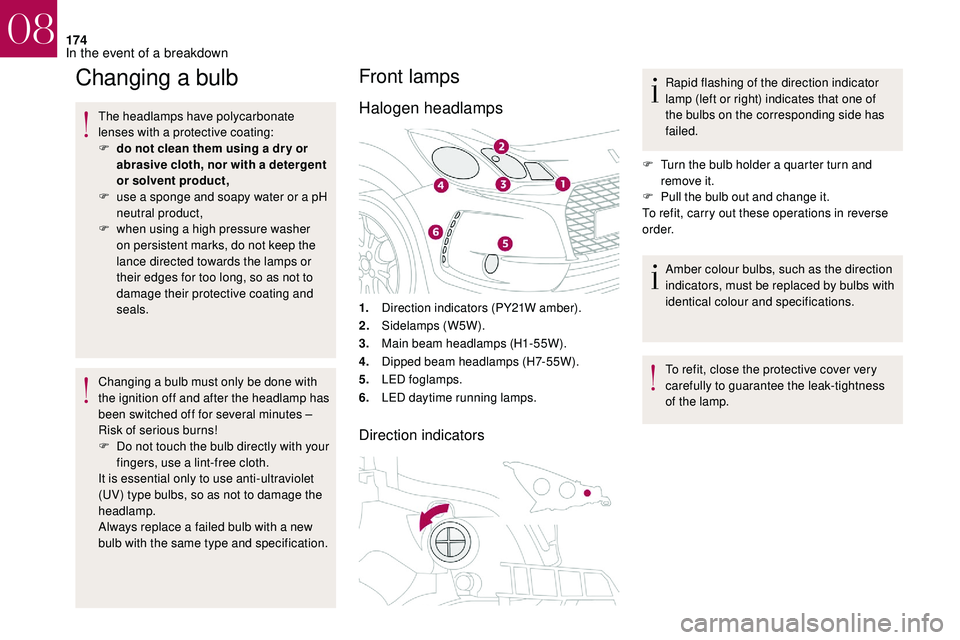
1. Direction indicators (PY21W amber).
2. Sidelamps (W5W).
3. Main beam headlamps (H1-55W).
4. Dipped beam headlamps (H7-55W).
5. LED foglamps.
6. LED daytime running lamps.
Direction indicators
Rapid flashing of the direction indicator
lamp (left or right) indicates that one of
the bulbs on the corresponding side has
failed.
F
T
urn the bulb holder a quarter turn and
remove it.
F
P
ull the bulb out and change it.
To refit, carry out these operations in reverse
o r d e r.
Amber colour bulbs, such as the direction
indicators, must be replaced by bulbs with
identical colour and specifications.
To refit, close the protective cover very
carefully to guarantee the leak-tightness
of the lamp.
08
In the event of a breakdown
Page 181 of 248
179
Number plate lamps (LED)
Third brake lamp (4 x W5W bulbs)F Push centrally on the lamp body, while levering it with two screwdrivers to extract it
to the outside.
F
D
isconnect the connector and, if necessary,
the lamp screenwash tube.
F
T
urn the bulb holder corresponding to the
faulty bulb a
quarter turn.
F
P
ull the bulb out and change it.
To refit, carry out these operations in reverse
o r d e r.Third brake lamp (LED)
For the replacement of this type of LED lamp,
contact the dealer network or a qualified
workshop.
F
O
pen the boot.
F
R
emove the two blanking plugs A located
on the lining. For the replacement of this type of light emitting
diode lamp, contact the dealer network or
a
qualified workshop.
08
In the event of a breakdown
Page 184 of 248
182
Installing electrical accessories
Your vehicle's electrical system is designed
to operate with standard or optional
equipment.
Before installing other electrical equipment
or accessories on your vehicle, contact the
dealer network or a qualified workshop.
DS AUTOMOBILES accepts no
responsibility for the cost incurred in
repairing your vehicle or for rectifying
malfunctions resulting from the installation of
accessories not supplied, not recommended
and not installed in accordance with its
specifications, in particular when the
combined power consumption of all of the
additional equipment connected exceeds
10
milliamperes.Fuses in the dashboard
The fusebox is placed in the lower dashboard
(left-hand side).
08
In the event of a breakdown
Page 193 of 248

191
F switch off all electrical consumers (audio system, wipers, lighting, etc.),
F
s
witch off the ignition and wait for four
minutes.
Upon accessing the battery, you only need to
disconnect the positive (+) terminal.
Quick-release terminal clamp
Disconnecting the (+) terminal
F Raise the lever A fully to release the clamp B .
Reconnecting the (+) terminal
F Position the open clamp B of the cable on
the positive terminal (+) of the battery.
F
P
ress down on the clamp to position it
correctly against the battery.
F
L
ock the clamp by lowering the lever A .Do not force the lever as locking will be
impossible if the clamp is not positioned
correctly; start the procedure again.
After reconnecting the battery
After reconnecting the battery, switch on the
ignition and wait 1
minute before starting to
allow initialisation of the electronic systems.
If minor problems nevertheless persist
following this operation, contact the dealer
network or a
qualified workshop.
You must reinitialise or reset certain systems by
yourself, consulting the corresponding section,
such as:
-
t
he remote control key,
-
t
he electric windows,
-
t
he date and time,
-
t
he radio preset stations.The Stop & Start system may not be
operational during the trip following the
first engine start.
In this case, the system will only be
available again after a
continuous
period of immobilisation of the vehicle,
a period which depends on the exterior
temperature and the state of charge of the
battery (up to about 8
hours).
To w i n g
Procedure for having your vehicle towed or for
towing another vehicle using the towing eye.
Access to tools
The towing eye is stored in the boot under the
f l o o r.
To access it:
F
o
pen the boot,
F
r
aise the floor,
F
r
emove the polystyrene storage box,
F
r
emove the towing eye from the holder.
08
In the event of a breakdown
Page 196 of 248

194
Characteristics of engines
and towed loads
Engines
The engine specifications (capacity, max.
power, max. speed, energy, CO
2 emissions,
e
tc.) for your vehicle are given in the
registration document and in the sales
literature.
These characteristics correspond to the values
type-approved on a
test bed, under conditions
defined in European legislation
(Directive 1999/99/EC).
For more information, contact the dealer
network or a
qualified workshop.
Weights and towed loads
The maximum weights and towed loads for
your vehicle are given in the registration
document and in the sales literature.
These values are also given on the
manufacturer's plate or label.
For more information, contact the dealer
network or a qualified workshop. The GTW and towed load values indicated are
valid up to a
maximum altitude of 1,000 metres.
The towed load value must be reduced by 10%
for each additional 1,000 metres of altitude.
The maximum authorised nose weight
corresponds to the weight permitted on the
towbar (removable with or without a tool).
GT W: Gross train weight.
High exterior temperatures may result
in a reduction in the per formance of
the vehicle to protect the engine. If the
exterior temperature is above 37°C, limit
the towed load.
Towing with a
towing vehicle which is only
slightly laden may negatively affect its
handling.
Towing a
trailer increases the braking
distance.
When towing, never exceed the speed
of 62
mph (100 km/h) (obser ve the local
legislation in force). If the exterior temperature is high, it is
recommended that the engine be allowed
to idle for 1
to 2 minutes after the vehicle
comes to a stop, to facilitate its cooling.
09
Technical data
Page 197 of 248
195
Engines and towed loads – PETROL
EnginesPureTech 82PureTech 82 S&SV Ti 120
Gearboxes BVM
(Manual 5-speed) ETG
(Electronic 5-speed) BVM
(Manual 5-speed) BVA
(Automatic 4-speed)
Code ----
Model codes:
SA… (Hatchback)/SB… (Cabrio) HMZ6
HMZ6/PS 5FS05FS9
Body style Hatchback/Cabrio Hatchback Hatchback Hatchback/Cabrio
Cubic capacity (cm
3) 1,1 9 91,1 9 9 1,59 8
Max power: EEC standard (kW) 6060 88
Fuel UnleadedUnleaded Unleaded
Braked trailer (within the GTW limit) on a
12%
slope 800
500900 900
Unbraked trailer (kg) 520500 570570
Recommended nose weight (kg) 46464646
09
Technical data
Page 198 of 248
196
EnginesPureTech
110 PureTech 110
S&SPureTech
130 S&STHP 155
THP 15 0 * THP
165 S&S
THP
15 0
S&S**
Gearboxes
E AT 6
(Automatic 6 -speed)BVM
(Manual
5-speed) EAT6
(Automatic 6-speed)BVM6
(Manual
6 -speed) BVM6
(Manual
6 -speed) BVM6
(Manual
6 -speed)
Code -- ----
Model codes:
SA… (Hatchback)/SB… (Cabrio) HNVT
HNZ6/S H NZ T/SH N V T/SHNYM/S 5FV8
5FN8* 5GZM/S
5GWM/S**
Body style Hatchback/
Cabrio Hatchback/
Cabrio Hatchback/
Cabrio Hatchback/
Cabrio Hatchback/
Cabrio Hatchback Hatchback/
Cabrio
Cubic capacity (cm
3) -1,1 9 9 1,1 9 9 -1,1 9 9 1,59 8 1,59 8
Max power: EEC standard (kW) -81 81 -96 115
11 0 * 120
11 0 * *
Fuel Unleaded Unleaded Unleaded Unleaded Unleaded Unleaded Unleaded
Braked trailer (within the GTW limit)
on a
12% slope (kg) 900
900900 -900 900900
Unbraked trailer (kg) 570 570/520 570 -570 570570
Recommended nose weight (kg) 464646 -46 4646
*
F
or Belgium and Russia.
**
F
or Belgium.
09
Technical data
Page 212 of 248

8
Radio reception may be affected by the
use of electrical equipment not approved
by DS AUTOMOBILES, such as a USB
charger connected to the 12
V socket.
The external environment (hills, buildings,
tunnels, basement car parks, etc.) may
block reception, including in RDS mode.
This is a
normal effect of the way in
which radio waves are transmitted and
does not indicate any failure of the audio
equipment.
Changing a frequency
Press Radio Media to display the
primary page.
By automatic frequency search
Press 3
or 4 to move the cursor for an
automatic search down or up for a
radio
frequency.
THEN
Select change source.
Select "FM Radio ".
Or "
AM Radio ".
OR Press Radio Media to display the
primary page.
Press on the secondary page.
Press " Frequency ".
THEN Enter the frequency in full (e.g.
92.10 MHz) using the keypad then
" Confirm ".
Changing radio station
Pressing the name of the current radio station
brings up a list.
To change radio station press the name of the
desired station.
Presetting a station
Select a radio station or frequency (refer to the
c orresponding section).
Press " Preset".
Select a
number in the list to preset the
previously chosen/adjusted radio station.
A long press on a
number saves (presets) the
station. Or
A press on the button in the upper-right part of
the screen presets all of the stations one after
the other.
Recalling preset stations
Press Radio Media
to display the
primary page.
Select " Preset".
Activating/Deactivating RDS
Press Radio Media to display the
primary page.
Press on the secondary page. Select "Settings ".
Select " Radio".
Activate/Deactivate " RDS options".
RDS, if activated, allows you to continue
listening to the same station by automatically
retuning to alternative frequencies. However,
in certain conditions, coverage of an RDS
station may not be assured throughout the
entire country as radio stations do not cover
100% of the territory. This explains the loss of
reception of the station during a
journey.
7-inch touch screen tablet