2018 CITROEN DISPATCH SPACETOURER display
[x] Cancel search: displayPage 226 of 400

224
Fatigue detection system
It is recommended that you take a break as
soon as you feel tired or at least every two
hours.The system cannot in any circumstances
replace the need for vigilance on the part
of the driver.
Do not take the wheel if you are tired.
Driving time warning
The system triggers an alert once it
detects that the driver has not taken
a break after two hours of driving at
a speed above 40
mph (65 km/h).If the driver does not follow this advice, the
alert is repeated hourly until the vehicle is
stopped.
The system resets itself if one of the following
conditions is met:
-
e
ngine running, the vehicle has been
stationary for more than 15
minutes,
-
t
he ignition has been switched off for a few
minutes,
-
t
he driver's seat belt is unfastened and their
door is open.
As soon as the speed of the vehicle drops
below 40 mph (65 km/h), the system goes
into standby.
The driving time is counted again once the
speed is above 40
mph (65 km/h).
Activation/Deactivation
The system is activated or deactivated via the
vehicle configuration menu.
With audio system
In the "Personalisation-
configuration " menu, activate/
deactivate " Fatigue Detection
System ".
With the touch screen
In the "Driving/Vehicle " menu,
activate/deactivate " Fatigue
Detection System ".
This alert is issued via the display of a
message encouraging you to take a break,
accompanied by an audible signal.
Driver attention alert
Depending on version, the "Driving time
warning" may be combined with the "Driver
attention alert". The system assesses the driver's
level of alertness by identifying
trajectory changes in relation to the
lane markings.
This system is particularly suited to fast roads
(speed higher than 40
mph (65 km/h)).
Driving
Page 230 of 400

228
Parking sensors
This system cannot in any circumstances
replace the need for vigilance on the part
of the driver.
Rear parking sensors
The system is switched on by engaging reverse
g e a r.
This is confirmed by an audible signal.
The system is switched off when you come out
of reverse gear.
Audible assistanceVisual assistance
This system indicates the proximity of any
obstacle (examples: pedestrian, vehicle, tree,
gate) which comes within the field of detection
of sensors located in the bumper.
Certain types of obstacle (examples: stake,
roadworks cone) detected initially will no longer
be detected at the end of the manoeuvre, if
they are located in blind spots in the sensors'
field of detection.
The proximity information is given by an
intermittent audible signal, the frequency of
which increases as the vehicle approaches the
obstacle.
The sound emitted by the speaker (right or
left) indicates the side on which the obstacle is
located.
When the distance between the vehicle and
the obstacle becomes less than approximately
thirty centimetres, the audible signal becomes
continuous.This supplements the audible signal by
displaying bars on the screen or the instrument
panel that move progressively nearer to the
vehicle. When the obstacle is at its closest, the
"Danger" symbol is displayed.
Driving
Page 232 of 400

230
Reversing camera with
display in the interior
mirror
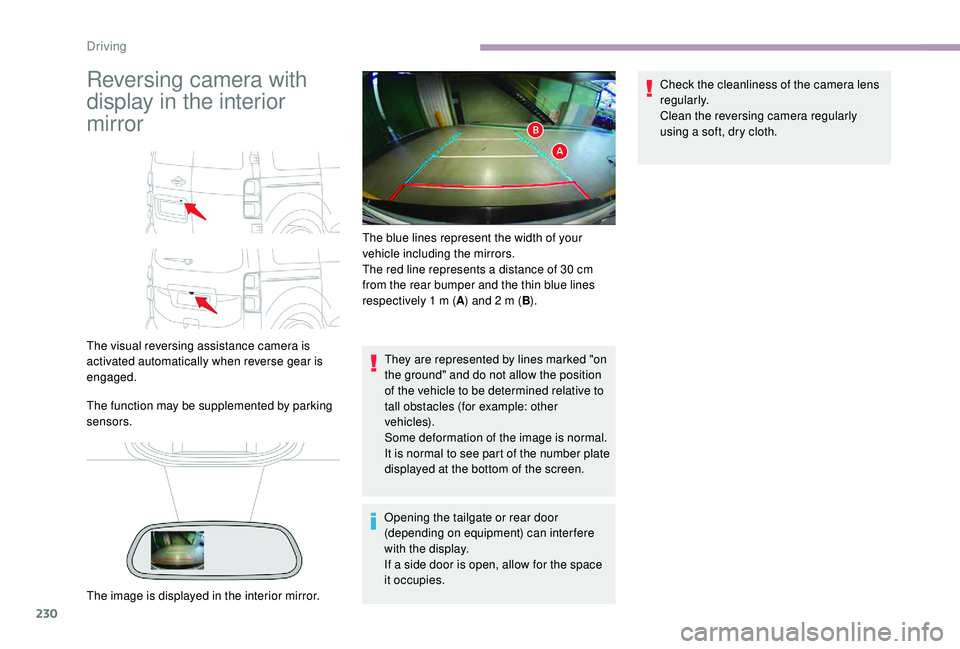
The visual reversing assistance camera is
activated automatically when reverse gear is
engaged.
The function may be supplemented by parking
sensors.They are represented by lines marked "on
the ground" and do not allow the position
of the vehicle to be determined relative to
tall obstacles (for example: other
vehicles).
Some deformation of the image is normal.
It is normal to see part of the number plate
displayed at the bottom of the screen.
Opening the tailgate or rear door
(depending on equipment) can interfere
with the display.
If a side door is open, allow for the space
it occupies. Check the cleanliness of the camera lens
regularly.
Clean the reversing camera regularly
using a soft, dry cloth.
The image is displayed in the interior mirror. The blue lines represent the width of your
vehicle including the mirrors.
The red line represents a distance of 30
cm
from the rear bumper and the thin blue lines
respectively 1 m (
A) and 2 m (
B).
Driving
Page 233 of 400

231
Visiopark 1
Principle of operation
The images provided by the cameras may
be distorted by the environment (external
conditions, driving mode, etc.).
The presence of areas in shadow, bright
sunlight, or poor lighting conditions may
make the image dark and reduce contrast.
The display disappears above
approximately 6 mph (10 km/h).
The system is automatically deactivated
about 7
seconds after coming out of
reverse or on opening a door, the boot.
This system allows the near surroundings of the
vehicle to be viewed in the display screen using
a camera located at the rear of the vehicle.
The parking sensors in the rear and/or front
bumper complete the information on the view
from above the vehicle (right-hand part).
In addition to the view from above the vehicle
(right-hand part) several types of view can be
displayed (left-hand part):
-
s
tandard rear view,
-
1
80° rear view,
-
r
ear zoom view. The system displays the contextual view
(left-hand part) as well as the view from above
the vehicle in its close surroundings.
AUTO mode is activated by default.
In this mode, the system chooses the best view
to display (standard or zoom) according to the
information received from the parking sensors.
The 180° view is only available via the menus. Using the rear camera, the vehicle's
surroundings are recorded during a
manoeuvre. An image from above your vehicle
in its close surroundings is reconstructed
(represented between the blue brackets) in real
time and as the vehicle progresses.
This representation facilitates the alignment of
your vehicle when parking and allows obstacles
close to the vehicle to be seen.
This image is automatically erased if the
vehicle remains stationary for too long.
6
Driving
Page 234 of 400

232
Rear views
Engage reverse gear to activate the camera,
located on the boot or
"Standard view""180° view"
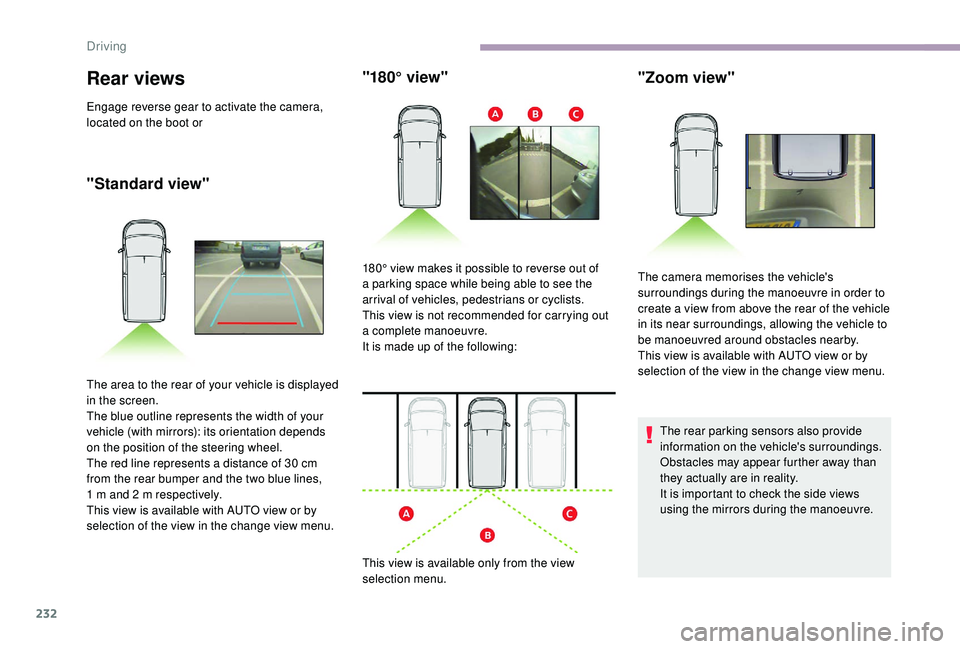
The area to the rear of your vehicle is displayed
in the screen.
The blue outline represents the width of your
vehicle (with mirrors): its orientation depends
on the position of the steering wheel.
The red line represents a distance of 30
cm
from the rear bumper and the two blue lines,
1
m and 2 m respectively.
This view is available with AUTO view or by
selection of the view in the change view menu. 180° view makes it possible to reverse out of
a parking space while being able to see the
arrival of vehicles, pedestrians or cyclists.
This view is not recommended for carrying out
a complete manoeuvre.
It is made up of the following:
This view is available only from the view
selection menu.
The rear parking sensors also provide
information on the vehicle's surroundings.
Obstacles may appear further away than
they actually are in reality.
It is important to check the side views
using the mirrors during the manoeuvre.
"Zoom view"
The camera memorises the vehicle's
surroundings during the manoeuvre in order to
create a view from above the rear of the vehicle
in its near surroundings, allowing the vehicle to
be manoeuvred around obstacles nearby.
This view is available with AUTO view or by
selection of the view in the change view menu.
Driving
Page 235 of 400

233
"AUTO mode"
Quick start mode
Activation
Activation is automatic on engaging reverse.
The function is displayed on the touch screen.
To close the window displayed, press on the
red cross at the top left of the window. The system will be deactivated
automatically if a trailer is attached or a
bicycle carrier is fitted on a towbar (vehicle
fitted with a towbar installed in line with
the manufacturer's recommendations).
Check the cleanliness of the camera lens
regularly.
Clean the reversing camera regularly
using a soft, dry cloth.
This mode is activated by default.
When an obstacle approaches at the level
of the red line (less than 30
cm) and using
sensors located on the rear bumper, this mode
switches from the rear view to the top view
automatically. A message is displayed advising you to check
your vehicle's surroundings before starting the
manoeuvre.
You can choose the display mode at any time
by pressing on this area.
This mode displays, as quickly as possible, the
contextual view (left-hand part) and the view
from above the vehicle. On display of the sub-menu, select one of the
four views:
"Standard view". "180° view".
"Zoom view".
"AUTO m o de".
6
Driving
Page 236 of 400

234
Under-inflation detection
This system automatically monitors the tyre
pressure while driving.
The system monitors the pressure in all four
tyres, once the vehicle is moving.
It compares the information given by the
wheel speed sensors with reference values,
which must be reinitialised after ever y tyre
pressure adjustment or wheel change.
The system triggers an alert as soon as it
detects a drop in the pressure of one or more
tyres.
The tyre under-inflation detection system
does not replace the need for vigilance on
the part of the driver.
This system still requires you to check
the tyre inflation pressures (including
the spare wheel) every month as well as
before a long journey.
Driving with under-inflated tyres impairs
handling, extends braking distances and
causes early tyre wear, particularly in
adverse conditions (heavy loads, high
speeds, long journeys). Driving with under-inflated tyres
increases fuel consumption.
The tyre pressure specifications for your
vehicle can be found on the tyre pressure
label.
For more information on the
Identification markings , refer to the
corresponding section.
Tyre pressures should be checked when
the tyres are "cold" (vehicle stopped for
1
hour or after a journey of less than
6
miles (10 km) at moderate speeds).
Other wise (when hot), add 0.3
bar to the
pressures shown on the label.
Snow chains
The system does not have to be
reinitialised after fitting or removing snow
chains.
Spare wheel
The steel spare wheel does not have an
under-inflation detection sensor.
Under-inflation alert
This warning is indicated by fixed
illumination of the lamp, an audible
signal and, depending on the
equipment installed, a message
displayed on the screen.
F
R
educe speed immediately, avoid excessive
steering movements and sudden braking.
F
S
top the vehicle as soon as it is safe to do
so.
The loss of pressure detected does not
always cause visible bulging of the tyre.
Do not satisfy yourself with just a visual
check.
F
I
n the event of a puncture, use the
temporary puncture repair kit or the spare
wheel (depending on equipment),
or
F
i
f you have a compressor, such as the one
in the temporary puncture repair kit, check
the pressures of the four tyres when cold,
or
F
i
f it is not possible to make this check
immediately, drive carefully at reduced
speed.
Driving
Page 283 of 400

281
FuseN° Rating
(A) Functions
F1 10Electric power steering, clutch switch.
F4 15Horn.
F5 20Front/rear screenwash pump.
F6 20Front/rear screenwash pump.
F7 10Rear 12
V accessory socket.
F8 20Single or double rear wipers.
F10/F11 30Internal/external locks, front and rear.
F13 10Front air conditioning controls, audio system controls, gear
lever, head-up display.
F14 5Alarm, emergency and assistance calls.
F17 5Instrument panel.
F19 3Steering mounted controls.
F21 3"
K
eyless Entry and Starting" or anti-theft system.
F22 3Rain and sunshine sensor, multifunction detection camera.
F23 5Seat belt unfastened or not fastened display screen.
F24 5Touch screen, reversing camera and parking sensors.
F25 5Airbags.
F29 20Audio system, touch screen, CD player, navigation.
F31 15Audio system (+ battery).
F32 15Front 12
V accessory socket.
F34 5Blind spot monitoring system, door mirror electric controls.
F35 5Heated washer jets, headlamp beam height control.
F36 5Torch charger, rear courtesy lamp.Version 1 (Eco)
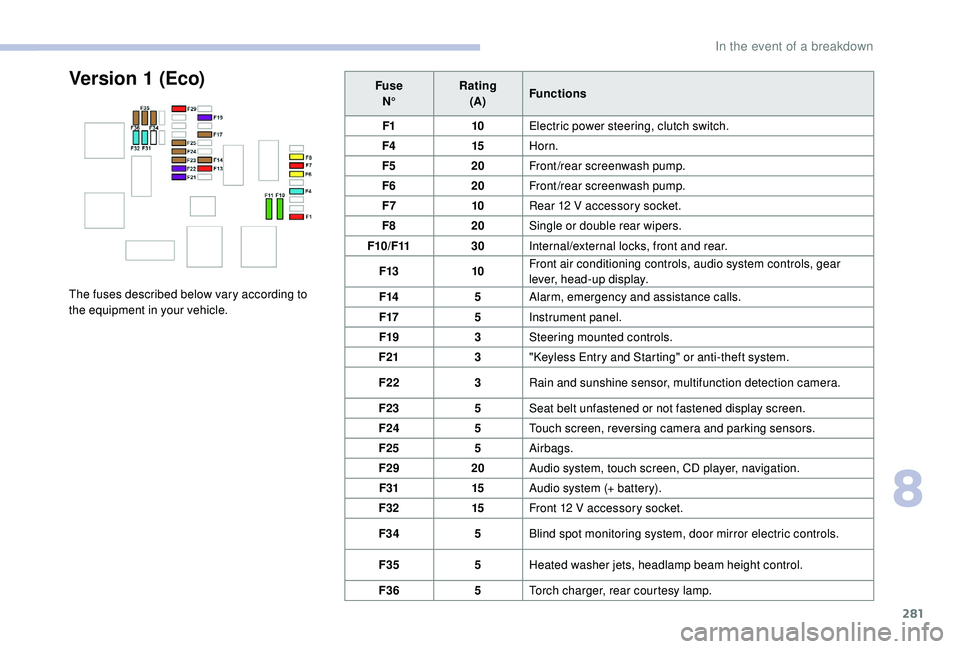
The fuses described below vary according to
the equipment in your vehicle.
8
In the event of a breakdown