2018 CITROEN C4 tow
[x] Cancel search: towPage 260 of 317

258
C4-cactus_en_Chap10b_SMEGplus_ed01-2016
Navigation - Guidance
Choosing a new destination
Select "Enter destination ". Select "
Save" to save the address
entered as a contact entry.
The system allows up to 200 entries.
Select " Confirm ".
Press " Show route on map " to start
navigation.
Select "
Address ".
Select the " Country:"
from the
l
ist offered, then in the same
w
ay the "City:" or its post
code, the " Road:", the " N°:".
Confirm
each time. Select "
Navigate to ".
Choose the restriction criteria:
"T
o l l s", "Ferries ", "Tr a f f i c ", "Strict ",
" Close ".
Choose
the navigation criteria:
"F
astest" or "Shortest " or "Time/
distance " or "Ecological". To
delete navigation information,
p
ress "
Settings ".
Press " Stop navigation ".
To resume navigation press
"S
ettings".
Press " Resume guidance ".
Press on Navigation
to display the
primary
pag
e.
Press on the secondary page.
Towards a new destination
Or
Audio and Telematics
Page 261 of 317

259
C4-cactus_en_Chap10b_SMEGplus_ed01-2016
Towards a recent destination
Select "Enter destination ".
Select an address from
t
he list offered.
Press on Navigation
to display the
primary
pag
e.
Press on the secondary page.
Select " Navigate to ".
Towards a contact
Select "Enter destination ".
Select " Contacts ".
Press on Navigation
to display the
primary
pag
e.
Press on the secondary page. Select a destination from
t
he contacts in the list
offered.
Select " Navigate to ".
Select the criteria then " Confirm" to
start
n
avigation.
To
be able to use navigation "towards
a c
ontact in the directory", it is first
necessary to enter the address for your
contact.
Select the criteria then " Confirm" or
press " Show route on map " to start
navigation.
.
Audio and Telematics
Page 262 of 317

260
C4-cactus_en_Chap10b_SMEGplus_ed01-2016
Towards GPS coordinates
Select "Enter destination ".
Select " Address ".
Enter the " Longitude: "
then the " Latitude: ".
Select " Navigate to ".
Select the criteria then " Confirm" or
press " Show route on map " to start
navigation. Press on Navigation to display the
primary
pag
e.
Press on the secondary page.
Towards a point on the map
Select "
Enter destination ".
Select " On the map ".
Press on Navigation
to display the
primary
pag
e.
Press on the secondary page.
Zooming
in on the map shows points with
i
nformation.
A
long
press on a point opens its content.
Towards points of interest (POI)
Points of Interest (POI) are listed in different
categories.Press on Navigation to display the
primary
pag
e.
Press
on the secondary page.
Select " Search for POI ".
Select " All POIs ",
Or "Motor ",
Or "Dining/hotels ".
Audio and Telematics
Page 296 of 317

294
C4-cactus_en_Chap11_index-alpha_ed01-2016
Warning lamps ................................................ 17
W arning lamp, SCR emissions
control
system
.............................................. 20
W
arning lamp, seat belts
................................97
W
arning lamp, Service.................................... 17
Warning
lamp, Stop
........................................ 17
W
ashing
(
advice)................................... 174,
183
Weights
...............
................................. 220, 222
Wheel, spare
......................................... 19
1,
19
2
Window controls
............................................. 48
W
indows, rear doors
...............................4
8, 183
Windows,
rear quarter
..................................18
3
Wiper
b
lades
(
changing)
.........................8
9, 163
Wiper, rear ....................................................... 87
Wipers
.......................................................1
5, 86
Wipers,
automatic rain sensitive
...............8
6, 88 T
Table of weights ...................................2 20, 222
Tables of engines ............................... ...219, 2
21
Tables of fuses
...................................... 2
0 7, 2 1 0
Tank,
AdBlue
® additive ......................... 17 5 , 17 9
Tank,
fuel
............................... ........................ 153
Technical data
....................................... 2
19-222
Telephone
..................................................... 2
74
Third
brake
lamp
........................................... 20
3
Three flashes (direction i n di c ato r s)
..................................................... 81
T
ime
(setting)
..............................
....................38
TMC (Traffic info)
.......................................... 2
62
To o l s
................
.............................. 185, 191, 192
Topping-up
the AdBlue
®
additive ...............
........................................ 179
Total distance recorder
................................... 37
T
ouch screen tablet
........................................ 28
T
ouch screen tablet ( M e nu s)
...............................
............ 29 -34, 230
To w b a r
................
................................... 120, 159
Towed loads
......................................... 2
20, 222
Towing
another
vehicle
......................... 21
6, 217
Towing
eye
...................................................... 76
T
raction control (ASR)
........................ 1
6, 18, 91
Traffic
information
(TA)
................................. 26
3
Traffic
information
(TMC)
.............................. 2
62
Tr a i l e r
...............
..................................... 120, 159
Triangle,
w
arning ..................................... 76, 18 4
Trip
computer
.................................................. 35
T
rip distance recorder
..................................... 37
T
y r e s
..............................................................
..10
Tyre under-inflation detection
...............
........................23, 150, 190Under
floor storage
.........................................
76
U
nder-inflation (detection)
............................
15
0
Unlocking
..............................
..........................
40
Unlocking from the inside
.........................4
4, 45
Unlocking the boot
....................................
4
0, 47
Unlocking the doors
...........................
4
0, 44, 46
Updating risk areas
.......................................
2
61
Updating the date
............................................
38
U
pdating the time
............................................
38
U
REA warning lamp
.............................
17
6 , 17 7
USB port ......................................69, 70, 72, 246
U
Ventilation ..............................
........ 9, 55, 56, 59
Visibility ............................... ............................65V
Warning and indicator lamps ........ 1 2, 13, 16, 17
Warning lam p, a irbag ................................ 1 5, 16
Warning
lamp, braking system
.......................18
W
arning lamp, Diesel engine
pre-heater
...............................
......................14
Warning
lamp, seat belt not fastened
.............97
W
arning lamp, low fuel level
...........................21
W
Alphabetical index
Page 312 of 317

6
In the event of a breakdown
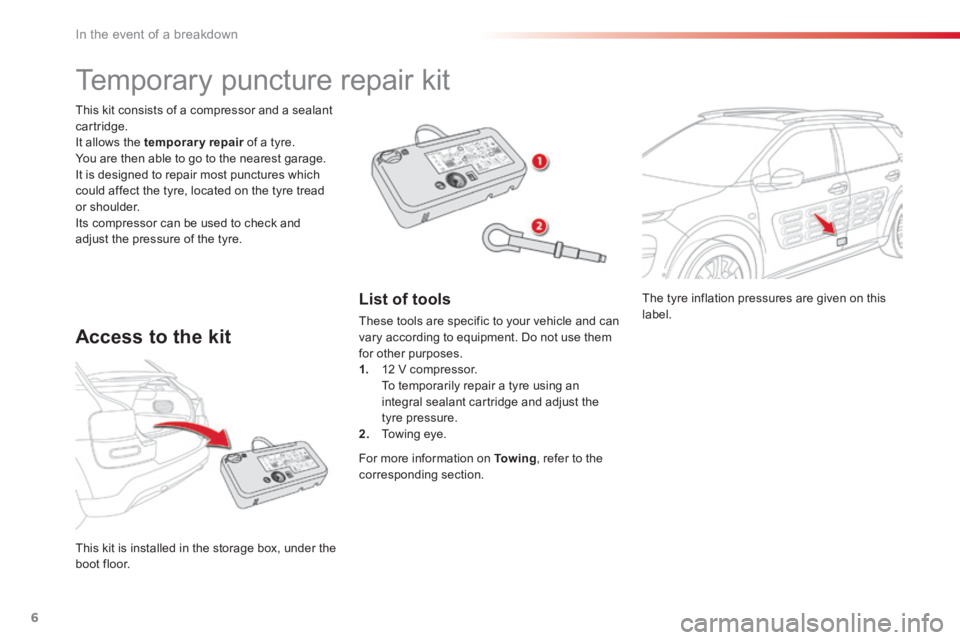
The tyre inflation pressures are given on this label.
This kit is installed in the storage box, under the boot floor.
This kit consists of a compressor and a sealant cartridge. It allows the temporary repair of a tyre. temporary repair of a tyre. temporary repair You are then able to go to the nearest garage. It is designed to repair most punctures which could affect the tyre, located on the tyre tread or shoulder. Its compressor can be used to check and adjust the pressure of the tyre.
Temporary puncture repair kit
Access to the kit
List of tools
These tools are specific to your vehicle and can vary according to equipment. Do not use them for other purposes. 1. 12 V compressor. To temporarily repair a tyre using an
integral sealant cartridge and adjust the tyre pressure. 2. Towing eye.
For more information on To w i n g , refer to the corresponding section.
Page 316 of 317

10
In the event of a breakdown
Removing the pipe and cartridge
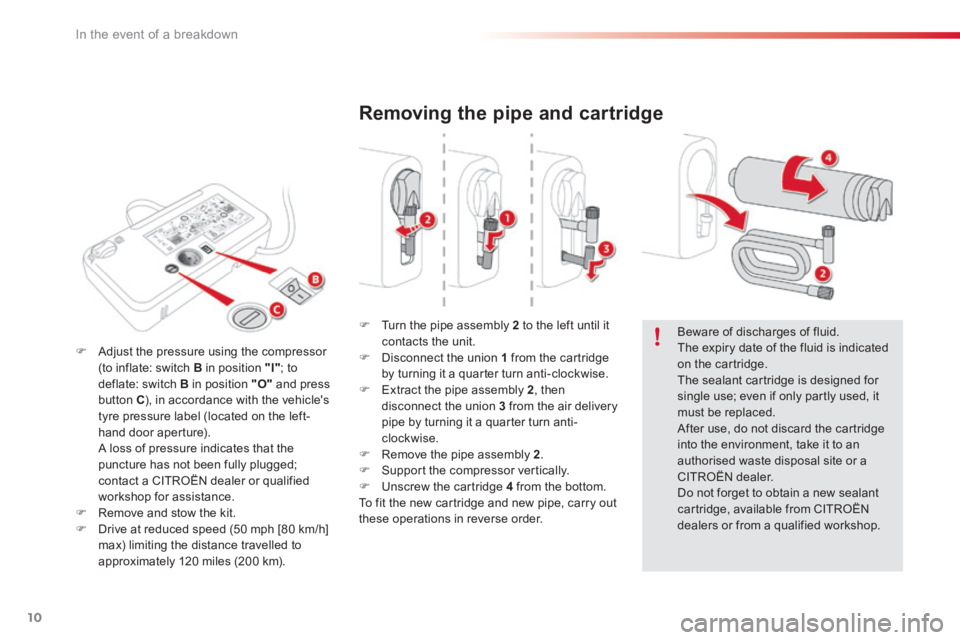
Turn the pipe assembly 2 to the left until it contacts the unit. Disconnect the union 1 from the cartridge by turning it a quarter turn anti-clockwise. Extract the pipe assembly 2 , then disconnect the union 3 from the air delivery pipe by turning it a quarter turn anti-clockwise. Remove the pipe assembly 2 . Support the compressor vertically. Unscrew the cartridge 4 from the bottom. To fit the new cartridge and new pipe, carry out these operations in reverse order.
Beware of discharges of fluid. The expiry date of the fluid is indicated on the cartridge. The sealant cartridge is designed for single use; even if only partly used, it must be replaced. After use, do not discard the cartridge into the environment, take it to an authorised waste disposal site or a CITROËN dealer. Do not forget to obtain a new sealant cartridge, available from CITROËN dealers or from a qualified workshop.
Adjust the pressure using the compressor (to inflate: switch B in position "I" ; to deflate: switch B in position "O" and press button C ), in accordance with the vehicle's tyre pressure label (located on the left-hand door aperture). A loss of pressure indicates that the puncture has not been fully plugged; contact a CITROËN dealer or qualified workshop for assistance. Remove and stow the kit. Drive at reduced speed (50 mph [80 km/h]
max) limiting the distance travelled to approximately 120 miles (200 km).
Page 317 of 317

11
8
In the event of a breakdown
Checking / adjusting tyre pressures
You can also use the compressor without injecting any product, to check and if necessary adjust your tyre pressures.
Turn the selector A to the "Air" position. Uncoil the white pipe G fully.
Connect the compressor's electrical connector to the vehicle's 12 V socket. Start the vehicle and let the engine run. Adjust the pressure using the compressor (to inflate: switch B in position "I" ; to deflate: switch B in position "O" and press button C ), according to the vehicle's tyre pressure label. Remove the kit then stow it.
Should the pressure of one or more tyres be adjusted, it is necessary to reinitialise the under-inflation detection system. For more information on Under-inflation detection , refer to the corresponding section.
Connect the pipe to the tyre valve.